Fix 1: Reset Toolbar Customizations
On Microsoft Excel, you can customize the toolbar to quickly access your frequently used commands. However, a startup issue with these custom preferences could make the Excel toolbar unresponsive on your computer. You can reset the toolbar customization in Excel to see if that gets the toolbar working.
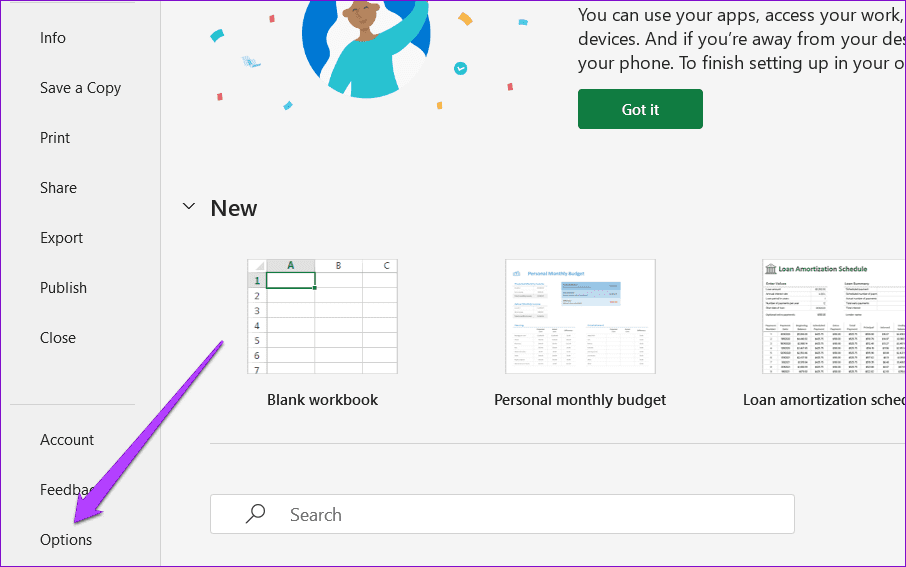
Step 1: Open Microsoft Excel and click the File menu at the top.

Step 2: Select Options from the sidebar.
Step 3: In the Quick Access Toolbar tab, click Reset next to Customizations and select Reset all customizations.
Step 4: Hit Yes to confirm.

Fix 2: Rename the Excel Toolbar File
If resetting the Excel toolbar proves ineffective, the Excel file containing your toolbar settings is likely corrupt. In that case, you must rename the Excel toolbar file on your computer. This will force Excel to create a new toolbar file, effectively fixing any issues.
Step 1: Press the Windows key + R to open the Run dialog box. Type the following command in the text box and press Enter.
%AppData%\Microsoft\Excel
Step 2: In the File Explorer window, you should see a file named Excel15.xlb or Excel.xlb, depending on your Office version. Right-click on it and click the rename icon.
Step 3: Rename the file to OldExcel15.xlb or OldExcel.xlb.

Restart your computer and use the toolbar again.
Fix 3: Start Excel in Safe Mode
Sometimes, a malfunctioning Excel add-in can cause the program to run into issues and behave strangely. You can verify this by opening Excel in safe mode, allowing it to run without add-ins.
To open Excel in safe mode, press the Windows key + R to access the Run dialog. Type excel -safe in the Open field and press Enter. If the toolbar works as expected in safe mode, disable all the add-ins and enable them individually to find the one causing the issue.
Step 1: In Excel, click the File menu at the top left corner and select Options.
Step 2: In the Add-ins tab, select COM Add-ins in the Manage drop-down menu and click the Go button next to it.

Step 3: Clear all the checkboxes to disable your add-ins and click OK.

Restart Excel after disabling add-ins and re-enable them one by one. Try using Excel after enabling each add-in to determine which one is causing the issue. After identifying the problematic add-in, consider removing it to prevent further issues.
Fix 4: Run the Office Repair Tool
Microsoft offers a useful repair tool for fixing issues with Office apps. This tool can automatically scan and fix issues with Microsoft Excel that may have caused the toolbar to stop working. Here’s how to run it.
Step 1: Press the Windows key + R shortcut to open the Run dialog box. Type appwiz.cpl in the box and press Enter.
Step 2: In the Programs and Features window, locate and select the Microsoft Office product on the list. Then, click the Change button at the top.

Step 3: Select the Online Repair option and click Repair.

Was this helpful?
Last updated on 22 April, 2024
Read Next
 How to Restore the Missing Google Chrome Toolbar
Fix 1: Re-Enable or Reinstall Extensions If Chrome is not showing your favorite extensions on the toolbar, try disabling and re-enabling them.
How to Restore the Missing Google Chrome Toolbar
Fix 1: Re-Enable or Reinstall Extensions If Chrome is not showing your favorite extensions on the toolbar, try disabling and re-enabling them.
 Missing Cast Option in Chrome? Here’s How to Add It Back to the Toolbar
Chrome lets you cast your browser tabs or the entire screen to all the nearby devices with Chromecast support.
Missing Cast Option in Chrome? Here’s How to Add It Back to the Toolbar
Chrome lets you cast your browser tabs or the entire screen to all the nearby devices with Chromecast support.
 6 Ways to Fix Hyperlinks Not Working in Microsoft Excel for Windows
Fix 1: Double Check the Link Path It is possible that the file path mentioned in the hyperlink is no longer accessible or that the web page link is misspelled.
6 Ways to Fix Hyperlinks Not Working in Microsoft Excel for Windows
Fix 1: Double Check the Link Path It is possible that the file path mentioned in the hyperlink is no longer accessible or that the web page link is misspelled.
 5 Ways to Fix AutoFill Not Working in Microsoft Excel for Windows
Basic Fixes Try a different workbook: Testing the AutoFill feature in a different workbook will help determine if the issue is limited to a specific Excel file.
5 Ways to Fix AutoFill Not Working in Microsoft Excel for Windows
Basic Fixes Try a different workbook: Testing the AutoFill feature in a different workbook will help determine if the issue is limited to a specific Excel file.
 5 Ways to Fix Find and Replace Not Working in Microsoft Excel
Fix 1: Make Sure the Correct Cells Are Selected To start, ensure that you are searching within the appropriate range of cells.
5 Ways to Fix Find and Replace Not Working in Microsoft Excel
Fix 1: Make Sure the Correct Cells Are Selected To start, ensure that you are searching within the appropriate range of cells.
 5 Ways to Fix Scrollbar Not Working in Excel
Preliminary Fixes Disable Scroll Lock: Scroll Lock can prevent Excel from scrolling properly.
5 Ways to Fix Scrollbar Not Working in Excel
Preliminary Fixes Disable Scroll Lock: Scroll Lock can prevent Excel from scrolling properly.
 4 Ways to Fix Microsoft Excel Not Responding on Windows 11
Fix 1: Open Microsoft Excel in Safe Mode and Disable Add-Ins You can open Excel in Safe Mode to run the app without add-ins.
4 Ways to Fix Microsoft Excel Not Responding on Windows 11
Fix 1: Open Microsoft Excel in Safe Mode and Disable Add-Ins You can open Excel in Safe Mode to run the app without add-ins.
 5 Ways to Fix Unable to Print From Microsoft Excel on Windows 11
Fix 1: Save Your Excel File in XPS Format and Try Again If Excel can't respond to print requests, save your file in the XPS format and try again.
5 Ways to Fix Unable to Print From Microsoft Excel on Windows 11
Fix 1: Save Your Excel File in XPS Format and Try Again If Excel can't respond to print requests, save your file in the XPS format and try again.
The article above may contain affiliate links which help support Guiding Tech. The content remains unbiased and authentic and will never affect our editorial integrity.

