Preliminary Fixes
- Disable Scroll Lock: Scroll Lock can prevent Excel from scrolling properly. To disable, right-click on the bottom status bar > choose Scroll Lock.
- Unfreeze panes: If rows or columns remain fixed while you scroll, panes are frozen. To unfreeze it, open Excel > go to View > click Freeze Panes > select Unfreeze Panes.
- Autofit row height in Excel: Sometimes, row height might affect how you perceive scrolling. To fix this, open the Excel file > select all cells > go to the Home tab > Format > choose Autofit Row Height.
- Update Microsoft Excel: Ensuring that your version of Excel is up-to-date can resolve many issues, including scrolling problems. To update, launch Excel > Account > Update Options > Update Now.
Fix 1: Restore the Missing Scroll Bar
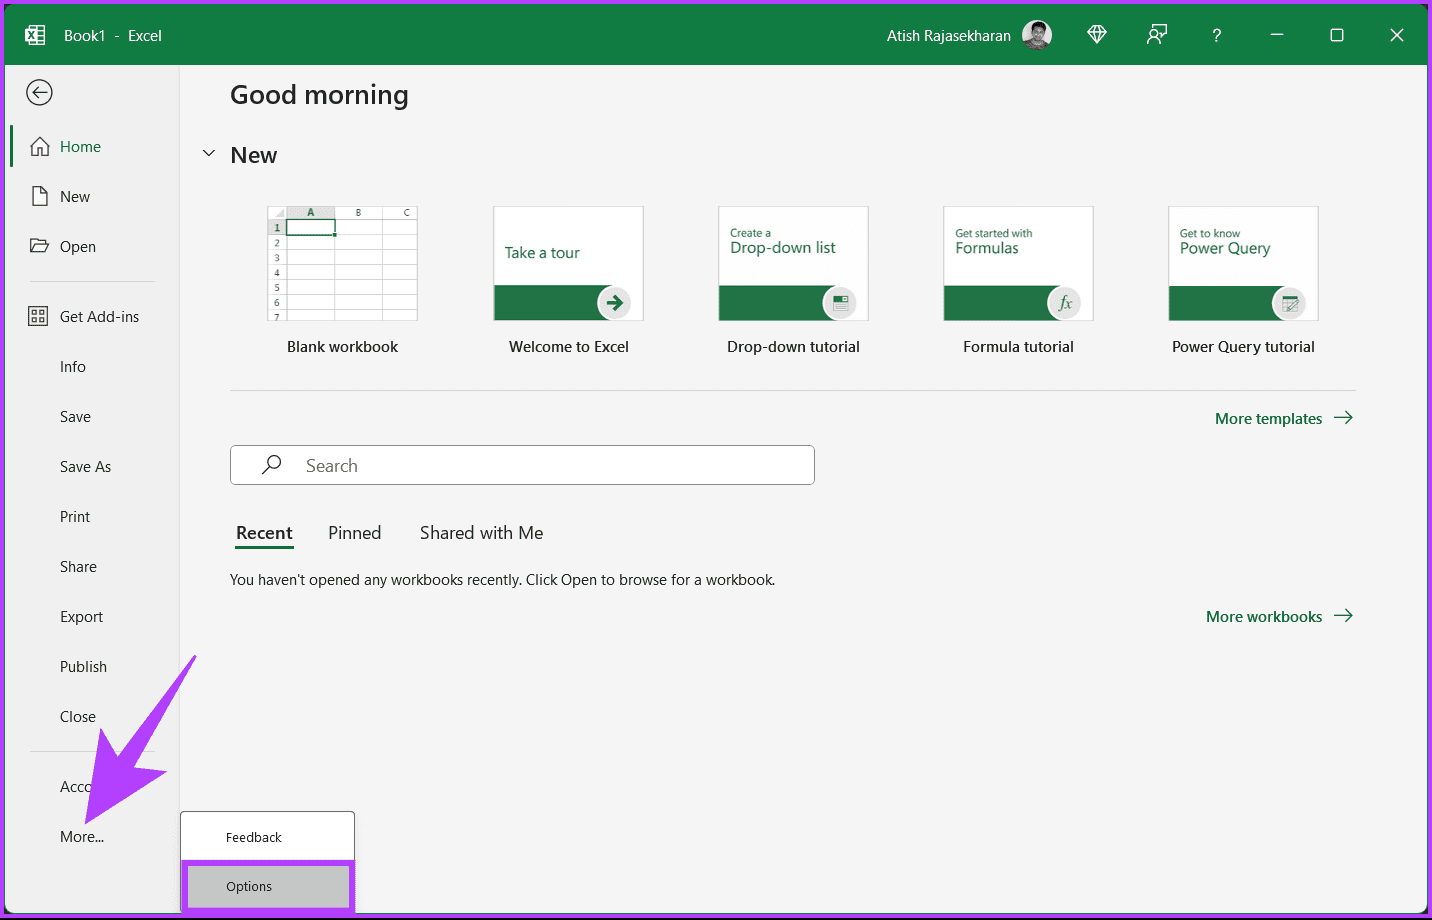
Step 1: Go to the File menu.
Step 2: In the sidebar, select More > Options.
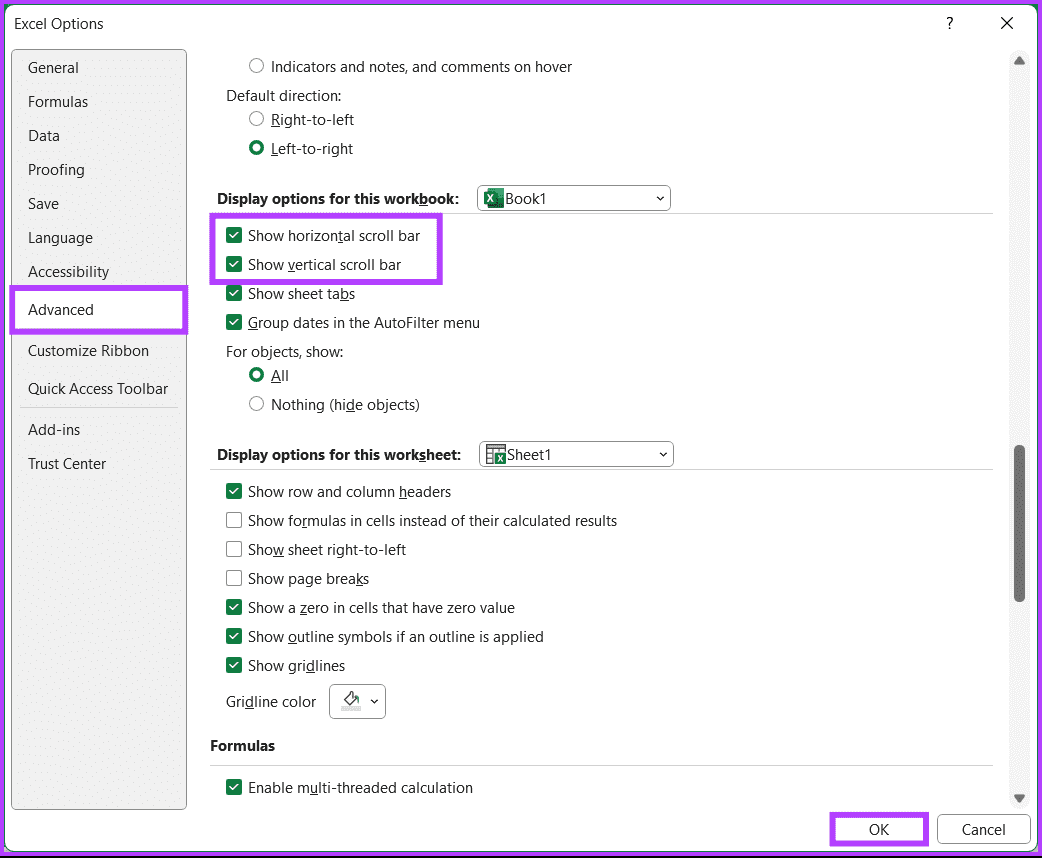
Step 3: Go to Advanced, and under Display options for this workbook, check the boxes for Show horizontal scroll bar and Show vertical scroll bar.
Step 4: Finally, click OK.
You enabled the scroll bar options in Excel. This should resolve the issue you were experiencing. If not, try the following method.
Also Read: How to fix the “Excel has run into an error” problem on Windows
Fix 2: Repair the Excel File
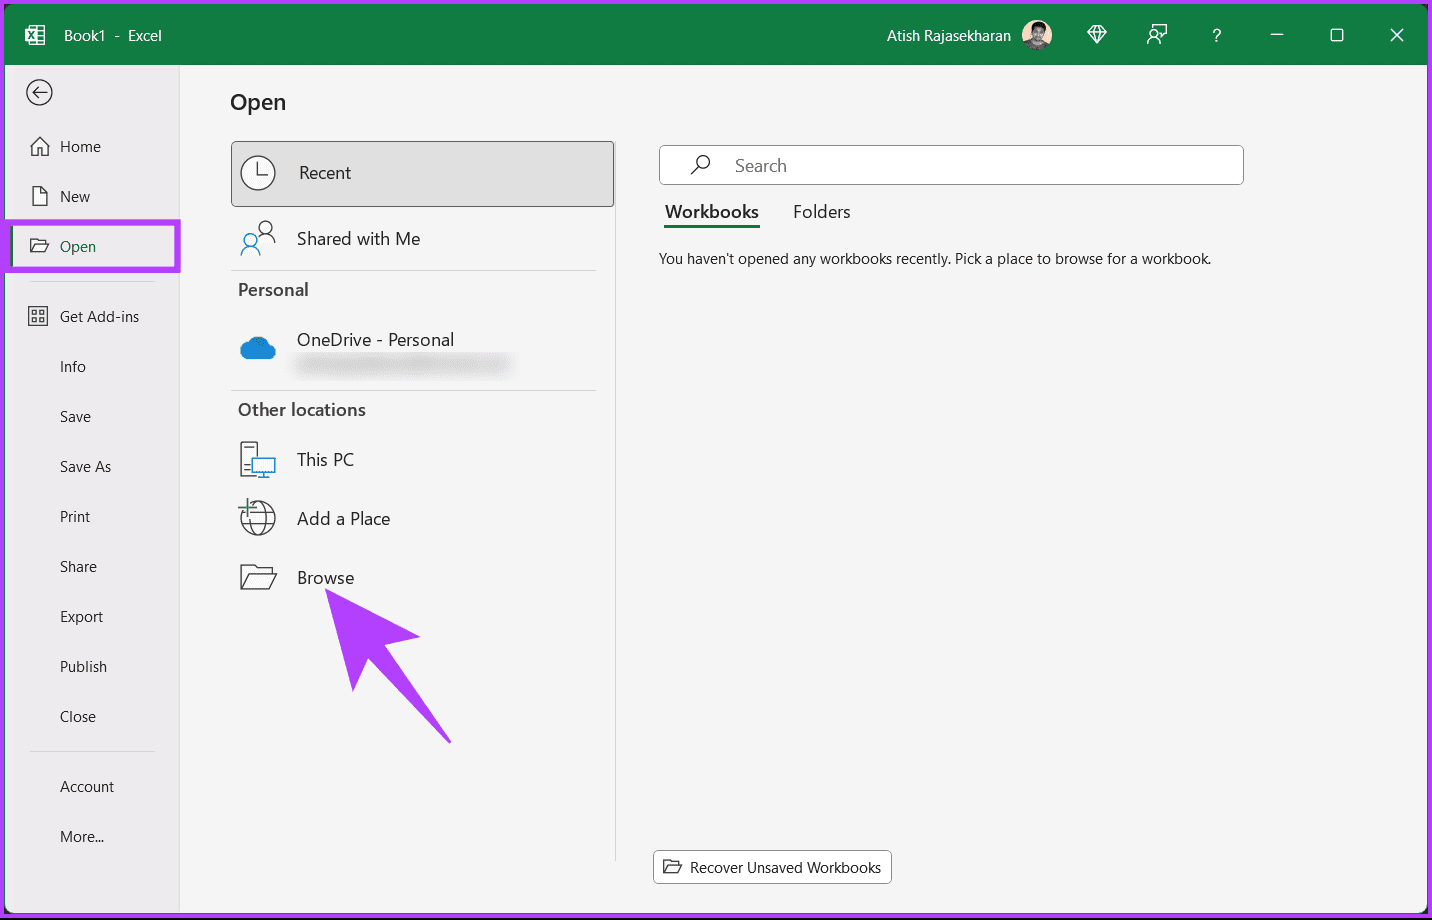
Step 1: Go to the File menu.
Step 2: Select Open > choose Browse under Other locations.
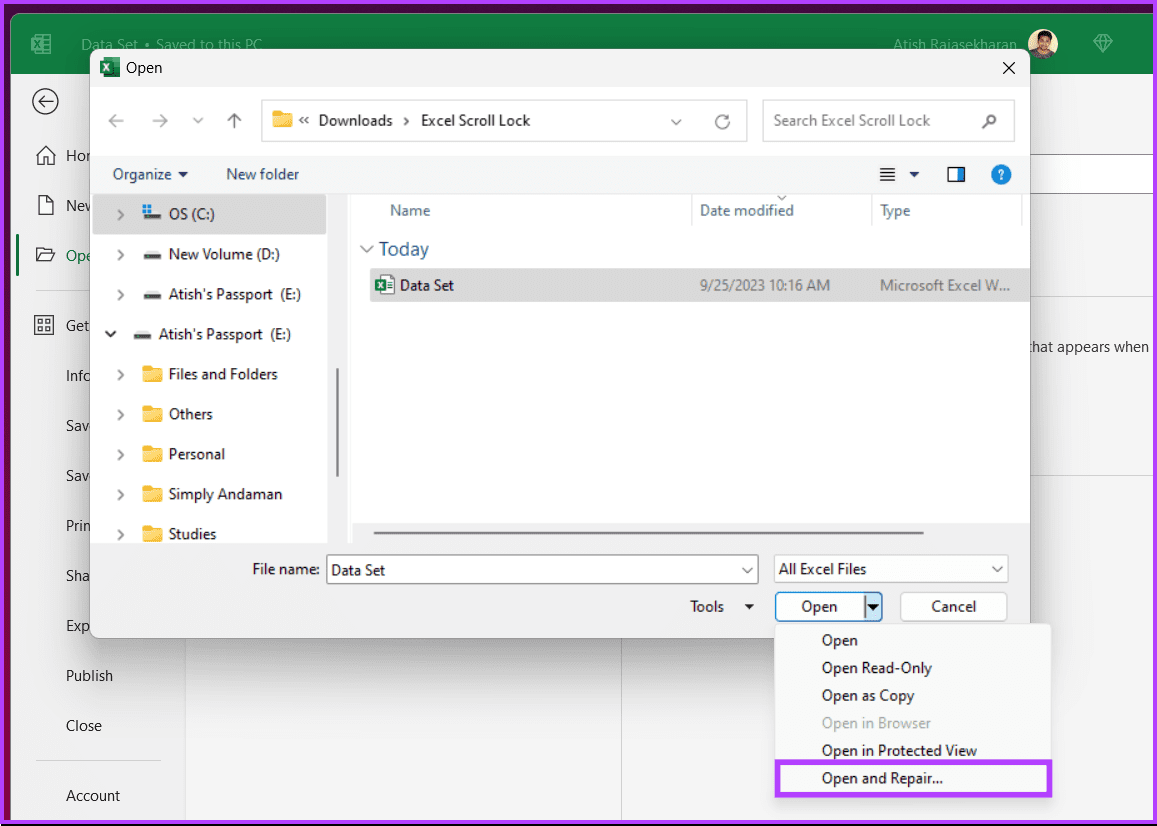
Step 3: Now, choose the file from the File Explorer menu. Once selected, click the chevron (arrow) icon next to the Open button.
Step 4: From the menu, choose Open and Repair.
Step 5: In the pop-up, choose Repair.
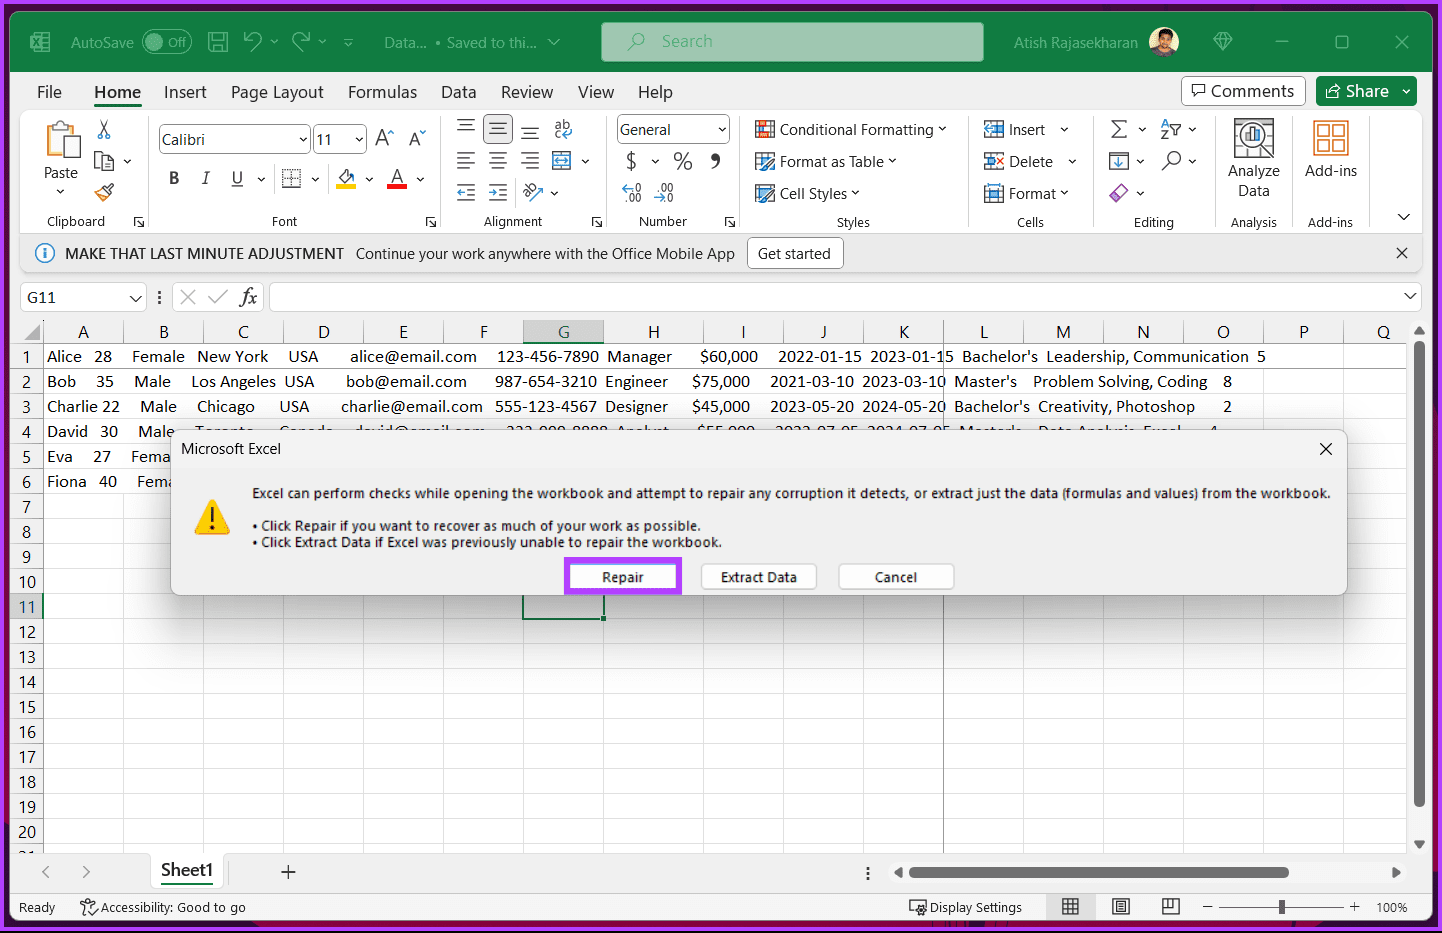
That’s it. Wait for Excel to perform checks and validation for potential file corruption. Once the operation is complete, a dialog box will display the result.
Step 6: Click the Close button to check if you can scroll through the spreadsheets now.
Also Read: How to change the display and authoring language in Microsoft Excel
Fix 3: Open Excel in Safe Mode
The following method is an extension of the previous one. If Microsoft Office applications malfunction due to corrupt or buggy add-ins, opening Excel in safe mode can resolve the problem.
Note: The Safe Mode feature is unavailable in Microsoft Excel for macOS.
Step 1: Press the Windows key, type Task Manager, and click Open.
Step 2: Select Microsoft Excel > click End task. This ensures that no instances or processes are running on Microsoft Excel.

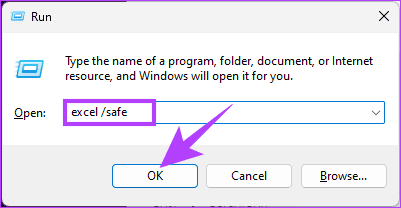
Step 3: Press the Windows key, type Run, and click Run as administrator.
Step 4: Type the below command and click OK.
excel /safe
When you open a worksheet in Safe Mode, all or any installed add-ins are disabled. You only need to re-enable the add-ins individually and check which is causing the scrolling problem. If you are wondering how to enable or disable add-ins in Excel, continue reading.
How to Enable and Disable Excel Add-Ins
Step 1: Open Excel and go to the File menu.
Step 2: Click More and choose Options from the sidebar.

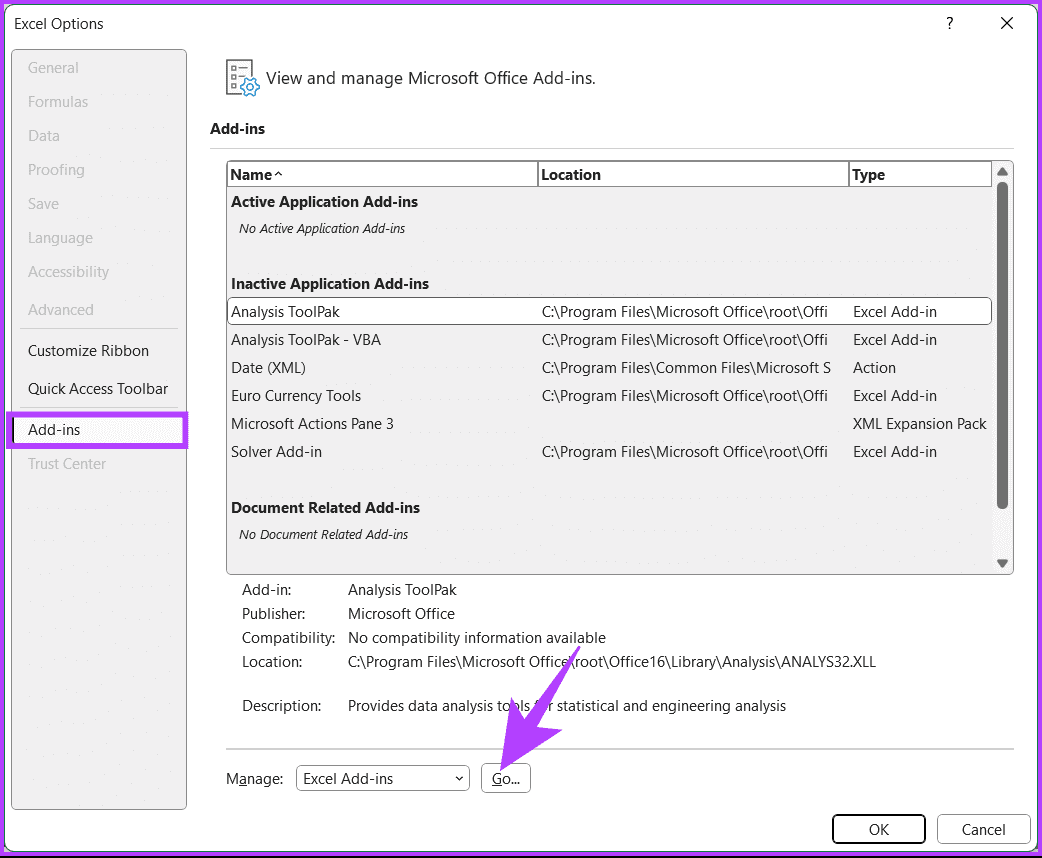
Step 3: Go to Add-ins. In the right pane, choose Excel Add-ins in the Manage drop-down and click Go.
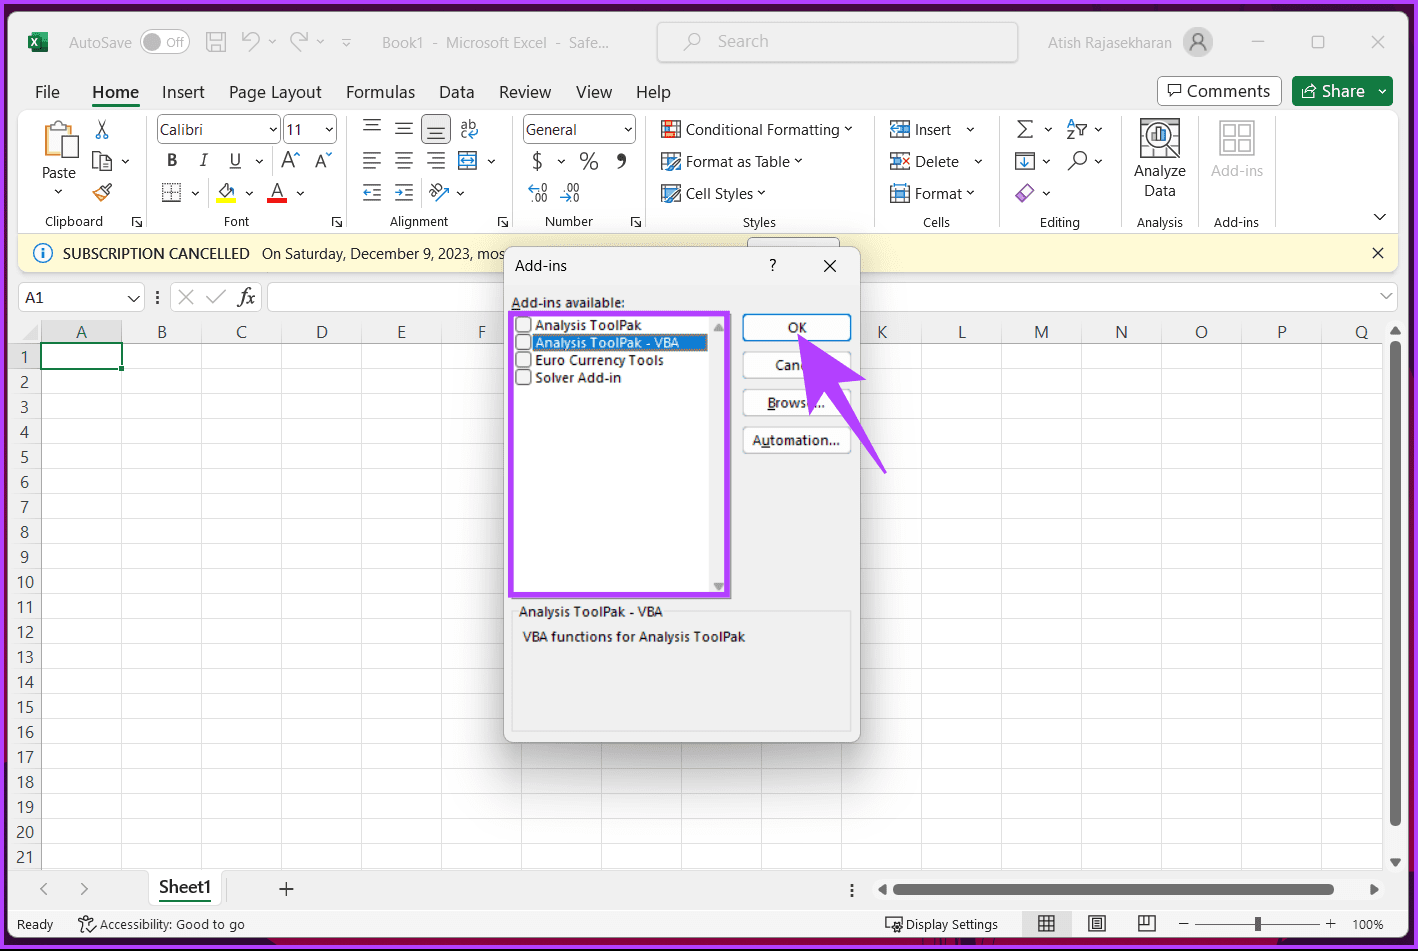
Step 4: By default, all the add-ins will be selected. You must deselect the add-in you want to disable and click OK.
You should check if any add-ins are causing problems, and if so, deactivate or activate them.
Fix 4: Disable Zoom on Roll with IntelliMouse
If you use Microsoft’s mouse, IntelliMouse, you will encounter this issue: Moving the scroll wheel zooms your worksheet instead of scrolling an Excel worksheet vertically.
Step 1: Open Excel and go to the File menu.
Step 2: Click More and choose Options from the sidebar.
Step 3: Go to Advanced from the sidebar and uncheck the Zoom on roll with IntelliMouse option. Finally, select OK.
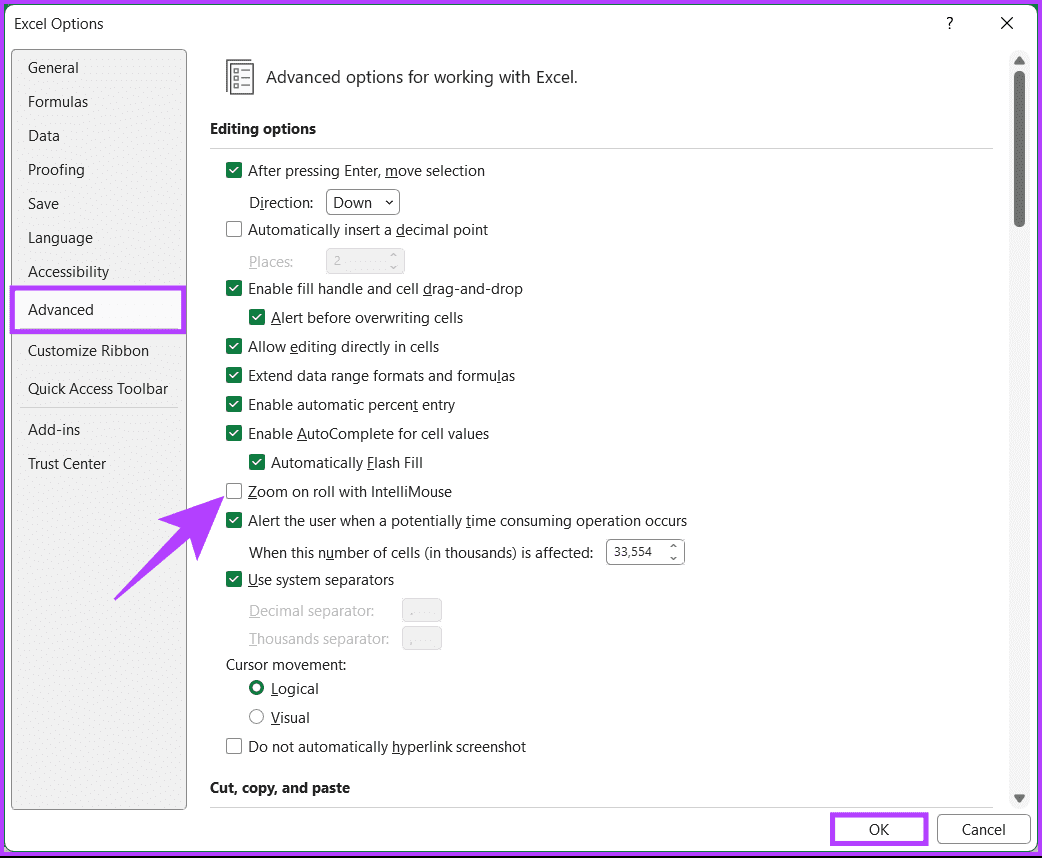
Now, the scroll function will let you move around rather than zooming in or out.
Also Read: How to insert a PDF document into an Excel spreadsheet on Windows
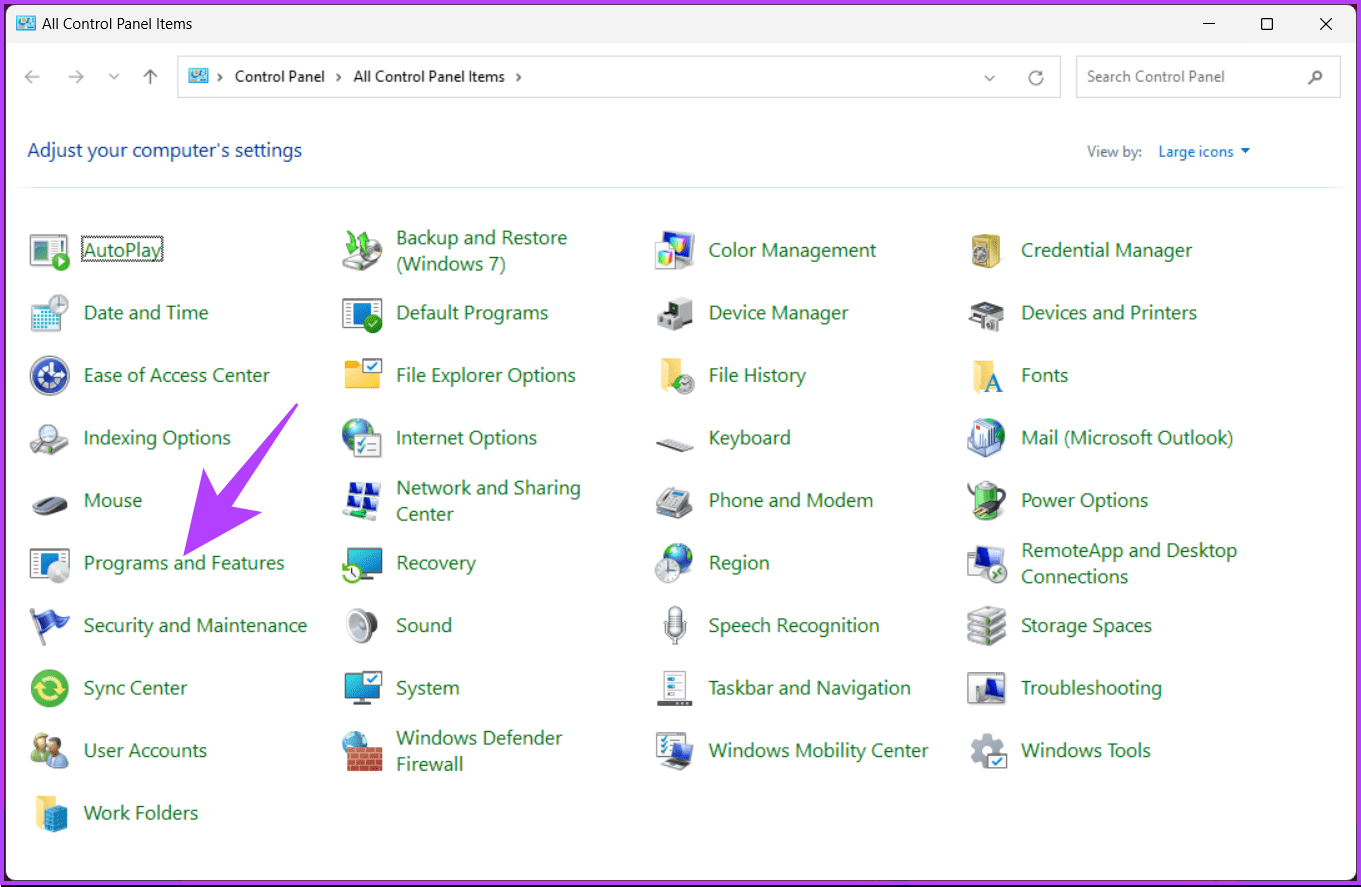
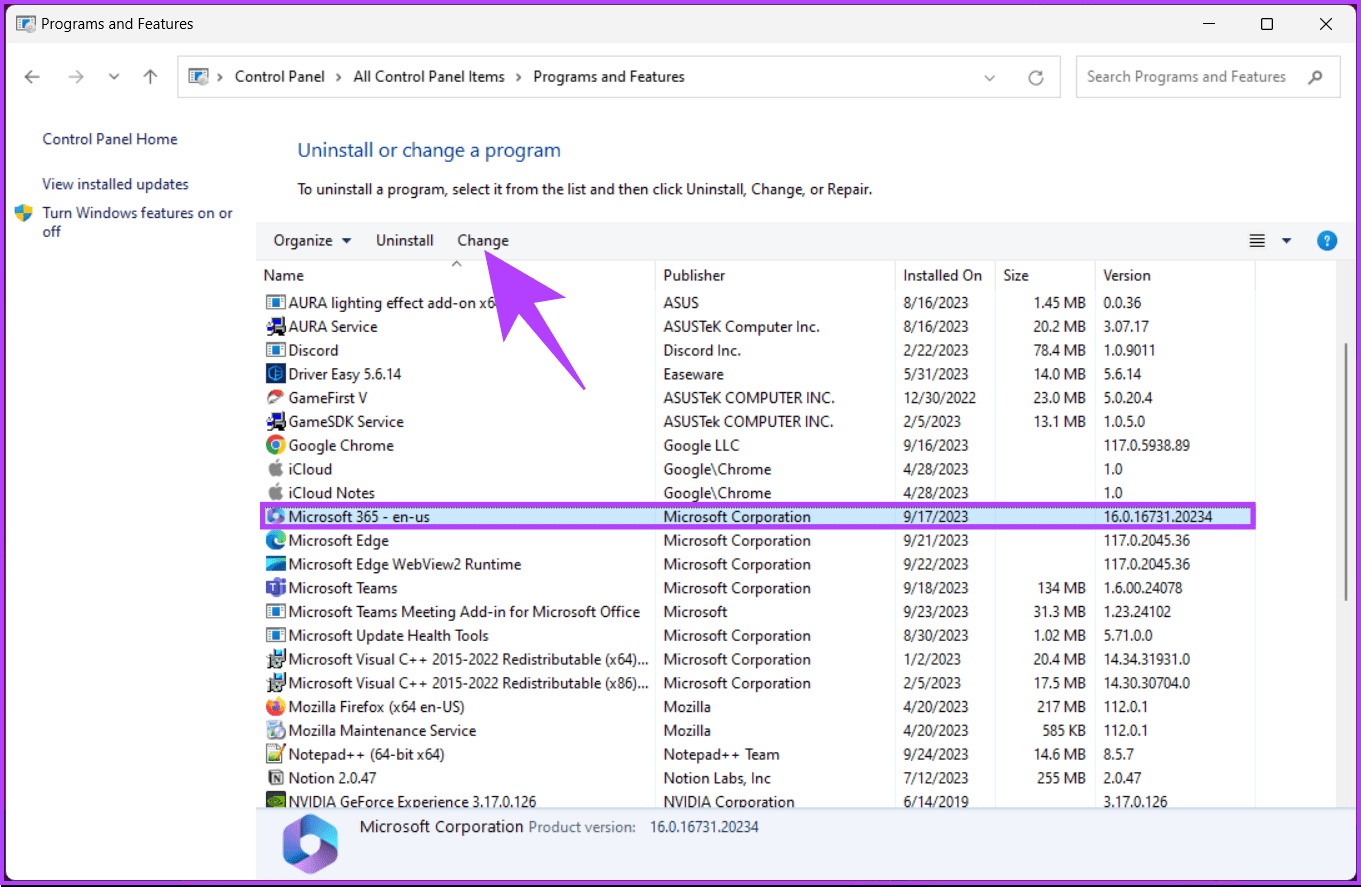
Fix 5: Run the Office Repair Tool
Step 1: Press the Windows key, type Control Panel, and click Open.
Step 2: Click on Programs and Features.
Step 3: Select Microsoft 365 or Microsoft Office and click Change.
In the User Account Control prompt, click Yes.
Step 4: In the pop-up window, select Quick Repair > click the Repair button.

Step 5: Select the Repair button again to start the repair operation.
Microsoft runs its checks and repairs and gets the issue resolved. Ensure you have the internet connected during this process. This will resolve any issue pertaining to Microsoft Office apps, including Excel. However, if none of the methods work, try contacting Microsoft Office support to resolve your issue.
FAQs
A grayed-out scrollbar typically means there’s no more content to scroll through in that direction. If your data fits within the visible area, the scrollbar may appear grayed out because there’s nothing more to display.
Custom Excel templates generally don’t affect scrollbars unless they include specific settings or macros that modify Excel’s default behavior. Review the template’s settings if you suspect it’s causing the issue.
Was this helpful?
Last updated on 30 August, 2024
Read Next
 4 Ways to Fix Excel Toolbar Not Working in Windows
Fix 1: Reset Toolbar Customizations On Microsoft Excel, you can customize the toolbar to quickly access your frequently used commands.
4 Ways to Fix Excel Toolbar Not Working in Windows
Fix 1: Reset Toolbar Customizations On Microsoft Excel, you can customize the toolbar to quickly access your frequently used commands.
 5 Ways to Fix Find and Replace Not Working in Microsoft Excel
Fix 1: Make Sure the Correct Cells Are Selected To start, ensure that you are searching within the appropriate range of cells.
5 Ways to Fix Find and Replace Not Working in Microsoft Excel
Fix 1: Make Sure the Correct Cells Are Selected To start, ensure that you are searching within the appropriate range of cells.
 6 Ways to Fix Hyperlinks Not Working in Microsoft Excel for Windows
Fix 1: Double Check the Link Path It is possible that the file path mentioned in the hyperlink is no longer accessible or that the web page link is misspelled.
6 Ways to Fix Hyperlinks Not Working in Microsoft Excel for Windows
Fix 1: Double Check the Link Path It is possible that the file path mentioned in the hyperlink is no longer accessible or that the web page link is misspelled.
 5 Ways to Fix AutoFill Not Working in Microsoft Excel for Windows
Basic Fixes Try a different workbook: Testing the AutoFill feature in a different workbook will help determine if the issue is limited to a specific Excel file.
5 Ways to Fix AutoFill Not Working in Microsoft Excel for Windows
Basic Fixes Try a different workbook: Testing the AutoFill feature in a different workbook will help determine if the issue is limited to a specific Excel file.
 7 Ways to Combine First and Last Names in Microsoft Excel
Method 1: Using Flash Fill Flash Fill is an intelligent tool in Excel that eliminates the need for complex formulas and manual data manipulation.
7 Ways to Combine First and Last Names in Microsoft Excel
Method 1: Using Flash Fill Flash Fill is an intelligent tool in Excel that eliminates the need for complex formulas and manual data manipulation.
 5 Ways to Fix Microsoft Excel Not Opening on Mac
Basic Fixes Check your Microsoft subscription: Visit your Microsoft 365 account and check your subscription status.
5 Ways to Fix Microsoft Excel Not Opening on Mac
Basic Fixes Check your Microsoft subscription: Visit your Microsoft 365 account and check your subscription status.
 4 Ways to Fix Microsoft Excel Not Responding on Windows 11
Fix 1: Open Microsoft Excel in Safe Mode and Disable Add-Ins You can open Excel in Safe Mode to run the app without add-ins.
4 Ways to Fix Microsoft Excel Not Responding on Windows 11
Fix 1: Open Microsoft Excel in Safe Mode and Disable Add-Ins You can open Excel in Safe Mode to run the app without add-ins.
The article above may contain affiliate links which help support Guiding Tech. The content remains unbiased and authentic and will never affect our editorial integrity.