Before going into the fixes, ensure the USB connector is connected to the motherboard USB port. One of the leading causes of this audio problem is microphone bleed, where the mic picks up audio other than your voice. If you accidentally plugged your USB connector into the keyboard port, you would have unintentionally created a secondary audio path.
Fix 1: Update Input and Output Settings on Discord
If you have set the Discord input and output devices to something other than your primary microphone and headphones, you may notice Discord is picking up game audio. You can reconfigure these settings using the steps below.
Step 1: Launch the Discord app.
Step 2: Click the Settings gear icon.

Step 3: On the left pane, click Voice & Video.
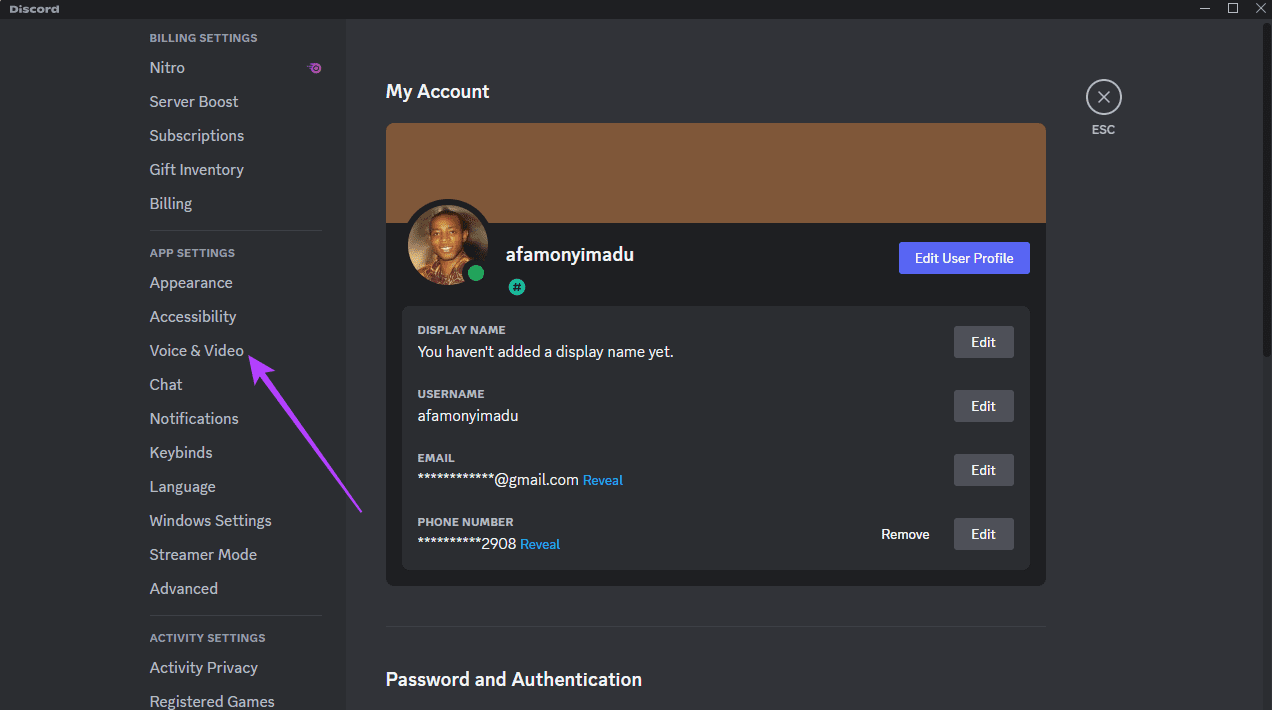
Step 4: Set your primary headphones and mic as the Output and Input devices.

Fix 2: Set Headphone and Microphone as Output and Input Device
If you have misconfigured input and output devices on your computer, the sound settings on your Discord application may be affected during gameplay. The workaround is configuring your input and output devices to your primary gaming options in the Windows 11 Settings app.
Step 1: Right-click the sound icon on the Taskbar and click Sound Settings.

Step 2: Under Output, select your primary gaming headphones, and under Input, select your primary microphone. If your headset has a built-in mic, you should also see an option to select it in the menu.

Fix 3: Update or Reinstall Sound and Audio Drivers
Sound drivers are essential components that aid communication between your sound card and the Windows 11 operating system. If your audio drivers are outdated, you may experience sound leaks in apps like Discord. To resolve this issue, you should update or reinstall the audio drivers.
Step 1: Right-click your Start menu, then click the Device Manager option.

Step 2: Expand the Audio inputs and outputs category, right-click your driver, click Uninstall device, and confirm your choice.

Step 4: Restart the device, relaunch the Device Manager, and click the icon for Scan for hardware changes.

Fix 4: Disable Listen to This Device Microphone Settings
A mic’s settings can also interfere with Discord’s voice audio. To that end, if you’re hearing your own voice when you speak into the microphone, or if the app is relaying game audio with your voice, it is probable that the ‘Listen to this device’ microphone setting is enabled. You should disable it by following the steps below.
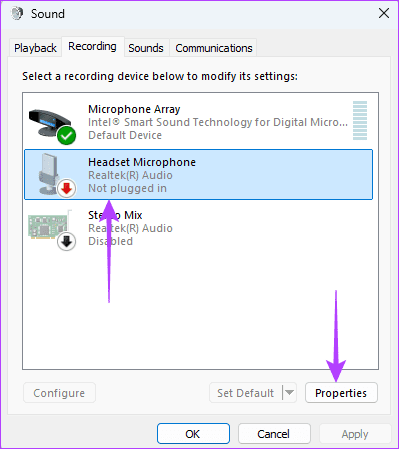
Step 1: Click the Taskbar’s magnifying lens, type control, and click the Control Panel app.

Step 2: Set View by to Large icons, and click the Sound option.

Step 3: Click the Recording tab, microphone, and the Properties button.

Step 4: Navigate to the listening tab and uncheck Listen to this device.

Step 5: Click the Advanced tab and enable both options in the Exclusive mode section.

Step 6: Click Apply and press OK.
Fix 5: Enable Acoustic Echo Cancellation in Realtek Audio Console
When Discord picks up game audio in Windows 11, it can create a frustrating echo effect during voice chats. This is often due to the microphone picking up sound from the speakers or headphones. Acoustic Echo Cancellation is a technology that can help mitigate this issue. It works by identifying and removing echoes from the audio signal.
Step 1: Click the Taskbar’s magnifying lens, type control, and click the Control Panel app.
Step 2: Set View by to Large icons, and click the Sound option.
Step 3: Click the Recording tab, your Realtek headset and the Properties button.
Step 4: Click the Enhancement tab, then tick the Acoustic Echo Cancellation checkbox.
Step 5: Click Apply and press OK.
Was this helpful?
Last updated on 23 August, 2024
Read Next
 3 Fixes if GeForce Experience Not Recording Game Audio in Windows 11
Common Fixes Close and restart GeForce Experience - Click the Arrow button in the system tray notifications area and right-click the NVIDIA icon to select Exit.
3 Fixes if GeForce Experience Not Recording Game Audio in Windows 11
Common Fixes Close and restart GeForce Experience - Click the Arrow button in the system tray notifications area and right-click the NVIDIA icon to select Exit.
 8 Fixes for Microphone Not Working in Xbox Game Bar on Windows 11
Basic Fixes Reconnect the external microphone: Plug out the external connected microphone, wait a few seconds, and reconnect it.
8 Fixes for Microphone Not Working in Xbox Game Bar on Windows 11
Basic Fixes Reconnect the external microphone: Plug out the external connected microphone, wait a few seconds, and reconnect it.
 7 Best Fixes for Game Controller Acting Like a Mouse on Windows 11
Fix 1.
7 Best Fixes for Game Controller Acting Like a Mouse on Windows 11
Fix 1.
 3 Fixes When Streamlabs Game Capture Not Working in Windows 11
Basic Fixes: Ensure that Streamlabs is installed in C drive: If you have installed Streamlabs on any drive other than the default location (C drive), you will face issues with
3 Fixes When Streamlabs Game Capture Not Working in Windows 11
Basic Fixes: Ensure that Streamlabs is installed in C drive: If you have installed Streamlabs on any drive other than the default location (C drive), you will face issues with
 4 Fixes for Audio Not Working in Microsoft Teams on Windows 11
Common Fixes Reboot Windows - Open the Start Menu, click Power in the bottom right, and select Restart.
4 Fixes for Audio Not Working in Microsoft Teams on Windows 11
Common Fixes Reboot Windows - Open the Start Menu, click Power in the bottom right, and select Restart.
 5 Fixes for Microsoft PowerPoint Not Playing Audio on Windows
Fix 1: Check the Volume Level in PowerPoint and Windows Your first step is double-checking the volume level in PowerPoint and on your Windows computer.
5 Fixes for Microsoft PowerPoint Not Playing Audio on Windows
Fix 1: Check the Volume Level in PowerPoint and Windows Your first step is double-checking the volume level in PowerPoint and on your Windows computer.
 5 Ways to Fix Audio Not Working on Discord
Basic Fixes Unmute yourself on Discord: Ensure you haven't accidentally muted yourself on Discord.
5 Ways to Fix Audio Not Working on Discord
Basic Fixes Unmute yourself on Discord: Ensure you haven't accidentally muted yourself on Discord.
 7 Ways to Fix Discord Audio Not Coming Through Headset
Fix 1: Check the Default Audio Output Device on Your System To start, check the default audio output device on your Windows or Mac computer and ensure that audio is
7 Ways to Fix Discord Audio Not Coming Through Headset
Fix 1: Check the Default Audio Output Device on Your System To start, check the default audio output device on your Windows or Mac computer and ensure that audio is
The article above may contain affiliate links which help support Guiding Tech. The content remains unbiased and authentic and will never affect our editorial integrity.

