Since it’s a built-in app, ClipChamp not working in Windows 11 typically doesn’t get resolved by updating the app or changing app-specific settings. This might be unhelpful at first, but you should usually get the app working with a few basic troubleshooting methods.
Fix 1: Fix ClipChamp Not Working in Windows 11 With the App Settings
Typically, you can run the stock troubleshooter for all apps you’ve installed. For Microsoft Store, there used to be a dedicated troubleshooter that has been removed in recent versions. Your only remaining option is to manually reset the app.
Step 1. Go to the search bar and enter “ClipChamp,” which should display the app as the result.
Step 2. On the right-side of the start panel, select “App Settings.”
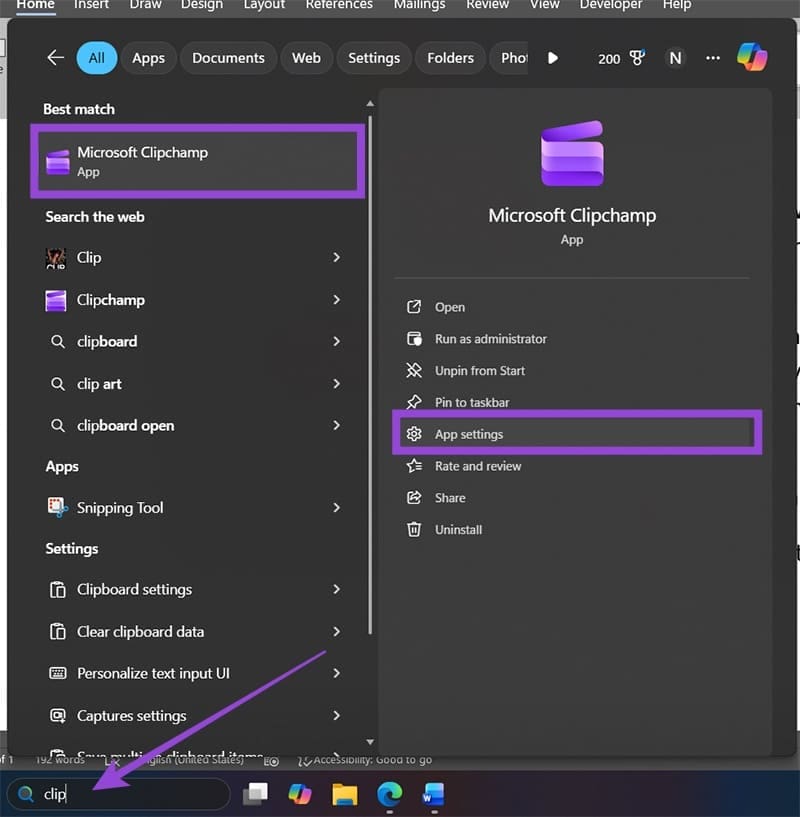
(Optional) If you don’t have the search bar, you can find ClipChamp on the list of installed apps or go through the “Apps” subsection in Settings.
Step 3. Scroll down and click on “Repair.” You’ll get a checkmark when the repair process is complete.
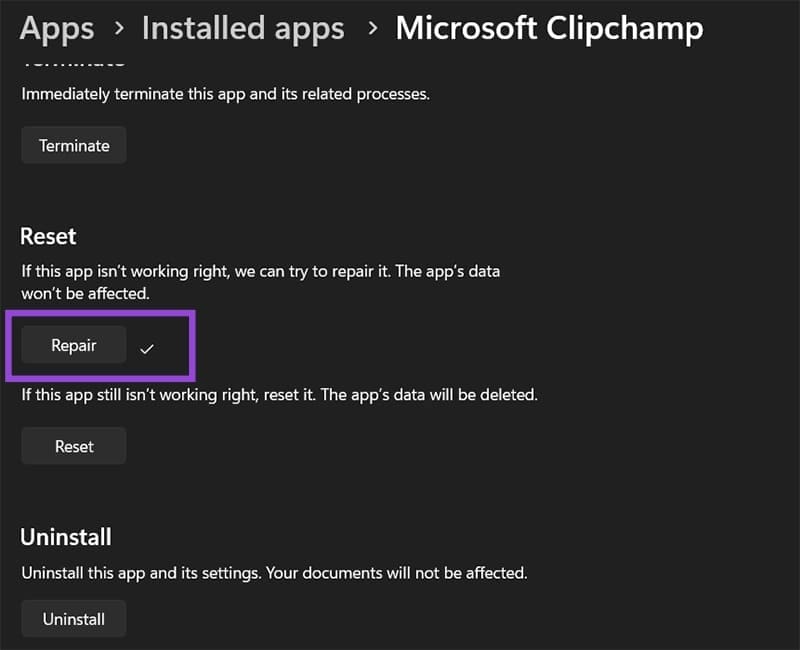
If ClipChamp doesn’t work still, you can reset it, which clears all data and essentially puts it to “factory settings”.
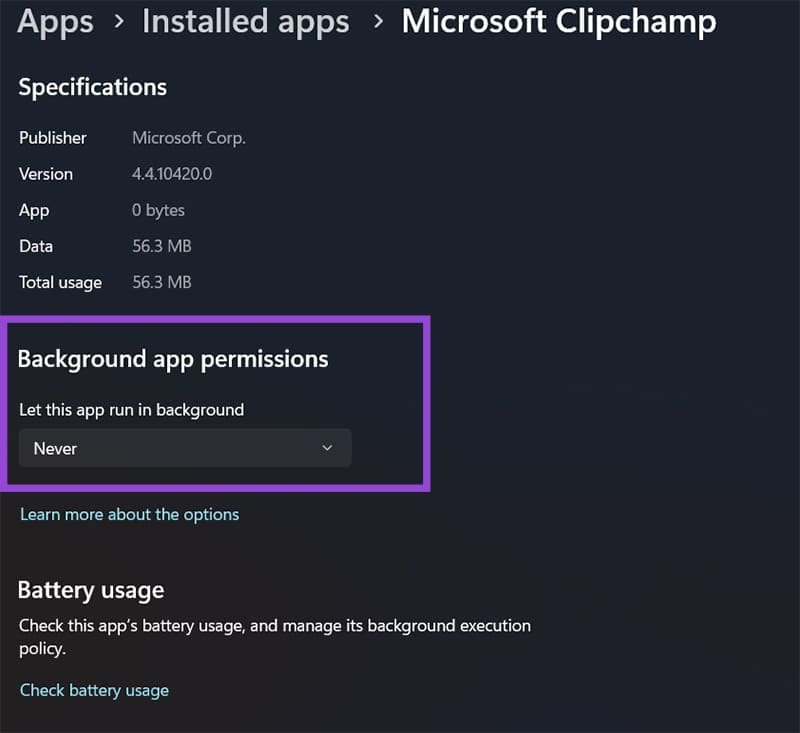
Alternatively, you can change the app’s background settings to stop the app from working in the background, which might be piling up data.
Fix 2: When ClipChamp Won’t Open by Running a SFC Scan
In some cases, ClipChamp won’t open if it encounters a corrupted file, which can happen when using a hard disk that’s close to full or updating Windows. An SFC scan can automatically detect and fetch the correct file versions.
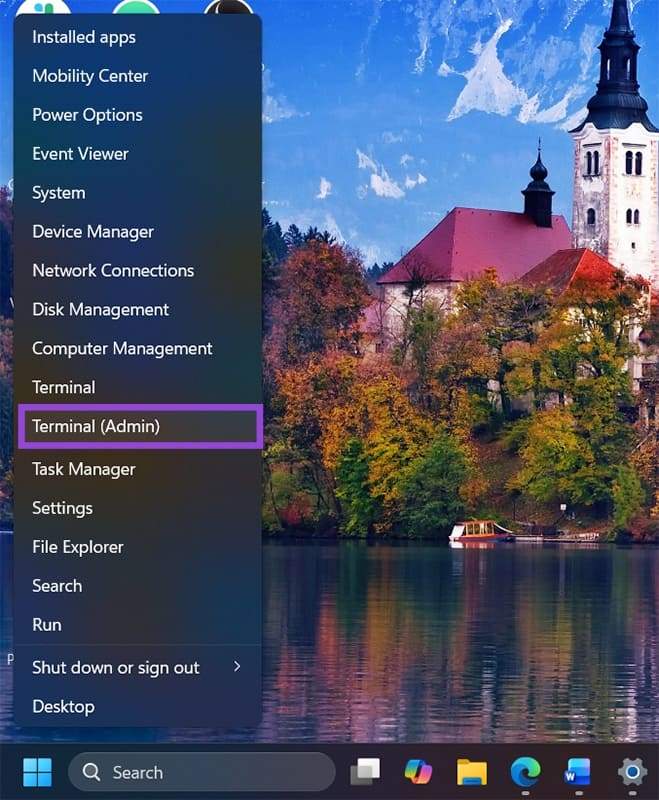
Step 1. Press “Win + R” to open the Run dialog, then insert “cmd” to open the Command Prompt. You can also search for it in the search bar, and the Terminal as an admin can be a direct alternative (available by right-clicking the Start icon).
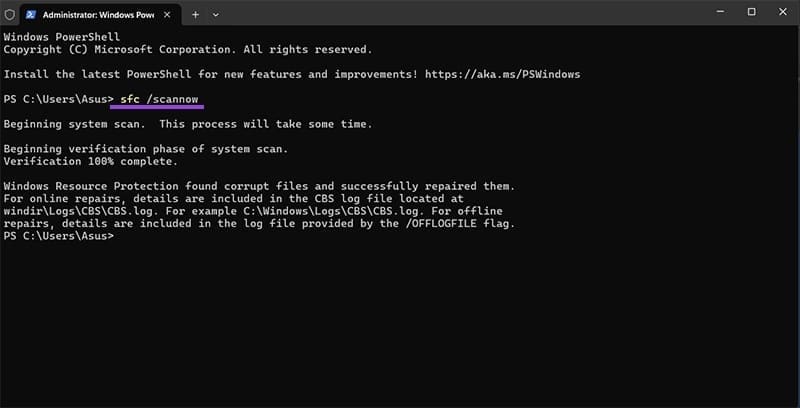
Step 2. Enter and run the command: “sfc /scannow”
Step 3. Follow the on-screen instructions and wait for the process to complete. Windows should re-download all corrupted files automatically.
Fix 3: Remove Unnecessary Programs to Save RAM Space
Being a video editor, ClipChamp can require increasingly more RAM and CPU resources to operate. In some cases, ClipChamp doesn’t work as expected or shuts down because the system can’t allocate more memory to it. This can happen if you’re using large or long videos and run other apps.
Typically, this means closing Chrome or another browser, as they can hog a lot of RAM, particularly on older devices or laptops.
You can also use the Task Manager to close background programs that you’re not using.
Fix 4: Temporarily Disable Antivirus or Firewall
If you’re using a third-party antivirus, temporarily disabling it then trying to run ClipChamp will ensure that you can see whether ClipChamp not working in Windows 11 is related to internet access. Alternatively, you can try to allow the program to bypass the Firewall.
Step 1. Open Settings, go to “Privacy and security,” then click on “Firewall and network protection.”
Step 2. Click on “Allow an app through firewall.”

Step 3. Click on the “Change settings” button on the top and allow user account control if needed.
Step 4. In the list, find “Microsoft ClipChamp” and make sure both the “Public” and “Private” options are checked. Click on “OK” to save.

Was this helpful?
Last updated on 15 November, 2025
Read Next
 How to Fix Windows Alt and F4 Keys Not Working Error on Windows 10
What do most people do when a computer peripheral or an accessory stops working suddenly?
How to Fix Windows Alt and F4 Keys Not Working Error on Windows 10
What do most people do when a computer peripheral or an accessory stops working suddenly?
 How to Fix Windows Clipboard Not Working on Windows 10
Basic Fixes Update Windows: Before starting, make sure that you're running the latest version of Windows.
How to Fix Windows Clipboard Not Working on Windows 10
Basic Fixes Update Windows: Before starting, make sure that you're running the latest version of Windows.
 Top 7 Ways to Fix Windows Key Not Working on Windows 10
Windows 10 operating system is full of keyboard shortcuts.
Top 7 Ways to Fix Windows Key Not Working on Windows 10
Windows 10 operating system is full of keyboard shortcuts.
 6 Ways to Fix Windows Security Not Opening or Working on Windows 11
Try Basic Fixes Uninstall any third-party antivirus program: Third-party antivirus programs can sometimes interfere with the Windows Security app and prevent it from opening on your Windows 11 PC.
6 Ways to Fix Windows Security Not Opening or Working on Windows 11
Try Basic Fixes Uninstall any third-party antivirus program: Third-party antivirus programs can sometimes interfere with the Windows Security app and prevent it from opening on your Windows 11 PC.
 7 Ways to Fix Windows Key Not Working in Windows 11
Basic Fixes Check for physical damage: There might be physical damage or dirt buildup on your keyboard.
7 Ways to Fix Windows Key Not Working in Windows 11
Basic Fixes Check for physical damage: There might be physical damage or dirt buildup on your keyboard.
 4 Ways to Fix Telegram Notifications Not Working on Windows 10 and Windows 11
Try Basic Fixes Disable Do Not Disturb mode: The Telegram app may not be showing notifications due to the Do Not Disturb mode on your Windows PC.
4 Ways to Fix Telegram Notifications Not Working on Windows 10 and Windows 11
Try Basic Fixes Disable Do Not Disturb mode: The Telegram app may not be showing notifications due to the Do Not Disturb mode on your Windows PC.
 3 Best Ways to Fix Keyboard Backlight Not Working on Windows 10 and Windows 11
Try Basic Fixes Toggle the keyboard backlight using the hotkey: You can use a key combination to quickly enable or disable the keyboard backlight on your Windows 11 PC.
3 Best Ways to Fix Keyboard Backlight Not Working on Windows 10 and Windows 11
Try Basic Fixes Toggle the keyboard backlight using the hotkey: You can use a key combination to quickly enable or disable the keyboard backlight on your Windows 11 PC.
 9 Fixes for Windows Subsystem for Android Not Working on Windows 11
Reminder: Windows Subsystem for Android and the Amazon App Store will no longer be available in the Microsoft Store after March 5, 2025.
9 Fixes for Windows Subsystem for Android Not Working on Windows 11
Reminder: Windows Subsystem for Android and the Amazon App Store will no longer be available in the Microsoft Store after March 5, 2025.
The article above may contain affiliate links which help support Guiding Tech. The content remains unbiased and authentic and will never affect our editorial integrity.