Audio problems can be a pain to troubleshoot, being caused both by hardware and software issues. If you’re having a stutter in your PC’s sound, you’re no doubt looking for answers. Not to worry: in this article, we’ll be showing you how to fix audio stuttering (Windows 11) and get back to smooth audio playback.
The Biggest Culprits
So, what’s behind my audio cutting out or stuttering? There are many potential causes, but the biggest ones are:
- Outdated, incompatible, or corrupted audio drivers
- High CPU use
- Hardware issues with headphones and speakers (especially Bluetooth ones)
- Current audio settings and clashes between system and third-party settings
How to Fix Stuttering
Let’s get down to how to fix audio stuttering. We’ve got some troubleshooting steps below that can help:
Check Your Audio Device
Before attempting other fixes for stuttering, first check your headphones or speakers.
- Check the battery levels.
- Ensure Bluetooth devices are within range of your PC.
- If you have a cable, try connecting this instead of wireless.
If you can try other audio outputs to see if the issue persists. If it does, your problem is more software-related.
Disable Audio Enhancements
Windows 11 Audio Enhancement can give better sound, but also cause issues, especially with third-party audio managers. Try disabling it to see if it resolves things:
Step 1. Open “Settings” (Win + I) and click “System.”
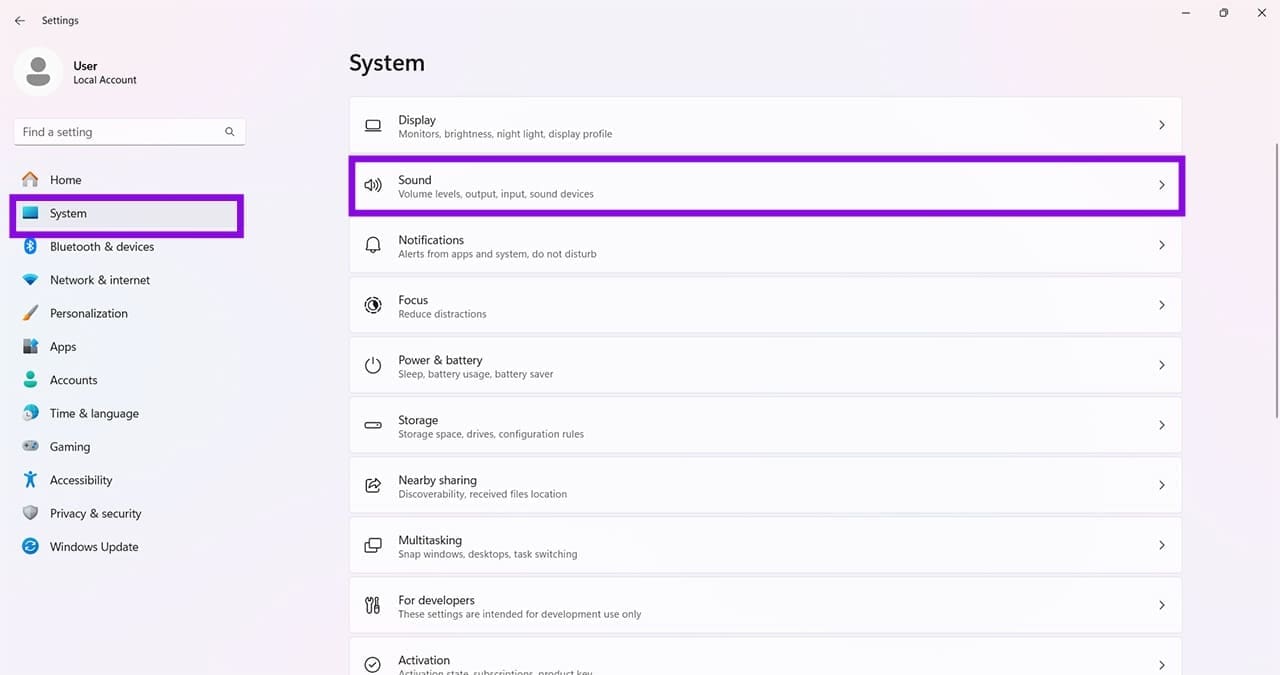
Step 2. Select “Sound” and head to the “Advanced” section.
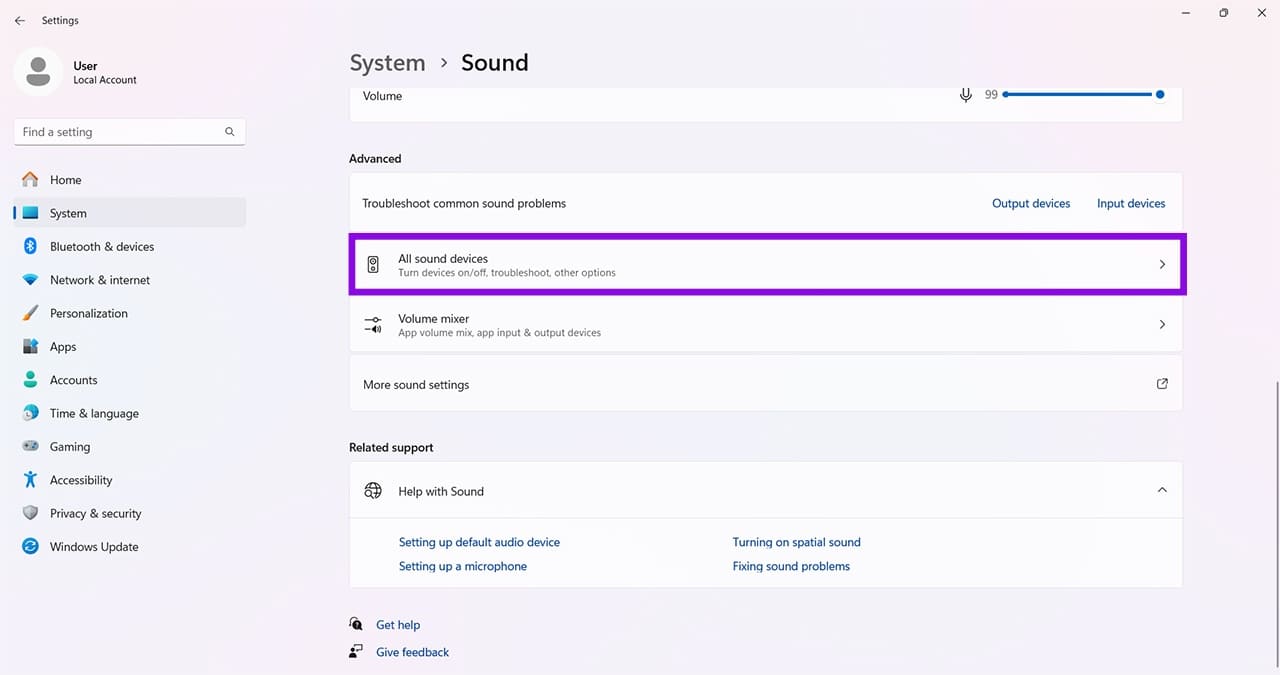
Step 3. Select “All sound devices” and your machine’s current output.

Step 4. Navigate to the “Output settings” subsection and select “Audio enhancements” drop-down to “Off.”
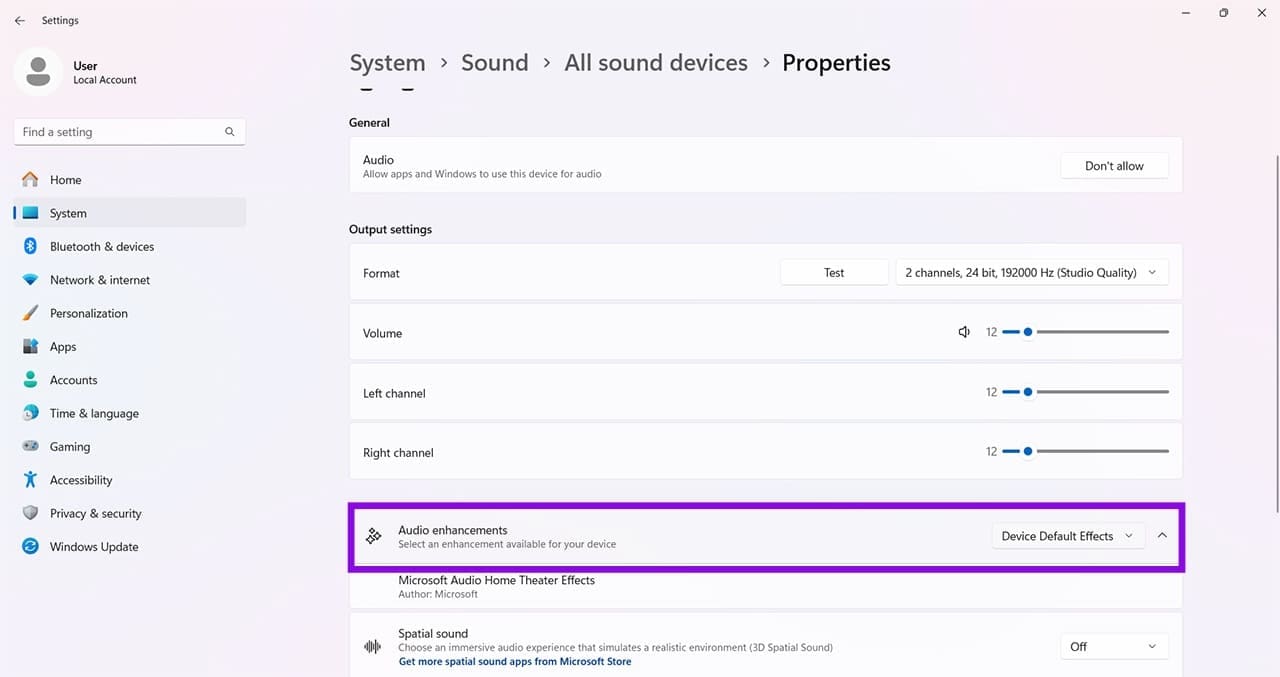
Step 5. Restart and test your audio again.
Change Audio Frequency
A quick fix that might help is to change the format of the audio output. An unsupported or incorrect audio format can cause audio quality or playback issues. Here’s what to do:
Step 1. Open “Settings” (Win + I) and choose “System” from the side panel.
Step 2. Click “Sound.”
Step 3. Under “Output,” select your current audio device.
Step 4. Under “Output settings,” click the drop-down button next to “Format.”

Step 5. Choose a different supported format.
Step 6. See if this resolves your issue.
Run the Audio Troubleshooter
Windows has a few troubleshooters for different components, and audio is no exception. Here’s how to run the troubleshooter:
Step 1. Open “Settings” (Win + I) and choose “System.”
Step 2. Scroll right down to “Troubleshoot” and click it.
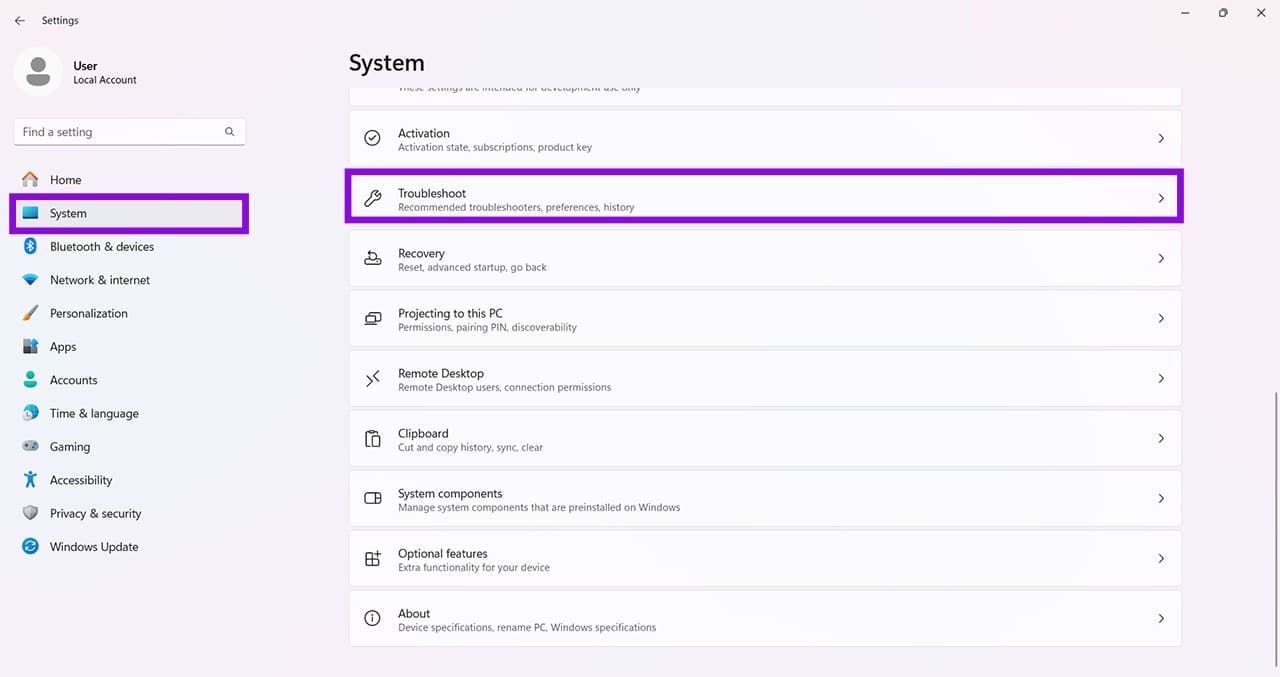
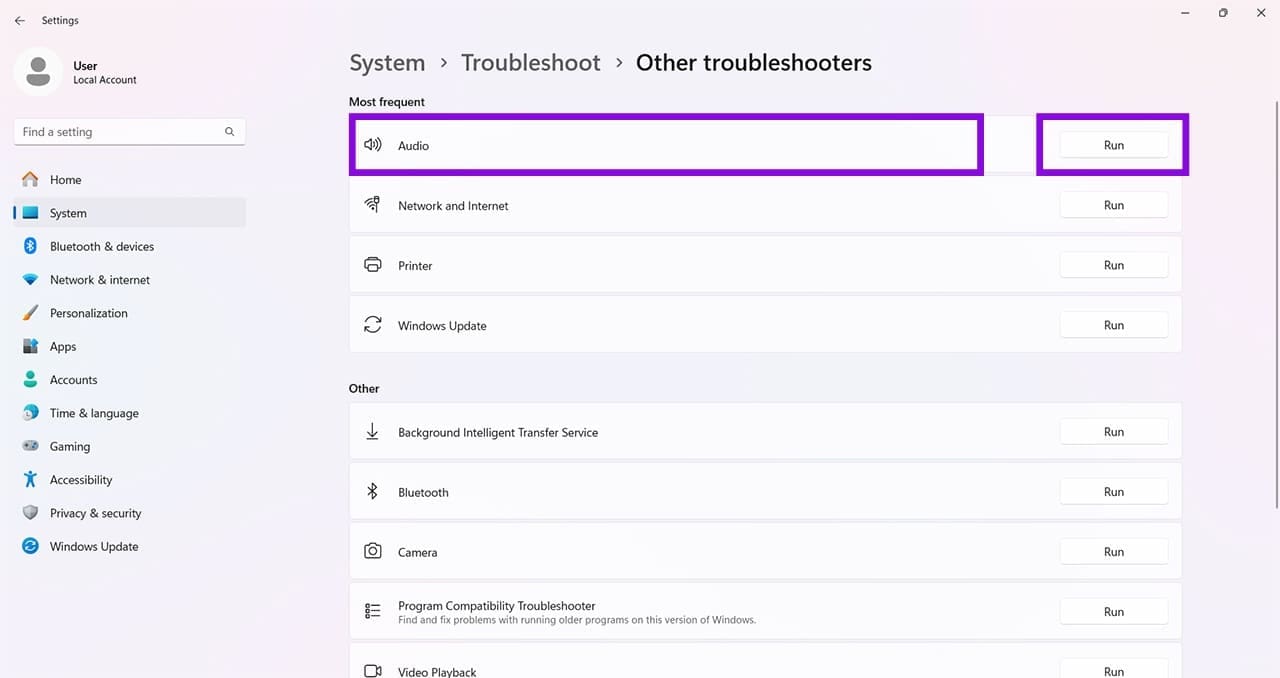
Step 3. Choose “Other troubleshooters.”

Step 4. Next to “Audio,” hit the “Run” button. The troubleshooter will start and detect any potential issues. Follow any steps stipulated.
Update or Roll Back Your Audio Drivers
Incompatible or outdated drivers are a prime offender when it comes to audio issues. Here’s what to do to update or roll back drivers:
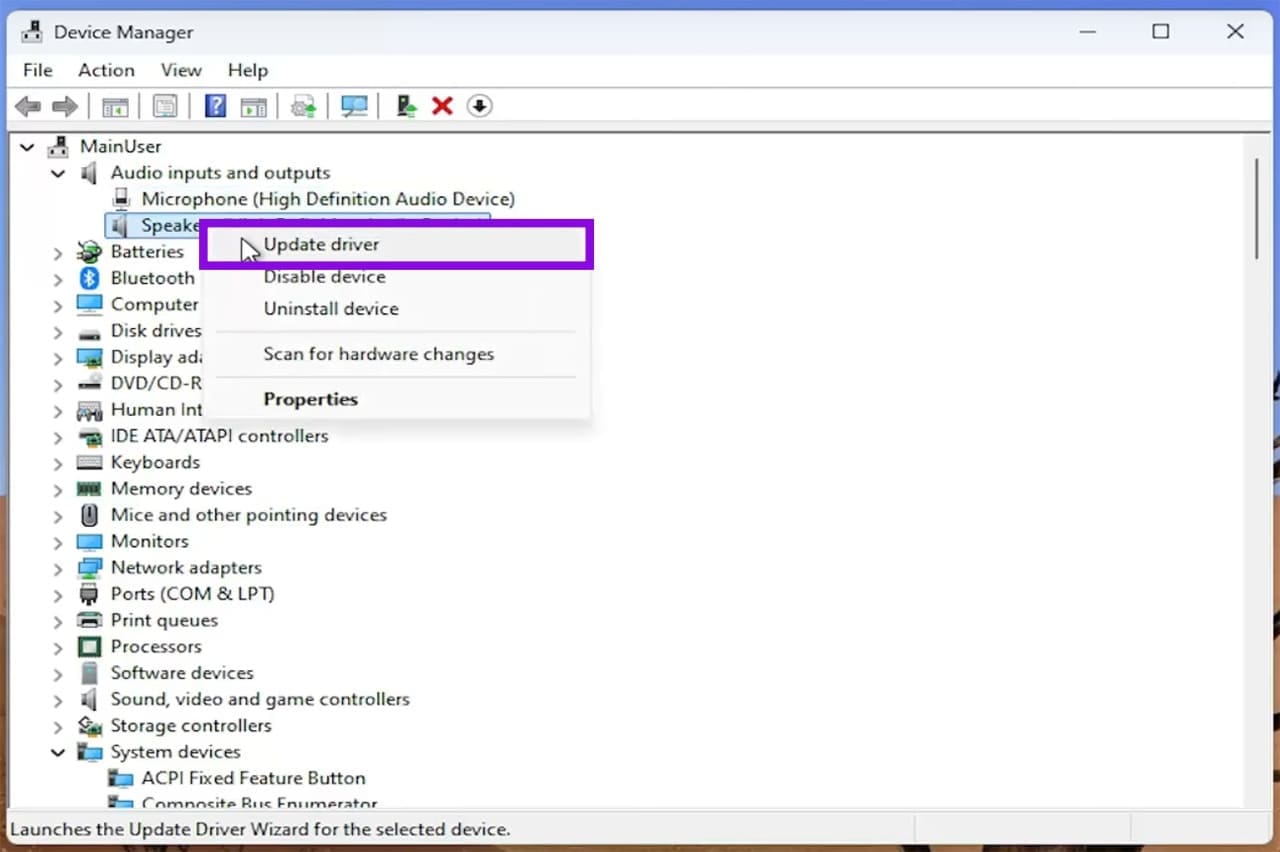
Step 1. Open the Run dialog (Win + R), type “devmgmt.msc” into the box, and hit “OK.”
Step 2. Navigate to “Audio inputs and outputs” and right-click the options below it.

Step 3. Select “Update driver” from the context menu.
Step 4. In the next pop-up, select “Search automatically for drivers” and let the process run. Follow the instructions to complete the update.

Step 5. If you want to install pre-existing drivers, you can click “Browse my computer for drivers.”

Step 6. Choose from the list provided and follow the prompts to reinstall. After this, restart and see if the issue is resolved.
Was this helpful?
Last updated on 31 August, 2026
Read Next
 6 Ways to Fix Realtek HD Audio Manager Missing in Windows 11/10
Fix 1: Check for Realtek HD Audio Manager in Apps Step 1: Open Windows Settings (Win + I) and navigate to Apps > Installed Apps.
6 Ways to Fix Realtek HD Audio Manager Missing in Windows 11/10
Fix 1: Check for Realtek HD Audio Manager in Apps Step 1: Open Windows Settings (Win + I) and navigate to Apps > Installed Apps.
 5 Ways to Fix VLC Audio Not Working on Windows 11
Basic Fixes Disable Audio Enhancements on Windows: It conflicts with the VLC audio output.
5 Ways to Fix VLC Audio Not Working on Windows 11
Basic Fixes Disable Audio Enhancements on Windows: It conflicts with the VLC audio output.
 4 Ways to Fix Zoom Audio Delay on Windows 11
Basic Fixes Check your network connection: Ensure your PC has a good internet connection.
4 Ways to Fix Zoom Audio Delay on Windows 11
Basic Fixes Check your network connection: Ensure your PC has a good internet connection.
 How to Fix Audio Not Working on Windows 10
Audio problems can be annoying while watching your favorite movie or during a video call.
How to Fix Audio Not Working on Windows 10
Audio problems can be annoying while watching your favorite movie or during a video call.
 6 Ways to Fix Audio Distortion Issues While Streaming on Windows 11
Fix 1: Reconnect the Audio Device Your first course of action is to disconnect your audio device and reconnect it.
6 Ways to Fix Audio Distortion Issues While Streaming on Windows 11
Fix 1: Reconnect the Audio Device Your first course of action is to disconnect your audio device and reconnect it.
 11 Easy Ways to Fix HDMI Audio Not Working in Windows 11
When watching a movie, series, show, etc., using HDMI audio seems to have become a staple.
11 Easy Ways to Fix HDMI Audio Not Working in Windows 11
When watching a movie, series, show, etc., using HDMI audio seems to have become a staple.
 5 Ways to Fix No Audio Device Is Installed Error on Windows 11
Fix 1: Enable Your Audio Device on Windows The first thing to do is ensure that you haven’t accidentally disabled the audio device on Windows.
5 Ways to Fix No Audio Device Is Installed Error on Windows 11
Fix 1: Enable Your Audio Device on Windows The first thing to do is ensure that you haven’t accidentally disabled the audio device on Windows.
 Windows Audio Device Graph Isolation: Fix High CPU Usage
What is Windows Audio Device Graph Isolation Windows Audio Device Graph Isolation, also known as audiodg.exe, is a process that handles digital signal processing, including advanced sound enhancement effects, on
Windows Audio Device Graph Isolation: Fix High CPU Usage
What is Windows Audio Device Graph Isolation Windows Audio Device Graph Isolation, also known as audiodg.exe, is a process that handles digital signal processing, including advanced sound enhancement effects, on
The article above may contain affiliate links which help support Guiding Tech. The content remains unbiased and authentic and will never affect our editorial integrity.