How to Enable Auto-Capitalization in Microsoft Word
Microsoft Word has a proofing section where users can personalize spelling and grammar settings. In this section, you can manage the option to auto-capitalize. Here’s how to enable auto-capitalization in Microsoft Word:
Step 1: Open the Word app or any Word document.
Step 2: Click on the File tab at the top left of the Microsoft Office Ribbon.

Step 3: Scroll to the bottom of the File menu and click on More Options to reveal a collapsed menu.

Step 4: Click Options from the menu.

Step 5: On the left of the Word Options pop-up, click the Proofing tab.

Step 6: Click the AutoCorrect Options button from the Proofing settings to launch the AutoCorrect window.

Step 7: On the AutoCorrect Window, click the AutoCorrect tab.

Step 8: To enable auto-capitalization, check the boxes next to one of the options in the AutoCorrect tab:
- Correct TWo INitial CApitals
- Capitalize first letter of sentences
- Capitalize first letter of table cells
- Capitalize names of days
- Correct accidental usage of cAPS LOCK key

Step 9: Click the Exceptions button to create exceptions where auto-capitalization must be set.

Step 10: On the AutoCorrect Exceptions window, click the INitial CAps tab.

Step 11: In the Don’t correct field, enter the capitalization format for words or letters you would not like Microsoft Word to correct when you type.

Step 12: Select Add to include the word to your exception list.

Step 13: Click OK at the bottom of the window to save your new exception.

Step 14: Click OK on the AutoCorrect Window to close it and save your auto-capitalization selections.

You may follow specific fixes if you cannot open certain Word files.
How to Disable Auto-Capitalization in Microsoft Word
If you want to disable auto-capitalization or you would like to update your exceptions list to include words Microsoft Word shouldn’t capitalize, here’s how you can do so:
Step 1: Open the Word app or any Word document.
Step 2: Click on the File tab at the top left of the Microsoft Office Ribbon.
Step 3: Scroll to the bottom of the File menu and click on More Options to reveal a collapsed menu.
Step 4: Click Options from the menu.
Step 5: On the left of the Word Options pop-up, click the Proofing tab.
Step 6: Click the AutoCorrect Options button from the Proofing settings to launch the AutoCorrect window.
Step 7: On the AutoCorrect Window, click the AutoCorrect tab.
Step 8: To disable auto-capitalization, untick all or some of the following options displayed in the AutoCorrect tab:
- Correct TWo INitial CApitals
- Capitalize first letter of sentences
- Capitalize first letter of table cells
- Capitalize names of days
- Correct accidental usage of cAPS LOCK key
Step 9: Click the Exceptions button to create Exceptions where your ticked options for auto-capitalization need not be set in.
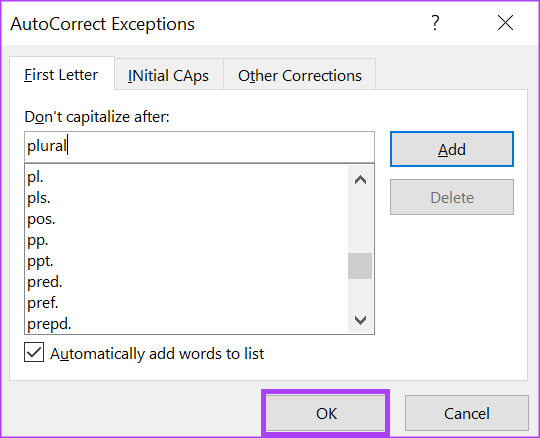
Step 10: On the AutoCorrect Exceptions window, click the First Letter tab.

Step 11: In the Don’t capitalize after field, enter the capitalization format for words or letters you would not like Microsoft Word to capitalize when you type.

Step 12: Select Add to include the word to your exception list.

Step 13: Click OK at the bottom of the window to save your new exception.
Step 14: Click OK on the AutoCorrect Window to close it and save your auto-capitalization selections.

Was this helpful?
Last updated on 20 July, 2024
Read Next
 How to Enable and Disable Focus Mode in Microsoft Word
How to Enable Focus Mode in Microsoft Word Focus Mode hides the Ribbon and Taskbar on your document to reduce distractions and let you work only on the document's text
How to Enable and Disable Focus Mode in Microsoft Word
How to Enable Focus Mode in Microsoft Word Focus Mode hides the Ribbon and Taskbar on your document to reduce distractions and let you work only on the document's text
 How to Enable and Disable Hyphenation in Microsoft Word
How to Turn on Hyphenation in Microsoft Word There are two types of hyphenation - automatic and manual.
How to Enable and Disable Hyphenation in Microsoft Word
How to Turn on Hyphenation in Microsoft Word There are two types of hyphenation - automatic and manual.
 How to Enable Equation Editor in Microsoft Word
Enable Equation Editor on MS Word for Mac Enabling the equation editor in Word for Mac users is immensely simple.
How to Enable Equation Editor in Microsoft Word
Enable Equation Editor on MS Word for Mac Enabling the equation editor in Word for Mac users is immensely simple.
 Apple Pages vs Microsoft Word: Which Word Processing Software Is Better
Every major tech company out there is offering their version of the productivity suite.
Apple Pages vs Microsoft Word: Which Word Processing Software Is Better
Every major tech company out there is offering their version of the productivity suite.
 Google Docs vs. Microsoft Word Online: Which Word Processor Is Better
Google Docs vs.
Google Docs vs. Microsoft Word Online: Which Word Processor Is Better
Google Docs vs.
 3 Ways to Disable or Enable Search Highlights in Windows 10 and Windows 11
Method 1: Disable or Enable Search Highlights From the Settings App The Settings app on Windows allows you to control most things on your PC.
3 Ways to Disable or Enable Search Highlights in Windows 10 and Windows 11
Method 1: Disable or Enable Search Highlights From the Settings App The Settings app on Windows allows you to control most things on your PC.
 How to Enable or Disable Internet Explorer Mode in Edge
Enable or Disable the Internet Explorer Mode in Microsoft Edge Microsoft Edge's Internet Explorer mode lets you effortlessly access old websites without switching browsers.
How to Enable or Disable Internet Explorer Mode in Edge
Enable or Disable the Internet Explorer Mode in Microsoft Edge Microsoft Edge's Internet Explorer mode lets you effortlessly access old websites without switching browsers.
 How to Enable or Disable Mouse Click Sound on Windows 11
Enable the Mouse Click Sound on Windows 11 If you're tired of your default mouse or trackpad click sound, setting a custom sound will enhance your navigation experience.
How to Enable or Disable Mouse Click Sound on Windows 11
Enable the Mouse Click Sound on Windows 11 If you're tired of your default mouse or trackpad click sound, setting a custom sound will enhance your navigation experience.
The article above may contain affiliate links which help support Guiding Tech. The content remains unbiased and authentic and will never affect our editorial integrity.