Method 1: Disable or Enable Search Highlights From the Settings App
The Settings app on Windows allows you to control most things on your PC. You can use it to disable or enable the search highlights feature quickly. Here’s how you can enable or disable search highlights.
Step 1: Press the Windows key + I to open the Settings app and go to Privacy & security > Search permissions.

Step 2: Scroll down to More settings and toggle off the Show search highlights option.

And that’s about it. You’ll no longer see search highlights while using search. If you’re on Windows 10, there’s a much faster way to disable search highlights. Right-click on the Taskbar, go to Search, and uncheck the Show search highlights option.
Method 2: Disable or Enable Search Highlights From Registry Editor
If you’re an avid Windows user who enjoys tinkering with the Registry Editor, you can use the following registry trick to enable or disable search highlights. Besides, this method can be useful to manage search highlight settings for all the users on your PC at once.
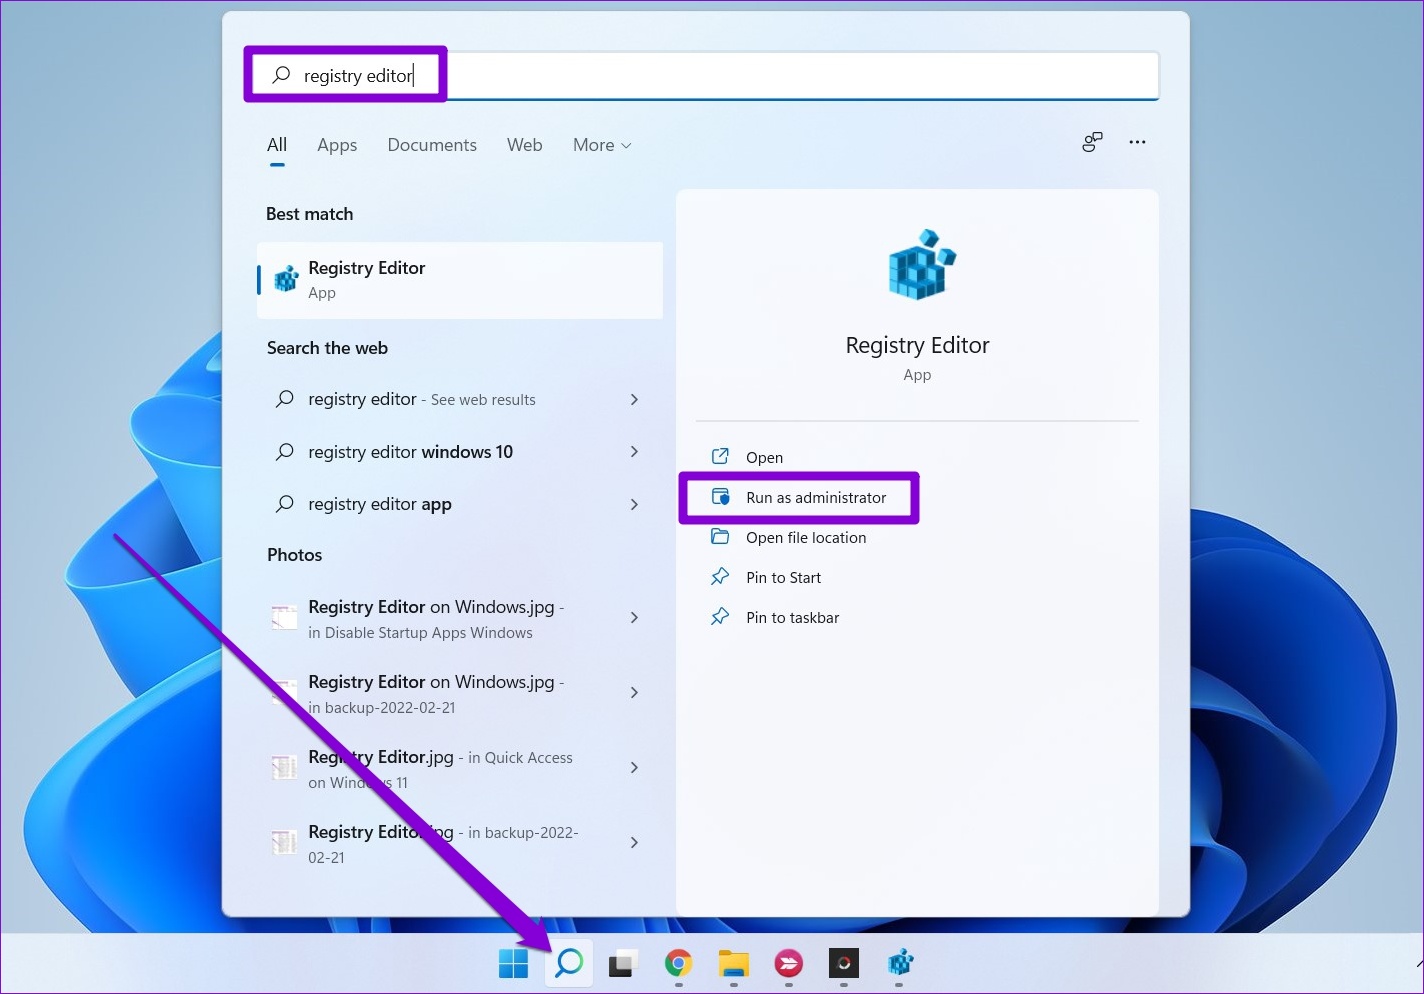
Step 1: Click the search icon on the taskbar, type registry editor in the box, and select Run as administrator.
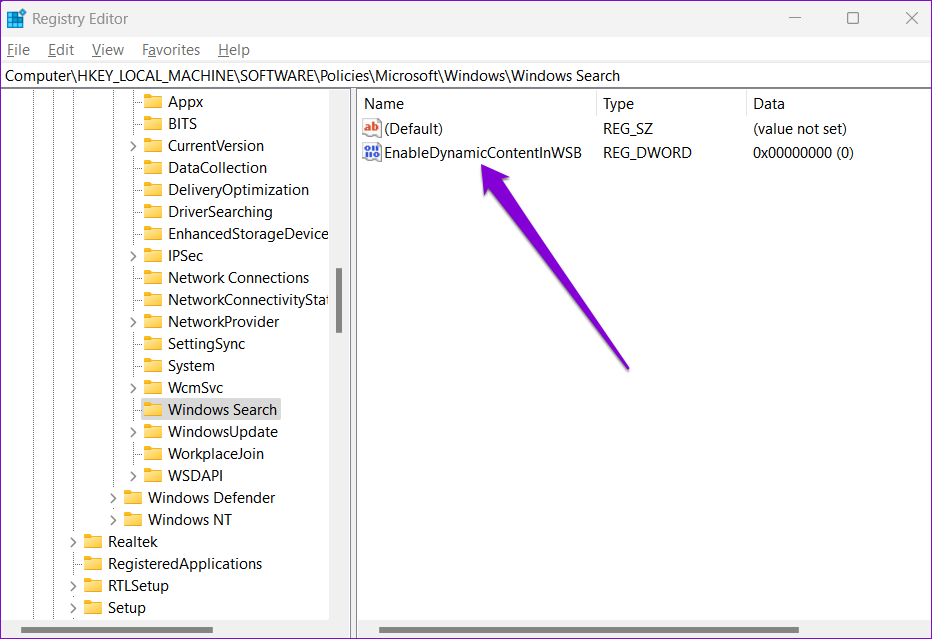
Step 2: In the Registry Editor window, use the address bar at the top to navigate to the following key:
HKEY_LOCAL_MACHINE\SOFTWARE\Policies\Microsoft\Windows\Windows Search
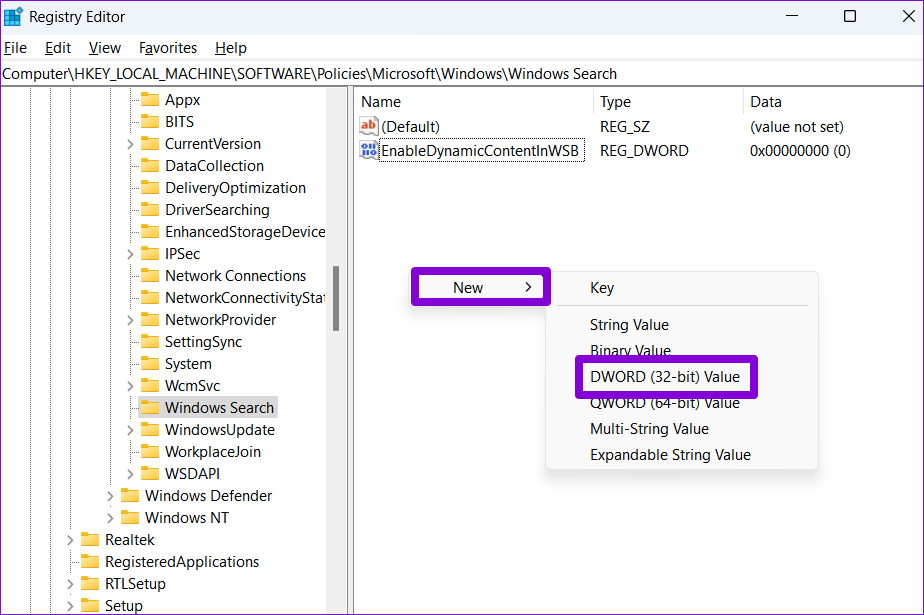
Step 3: On your right, look for the EnableDynamicContentInWSB entry.
If you can’t find it, right-click anywhere on the empty space, go to New, and select DWORD (32-bit) Value. Name it EnableDynamicContentInWSB.
Step 4: Double-click on EnableDynamicContentInWSB and change its value data to 0 (zero) and hit OK.
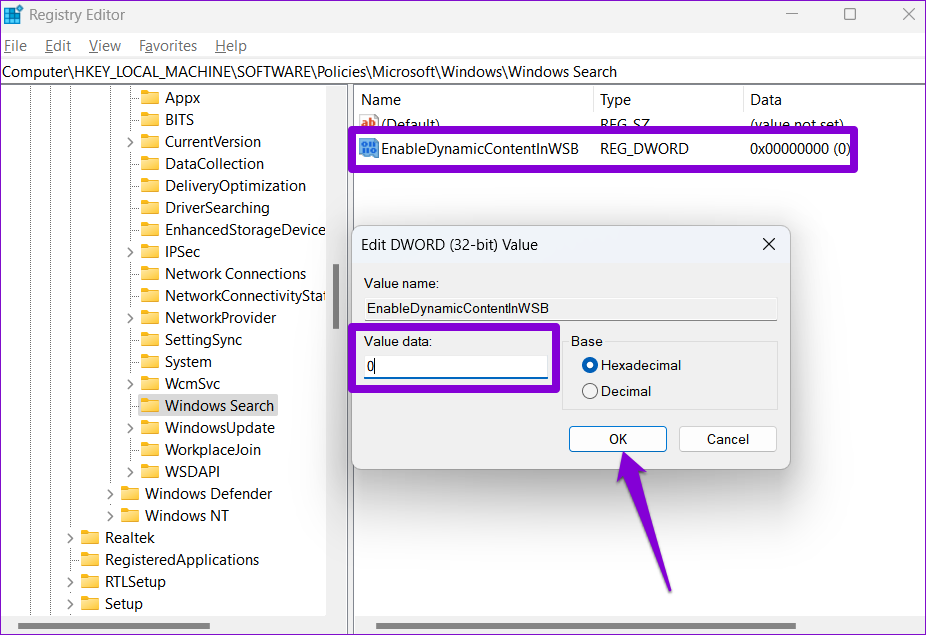
Exit Registry Editor and restart your PC to apply the changes. If you wish to enable the search highlights at any point, follow the same steps above and change the value data for EnableDynamicContentInWSB to 1 in Step 5.

Method 3: Disable or Enable Search Highlights via Group Policy
Similar to the Registry Editor, the Group Policy Editor also allows you to change your PC’s settings. However, it’s important to note that Group Policy Editor is only available on Windows Pro, Enterprise, and Education editions. So, if you’re using the Home edition of Windows , you’ll have to make do with the above two methods.
Step 1: Press the Windows key + R to launch the Run dialog box. Type in gpedit.msc in the Open field and press Enter.
Step 2: In the Local Group Policy Editor window, go to Computer Configuration > Administrative Templates > Windows Components.
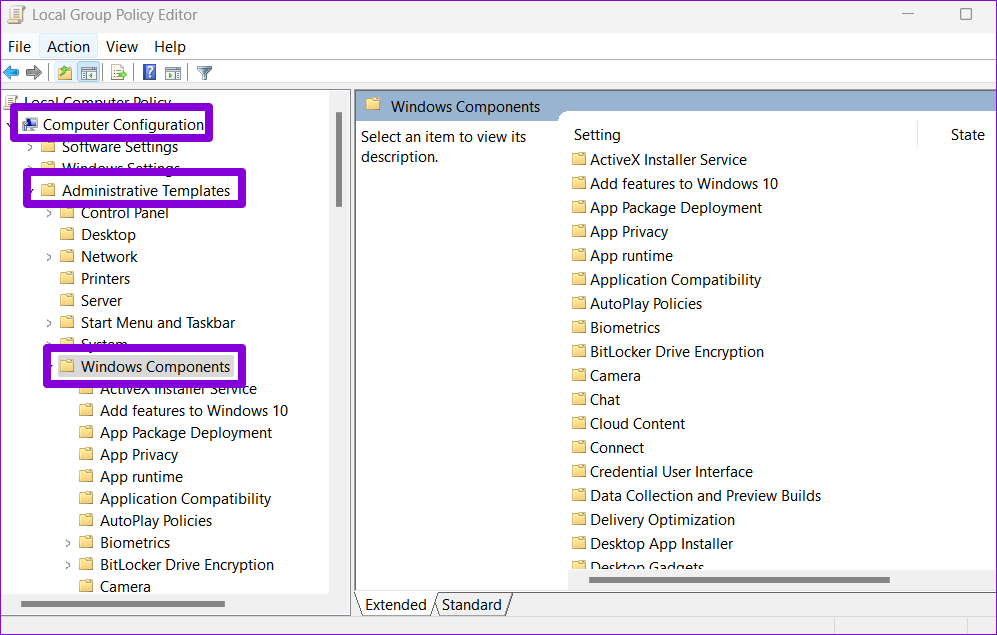
Step 3: Inside Windows Components, scroll down to locate the Search folder.
Step 4: Double-click on Allow search highlights option on your right.
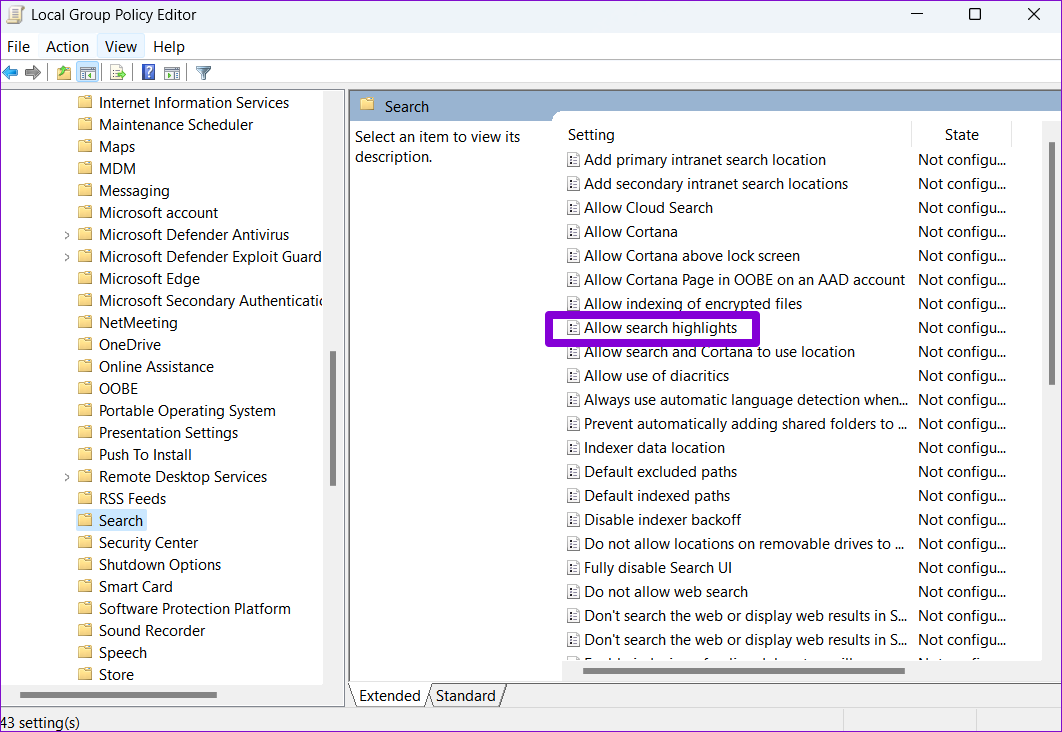
Step 5: Select Disabled in the following window and hit Apply to save changes.

Similarly, you can select Enabled in Step 5 to activate the search highlight functionality at any point.
Was this helpful?
Last updated on 02 July, 2024
2 Comments
Leave a Reply
Read Next
 How to Download Instagram Highlights on Your Phone or PC
Download Your Instagram Story Highlights from Instagram App Earlier you could download Instagram Highlights directly from the Highlight’s insight section.
How to Download Instagram Highlights on Your Phone or PC
Download Your Instagram Story Highlights from Instagram App Earlier you could download Instagram Highlights directly from the Highlight’s insight section.
 How to Add and Use Facebook Story Highlights: A Definitive Guide
What Are Facebook Story Highlights Highlights are like photo albums where you can sort stories in different folders according to their content.
How to Add and Use Facebook Story Highlights: A Definitive Guide
What Are Facebook Story Highlights Highlights are like photo albums where you can sort stories in different folders according to their content.
 How to Fix Instagram Highlights Not Loading or Showing
Why Can't I See Highlights on Instagram Internet connection issues - Slow or unstable internet or network connectivity issues can stop Instagram Highlights from loading or showing.
How to Fix Instagram Highlights Not Loading or Showing
Why Can't I See Highlights on Instagram Internet connection issues - Slow or unstable internet or network connectivity issues can stop Instagram Highlights from loading or showing.
 How to Put Highlights on Instagram Without Story
How to Add Highlights in Instagram Without Story If you are looking for a direct way to add highlights without adding to the Story, there aren't any.
How to Put Highlights on Instagram Without Story
How to Add Highlights in Instagram Without Story If you are looking for a direct way to add highlights without adding to the Story, there aren't any.
 3 Ways to Enable or Disable Sync Settings in Windows
Method 1: Turn Sync Settings On or Off Using the Settings App The Settings app gives you several options for managing your account preferences, including the ability to enable or
3 Ways to Enable or Disable Sync Settings in Windows
Method 1: Turn Sync Settings On or Off Using the Settings App The Settings app gives you several options for managing your account preferences, including the ability to enable or
 4 Ways to Enable or Disable Num Lock at Windows Startup
Method 1: Disable Fast Startup Step 1: Click the search icon on the taskbar, type control panel, and press Enter.
4 Ways to Enable or Disable Num Lock at Windows Startup
Method 1: Disable Fast Startup Step 1: Click the search icon on the taskbar, type control panel, and press Enter.
 How to Disable Web Search in Windows 11 Start Menu
Use Registry Editor To disable web search in the Windows 11 Start Menu, follow these steps: Step 1: Open the Registry Editor and navigate to the following key: Computer\HKEY_CURRENT_USER\Software\Policies\Microsoft\Windows Step
How to Disable Web Search in Windows 11 Start Menu
Use Registry Editor To disable web search in the Windows 11 Start Menu, follow these steps: Step 1: Open the Registry Editor and navigate to the following key: Computer\HKEY_CURRENT_USER\Software\Policies\Microsoft\Windows Step
 How to Enable or Disable Smart App Control in Windows 11
Have you ever downloaded an app that was more trouble than it's worth?
How to Enable or Disable Smart App Control in Windows 11
Have you ever downloaded an app that was more trouble than it's worth?
The article above may contain affiliate links which help support Guiding Tech. The content remains unbiased and authentic and will never affect our editorial integrity.

Sadly, Microsoft Windows team spends most of its time doing stupid stuff like this rather than really making Windows a great OS. Don’t even get me started on the browser Edge which has also become a bloated mess.
It didn’t work for me. I’m on version 22H2 22621.819. My search app only shows 3 top apps and a clean search bar. In settings search highlights is on. In the mentioned regedit there is no “search” reg. After enable search highlights in group policies, the “show search highlights” in settings was greyed out. So, I’m a bit confused. I think this actually happened after an update.