Virtualization-Based Security (VBS) walls off a protected region of memory, which stops unsigned drivers and malicious code from loading even if they slip past your antivirus. It’s useful, but it comes at a cost: VBS and the related Memory Integrity feature can drop gaming and app performance by anywhere from 5% to 15%, although the impact varies widely depending on hardware, applications, and Windows version. If you want to learn how to disable VBS Windows 11, you have several options.
Part 1 – Check Whether VBS Is Running
Before changing anything, you need to check whether VBS is active.
Step 1. In the search bar, type “System Information” and open the top result.
Step 2. On the “System Summary” page (which should be open by default), scroll down to the “Virtualization-based security” row. If it reads “Running,” VBS is on. If it reads “Not enabled,” you’re already done.
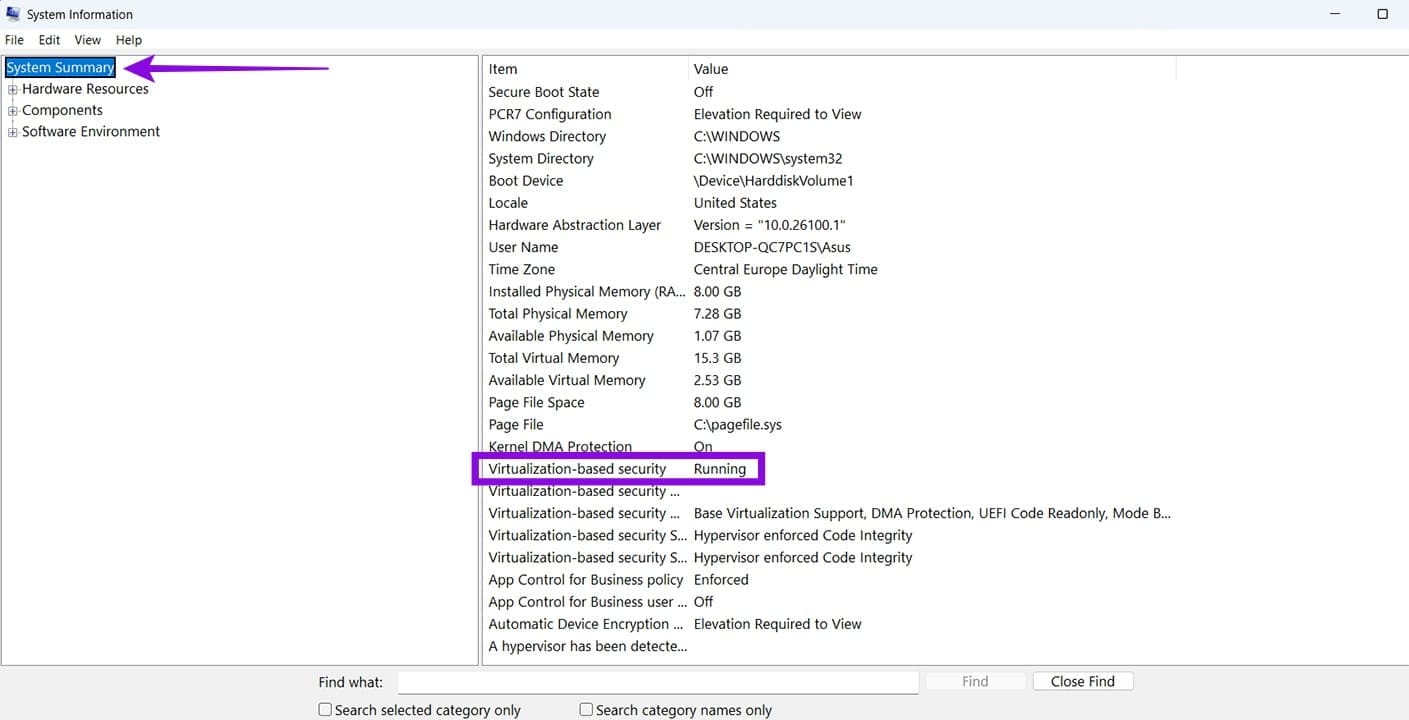
You can return here after each method below to confirm the change took effect, but only after a system restart.
Option 1 – How to Disable VBS Windows 11 via Windows Security
VBS is usually held on by the Memory Integrity setting, and turning that off disables it.
Step 1. Search for “Core Isolation,” and open the top result. This jumps straight to the relevant page in Windows Security.
Step 2. Find the “Memory Integrity” toggle and switch it to “Off.”
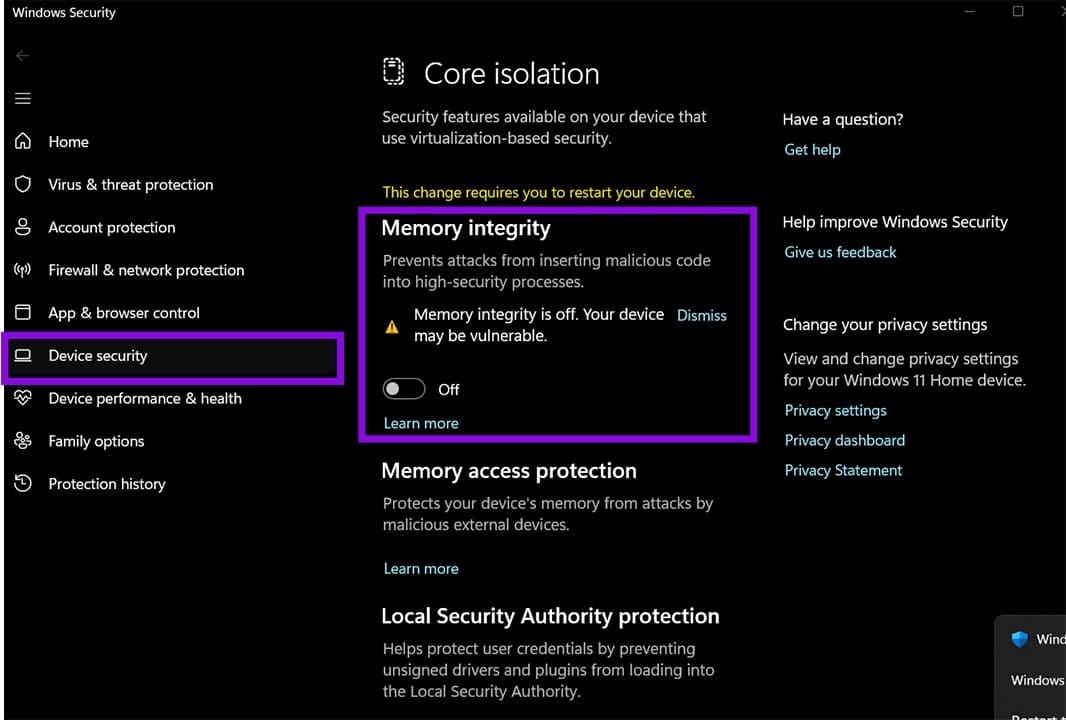
Step 3. Restart your PC.
Option 2 – Disabling VBS on Windows 11 via the Registry Editor
As with any registry change, create a backup first.
Step 1. Press “Win + R,” insert “regedit,” and click “Enter.” Accept the UAC prompt.
Step 2. Navigate to: HKEY_LOCAL_MACHINE\System\CurrentControlSet\Control\DeviceGuard. You can paste this into the address bar at the top of the Registry Editor (you need to drag over the entire previous address to replace it).
Step 3. In the right-hand pane, open the value named “EnableVirtualizationBasedSecurity.” If it doesn’t exist, right-click on the pane, then select “New” and choose “DWORD (32-bit) Value” and name it exactly that.
Step 4. Set the value to “0” and click “OK.”
Step 5. Close the Registry Editor and restart your PC.
Option 3 – Disable VBS With the Group Policy Editor
Note that the Group Policy Editor isn’t available on Windows 11 Home (unless you use a very obscure workaround that might not function).
Step 1. Press “Win + R,” type “gpedit.msc,” and click “OK.”
Step 2. Navigate to: Computer Configuration > Administrative Templates > System > Device Guard.
Step 3. Double-click the “Turn On Virtualization Based Security” policy.
Step 4. Select “Disabled,” click “Apply,” then select “OK.”
Step 5. Close the editor and restart your PC.
Option 4 – Disable VBS Using Command Prompt
This is another method you can use to disable VBS.
Step 1. Right-click on the Start icon and select “Terminal (Admin).
Step 2. Swap to the Command Prompt from the top-left toolbar or hit “Ctrl + Shift + 2.”
Step 3. Paste the following command and tap “Enter”: “bcdedit /set hypervisorlaunchtype off”.

Step 4. Close the Command Prompt and restart the PC.
To reverse this later, you can run the same command with “auto” in place of “off.”
Note that using this command also switches off other features that depend on it, such as the Windows Subsystem for Linux and Windows Sandbox.
Option 5 – Turn Off Windows Virtualization Features
Some virtualization-related Windows features can keep VBS running in the background.
Step 1. Go to Search, type “Turn Windows features on or off,” and open it.
Step 2. Uncheck the following, if present:
- Virtual Machine Platform
- Windows Hypervisor Platform
- Microsoft Defender Application Guard
Step 3. Click “OK,” then restart your PC when prompted.

Option 6 – Disable Virtualization in the BIOS or UEFI
You can disable CPU virtualization in your firmware. However, this is the most varied method since BIOS settings will differ depending on the manufacturer.
Step 1. Restart your PC and press the BIOS key as it boots. This is usually “Del,” “F2,” or “F10.”
Step 2. Switch to “Advanced Mode” if your firmware offers one, then open the “Advanced” or “CPU Configuration” section.
Step 3. Disable the virtualization setting. On AMD systems, this is “SVM Mode”; on Intel systems, it’s usually “Intel VT-x” or “Intel Virtualization Technology.”
Step 4. Press “F10” to save and exit, then let Windows boot normally.
Was this helpful?
Last updated on 27 June, 2026
Read Next
 6 Ways to Disable Virtualization-Based Security (VBS) in Windows
Method 1: Disable VBS/HVCI in Windows Using Core Isolation Step 1: Click on the Start icon, and search and open Core Isolation.
6 Ways to Disable Virtualization-Based Security (VBS) in Windows
Method 1: Disable VBS/HVCI in Windows Using Core Isolation Step 1: Click on the Start icon, and search and open Core Isolation.
 How to Disable Task View in Windows 10 Completely
The Task View feature in Windows 10 is a boon for power users.
How to Disable Task View in Windows 10 Completely
The Task View feature in Windows 10 is a boon for power users.
 5 Ways to Completely Disable Windows Defender
Method 1: Using Command Prompt Step 1: Press the Windows key on your keyboard, type Command Prompt, and click Run as administrator.
5 Ways to Completely Disable Windows Defender
Method 1: Using Command Prompt Step 1: Press the Windows key on your keyboard, type Command Prompt, and click Run as administrator.
 How to Completely Disable Google Discover on Android
https://youtu.be/rT43IdQQXWs Disable Google Discover From the Home Screen on Android One of the quickest ways to disable Google Discover on your Android phone is to get rid of the built-in
How to Completely Disable Google Discover on Android
https://youtu.be/rT43IdQQXWs Disable Google Discover From the Home Screen on Android One of the quickest ways to disable Google Discover on your Android phone is to get rid of the built-in
 A Guide to Completely Uninstall OneDrive From Windows
Things to Know Before Uninstalling OneDrive OneDrive is often used for file synchronization across devices.
A Guide to Completely Uninstall OneDrive From Windows
Things to Know Before Uninstalling OneDrive OneDrive is often used for file synchronization across devices.
 How to Completely Uninstall McAfee From Windows 11
Prerequisite: Stop All McAfee Services Running in the Background Before you start, stop all McAfee services running in the background.
How to Completely Uninstall McAfee From Windows 11
Prerequisite: Stop All McAfee Services Running in the Background Before you start, stop all McAfee services running in the background.
 How to Completely Uninstall Existing GPU Drivers the Right Way
How to Uninstall GPU Drivers Using DDU Step 1: Download the DDU installer from the Guru3D dedicated webpage.
How to Completely Uninstall Existing GPU Drivers the Right Way
How to Uninstall GPU Drivers Using DDU Step 1: Download the DDU installer from the Guru3D dedicated webpage.
 How to Completely Uninstall Discord From Windows, Mac, Android, and iOS
https://youtu.be/Zvxq_KArqpY How to Completely Uninstall Discord From Windows Note: We are running on a Windows 11 machine.
How to Completely Uninstall Discord From Windows, Mac, Android, and iOS
https://youtu.be/Zvxq_KArqpY How to Completely Uninstall Discord From Windows Note: We are running on a Windows 11 machine.
The article above may contain affiliate links which help support Guiding Tech. The content remains unbiased and authentic and will never affect our editorial integrity.