I don’t like iTunes. It’s a bloated mess, takes ages to launch and everything feels sluggish. Unfortunately, Apple needs me to keep using it even for something as trivial as a file transfer. And, it’s my job to keep iTunes running on Windows 10 in top shape.
But, it’s not easy to do that.

Just about anything can cause iTunes to stop functioning normally. Windows updates, corrupted music libraries, outdated network drivers, etc. Well, the list goes on and on.
If iTunes doesn’t launch on your PC all of a sudden or if it starts crashing after some time, don’t start freaking out just yet. There are a number of fixes that can get it up and running normally.
Some of the fixes are easy to perform but others do require a bit of work. So, fasten your seatbelts and let’s get started.
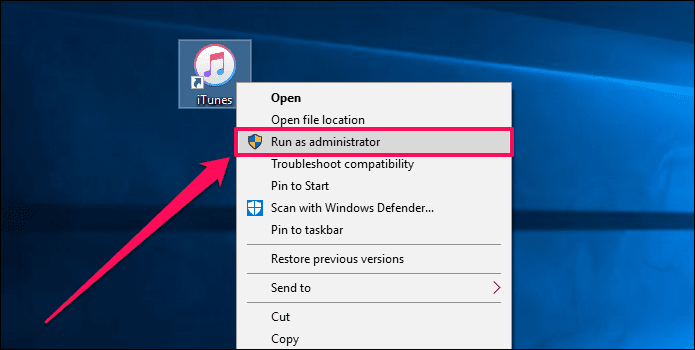
1. RUN AS ADMINISTRATOR
Various reasons – operating system updates, for example – may change the default permissions of the numerous files and folders that iTunes uses. This, in turn, restricts iTunes from gaining access to certain areas of your PC and stops it from launching.
However, providing iTunes administrative privileges should allow it to bypass such restrictions and open up as usual.
Step 1: Right-click the iTunes shortcut and select Run as Administrator.
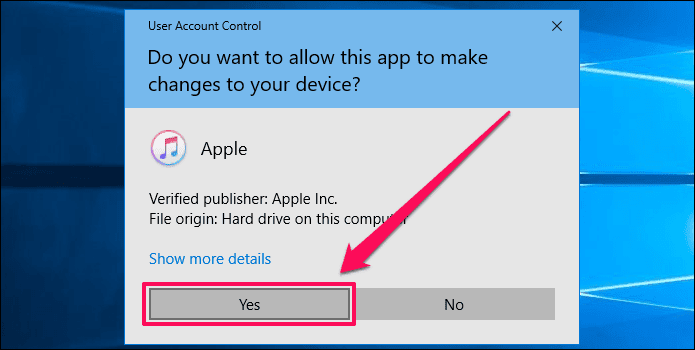
Step 2: On the User Account Control dialog box, click Yes.
iTunes should launch properly now and doing this once should fix the issue. If the application doesn’t open normally on any subsequent attempt, you must keep on launching it with elevated rights.
To prevent the process from being such a drag, you can configure the iTunes shortcut to always launch with administrative privileges instead. Let’s see how you can do that.
Step 3: Right-click the shortcut and select Properties on the context menu.

Step 4: Under the Compatibility tab, check the box next to Run this Program as an Administrator. Next, click the Apply and OK buttons to save the changes.
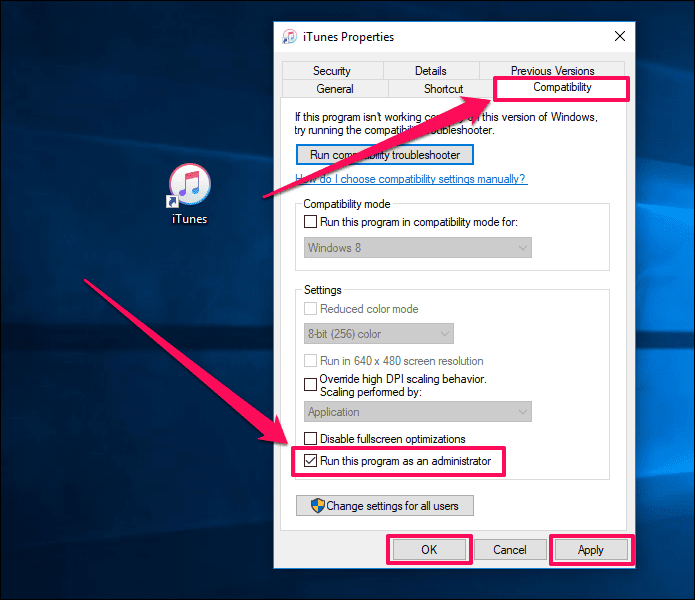
Great! You can now launch iTunes without having to right-click and select the Run as Administrator option each time.
NOTE:
2. FORCE-QUIT ITUNES
Sometimes, iTunes tends to freeze at startup, which is pretty normal when you try to immediately relaunch the application after shutting it down. Usually, a computer restart would fix it. But rather than wasting valuable time, however, you can instead remove the frozen iTunes process directly via the Task Manager.
Step 1: Right-click the task bar and select Task Manager. If your entire PC is frozen, press Ctrl+Alt+Del to forcibly launch the Task Manager.
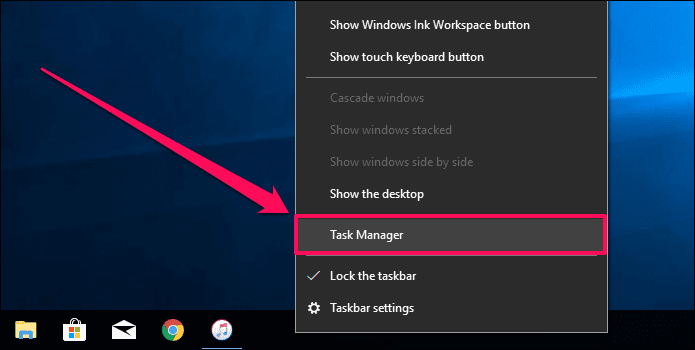
Step 2: Under the Processes tab, select iTunes and click End Task.
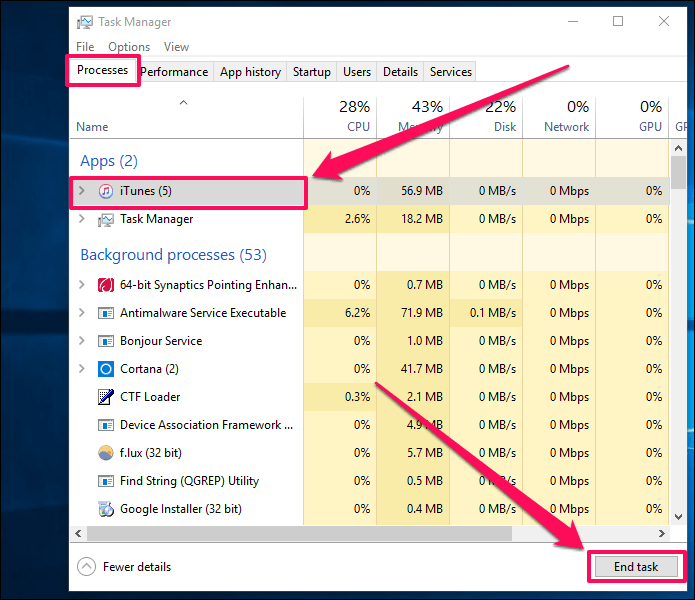
That should take care of the frozen process. You should now be able to open iTunes normally.
3. UPDATE ITUNES
Windows 10 receives frequent automatic updates on a regular basis and this may cause enough changes so as to prevent iTunes from running properly. However, updating it to the latest version of iTunes may fix such issues. Let’s get the application updated ASAP.
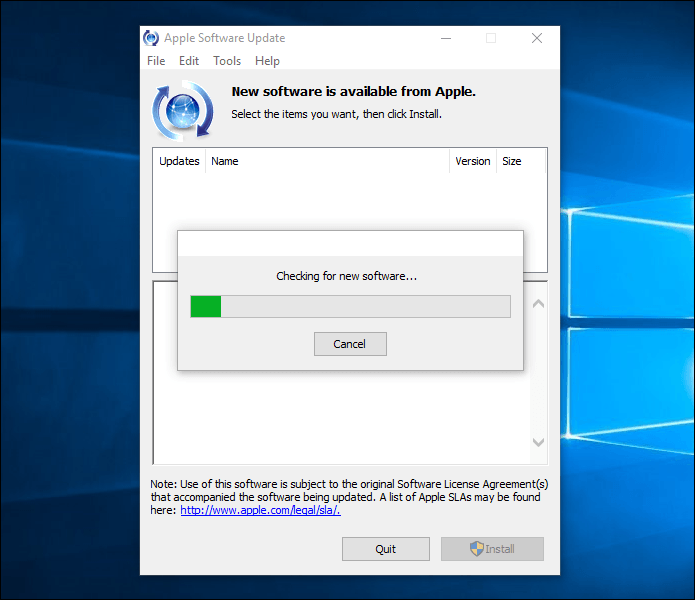
Launch Apple Software Update. It’s an updater bundled in with iTunes and you can access it from the Start menu. Once you’ve launched the updater, wait for a moment while it checks for available updates.
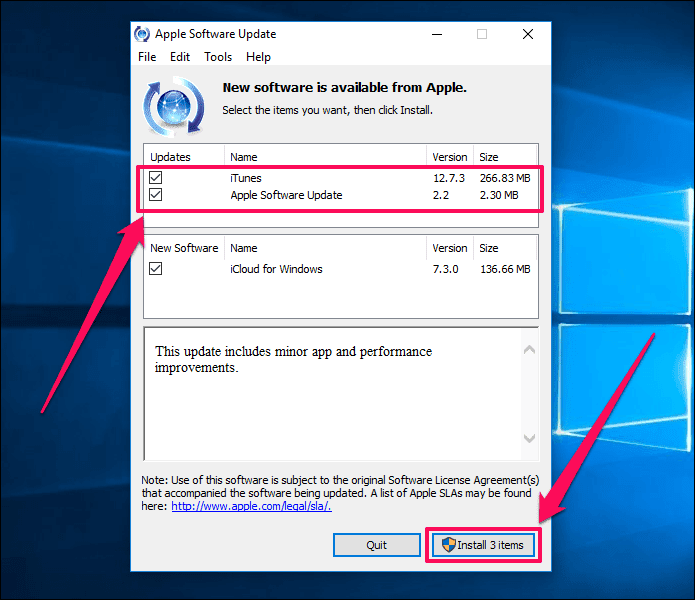
If there’s an iTunes update, select it and click Install to apply the update. Also, make it a point to select any updates for related Apple software as well.
After the update process, attempt to open iTunes. If the issue was caused by a Windows 10 update in the first place, iTunes should function normally now. Yay!
ALSO READ: How to Stop iTunes, iPhoto and Image Capture from Automatically Launching When Connecting iPhone
4. USE COMPATIBILITY MODE
Compatibility Mode is another quick fix that can help you keep iTunes running just in case you don’t have a new application update to offset any issue caused by a recent Windows 10 update.
Get to the Properties for your iTunes shortcut. Under the Compatibility tab, check the box next to Run This Program in Compatibility Mode for and select Windows 8. Click Apply and then click OK to save the changes.
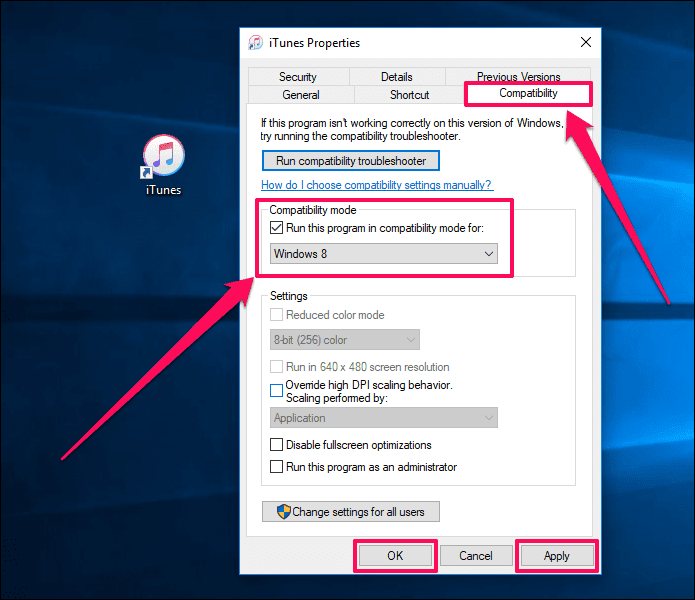
If iTunes still doesn’t launch, select an even older version of Windows such as Windows 7 or Windows Vista and try again. Also, attempt to run it with administrative privileges if that fails.
IMPORTANT:
5. LAUNCH IN SAFE MODE
If you have any third-party visual plugins installed on iTunes, there’s a chance for the application to hang, usually at launch. To determine if this is the case, you must attempt to run iTunes in Safe Mode.
NOTE: Even if you don’t have any plug-ins installed, launching iTunes in Safe Mode may fix any lingering issues with configurations and preferences caused by sudden application exits or crashes
Step 1: Press Ctrl+Shift and then attempt to launch iTunes. On the pop-up box, click Continue to accept that you want to open the application in Safe Mode.
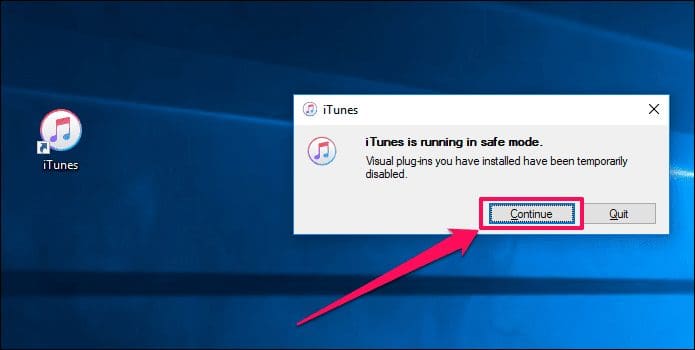
If iTunes loads properly, the issue might be caused by an outdated plugin. Now, let’s attempt to isolate the problematic plugin. Before proceeding, exit iTunes.
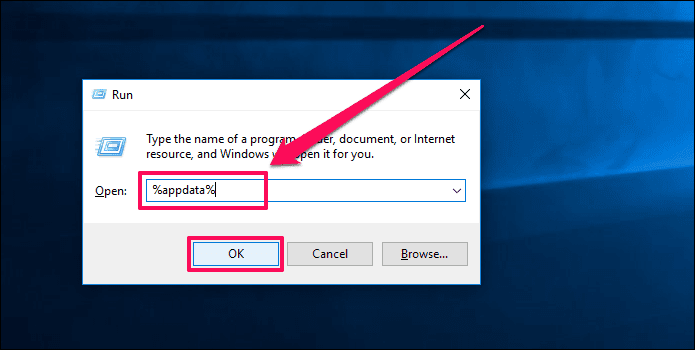
Step 2: Go to the storage location of the iTunes plugins. To do that, press Windows+R to launch Run. Now, enter %appdata% into the Run box and click OK.
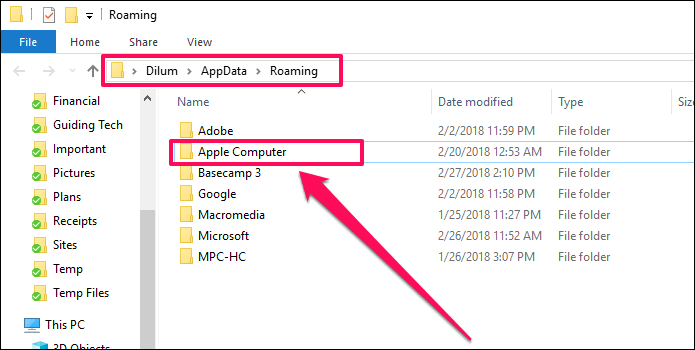
Step 3: You should be inside a folder labeled Roaming. Now, open these folders in the following order — Apple Computer > iTunes > iTunes Plug-ins.
Step 4: Copy the plugin files within the folder to another location – to the desktop, for example.
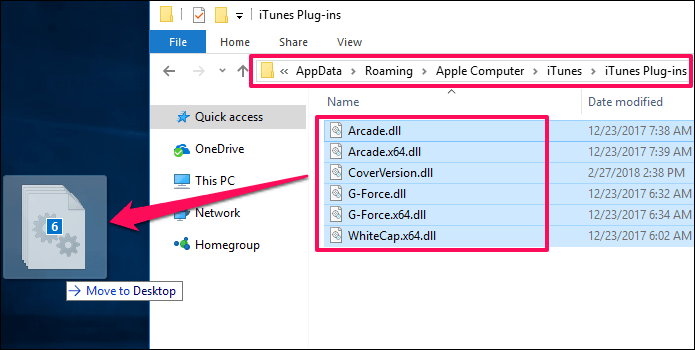
Now, it’s just a matter of copying and pasting each file one by one back to the iTunes Plug-ins folder and then attempting to launch iTunes to identify the problematic plugin.
Now, it’s just a matter of copying and pasting each file one by one back to the iTunes Plug-ins folder.
Once you’ve singled it out, you can either contact the publisher of the plugin for an updated version or permanently remove it from the iTunes Plug-ins folder. For now, proceed with the working plugins to open the application normally.
ALSO READ: Top 3 Issues with Windows 10 and Their Easiest Solutions
6. REPAIR ITUNES
If running iTunes as an administrator, launching it in Safe Mode or applying the latest updates didn’t fix things for you, then it might be time to repair your iTunes installation. There’s nothing complex about the whole thing and you should be done in a few minutes.
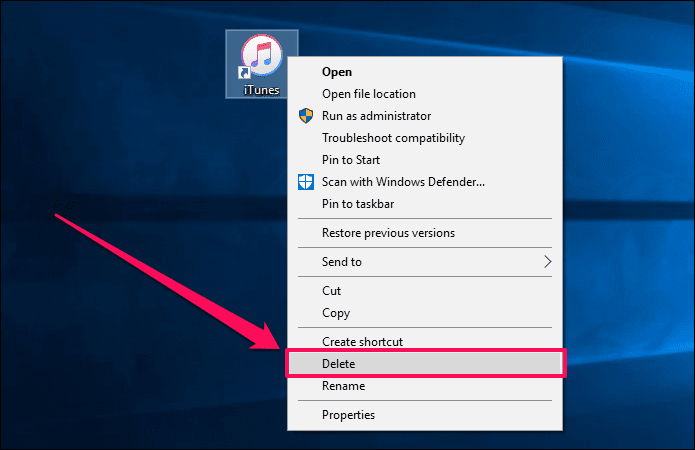
Step 1: Manually delete any shortcuts to iTunes on the desktop or task bar.
Step 2: Open the Start menu, search for Apps & Features, and press Enter. From the list of app, select iTunes and click Modify.

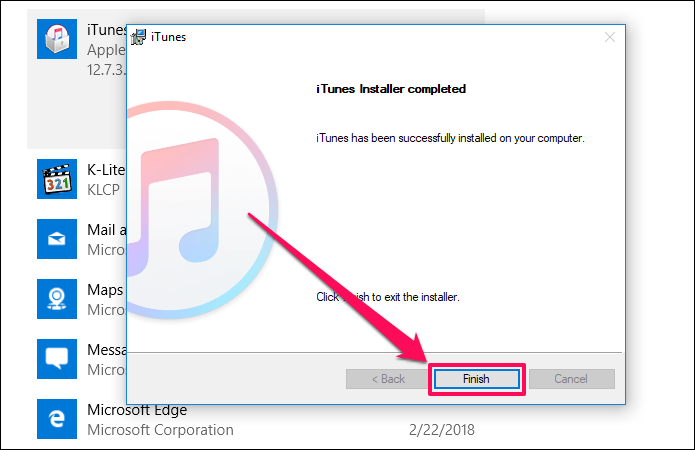
Step 4: On the iTunes installer, click Repair and then click Next. You really shouldn’t have to do anything else beyond this point.

Step 5: Click Finish once the iTunes Installer finishes the repair procedure.
That was easy, right? Hopefully, iTunes should work normally now. If not, let’s continue on with the other fixes.
7. RESTORE OLDER ITUNES LIBRARY
Sometimes, certain corrupted files within your iTunes music library can stop it from working properly. Let’s see how we can find out if that’s the case.
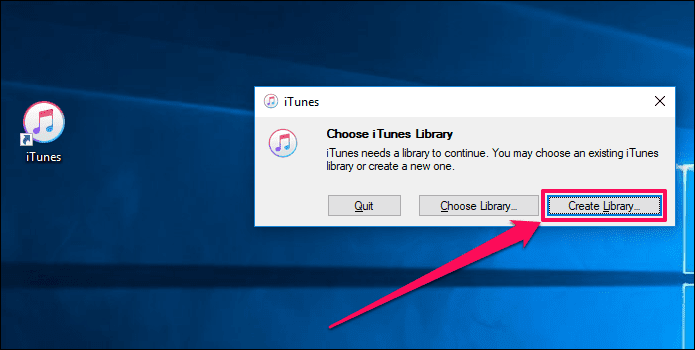
Step 1: Attempt to open iTunes while holding down the Shift key. On the pop-up window, click Create Library.
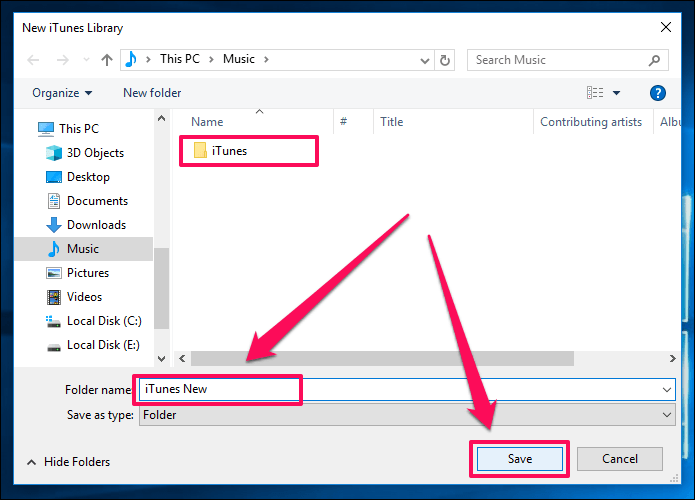
Step 2: Your default library resides within a folder labeled iTunes. To create a new library, enter a filename – iTunes New, for example – and click Save.
If iTunes opens after creating the new library, you can safely ascertain that the issue occurs due to a corrupted library entry. To resolve this, we can either restore an older version of the library or manually re-add files to the new library. Let’s see how.
IMPORTANT:
Step 3: Open the original iTunes library folder and move the iTunes Library file to your desktop. Once you’ve done that, open the Previous iTunes Libraries folder.
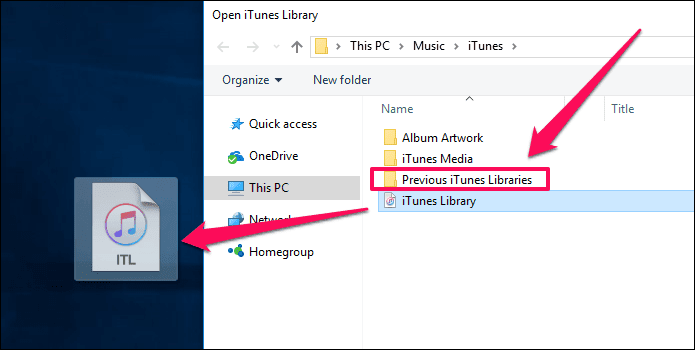
NOTE:
Step 4: This folder features older versions of the library that were backed up during previous iTunes updates. You can distinguish each file by the date tags at the end of the file names. Neat, right?
Now, copy the most recent version of the iTunes library to the iTunes folder – go one folder back – and rename it to iTunes Library.

Step 5: Configure iTunes to switch back to your default library. To do that, relaunch iTunes with the Shift key held down, click Choose Library, select the iTunes folder and then select the renamed iTunes Library file within.

Now, open iTunes. If everything works flawlessly, you can keep on using iTunes as usual. If it still doesn’t work, however, you can keep on restoring earlier versions of the iTunes library to find one that works.
As a last resort, choose to re-add files to a new library.
Step 6: Open iTunes while holding the Shift key down and create a new iTunes library. Or, you can use the Choose Library option to select the new library that you created in Steps 1 and 2.
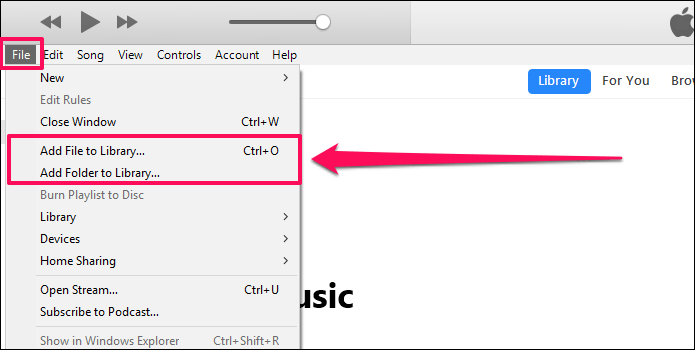
After launching iTunes, click File and then use the Add File to Library or Add Folder to Library options to add music from the various locations of your PC back to the library. Your task is to isolate the problematic music files, so make sure to not add everything all at once.
Your task is to isolate the problematic music files, so make sure to not add everything all at once.
Whenever you attempt to add any files or folders with issues, iTunes should crash or prompt you with an error. In that case, re-add your music to a newer library but without the problematic items.
NOTE: This can be quite a lengthy and arduous process but, if the issues are caused by incompatible or corrupt music files
8. CONFIGURE FIREWALL
The Windows 10 firewall may block iTunes from connecting to the Internet properly. Usually, this happens after a Windows or iTunes update. As a result, you’ll find the application having trouble communicating with the Internet and crashing as a result.
However, you can fix this issue by allowing iTunes to communicate on both private and public networks.
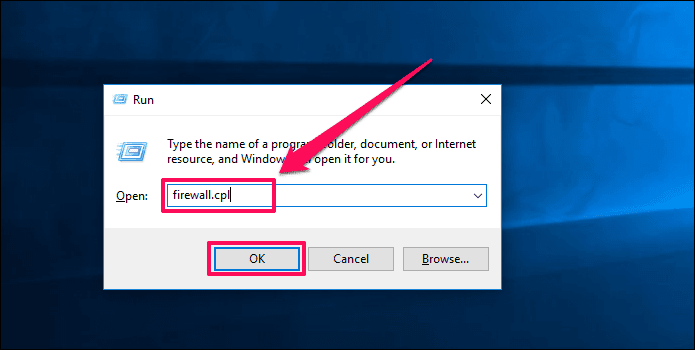
Step 1: Open the Run box, enter firewall.cpl, and click Run.
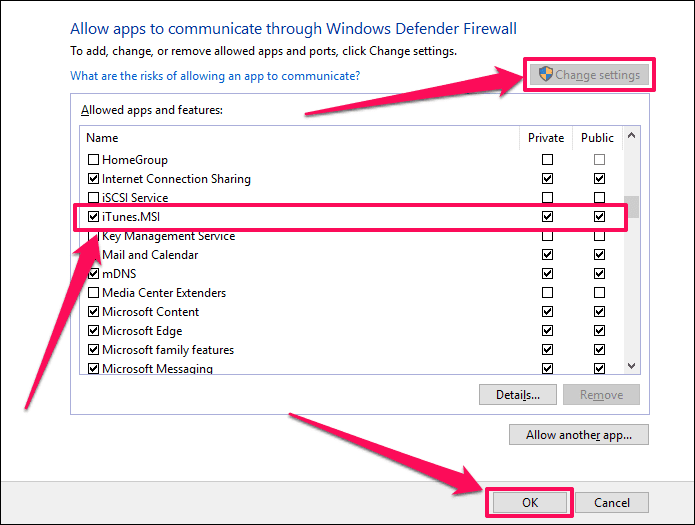
Step 2: Click the option labeled Allow an App or Feature Through Windows Firewall.

Step 3: Click the button labeled Change Settings to enable modifications to the firewall. Now, scroll down the list, and make sure that both the checkboxes – Private and Public – are enabled next to iTunes.
If you have networking issues, you’ll find one of these checkboxes disabled. Once done, click OK to save the changes.
Also, don’t be surprised to find the iTunes entry not listed within the firewall at all. If this is the case, do as follows:
Step 4: Click the Allow Another App button and manually find the iTunes executable file. By default, it resides within the C:/Program Files/iTunes directory.
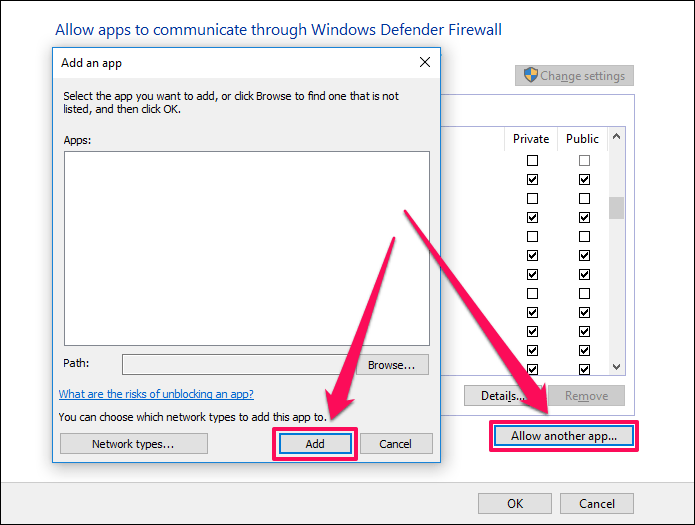
Step 5: Select the file – iTunes.exe – and click Add.

After adding, allow the application on both Private and Public networks and save the changes. iTunes should now connect to the Internet and work without any hiccups.
ALSO READ: How to Completely Disable Windows Defender in Windows 10
9. DISABLE INTERNET
Sometimes, outdated or corrupt network drivers can crash or stop iTunes from launching at all and you can isolate the issue simply by disabling your Internet.
If you are connected via Wi-Fi, simply disconnect from it, and if you’re on a wired connection, consider removing your Ethernet cable.
If iTunes launches properly without the Internet, it’s time to fix your network drivers. Before proceeding, reconnect to the Internet.
Step 1: Open the Device Manager. To do that, type Device Manager into the Start menu and press Enter.

Step 2: Expand Network Adapters. You should see a list of items listed underneath. Right-click an item and select Update Driver.
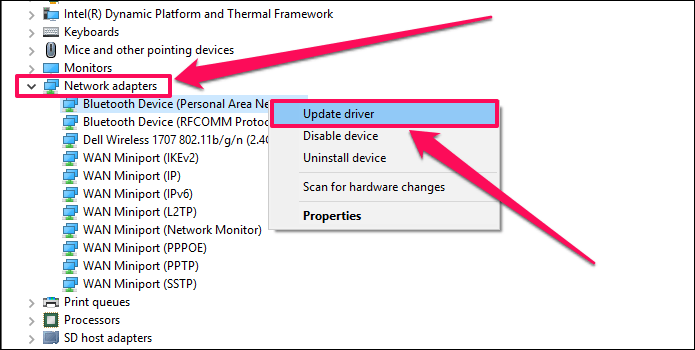
Step 3: On the pop-up box, click Search Automatically for Updated Drivers.

Repeat the process for each item listed under Network Adapters.
Windows 10 should download and install the appropriate drivers over the Internet. If that fails, you may have to manually download the drivers from your PC manufacturer’s website and select them via the Browse My Computer for Driver Software option instead.
10. REINSTALL ITUNES
Yeah, you tried everything but iTunes still won’t open. There might be something serious such as a corrupted file preventing the application from loading properly that a normal repair can’t rectify.
So, it’s finally time to do what you’ve been dreading all along. A complete reinstall. Don’t worry, it won’t take long.
NOTE: Removing iTunes does not delete your music library
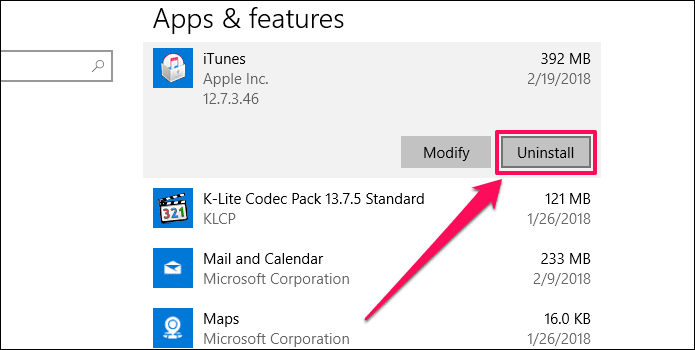
Step 1: Open Apps & Features, select iTunes and then click Uninstall to remove it.
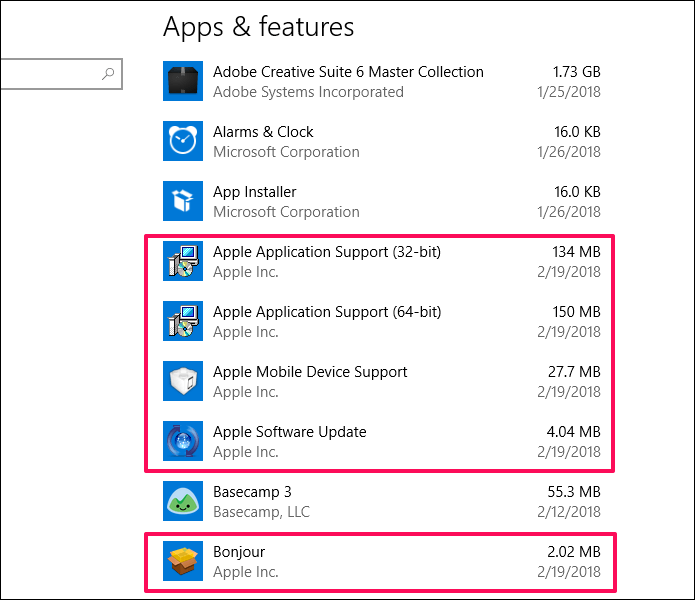
Step 2: Once iTunes is removed, continue uninstalling the iTunes-related programs in the following order:
- Apple Software Update
- Apple Mobile Device Support
- Bonjour
- Apple Application Support 32-bit
- Apple Application Support 64-bit
Once you’ve done that, it’s usually good practice to restart your PC before proceeding to the next step.
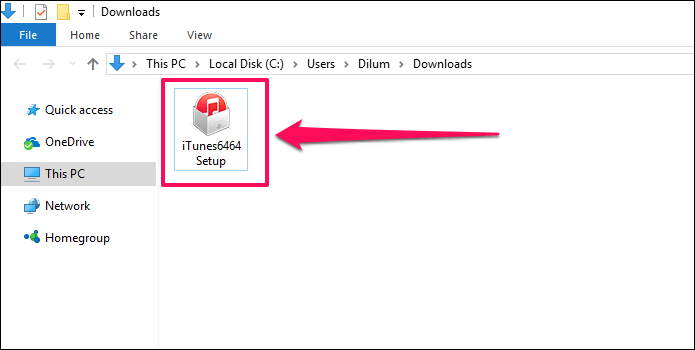
Step 3: Download the latest version of iTunes. Once you’ve done that, double-click the file and follow the onscreen prompts to reinstall iTunes.
NOTE: You can download iTunes from the Apple Downloads page
You reinstalled iTunes. Now, try launching it. It should open. If not, try running it as an administrator. No luck? Continue on to the next fix then.
11. INSTALL OLDER VERSION
We’ve gone through a number of fixes and the reason for iTunes to not work properly may lie in the incompatibilities between certain older hardware components and newer versions of iTunes. In fact, there are known incompatibilities with older video cards.
Since updating or reinstalling didn’t fix things, let’s do the opposite and downgrade iTunes to an earlier version.
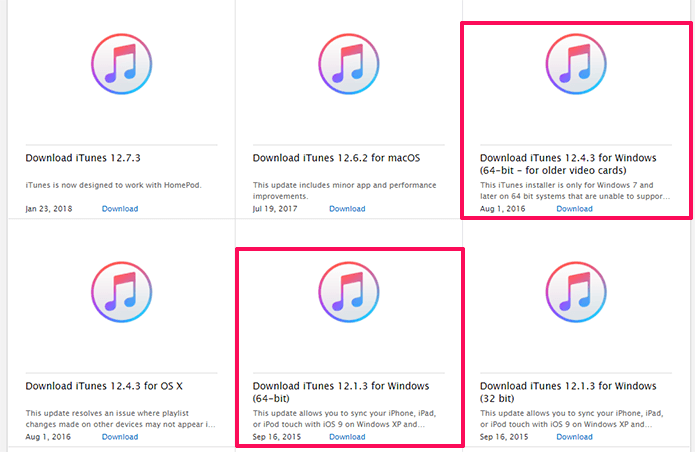
Completely remove iTunes from your computer (Follow the steps under Reinstall iTunes to learn how to do that). Once you’ve done that, download an earlier version of iTunes from Apple. You should now find a list of the most recent iterations listed on the iTunes Downloads page.
If you have video playback errors, you can also opt for a version listed with the For Older Video Cards tag.
If the older version of iTunes works normally on your PC upon installation, you may want to keep your hands off the automatic update prompts at launch. Also, you may have to forego any of the latest features available with the newer versions of iTunes. But, having the damn thing running at all is better than nothing, right?
DID THAT WORK?
Phew! That was a lot, wasn’t it? Hopefully, you didn’t have to come this far and fixed the issue straight off the bat. Running iTunes as an administrator resolves things for most users but working through any of the other fixes mentioned above should do the trick as well.

Since it doesn’t look as if there are any plans to remove iTunes from being a requirement anytime in the near future, expect to deal with these annoyances on a regular basis. C’mon, Apple! Either fix this mess or get rid of it already.
So, how did things go for? Know of any other fixes? Share with us in comments below.
Next up: Are you facing an famous iTunes installer error on Windows 10? Here’s a guide that will help you fix that.
Was this helpful?
Last updated on 07 February, 2022
Read Next
 3 Fixes for iTunes Not Syncing Music on Windows 11
Basic Fixes Check internet speed: Check if you have good internet speeds at your connected network.
3 Fixes for iTunes Not Syncing Music on Windows 11
Basic Fixes Check internet speed: Check if you have good internet speeds at your connected network.
 5 Best Ways to Update iTunes on Windows 10
On Windows 10, iTunes is that one program that never seems to change with the times.
5 Best Ways to Update iTunes on Windows 10
On Windows 10, iTunes is that one program that never seems to change with the times.
 Transfer Music From PC to iPhone (With or Without iTunes)
How to Transfer Music From iTunes to iPhone While Mac has moved on to Finder, iTunes is still the bridge between iPhone and PC.
Transfer Music From PC to iPhone (With or Without iTunes)
How to Transfer Music From iTunes to iPhone While Mac has moved on to Finder, iTunes is still the bridge between iPhone and PC.
 Top 7 Fixes for Outlook Notifications Not Working on Windows 10
How many times have you missed an important email when Outlook didn't send you a notification on Windows 10?
Top 7 Fixes for Outlook Notifications Not Working on Windows 10
How many times have you missed an important email when Outlook didn't send you a notification on Windows 10?
 7 Fixes for Animations Not Working in PowerPoint on Windows
Fix 1: Check Animation Order and Triggers Before you try anything else, it’s a good idea to check the set animation effects and triggers in your PowerPoint presentation.
7 Fixes for Animations Not Working in PowerPoint on Windows
Fix 1: Check Animation Order and Triggers Before you try anything else, it’s a good idea to check the set animation effects and triggers in your PowerPoint presentation.
 6 Fixes for Roblox Chat Not Working on Windows
Fix 1: Modify Roblox Privacy Settings to Unblock Messages A common reason why the chat option may not show up or work in Roblox is if you have previously turned
6 Fixes for Roblox Chat Not Working on Windows
Fix 1: Modify Roblox Privacy Settings to Unblock Messages A common reason why the chat option may not show up or work in Roblox is if you have previously turned
 5 Fixes for Roblox Installer Not Working on Windows
Fix 1: Try Launching Roblox From the AppData Folder The Roblox installation process on Windows can sometimes become stuck for various reasons, making it seem like the installer is not
5 Fixes for Roblox Installer Not Working on Windows
Fix 1: Try Launching Roblox From the AppData Folder The Roblox installation process on Windows can sometimes become stuck for various reasons, making it seem like the installer is not
The article above may contain affiliate links which help support Guiding Tech. The content remains unbiased and authentic and will never affect our editorial integrity.