Basic Fixes
- Restart PC: Restart your PC to fix temporary bugs and glitches.
- Run SFC scan: Run the SFC scan to detect, and fix any corrupted system files.
- Test your RAM: Enter the command mdsched.exe in the Run application, and choose Restart Now and Check for Problems.
- Check hard drive for errors: Open Command Prompt as an admin, and enter the command
chkdsk /f /r D:, and restart your PC when the command is executed.
Fix 1: Disable Overclocking
Although overclocking can improve your computer’s performance, it may also result in drawbacks, such as instability and overheating, which can eventually lead to errors.
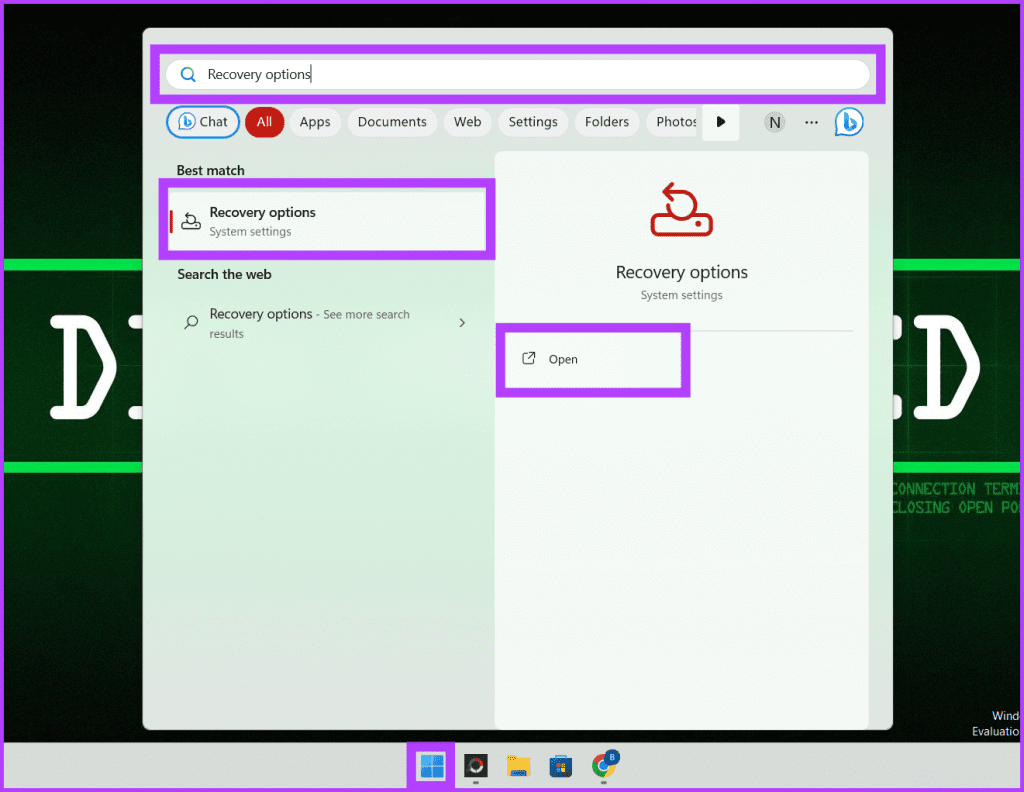
Step 1: Press Windows + S on your keyboard to launch the search menu. Now, type Recovery options and press Enter.
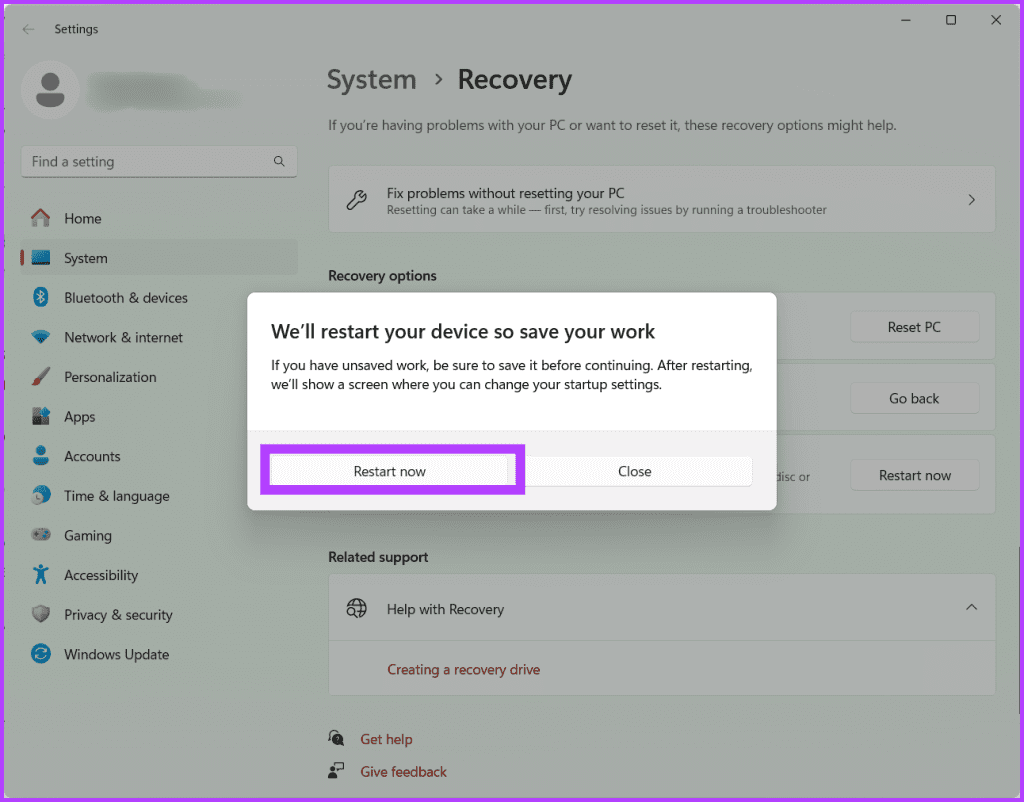
Step 2: Click on Restart now next to Advanced Startup.

Step 3: Confirm the selection by clicking Restart Now again.
Step 4: Your PC will now restart. Once done, choose Troubleshoot.
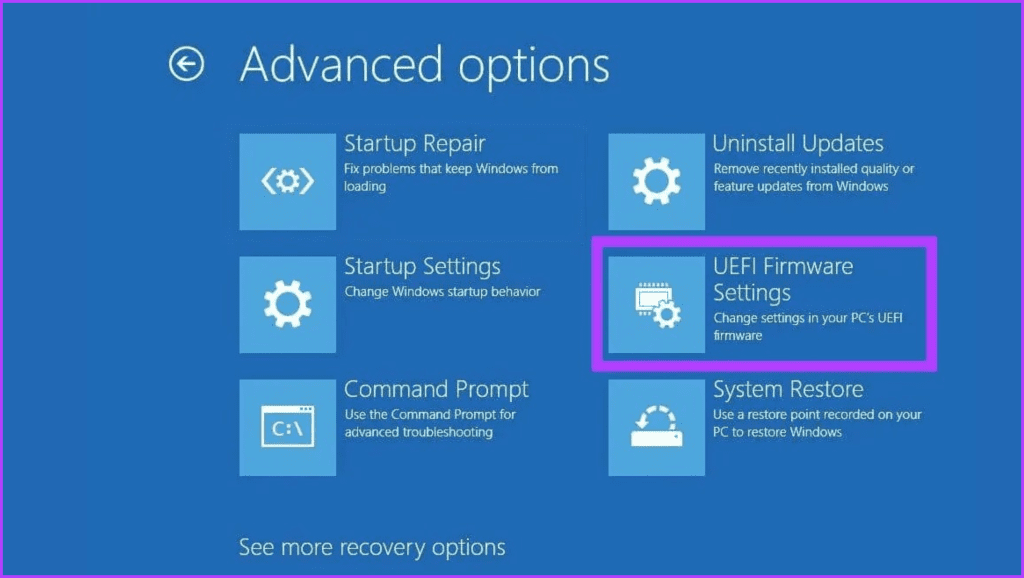
Step 5: Navigate to Advanced options.

Step 6: Select the UEFI Firmware Settings.
Step 7: Now, press the Restart button to reboot your computer and access the BIOS screen.
Note: Depending on your motherboard, the BIOS screen may look different on your PC.
- In the BIOS screen, press F9 to choose Setup Defaults and select Yes.
- Press the F10 button on your keyboard to exit the BIOS screen and save the changes.
Fix 2: Update Your Graphics Driver
The graphics driver is responsible for translating your software’s commands into visuals on your screen. However, if it’s outdated or buggy, it can lead to various issues.
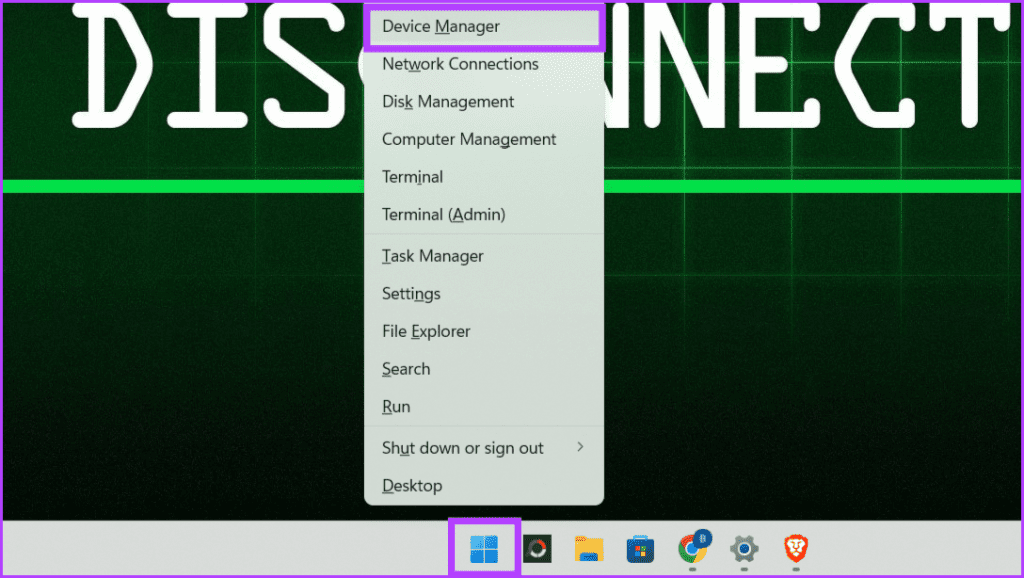
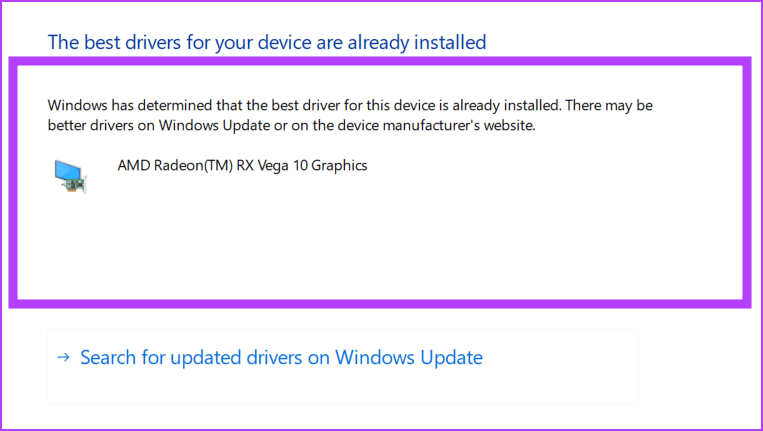
Step 1: Press the Windows key + X and choose Device Manager. Click yes to grant permission to the app to make changes to your device.
Step 2: Double-click on Display adapters. Select your graphic driver, right-click on it, and choose Update driver.

Step 3: Choose Search automatically for drivers from the options.

Step 4: Now Windows will show you driver details. If an update is available, install it and reboot your system.
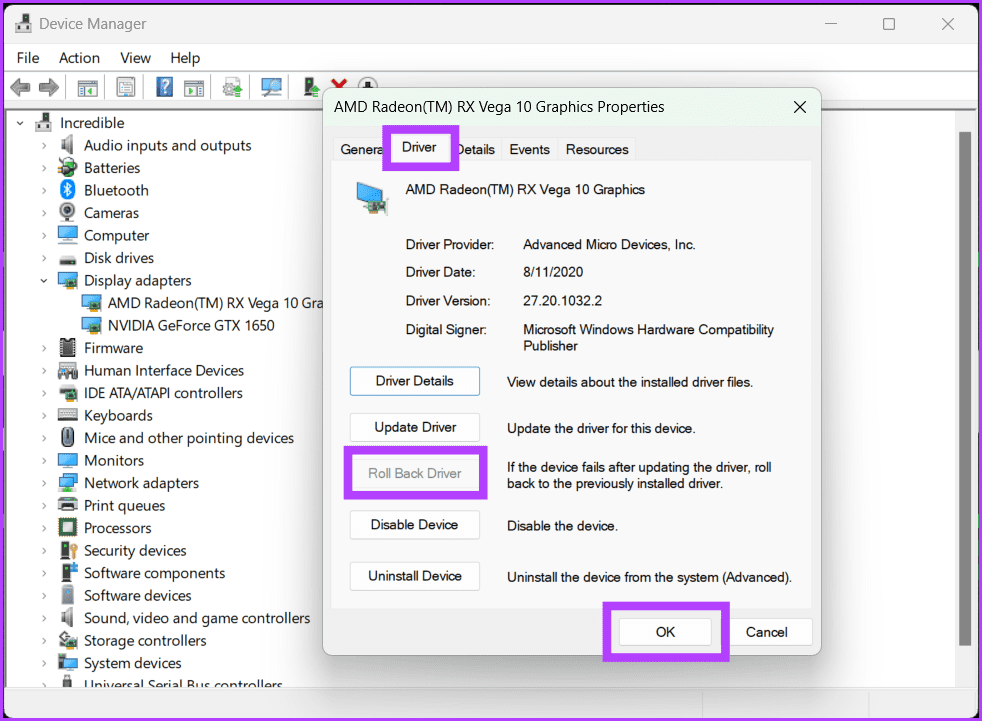
If you’ve recently faced this issue and updating the graphics driver was useless, try rolling back the driver to its stable old state. This will revert to a previously installed version of the display driver and potentially eliminate the issues because of incompatibility or bugs with the newly installed or updated graphics driver.
Step 1: Double-click on the display adapter.
Step 2: Head to the Driver tab at the top. Click on the Roll Back Driver button. Follow the on-screen instructions and press OK.
Fix 3: Run Applications in Compatibility Mode
When you see a video memory internal error, a program often has trouble getting along with the latest updates. So, by running the program in Compatibility Mode, you’re giving your computer a way to communicate with older software.
Step 1: Go to This PC, locate and right-click the program, and choose Properties.

Step 2: Ensure that in the Compatibility tab, the box next to Run this program in compatibility mode for is checked.

Step 3: Select the OS from the dropdown box and hit OK, followed by Apply.

Fix 4: Update BIOS
BIOS (Basic Input/Output System) is firmware stored on a chip on the motherboard of a computer. It is responsible for setting the hardware initialization and booting up the OS. In simple words, it is the brain of your computer, as it is responsible for handling essential hardware operations.
An outdated BIOS version may result in problems with your system’s compatibility., including the “Video Memory Management Internal” error. However, you can fix it by updating to the latest BIOS version on the manufacturer’s website for your motherboard and following the on-screen instructions.
Was this helpful?
Last updated on 08 August, 2024
Read Next
 How to Increase Internal Memory on Any Xiaomi Phone
In March this year, we had written a post on how to increase the internal storage on Android devices using adaptable storage.
How to Increase Internal Memory on Any Xiaomi Phone
In March this year, we had written a post on how to increase the internal storage on Android devices using adaptable storage.
 3 Ways to Fix ‘Not Recognized as an Internal or External Command’ Error in Windows
Basic Fixes Run CMD in admin mode: Some commands require an elevated Command Prompt window to run properly.
3 Ways to Fix ‘Not Recognized as an Internal or External Command’ Error in Windows
Basic Fixes Run CMD in admin mode: Some commands require an elevated Command Prompt window to run properly.
 5 Fixes for Microsoft Outlook Out of Memory or System Resources Error on Windows
Fix 1: Run the Inbox Repair Tool Damaged or corrupted PST or OST files can cause Outlook to run out of memory on your Windows computer.
5 Fixes for Microsoft Outlook Out of Memory or System Resources Error on Windows
Fix 1: Run the Inbox Repair Tool Damaged or corrupted PST or OST files can cause Outlook to run out of memory on your Windows computer.
 4 Ways to Increase Dedicated Video Memory (VRAM) in Windows 10/11
Method 1: Upgrade to a Dedicated GPU The best way to increase the dedicated Video RAM (VRAM) on your Windows is by upgrading the Graphics card in your PC.
4 Ways to Increase Dedicated Video Memory (VRAM) in Windows 10/11
Method 1: Upgrade to a Dedicated GPU The best way to increase the dedicated Video RAM (VRAM) on your Windows is by upgrading the Graphics card in your PC.
 5 Ways to Fix “Your Computer Is Low on Memory” Error on Windows 10 and Windows 11
Try Basic Fixes Close unwanted apps and programs: Start by closing any unwanted apps and programs on your computer, especially the ones consuming a major chunk of your PC’s memory.
5 Ways to Fix “Your Computer Is Low on Memory” Error on Windows 10 and Windows 11
Try Basic Fixes Close unwanted apps and programs: Start by closing any unwanted apps and programs on your computer, especially the ones consuming a major chunk of your PC’s memory.
 4 Ways to Fix DirectX ‘Could Not Allocate Sufficient Memory’ Error on Windows 11
Common Fixes Launch the Windows Memory Diagnostic tool: Press the Windows key, search Windows Memory Diagnostic tool, and click to open it.
4 Ways to Fix DirectX ‘Could Not Allocate Sufficient Memory’ Error on Windows 11
Common Fixes Launch the Windows Memory Diagnostic tool: Press the Windows key, search Windows Memory Diagnostic tool, and click to open it.
 9 Ways to Fix Memory Integrity Is Off Error on Windows 11/10
Fix 1: Review Incompatible Drivers Step 1: Press the Windows key, type Windows Security, and hit Enter.
9 Ways to Fix Memory Integrity Is Off Error on Windows 11/10
Fix 1: Review Incompatible Drivers Step 1: Press the Windows key, type Windows Security, and hit Enter.
 6 Ways to Fix Google Chrome Error Code: Out of Memory on Windows
Basic Fixes Restart PC: Restart your PC to fix temporary bugs and glitches.
6 Ways to Fix Google Chrome Error Code: Out of Memory on Windows
Basic Fixes Restart PC: Restart your PC to fix temporary bugs and glitches.
The article above may contain affiliate links which help support Guiding Tech. The content remains unbiased and authentic and will never affect our editorial integrity.

