Basic Fixes
- Check junk mail: Sometimes, Gmail, iCloud, or Outlook algorithms can be aggressive and send emails directly to the Junk box. You should regularly check the Junk box in the Mail app.
- Check server status: Visit the official Apple System Status page and see if the Mail app servers are working fine.
- Check Google account and OneDrive storage: Depending on your email client, check the drive storage status to rest assured about receiving emails.
- Update macOS: Open Settings > General > Software Update and see if an update is available.
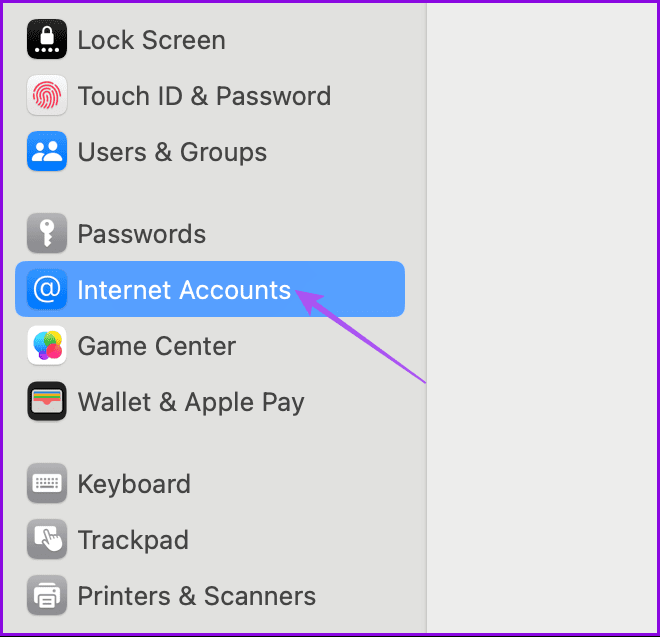
Fix 1: Add Email Account Again
Try removing and re-adding your email account in the Mail app. This will download your chats again and sync them in the Mail app.
Go to Settings > Internet Accounts > select your email account > remove and add it again.
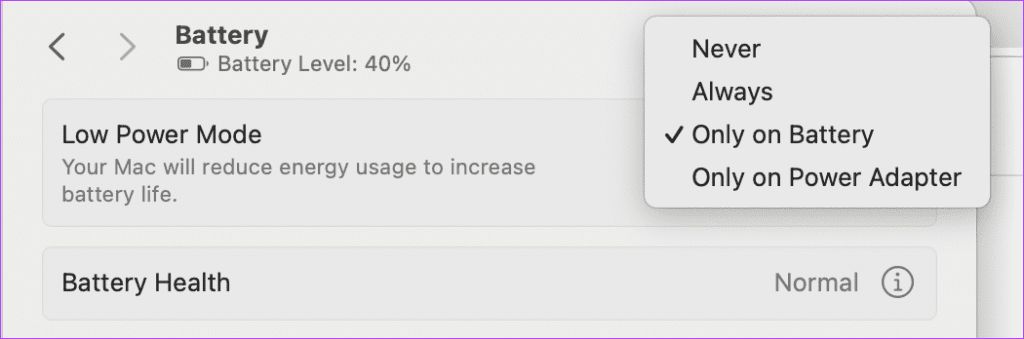
Fix 2: Disable Low Power Mode
Low Power Mode on Mac conserves battery life by limiting background app functions, including receiving email notifications. So, try disabling Low Power Mode if it is absolutely necessary.
Open Settings > Battery > disable Low Power Mode.
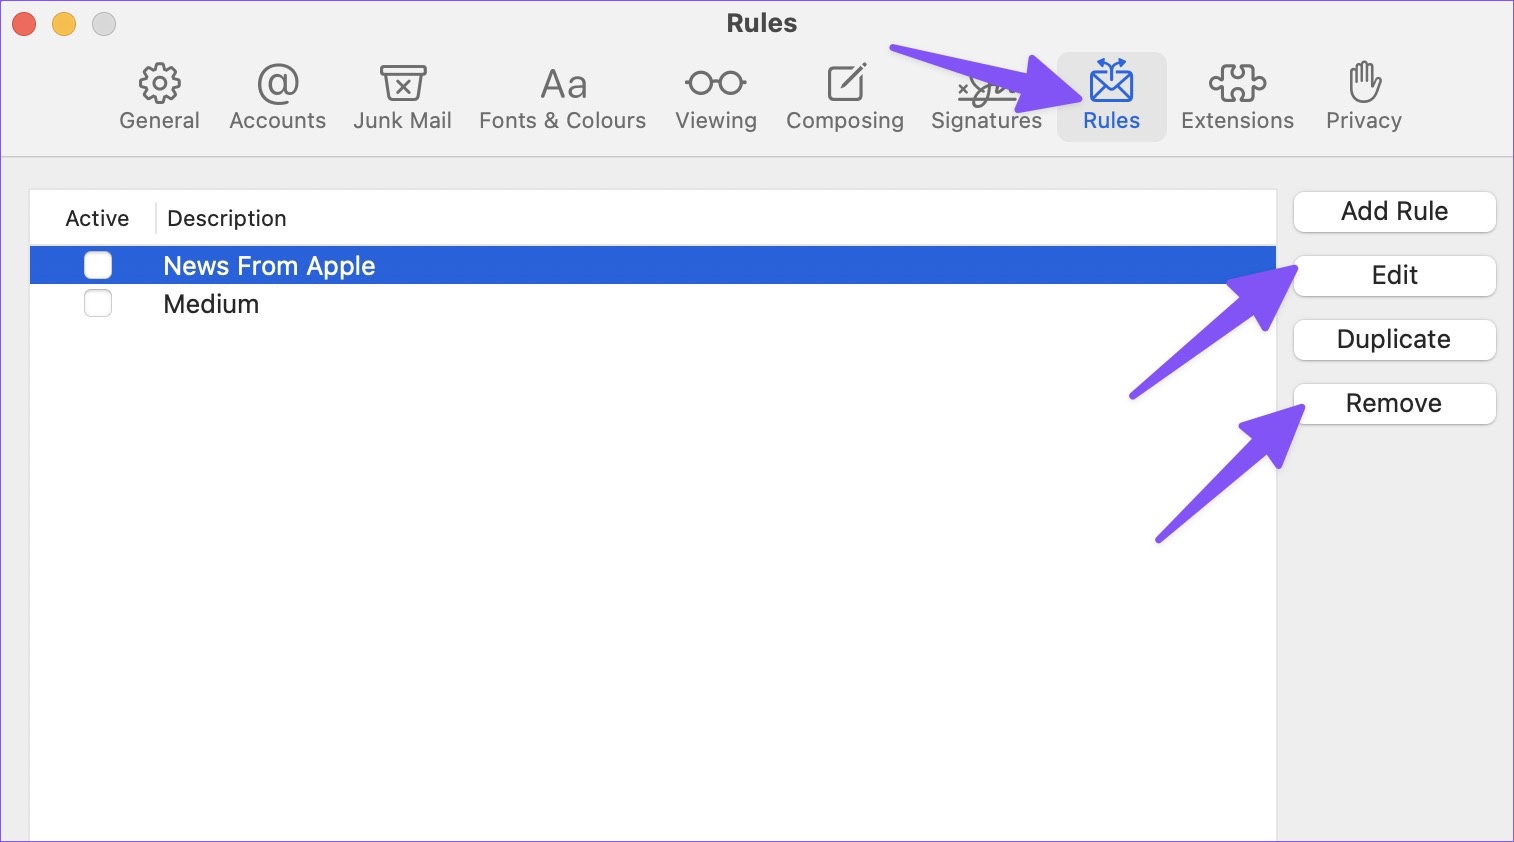
Fix 3: Check Mail Rules
Some marketing companies might spam your inbox with too many emails. So, it’s natural to create email rules to avoid any promotional emails. Unfortunately, you might also miss relevant emails in the process. To fix that, revisit the Rules section and remove unnecessary ones.
Step 1: Open the Mail app on your Mac > click on Mail at the top-left corner > select Settings.
Step 2: Click on the Rules tab. Select a rule and click on the Edit or Remove button to make changes.
Also Read: How to attach photos to the Mail app
Fix 4: Disable Focus Mode on Mac
Focus is Apple’s version of DND (Do Not Disturb) on Mac. When enabled, it suspends all app notifications and calls on Mac. You have two options: disable Focus or add Mail as an exception.
Step 1: Select Mac Control Center at the top-right corner.
Step 2: Disable Focus tile from the menu.
You can also add Mail as an exception in Focus on Mac.
Open System Settings > select Focus > disable the current Focus Mode.

Fix 5: Use Safe Mode
Safe Mode is a built-in tool for troubleshooting issues with the default apps installed on your Mac. The Mail app comes pre-installed, and if you continue facing the same issue, try booting your Mac in Safe Mode.
For Macs With Apple M-Series Chip
Step 1: Click on the Apple logo at the top-left corner and select Shut Down.
Step 2: After your Mac shuts down, press and hold the Power button till you see two startup options.
Step 3: Select Macintosh HD while holding the Shift Key and then select Continue in Safe Mode.

For Macs With Intel Chip
Step 1: Click the Apple logo at the top-left corner > select Restart.
Step 2: As soon as your Mac restarts, press and hold the Shift Key.
Step 3: Release the Shift Key once you see the login window.
Was this helpful?
Last updated on 24 July, 2024
Read Next
 How to Fix Outlook for Mac Not Receiving Emails Automatically
Basic Fixes Check email storage: If your email inbox storage is full, you won’t receive new messages in any app or on the web Switch between new and classic Outlook
How to Fix Outlook for Mac Not Receiving Emails Automatically
Basic Fixes Check email storage: If your email inbox storage is full, you won’t receive new messages in any app or on the web Switch between new and classic Outlook
 4 Fixes for Can’t Send Emails Using Mail App on Mac
Basic Fixes Check Wi-Fi connection: Ensure that you have connected to a 5GHz Wi-Fi network for faster speeds to send your emails.
4 Fixes for Can’t Send Emails Using Mail App on Mac
Basic Fixes Check Wi-Fi connection: Ensure that you have connected to a 5GHz Wi-Fi network for faster speeds to send your emails.
 Outlook App vs Apple Mail: Which Is a Better iOS Mail App
Frankly, there are so many mail apps for the iOS platform that it can be difficult to zero in on one.
Outlook App vs Apple Mail: Which Is a Better iOS Mail App
Frankly, there are so many mail apps for the iOS platform that it can be difficult to zero in on one.
 5 Ways to Fix Delayed Emails in Mail App on iPhone
Common Fixes Enable Background App Refresh - Access General settings on iPhone, tap Background App Refresh, and enable the toggle for the Mail app.
5 Ways to Fix Delayed Emails in Mail App on iPhone
Common Fixes Enable Background App Refresh - Access General settings on iPhone, tap Background App Refresh, and enable the toggle for the Mail app.
 5 Ways to Fix Outlook Not Receiving Emails on iPhone
Common Fixes Enable and disable the Airplane Mode: Open the Settings app, toggle on the Airplane Mode, and turn it off after a few seconds.
5 Ways to Fix Outlook Not Receiving Emails on iPhone
Common Fixes Enable and disable the Airplane Mode: Open the Settings app, toggle on the Airplane Mode, and turn it off after a few seconds.
 2 Ways to Fix Outlook Receiving Late Emails on Windows 11
Basic Fixes: Check the Internet connection and Outlook server status: If you work with a sketchy Internet connection on your laptop, you may face delays in receiving emails on Outlook.
2 Ways to Fix Outlook Receiving Late Emails on Windows 11
Basic Fixes: Check the Internet connection and Outlook server status: If you work with a sketchy Internet connection on your laptop, you may face delays in receiving emails on Outlook.
 4 Ways to Fix iPad Not Receiving Emails
Basic Fixes: Check network connection: If your iPad has network connection issues, it can’t receive new emails and update the current inbox in the Mail app. So, connect to a better network
4 Ways to Fix iPad Not Receiving Emails
Basic Fixes: Check network connection: If your iPad has network connection issues, it can’t receive new emails and update the current inbox in the Mail app. So, connect to a better network
The article above may contain affiliate links which help support Guiding Tech. The content remains unbiased and authentic and will never affect our editorial integrity.