Try Basic Fixes
- Unlock your iPhone before connecting it to the computer: iOS requires you to unlock the device with your Touch ID, Face ID, or passcode before you can access the files on your PC. So, unlock the iPhone and connect it to your computer using a USB cable with a Lightning port. Your files will show up in the DCIM folder.
- Use a USB cable that supports data transfer: Ideally, the best cable to use for transferring data to and from your iPhone is the one that came in the box. The USB-C to lighting cable directly from Apple should give you the best compatibility and data transfer speeds. A cheap lighting cable may not be certified and can cause issues with showing files on your PC.
Fix 1: Change the Capture Format to “Most Compatible”
The iPhone can capture photos and videos in two formats — High Efficiency and Most Compatible. The High Efficiency format uses HEIF or HEVC compression standard to save more space on your iPhone’s storage. However, this format is not compatible with all devices. As a result, files recorded in these formats may not show up on your PC.
On the other hand, the Most Compatible format uses the standard JPEG or H.264 compression standards which are compatible with most devices. So, it’s a good idea to change the capture format to this option. Here’s how to do it.
Step 1: Open the Settings app and navigate to Camera > Formats.
Step 2: Select Most Compatible.


Fix 2: Use iTunes to Transfer Files
iTunes is an app developed by Apple to transfer files to and from your iPhone. If you can’t access the files on your iPhone using Windows Explorer, we suggest using iTunes. All the files on your iPhone will be accessible.
Step 1: Install iTunes on your Windows PC using the link below.
Step 2: Open iTunes and connect your iPhone to your computer using a USB cable.
Step 3: A prompt on your iPhone will pop up asking if you want to allow the device to access photos and videos. Select Allow.
Step 4: You will see another prompt on your iPhone asking if you want to trust the computer. Tap on Trust. Then, enter your passcode.


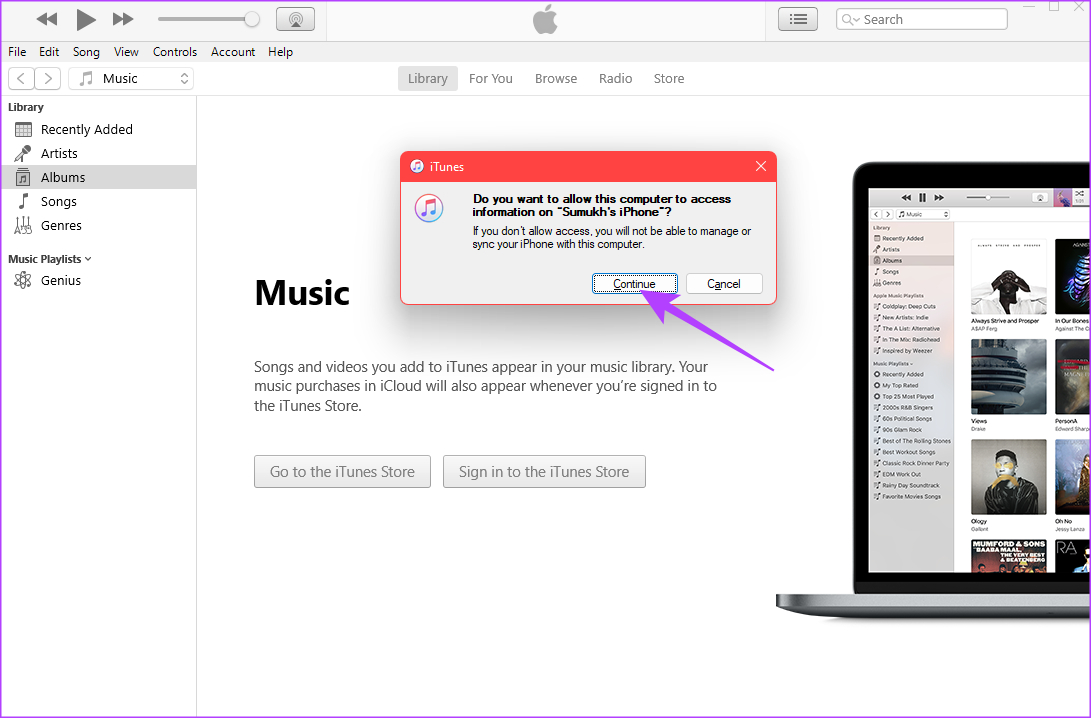
Step 5: After that, you need to allow your computer to access the information on your iPhone. Click on Continue.
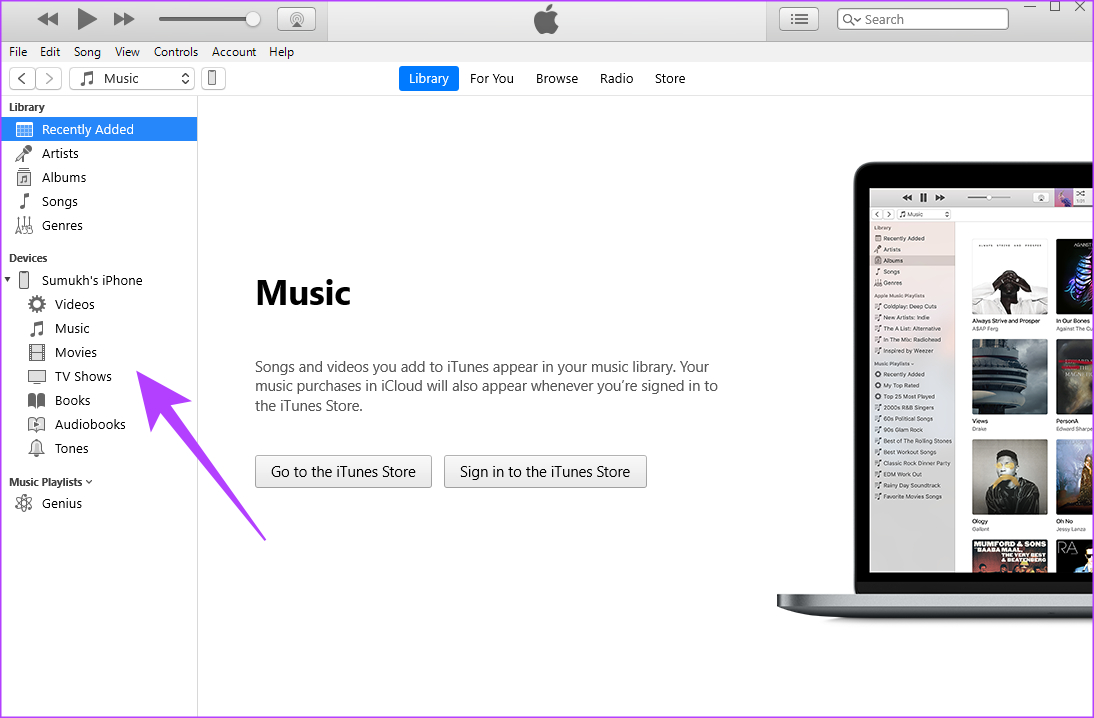
Step 6: Your iPhone’s contents will now show up in iTunes. Use the pane on the left to navigate to the category you want and access your files.
Fix 3: Enable the “Keep Originals” Toggle in Photo Settings
This setting is correlated to the compatibility point we mentioned earlier. There is an option within the Photos app that lets you choose whether you want your iPhone to transfer media in a compatible format or the original recorded format. If large files are not showing up on your PC, changing this setting will fix that. Here’s how to do it.
Step 1: Open the Settings app on your iPhone.
Step 2: Scroll down and navigate to the Photos tab.
Step 3: Right at the bottom, under “Transfer to Mac or PC,” select Keep Originals.


Connect your iPhone to the PC, and the files that weren’t showing up earlier will be visible.
Was this helpful?
Last updated on 03 September, 2024
Read Next
 3 Ways to Fix USB Drive Not Showing Files and Folders on Windows 11
Try These Basic Fixes Configure File Explorer to show hidden items: If some of your files and folders are missing from the USB drive but the storage space is still
3 Ways to Fix USB Drive Not Showing Files and Folders on Windows 11
Try These Basic Fixes Configure File Explorer to show hidden items: If some of your files and folders are missing from the USB drive but the storage space is still
 5 Best Ways to Transfer Files Between iPhone and Windows PC
We always speak about how convenient the Apple ecosystem is.
5 Best Ways to Transfer Files Between iPhone and Windows PC
We always speak about how convenient the Apple ecosystem is.
 Samsung My Files vs Google Files: Which File Manager Is Better on Galaxy Phones
Samsung apps are bundled to replace the official Google Apps in the One UI.
Samsung My Files vs Google Files: Which File Manager Is Better on Galaxy Phones
Samsung apps are bundled to replace the official Google Apps in the One UI.
 4 Ways to Fix Files App Not Working on iPhone
Basic Fixes Restart iPhone: If a bug on iOS is causing problems with the Files app, try restarting your iPhone.
4 Ways to Fix Files App Not Working on iPhone
Basic Fixes Restart iPhone: If a bug on iOS is causing problems with the Files app, try restarting your iPhone.
 7 Ways to Fix Safari Not Downloading Files on iPhone and Mac
Basic Fixes Check network connection: Safari won’t download media or other files if the data connection on your iPhone or Mac is spotty.
7 Ways to Fix Safari Not Downloading Files on iPhone and Mac
Basic Fixes Check network connection: Safari won’t download media or other files if the data connection on your iPhone or Mac is spotty.
 8 Ways to Fix iPhone Trust This Computer Not Showing Up
Usually, you get a 'Trust This Computer?' prompt whenever you connect an iPhone or iPad to a PC or Mac for the first time.
8 Ways to Fix iPhone Trust This Computer Not Showing Up
Usually, you get a 'Trust This Computer?' prompt whenever you connect an iPhone or iPad to a PC or Mac for the first time.
 5 Ways to Fix Telegram Not Showing Notifications on iPhone
Basic Yet Essential Methods to Try Check Telegram servers: It's possible that Telegram servers are down.
5 Ways to Fix Telegram Not Showing Notifications on iPhone
Basic Yet Essential Methods to Try Check Telegram servers: It's possible that Telegram servers are down.
 4 Ways to Fix Screen Time Not Showing Data on iPhone
Common Fixes Check service status - Use the Apple System Status page to verify Screen Time availability.
4 Ways to Fix Screen Time Not Showing Data on iPhone
Common Fixes Check service status - Use the Apple System Status page to verify Screen Time availability.
The article above may contain affiliate links which help support Guiding Tech. The content remains unbiased and authentic and will never affect our editorial integrity.