What happens when you boot your computer? You view a familiar Windows logo followed by some animation and then the Windows login screen. Instead of that, some users see a blank or black screen with a blinking cursor when the computer starts. That can be unsettling and scary because now, you can’t even troubleshoot. However, we are confident that our solutions can help.

There are ways to solve this error, just like any other. You just need to take a deep breath and calm down first. Understand that there is no easy way out, and most solutions will end up either in system restore or reinstall. That’s just the nature of the error, which is why black and blue screens are some of the most dreaded errors in the Windows world.
Let’s begin.
Note: A black screen with a blinking cursor is different from a black screen with no cursor. We are going to discuss the former here. Different errors require different troubleshooting steps.
1. Remove Accessories
Here is what’s happening. Your computer fails to boot up because it can’t read the necessary files stored on the partition. It can be possible that a pen drive or external hard disk is preventing it from accessing crucial OS files. To put it differently, it’s looking in the wrong drive. Shut down your computer and remove all accessories including mouse and CD or disk and try again. Press and hold the power button for a few seconds to force shut down.
2. Safe Mode
Can you boot your computer in Safe Mode? There are a few ways to boot your PC in Safe mode. The simplest way is to press and hold the power button for a few seconds while the computer is booting up. That will interrupt the boot process and shut down the computer. Do it three times.
Press power button > Press and hold power button until shut down – Repeat thrice.
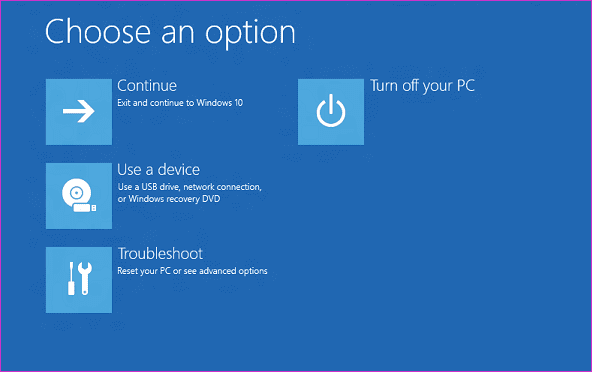
You should see a blue screen with some options the fourth time you boot your computer. Welcome to Windows RE (Recovery Environment). An advanced UI where you can repair, troubleshoot, restore, and reset Windows 10 with a few clicks. Follow the below path.
Troubleshoot > Advanced options > Startup Settings > Restart
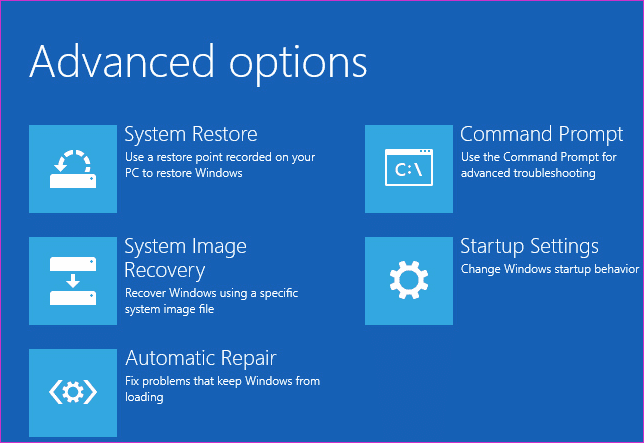
You will now press the relevant key (4, 5, or 6) to boot computer into Safe Mode with Command Prompt.
Alternatively, you can press the F8 or F12 key during the boot process, but that no longer works on all laptops. Especially, if it houses SSD and uses UEFI BIOS.
Once you enter the Safe Mode, check for the following:
- Take an external backup of your data immediately in case you have to restore or reinstall Windows OS
- Check for malware using Malwarebytes and also scan for virus that may be preventing the OS from booting up
- Uninstall any recently installed apps that you don’t recognize or might be causing conflict
- Uninstall recently updated drivers – remove updates and if the driver is faulty, uninstall it
- Update all hardware drivers which may be causing blinking cursor error
Reboot your computer like you normally do from the Start menu to check if the computer still gets stuck on the blinking cursor screen.
3. BIOS Settings
You will follow the same steps above by repeating the power button trick three times, but instead of entering the Safe Mode, you will enter UEFI Firmware Settings. That’s the latest iteration of BIOS.
Troubleshoot > Advanced options > UEFI Firmware Settings
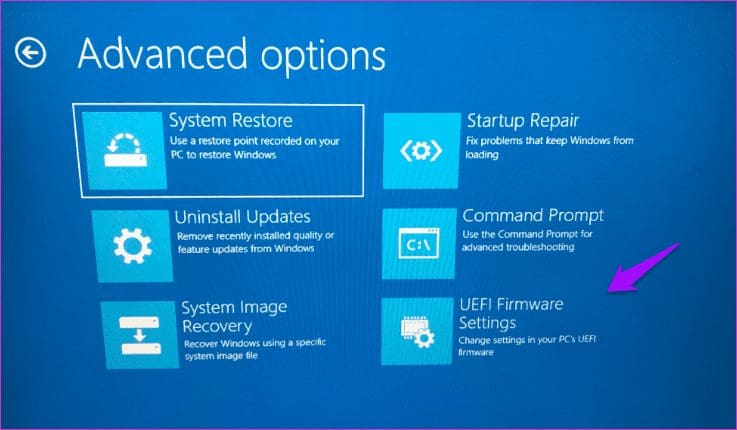
Click on the next screen to boot into BIOS. You cannot use a mouse so only a keyboard is allowed. Use the arrow and Enter or Esc keys to move around. You will find instructions at the bottom of the screen, but it is pretty simple so don’t worry. You need to switch boot settings from Legacy to UEFI mode under Startup Options.
Also, check the boot order under the Boot menu and make sure that it is set to boot from the Hard Drive first and pen drive or other external drives second. That will make sure that the problem won’t reappear when you connect a pen drive during the boot process ever.
Save and Exit to reboot and check if the error persists.
Note: Each BIOS layout or UI is a little different but the basic functionality remains the same. Just find the above options and make necessary changes. And don’t forget to save changes before you exit.
4. Command Prompt
Open Command Prompt (while in Safe Mode) and follow the below steps only if you have Windows Setup Media like a CD or a pen drive.
Give the below commands one at a time.
sfc /scannow Bootrec /FixMbr Bootrec /FixBoot Bootrec /RebuildBcd
The last three commands will repair Master Boot Record (MBR), Boot Sector, and BCD Store, respectively.
5. Restore or Reinstall
Well, if you’ve come this far without success then you have exhausted all other options. If you have a backup of your data or use cloud storage for everything, you have nothing to fear. Restoring the computer won’t delete your personal files anyway. That’s what reinstalling the OS does. That’s why I recommend you restore the computer first and see if that helps. It will help 9 out of 10 times.
If the above method is not working for you, use the installation media disk that you may have created on a CD or pen drive. Check Microsoft’s site on how to create an installation media. Alternatively, you can visit your nearest support center.
Always Have a Backup
Here are two pieces of advice that can save you a lot of trouble in the future and they are both really simple. One is to take backups. Even better if you move to the cloud because that way, you don’t have to do it manually. The second is to create a restore point every time you are about to make major changes to your system. One example could be before installing an app.
I hope we were of help. If you found another way to fix the blinking cursor error in Windows 10, share it with us in the comments section below.
Next up: OneDrive is a great cloud solution and one of its features is the ability to restore older versions of the files. Click on the link below to learn how to do just that.
Was this helpful?
Last updated on 13 July, 2021
Read Next
 Why Is My Chromebook Battery Light Blinking White: 4 Ways to Fix the Issue
Many Chromebook users noticed the LED near the power cord connector sometimes blinks white.
Why Is My Chromebook Battery Light Blinking White: 4 Ways to Fix the Issue
Many Chromebook users noticed the LED near the power cord connector sometimes blinks white.
 6 Ways to Fix Mouse Cursor Moving on Its Own in Windows
Basic Fixes Change old mouse pads: If a portion of your mousepad has faded and lost the coarseness needed to hold the mouse in place, it can make your mouse
6 Ways to Fix Mouse Cursor Moving on Its Own in Windows
Basic Fixes Change old mouse pads: If a portion of your mousepad has faded and lost the coarseness needed to hold the mouse in place, it can make your mouse
 5 Ways to Fix Mouse Cursor Not Showing on Windows 11
https://youtu.be/99YOYxqJPQ0 Fix 1: Clean the Trackpad or the Bottom Surface of the Mouse Sometimes, the dirt accumulated on your laptop’s trackpad may hinder the cursor’s movement.
5 Ways to Fix Mouse Cursor Not Showing on Windows 11
https://youtu.be/99YOYxqJPQ0 Fix 1: Clean the Trackpad or the Bottom Surface of the Mouse Sometimes, the dirt accumulated on your laptop’s trackpad may hinder the cursor’s movement.
 5 Ways to Fix Mouse Cursor Stuck on Mac
Basic Troubleshoot Remove connected devices - To ensure that the culprit isn't a connected device, say a Bluetooth mouse or keyboard, remove all devices and try again.
5 Ways to Fix Mouse Cursor Stuck on Mac
Basic Troubleshoot Remove connected devices - To ensure that the culprit isn't a connected device, say a Bluetooth mouse or keyboard, remove all devices and try again.
 Top 8 Ways to Fix Mouse Cursor Lagging on Mac
A Mac is generally known for its friendly UI and smooth performance.
Top 8 Ways to Fix Mouse Cursor Lagging on Mac
A Mac is generally known for its friendly UI and smooth performance.
 How to Customize the Mouse Cursor on Windows 11
How to Change the Color and Size of the Mouse Cursor There are a few default cursor options in Windows 11 if you want to change the way the mouse
How to Customize the Mouse Cursor on Windows 11
How to Change the Color and Size of the Mouse Cursor There are a few default cursor options in Windows 11 if you want to change the way the mouse
 3 Fixes for Roblox Cursor Going Off Screen on Windows
Fix 1: Repair or Reset Roblox First, you should use the app repair feature on Windows to fix Roblox.
3 Fixes for Roblox Cursor Going Off Screen on Windows
Fix 1: Repair or Reset Roblox First, you should use the app repair feature on Windows to fix Roblox.
 8 Fixes When the Text Cursor Turns White on Windows 11
Basic Fixes: Uninstall recent Windows updates: If the cursor problem starts after an update, rolling back the update will fix it.
8 Fixes When the Text Cursor Turns White on Windows 11
Basic Fixes: Uninstall recent Windows updates: If the cursor problem starts after an update, rolling back the update will fix it.
The article above may contain affiliate links which help support Guiding Tech. The content remains unbiased and authentic and will never affect our editorial integrity.