Basic Fixes
- Check if Netflix is down: Though unlikely, Netflix might be facing some downtime with its servers in your region.
- Check your internet speed: Even Netflix recommends specific internet speeds to enjoy your favorite Netflix movies and shows in the highest resolution without facing any glitches.
- Update or reinstall Netflix: Installing the latest version from the Microsoft Store should solve the issue.
Fix 1: Update Display Drivers
If Downdetector doesn’t show any issue with Netflix, try updating the display drivers on your Windows 11 computer. It is possible that the current version of the display drivers is outdated and doesn’t run the Netflix app smoothly. Here’s how to update the display driver on your PC.
Step 1: Open Device Manager and click on Display Adapters.

Step 2: Right-click on the display driver name and choose Update Driver.

Step 3: Click on Search Automatically For Drivers to start the process.
Step 4: Follow the on-screen instructions and finish installing the drivers.
Fix 2: Create a New Netflix Profile
You can try creating a new Netflix profile free from any settings or preferences that might be causing content playback issues. Depending on the plan you choose, you can have multiple Netflix profiles.
Fix 3: Reset Netflix App Settings
You may also reset all Netflix app settings. That’ll remove data like your login and other downloaded movies from your computer. If the latter content isn’t your concern, you should certainly employ this method. Here’s how to proceed.
Step 1: Open Settings and click on Apps.
Step 2: Click on Apps and Features on the right and look for Netflix.

Step 3: Click the three dots next to the Netflix app > Advanced Options.

Step 4: Scroll down and click on Reset.
Step 5: Click Reset again to confirm your choice.

Fix 4: Flush DNS Cache
DNS Cache includes information about all the previous websites that you have visited. If the Netflix app is still not working on your Windows PC or showing you Error Code U7353, flush the DNS cache and see if it solves the issue. Here’s how to do it.
Step 1: Run Command Prompt as Administrator on your Windows 11 PC or laptop.

Step 2: Type the following command and press Enter.
ipconfig /flushdns

After that process finishes, you will see the message, “Successfully flushed the DNS Revolver Cache.”
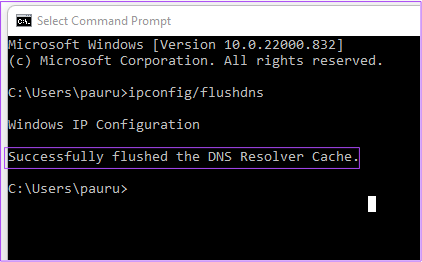
Step 3: Close the Command Prompt window and open Netflix to see if it works as usual.
Fix 5: Delete MSPR.HDS Files on Your Windows PC
If the Netflix app shows you the error code H7363-1260-80070057, try deleting the MSPR.HDS files from your Windows 11 PC. Microsoft developed these files for apps like Netflix that use them for Digital Rights Management, i.e., content protection against piracy. After you delete these files, your computer will automatically generate a new version of them. Follow these steps to delete these files.
Step 1: Click the Folder icon on the taskbar to launch the Windows Explorer.
Step 2: Click the Search bar at the top right and type mspr.hds in the Search box. Press Enter.

Step 3: After all the files appear on your screen, select all and press Shift + Delete to erase them permanently.

Step 4: Restart your PC and open Netflix to check if it works normally.
Was this helpful?
Last updated on 08 August, 2024
1 Comment
Leave a Reply
Read Next
 Netflix Standard vs. Premium: Which Netflix Plan Is Best for You
Netflix Subscription Plans At a Glance While Netflix provides three plans in total, the Standard and Premium plans take the cake.
Netflix Standard vs. Premium: Which Netflix Plan Is Best for You
Netflix Subscription Plans At a Glance While Netflix provides three plans in total, the Standard and Premium plans take the cake.
 3 Fixes for Netflix App Not Showing in Play Store on Android TV
Basic Fixes Check for Netflix app support: Newer versions of the Netflix app don't run properly on older Android TV models that have stopped receiving software updates.
3 Fixes for Netflix App Not Showing in Play Store on Android TV
Basic Fixes Check for Netflix app support: Newer versions of the Netflix app don't run properly on older Android TV models that have stopped receiving software updates.
 3 Fixes for Netflix Picture-In-Picture Mode Not Working on Android
Fix 1: Upgrade Netflix Plan If you are from a country where Netflix offers an ad-supported version, you must upgrade to a premium plan.
3 Fixes for Netflix Picture-In-Picture Mode Not Working on Android
Fix 1: Upgrade Netflix Plan If you are from a country where Netflix offers an ad-supported version, you must upgrade to a premium plan.
 4 Fixes for Amazon Prime Video App Not Working on Windows 11
Basic Fixes: Check device limit: You can use Prime Video to stream content on up to three devices using your account.
4 Fixes for Amazon Prime Video App Not Working on Windows 11
Basic Fixes: Check device limit: You can use Prime Video to stream content on up to three devices using your account.
 5 Fixes for Cloud Gaming Not Working in Xbox App for Windows
Fix 1.
5 Fixes for Cloud Gaming Not Working in Xbox App for Windows
Fix 1.
 How to Change Netflix Download Location on Windows PC
How to Change Netflix Download Location on Windows Step 1: On your Windows PC, press the Windows + I keys together to open Settings.
How to Change Netflix Download Location on Windows PC
How to Change Netflix Download Location on Windows Step 1: On your Windows PC, press the Windows + I keys together to open Settings.
 Top 4 Ways to Fix Netflix T1 Error on Windows 10
Picture this - you've just launched the Netflix app on your Windows 10 computer to watch a new episode of your favorite show.
Top 4 Ways to Fix Netflix T1 Error on Windows 10
Picture this - you've just launched the Netflix app on your Windows 10 computer to watch a new episode of your favorite show.
 5 Fixes for Windows Security App Showing White Screen on Windows 11
Common Fixes Reboot PC: Press the Windows + X shortcut to open the Power User Menu, select Shut down or sign out, and click Restart.
5 Fixes for Windows Security App Showing White Screen on Windows 11
Common Fixes Reboot PC: Press the Windows + X shortcut to open the Power User Menu, select Shut down or sign out, and click Restart.
The article above may contain affiliate links which help support Guiding Tech. The content remains unbiased and authentic and will never affect our editorial integrity.
Check your facts, please. Netflix has removed the ability to download content to a PC.
This really sucks, IMHO.