Basic Fixes
- Temporarily remove other keyboard languages: The autocorrect feature might not work for some other languages that you wish to use.
- Force quit and relaunch the keyboard: You can force quit and relaunch whatever keyboard app you use to give it a fresh start.
- Update your keyboard app: Always use the updated version of the Keyboard app on your Android phone.
1. Enable Spell Checker and Grammar Checker
These two features are responsible for enabling autocorrect on your Android phone.
Step 1: Open Settings on your Android phone and tap on System.
Step 2: Tap on Languages and Input and select Spell Checker.
Step 3: Enable the toggle for Use Spellchecker. Then, tap on Languages and ensure that you select your preferred language for Spell Checker.


Step 4: Tap the Settings icon next to Default Spell Checker and enable the toggle for Grammar Check.
Fix 2: Check Autocorrect Settings for Your Keyboard
Whichever keyboard you use on your Android phone, check the autocorrect settings for the same.
For Gboard
Step 1: Open Settings on your Android phone and select System.
Step 2: Tap on Languages and input and select On-screen keyboard.
Step 3: Select Gboard and tap on Text correction.


Step 4: Under Corrections, check if you have enabled options like Auto-correction, Auto-capitalization, and Auto-space After Punctuation.

For Microsoft SwiftKey
Step 1: Open Microsoft SwiftKey on your Android phone and select Typing.
Step 2: Check if you have enabled Autocorrect, Auto Capitalize, and Auto Space.
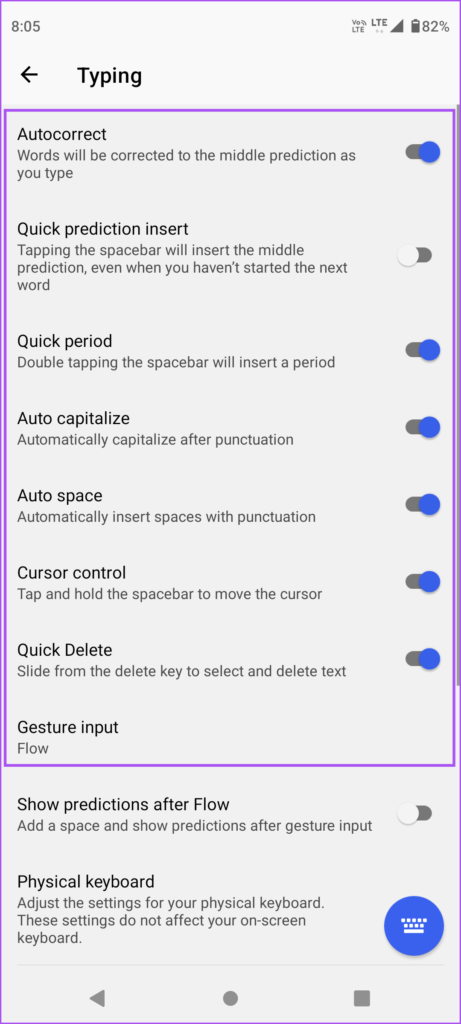
After enabling them, close Microsoft SwiftKey and launch the SwiftKey keyboard to check if the problem is solved.
Fix 3: Delete Learned Words and Data
Sometimes, the words you add to your personal dictionary get suggested instead of the correct spellings. So, try removing the learned words.
Open Settings > System > Languages and input > Personal dictionary and delete any news words or data you added.


You can also refer to our post if Voice-to-Text is not working on your Android phone.
Was this helpful?
Last updated on 01 July, 2024
1 Comment
Leave a Reply
Read Next
 3 Best Fixes for Windows 10 Autocorrect Not Working
Did you know that Windows 10 comes with an autocorrect tool built-in?
3 Best Fixes for Windows 10 Autocorrect Not Working
Did you know that Windows 10 comes with an autocorrect tool built-in?
 How to Adjust AutoCorrect Settings in Microsoft Word
How to Enable or Disable AutoCorrect on Microsoft Word By default, the AutoCorrect feature relies on the library of the words from the language you've chosen to use in the
How to Adjust AutoCorrect Settings in Microsoft Word
How to Enable or Disable AutoCorrect on Microsoft Word By default, the AutoCorrect feature relies on the library of the words from the language you've chosen to use in the
 Top 11 Fixes for Wi-Fi Calling Not Working on Android
Wi-Fi calling is a convenient feature that lets you make your cellular calls over Wi-Fi.
Top 11 Fixes for Wi-Fi Calling Not Working on Android
Wi-Fi calling is a convenient feature that lets you make your cellular calls over Wi-Fi.
 Top 8 Fixes for Google At a Glance Widget Not Working on Android
Introduced as an exclusive feature for the Pixel Launcher, At a Glance widget eventually made it to all Android phones.
Top 8 Fixes for Google At a Glance Widget Not Working on Android
Introduced as an exclusive feature for the Pixel Launcher, At a Glance widget eventually made it to all Android phones.
 3 Fixes for Android Keyboard Not Working in the YouTube App
Basic Fixes Force quit and relaunch YouTube and Android keyboard: This will give the apps a fresh start on your device.
3 Fixes for Android Keyboard Not Working in the YouTube App
Basic Fixes Force quit and relaunch YouTube and Android keyboard: This will give the apps a fresh start on your device.
 4 Fixes for Messages Notifications Not Working on Android
Basic Fixes: Enable and disable Airplane Mode: You won't receive RCS messages if your phone has network connection issues.
4 Fixes for Messages Notifications Not Working on Android
Basic Fixes: Enable and disable Airplane Mode: You won't receive RCS messages if your phone has network connection issues.
 5 Fixes for Google Maps Timeline Not Working on Android and iPhone
Fix 1: Configure Location Permission for Google Maps Google Maps requires location access on your Android or iPhone to create an accurate timeline.
5 Fixes for Google Maps Timeline Not Working on Android and iPhone
Fix 1: Configure Location Permission for Google Maps Google Maps requires location access on your Android or iPhone to create an accurate timeline.
 3 Fixes for Headphone Jack Not Working on Android
Basic Fixes Clean the headphone jack: Use a cotton bud dipped in a small amount of rubbing alcohol as the headphone jack is prone to collecting dust and debris over
3 Fixes for Headphone Jack Not Working on Android
Basic Fixes Clean the headphone jack: Use a cotton bud dipped in a small amount of rubbing alcohol as the headphone jack is prone to collecting dust and debris over
The article above may contain affiliate links which help support Guiding Tech. The content remains unbiased and authentic and will never affect our editorial integrity.


I just updated to the latest May 2024 android update (forced, of course), temporarily disabled spelling correction and grammar check, and now those are permanently gone!
I looked for all the settings in this article and can’t find any.
It’s an Oppo Reno 11 5g, btw.