In today’s interconnected world, managing your contacts efficiently is key to staying in touch with friends, colleagues, and acquaintances. Thankfully, Gmail offers a seamless way to add, edit, or delete contacts, ensuring your address book is always up-to-date. If you aren’t aware, here’s how to add, edit or delete contacts in Gmail.
Why would you want to change contacts in Gmail, you ask? Well, the answer is simple: life is dynamic, and so are our connections. As relationships evolve and details change, it’s essential to have your contact list reflect these updates accurately. So, without further ado, let’s begin with the article.
How to Add Contacts in Gmail
There is not much to it regarding adding contacts to Gmail; it’s a pretty straightforward process. Depending on your device, the steps may be different. Let’s begin with the steps for the desktop.
Note: You only need to carry out the method on one device, and all the devices connected to the same Gmail account will sync automatically.
On Desktop
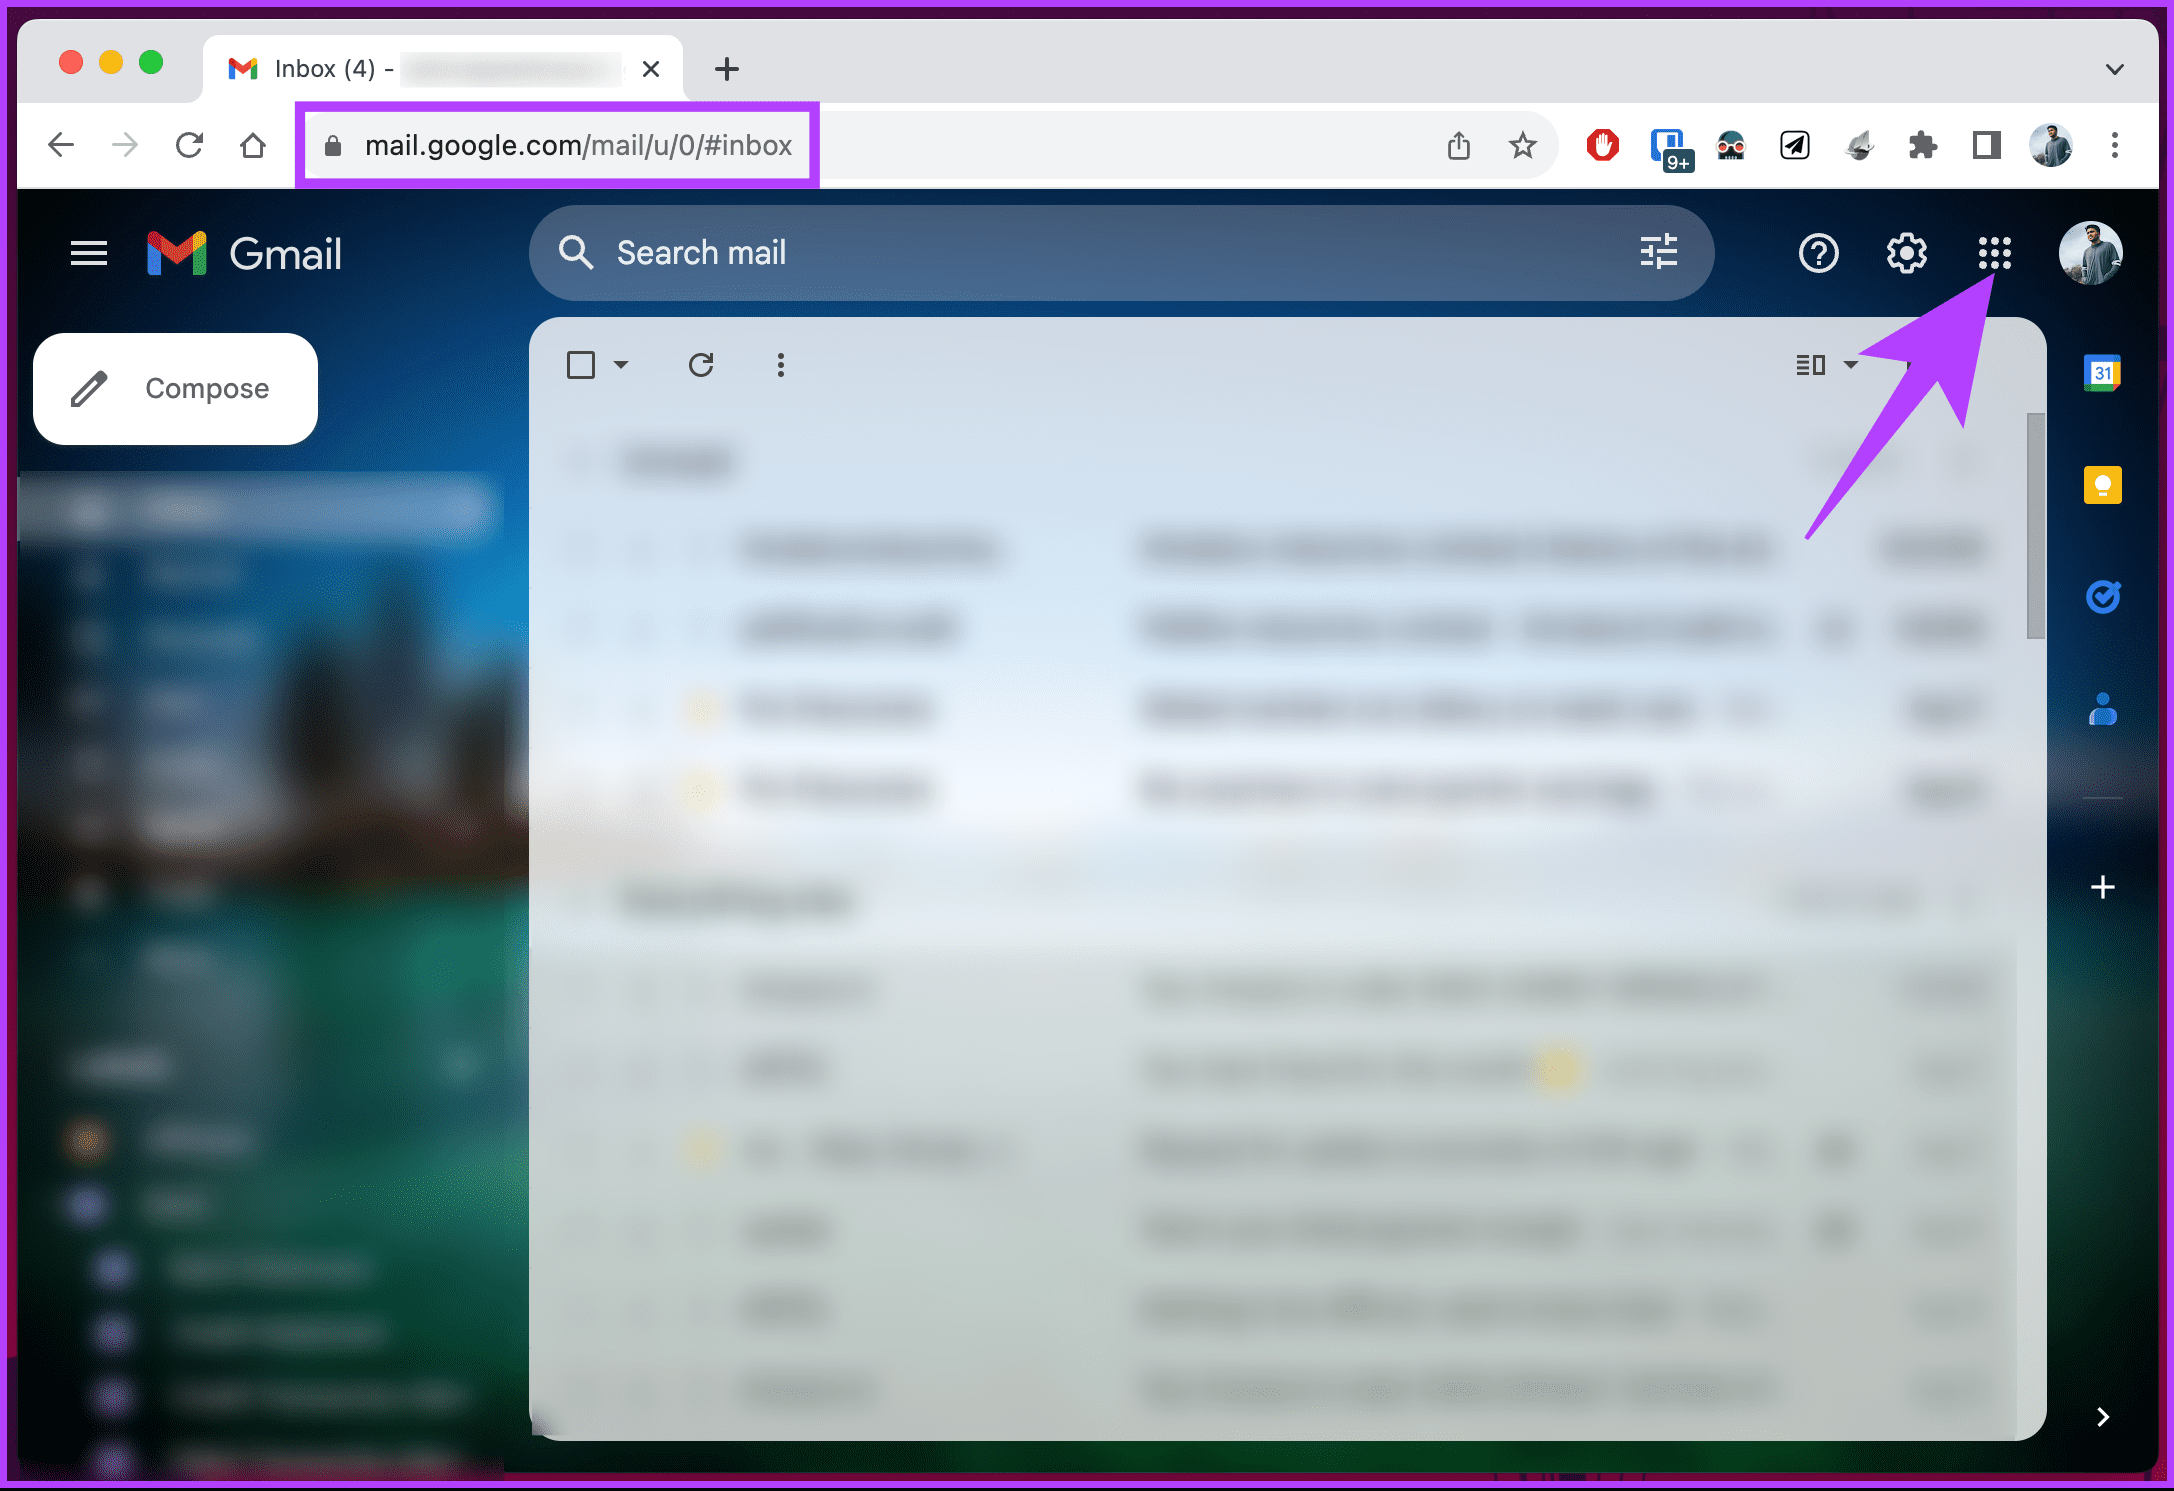
Step 1: Open Gmail in your preferred web browser on your Windows, Mac, or Linux computer.
Step 2: Click the dotted rectangle icon (Google Apps) next to your profile picture.
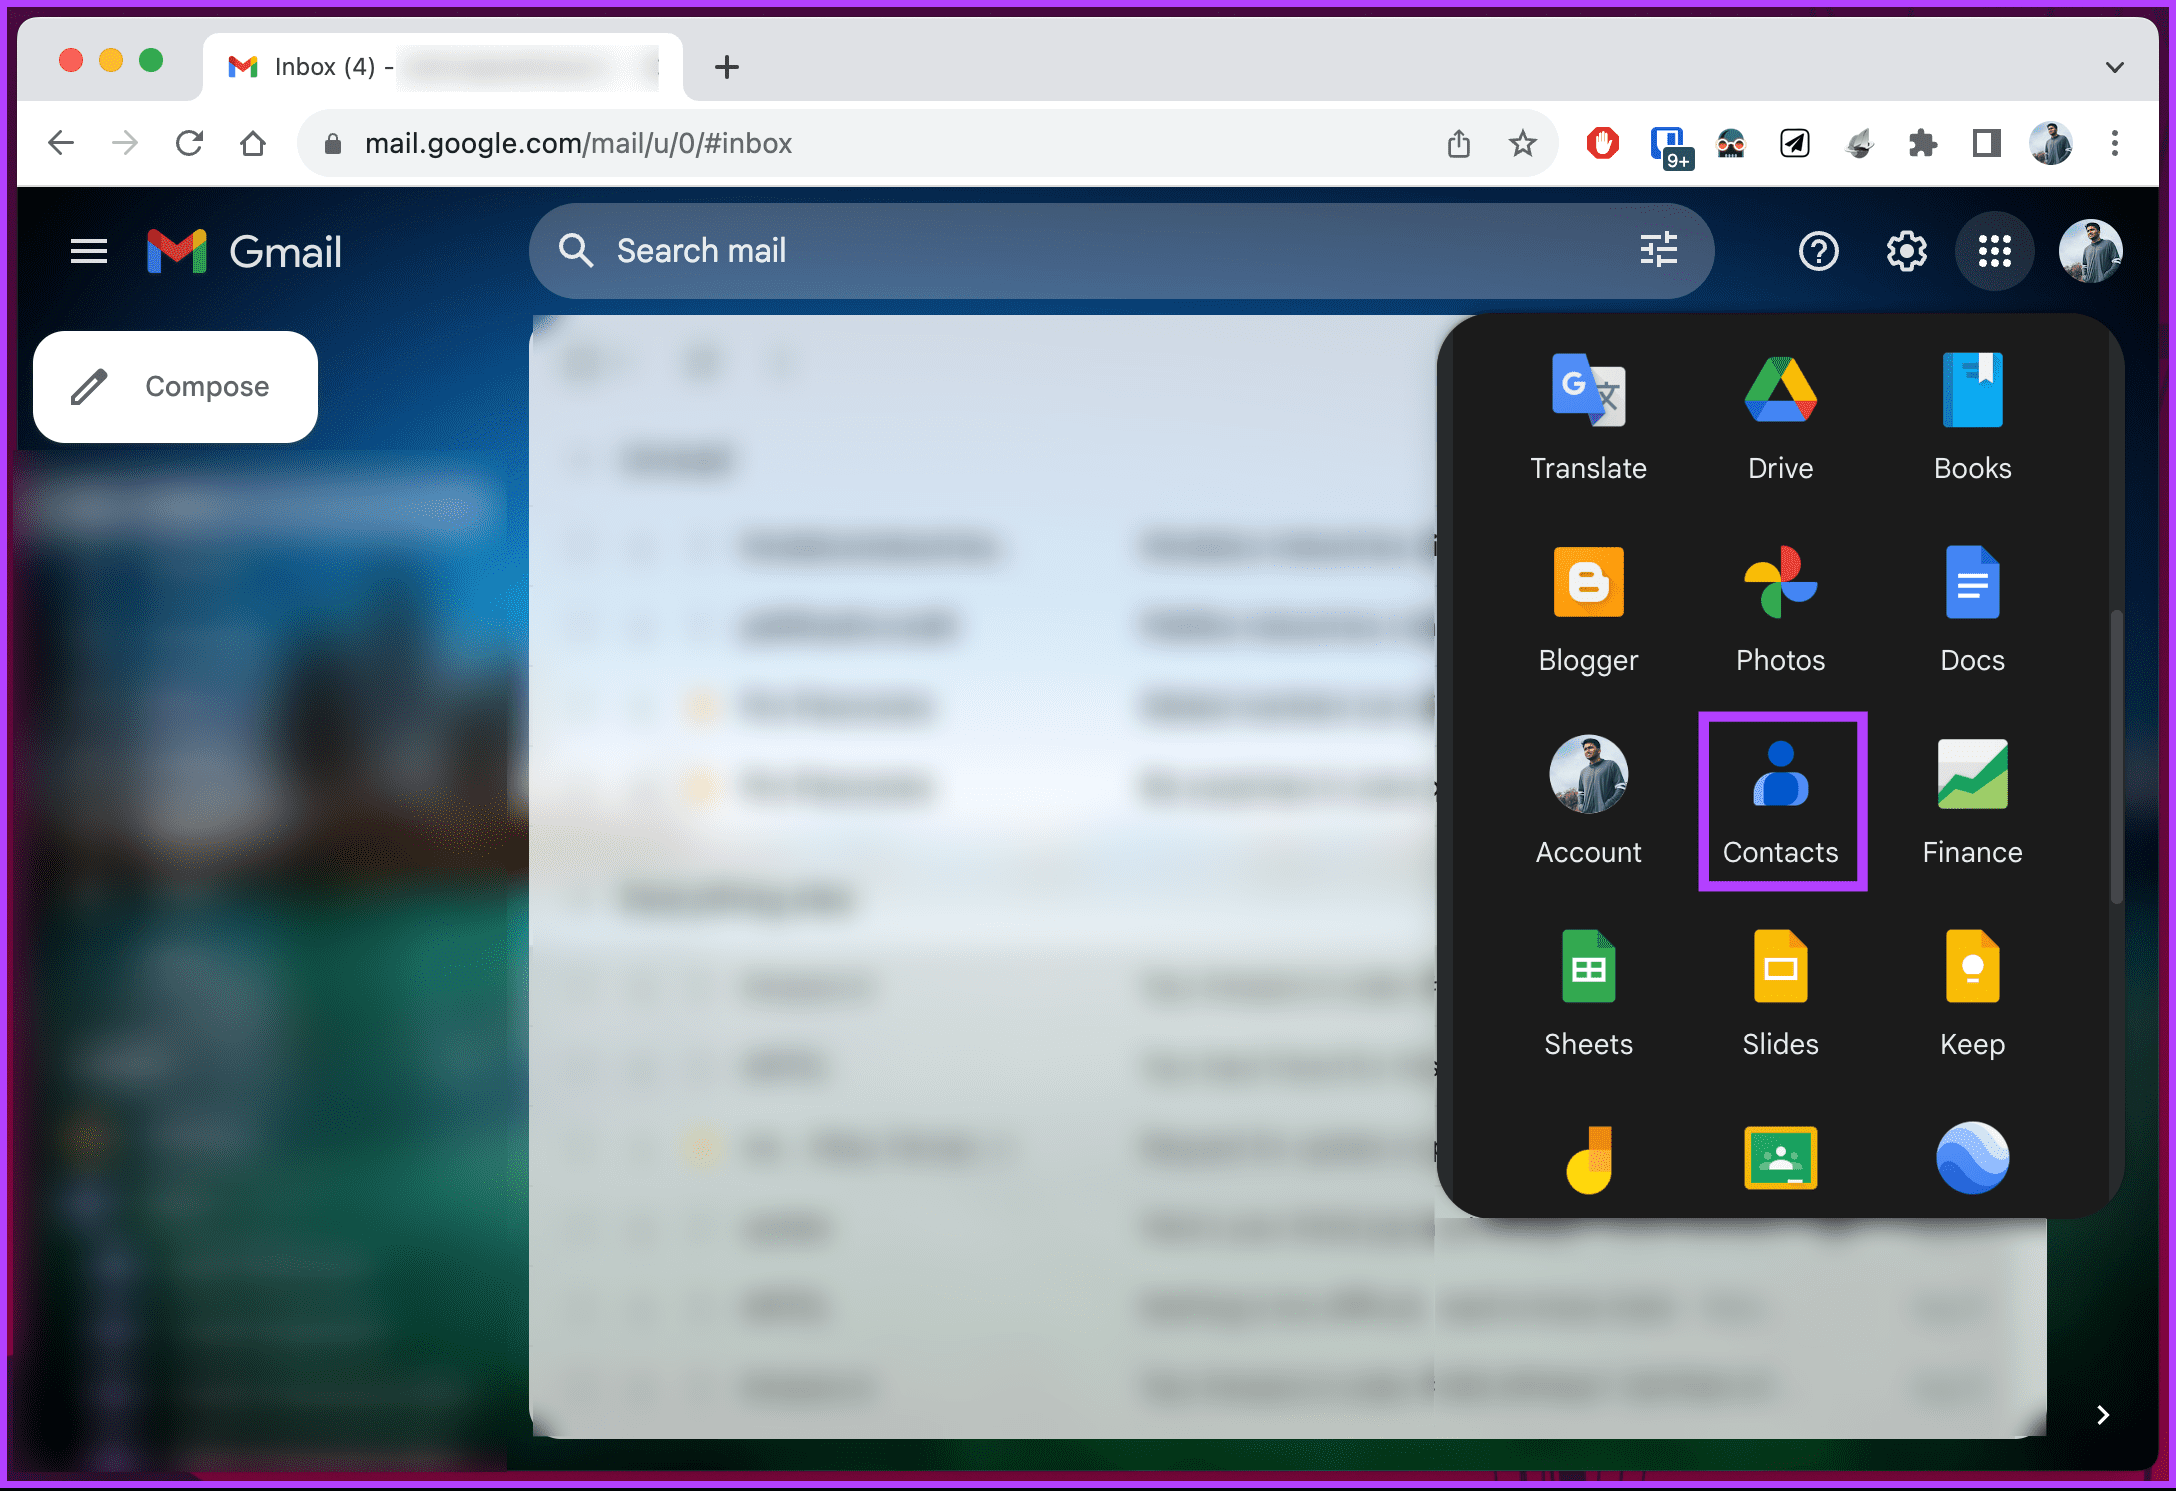
Step 3: From the modal, choose Contacts. If the contact is unavailable in the modal, scroll down to find it.
You will be redirected to a new browser tab to view your current Gmail contacts list.
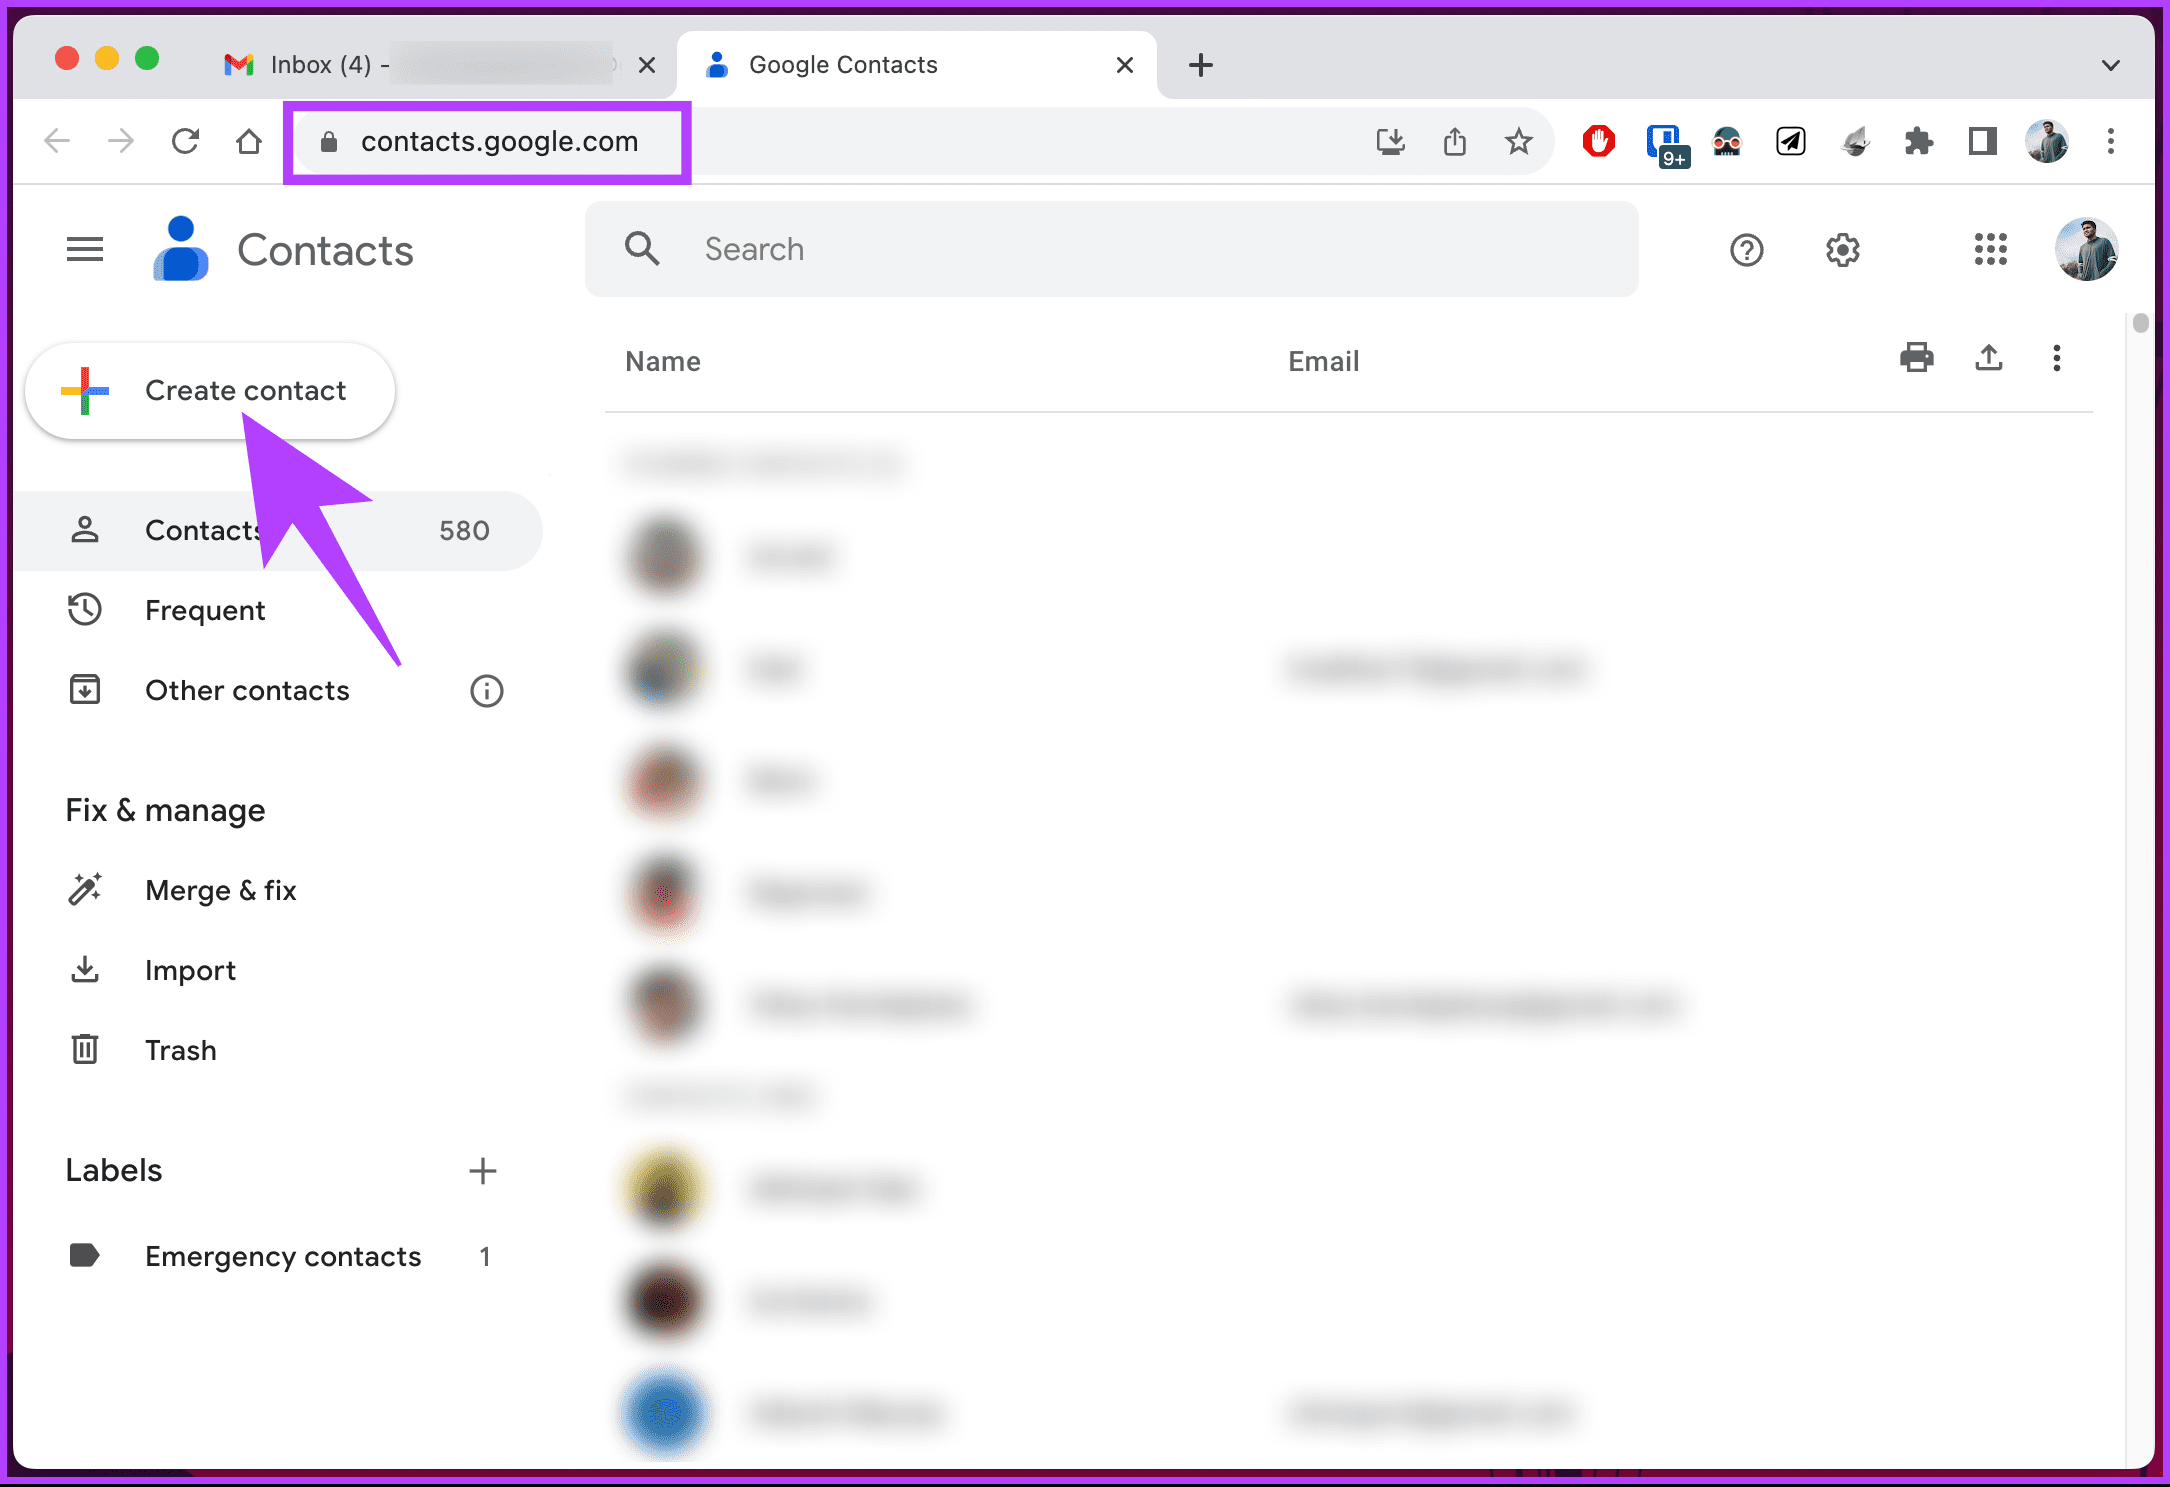
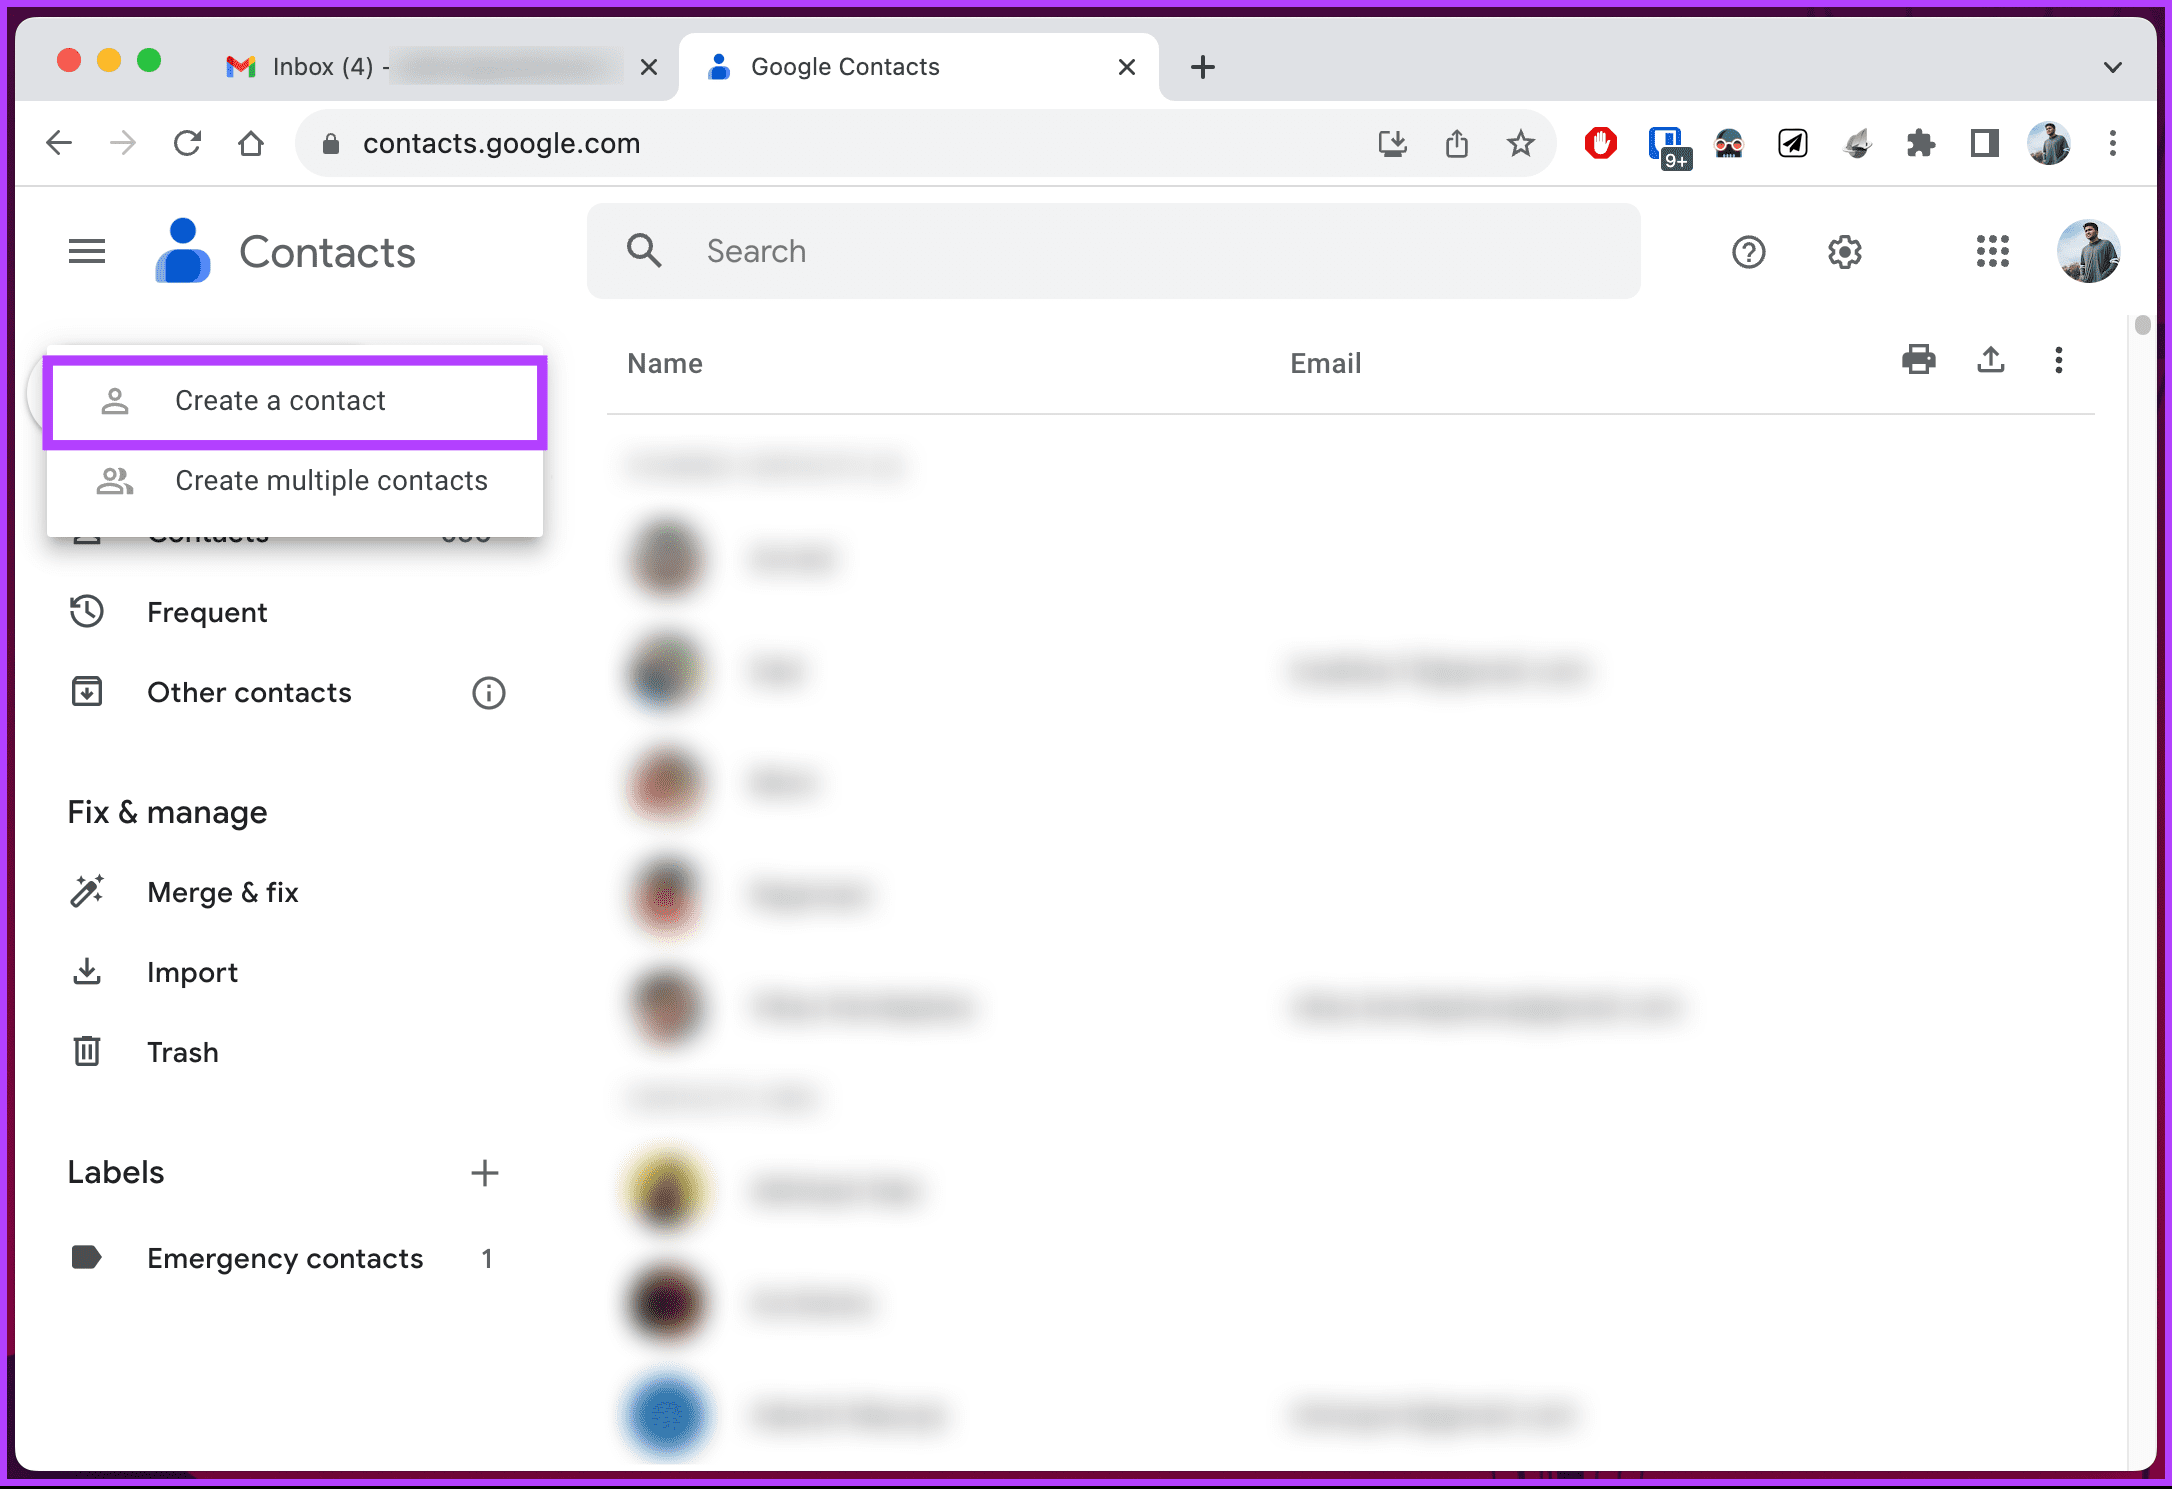
Step 4: In Google Contacts, click Create contact from the left pane.
Step 5: Choose between two options, i.e., ‘Create a contact’ or ‘Create multiple contacts.’
Tip: If you have multiple contacts to be added in one go, choose ‘Create multiple contacts’. If not, go ahead with creating a new contact.
Step 6: Now, enter the details, such as first name, last name, and so on, for the contact you want to add.
Step 7: Finally, click Save to create a new contact.
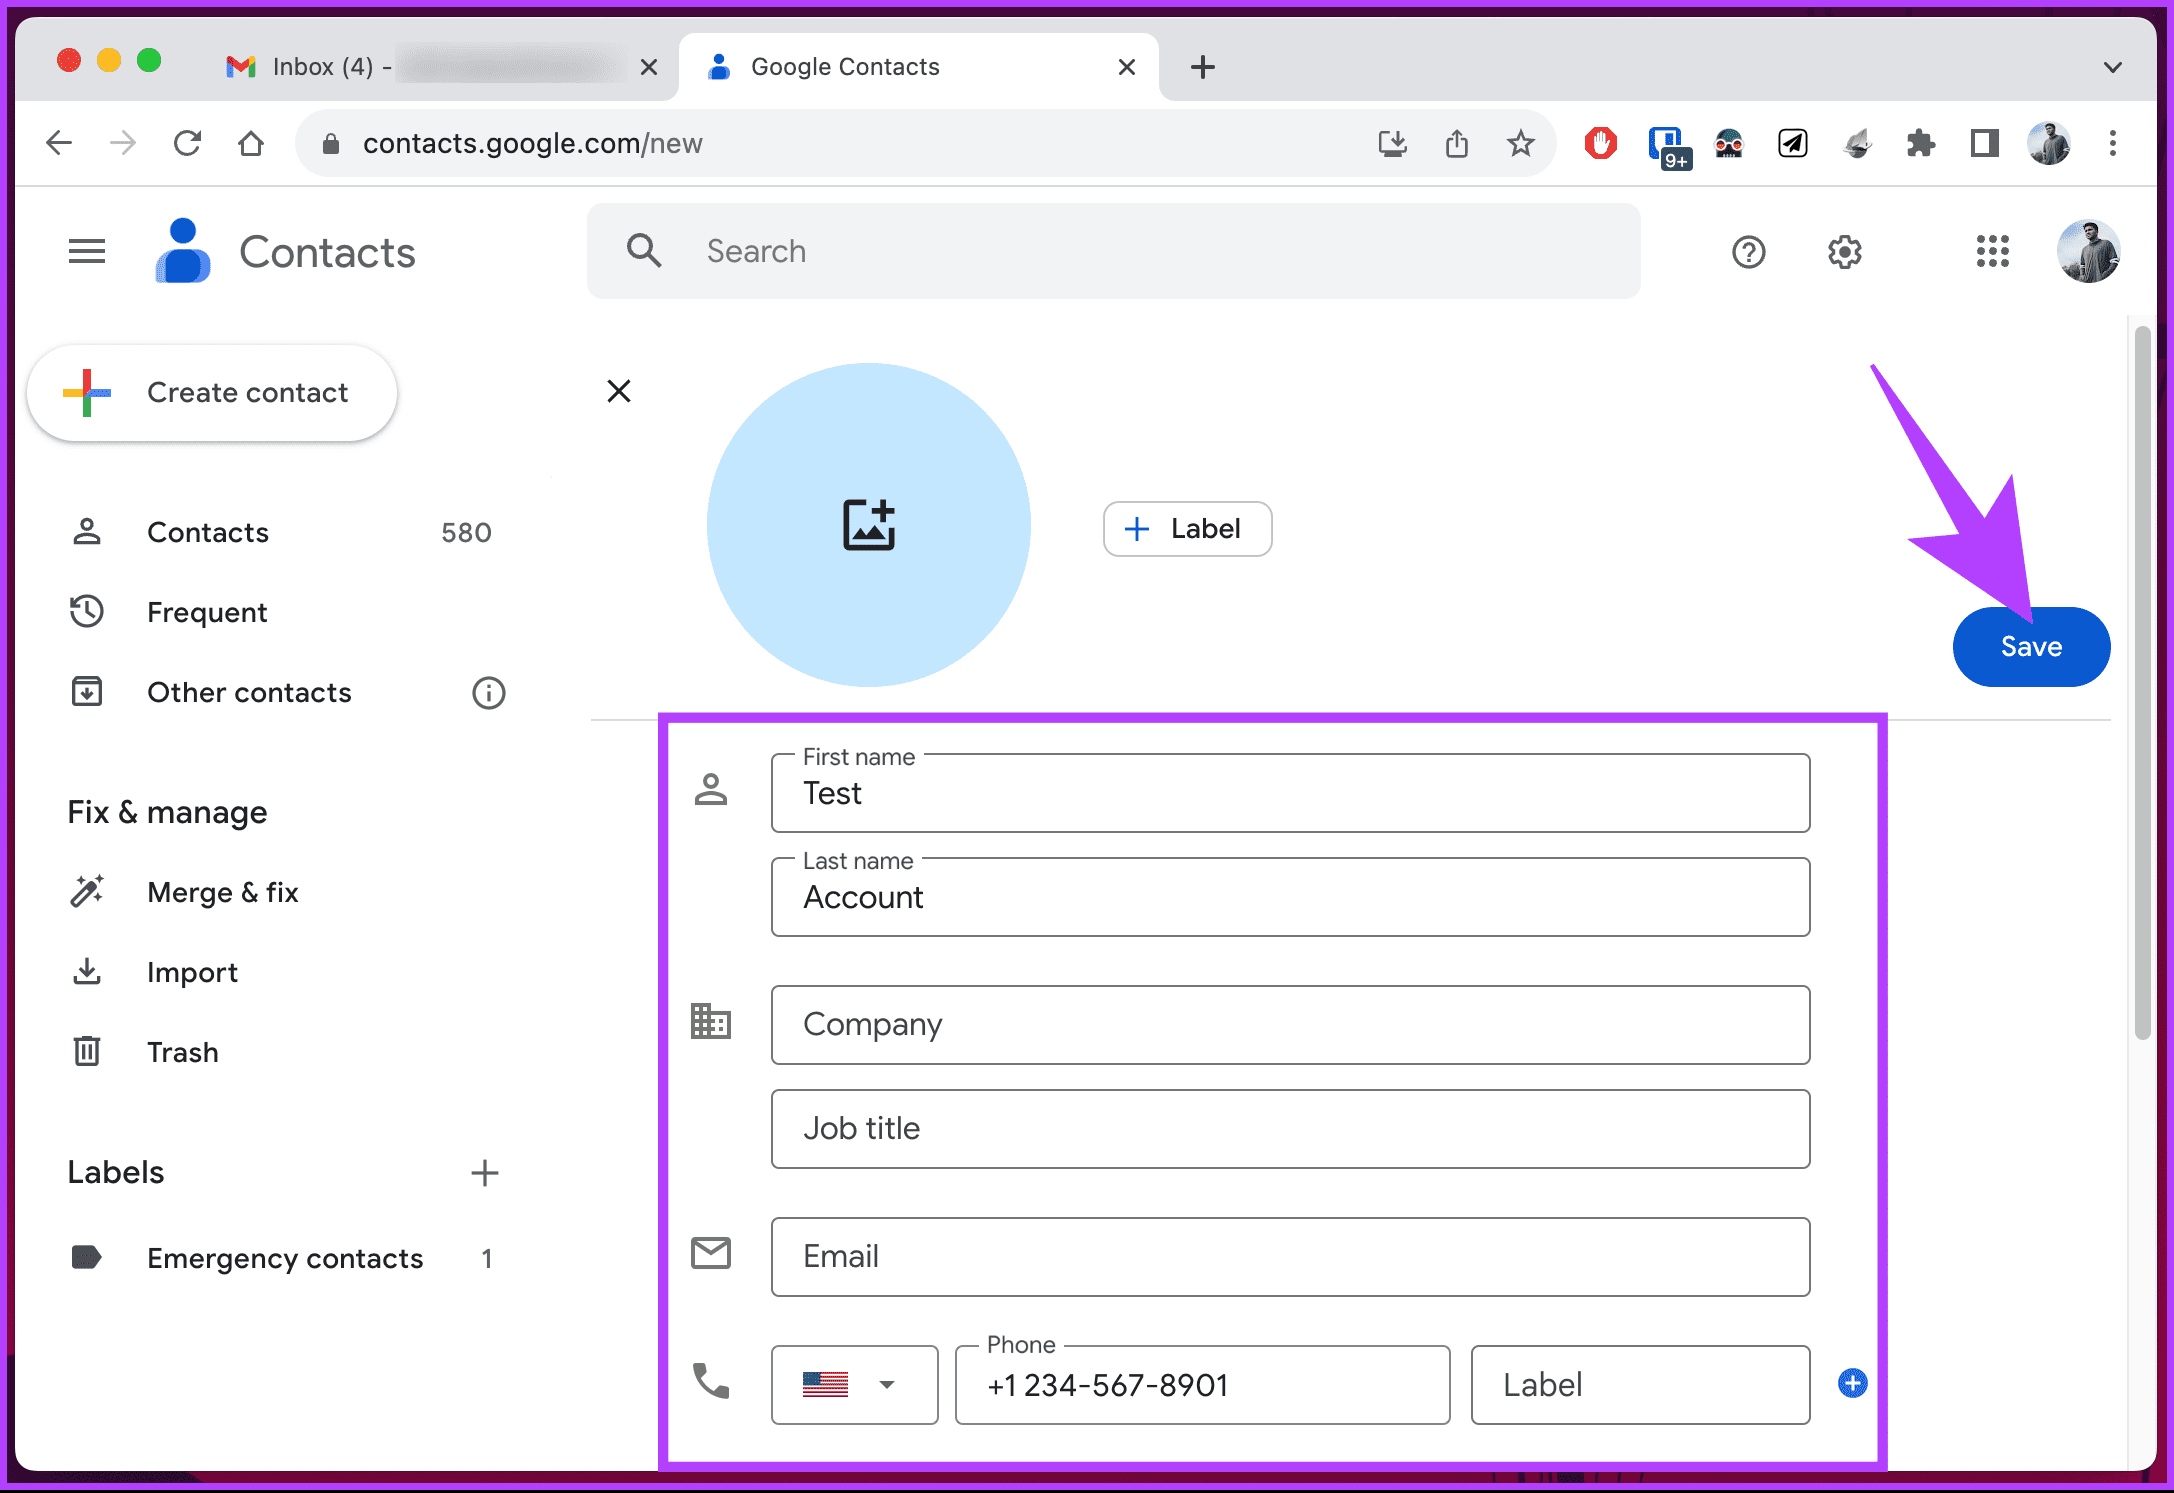
That’s it. You will see a snack bar confirming that you have created a new contact, which will be added to your Gmail account.
On Android
It is common for OEMs to provide their Contacts app that syncs with Gmail. You can continue with the one you already have or follow the instructions below if you don’t.
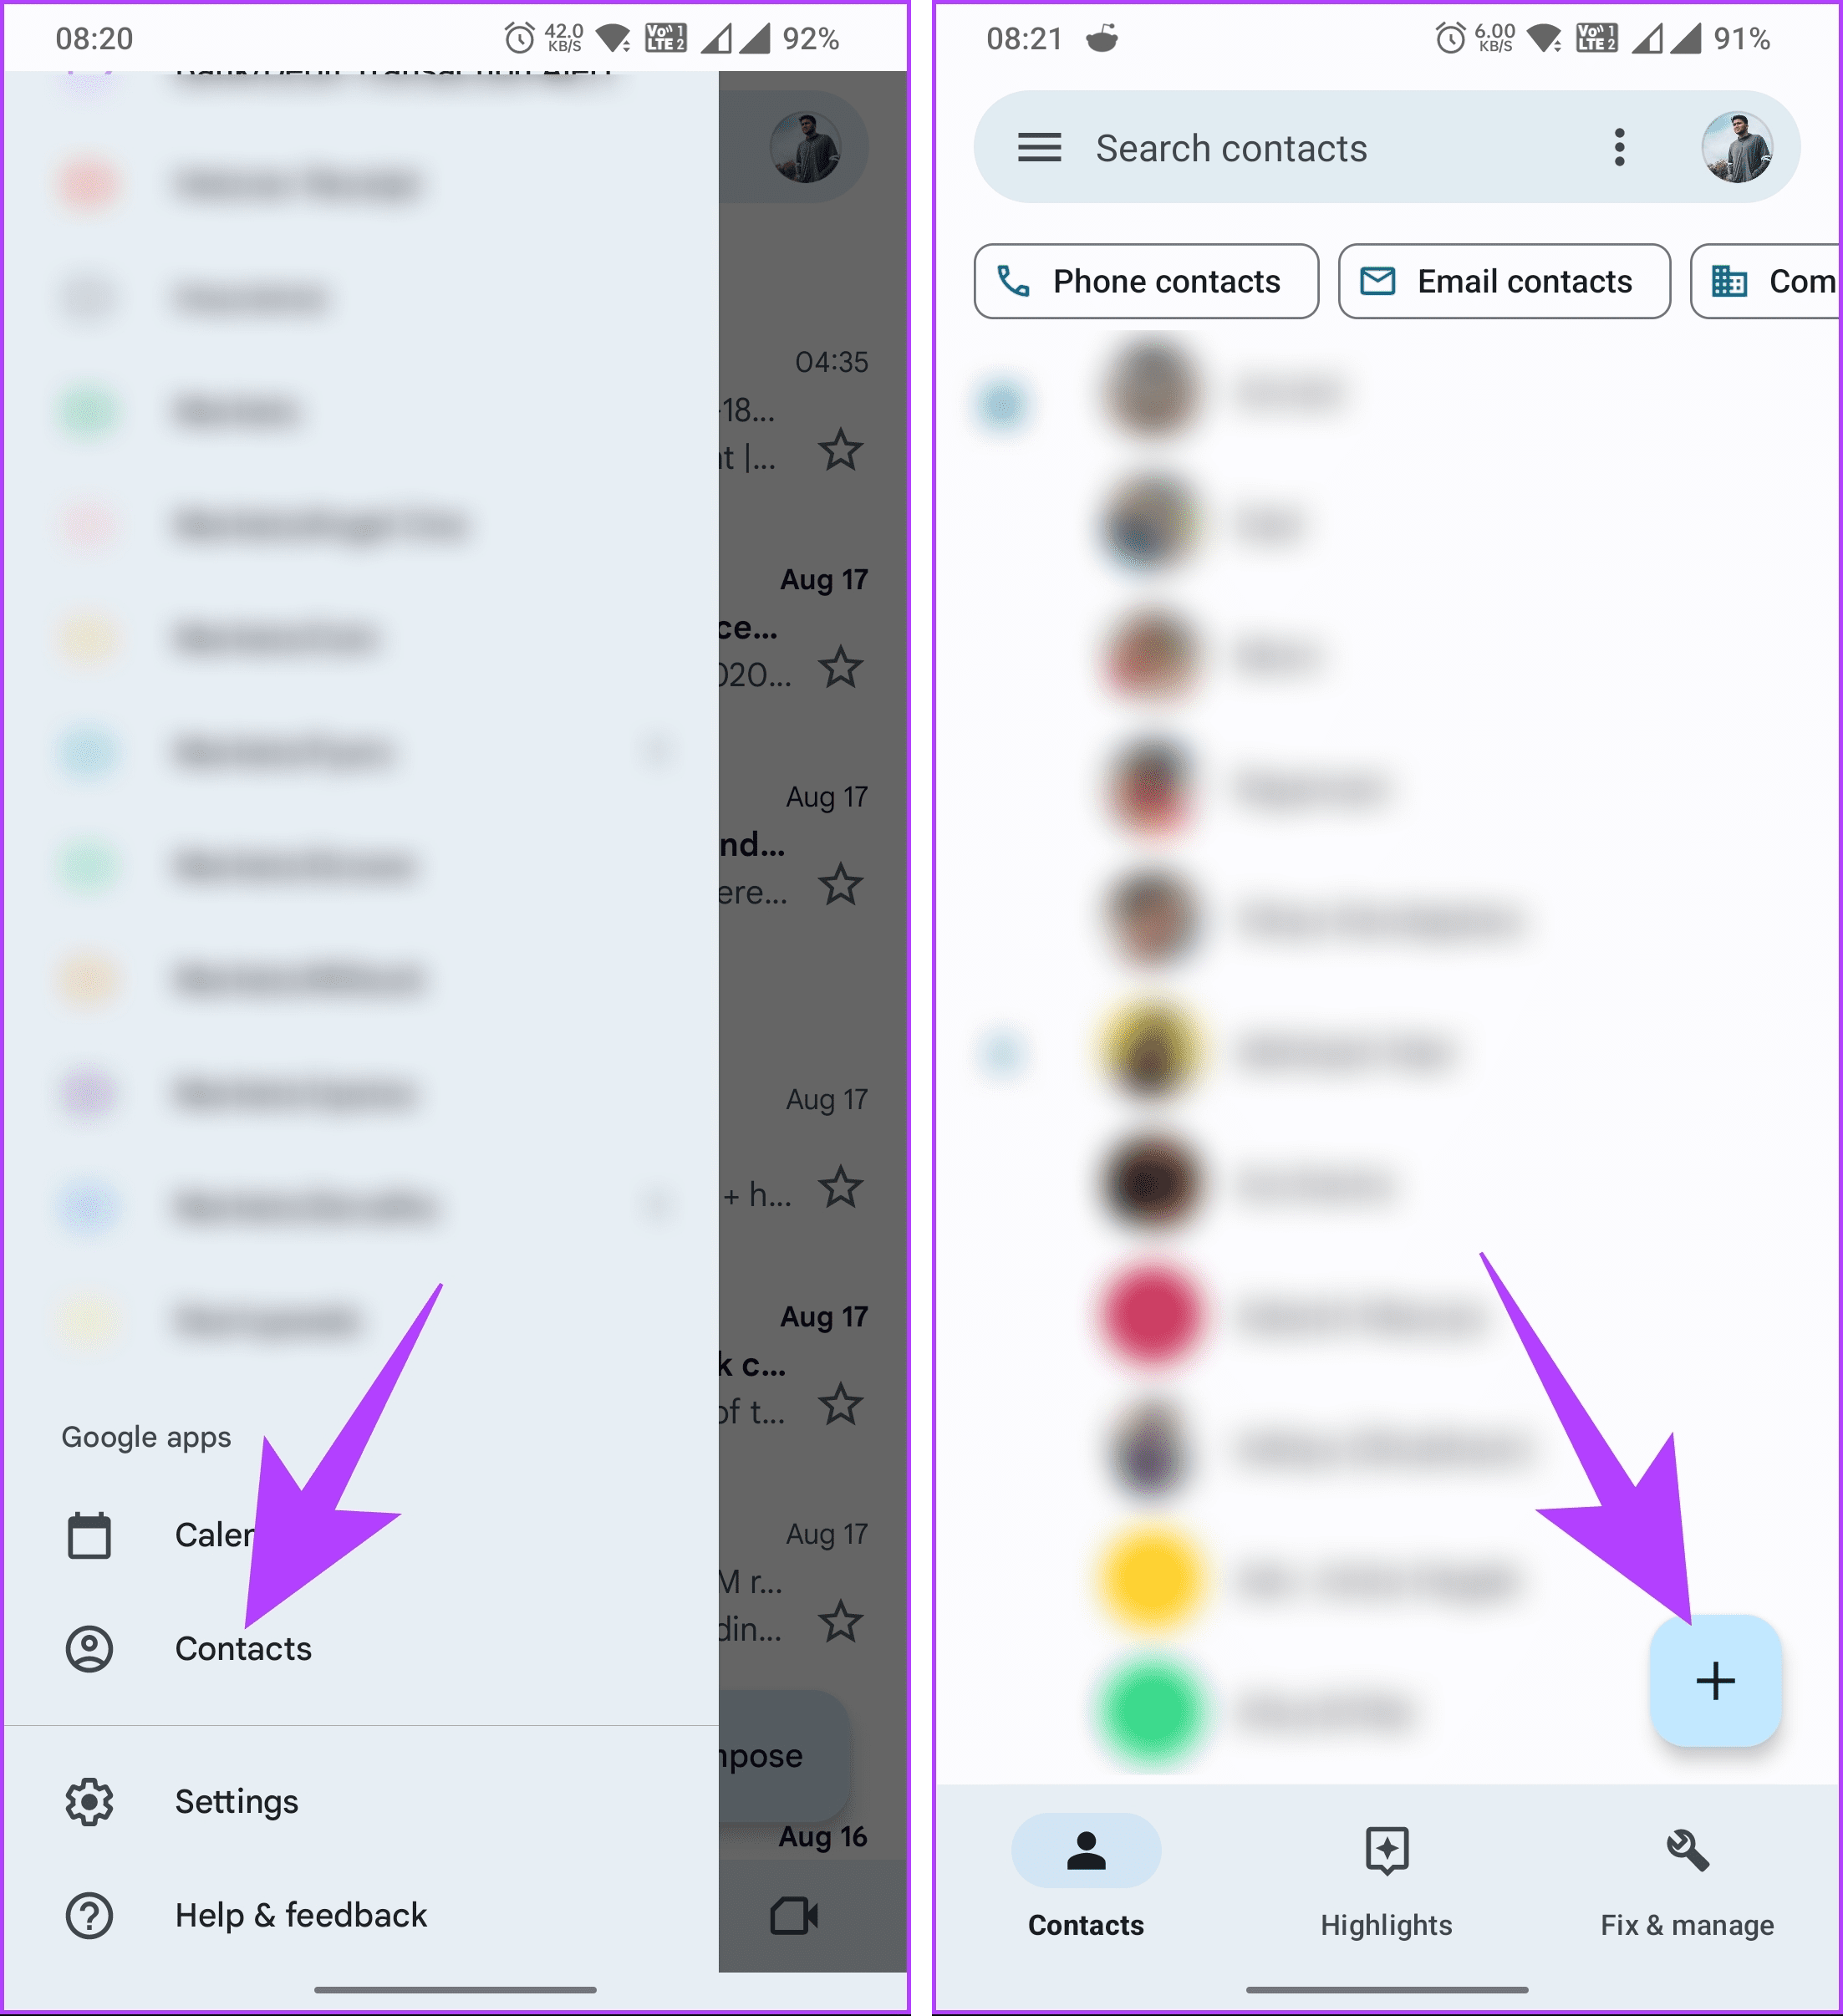
Step 1: Launch the Gmail app on your Android device. Once launched, tap on the hamburger icon in the top-left corner.

Step 2: Scroll under the Google apps section and tap Contacts.
Note: If the Contacts app is not installed on your device, you must download it.
This will trigger the Contacts app. If you don’t want to install any app, use the default Contacts app on your device and map the new contact to your Gmail account.
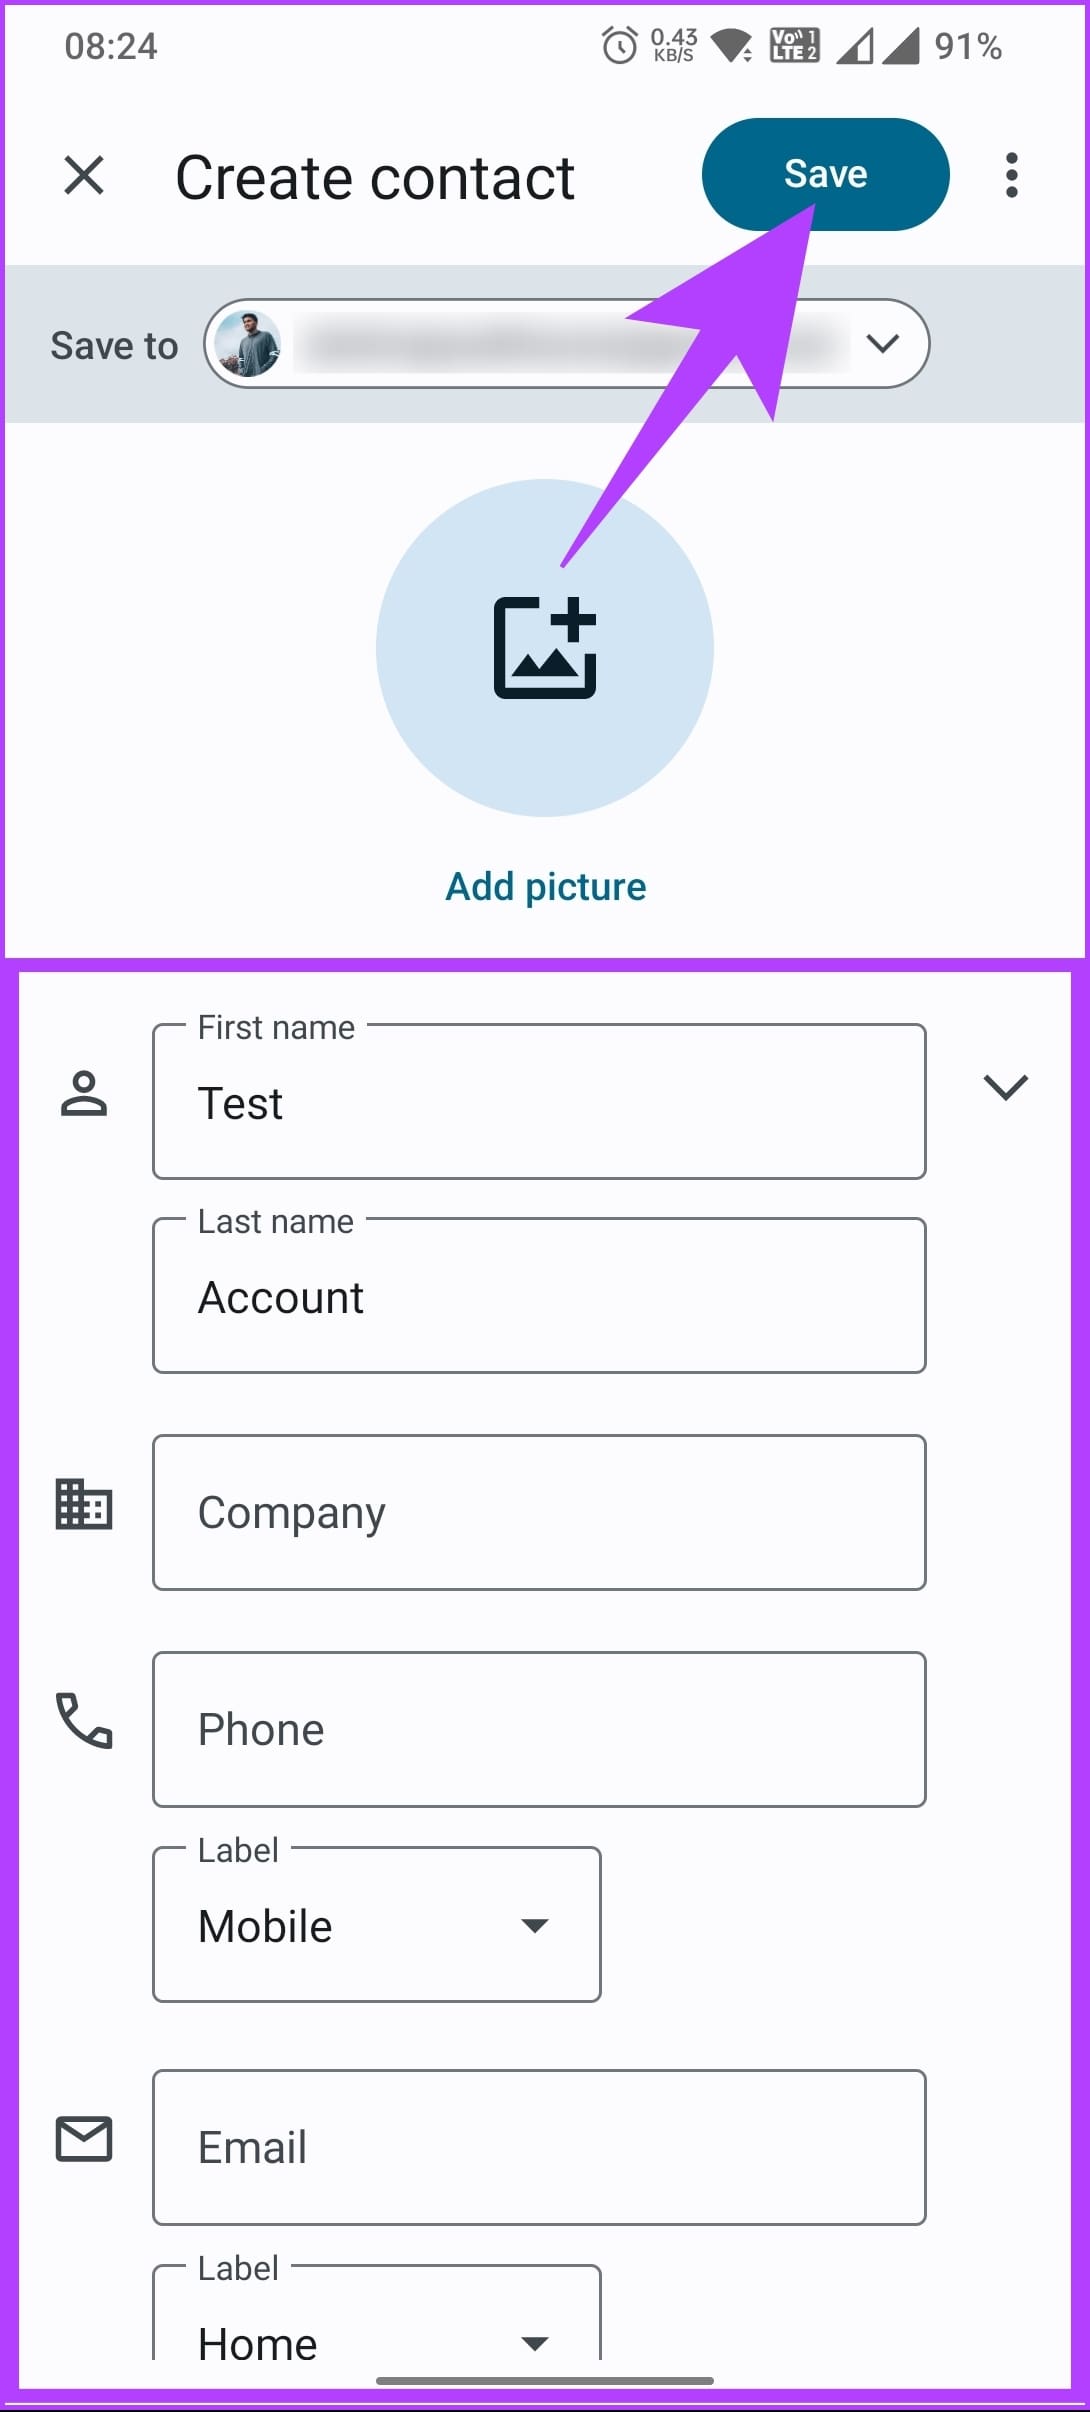
Step 3: Tap the plus (+) floating button in the Contacts app. Ensure you have selected the correct email address, and enter contact details such as first name, last name, etc.
Step 4: Once you enter the details, tap Save in the top navigation bar.
On iOS
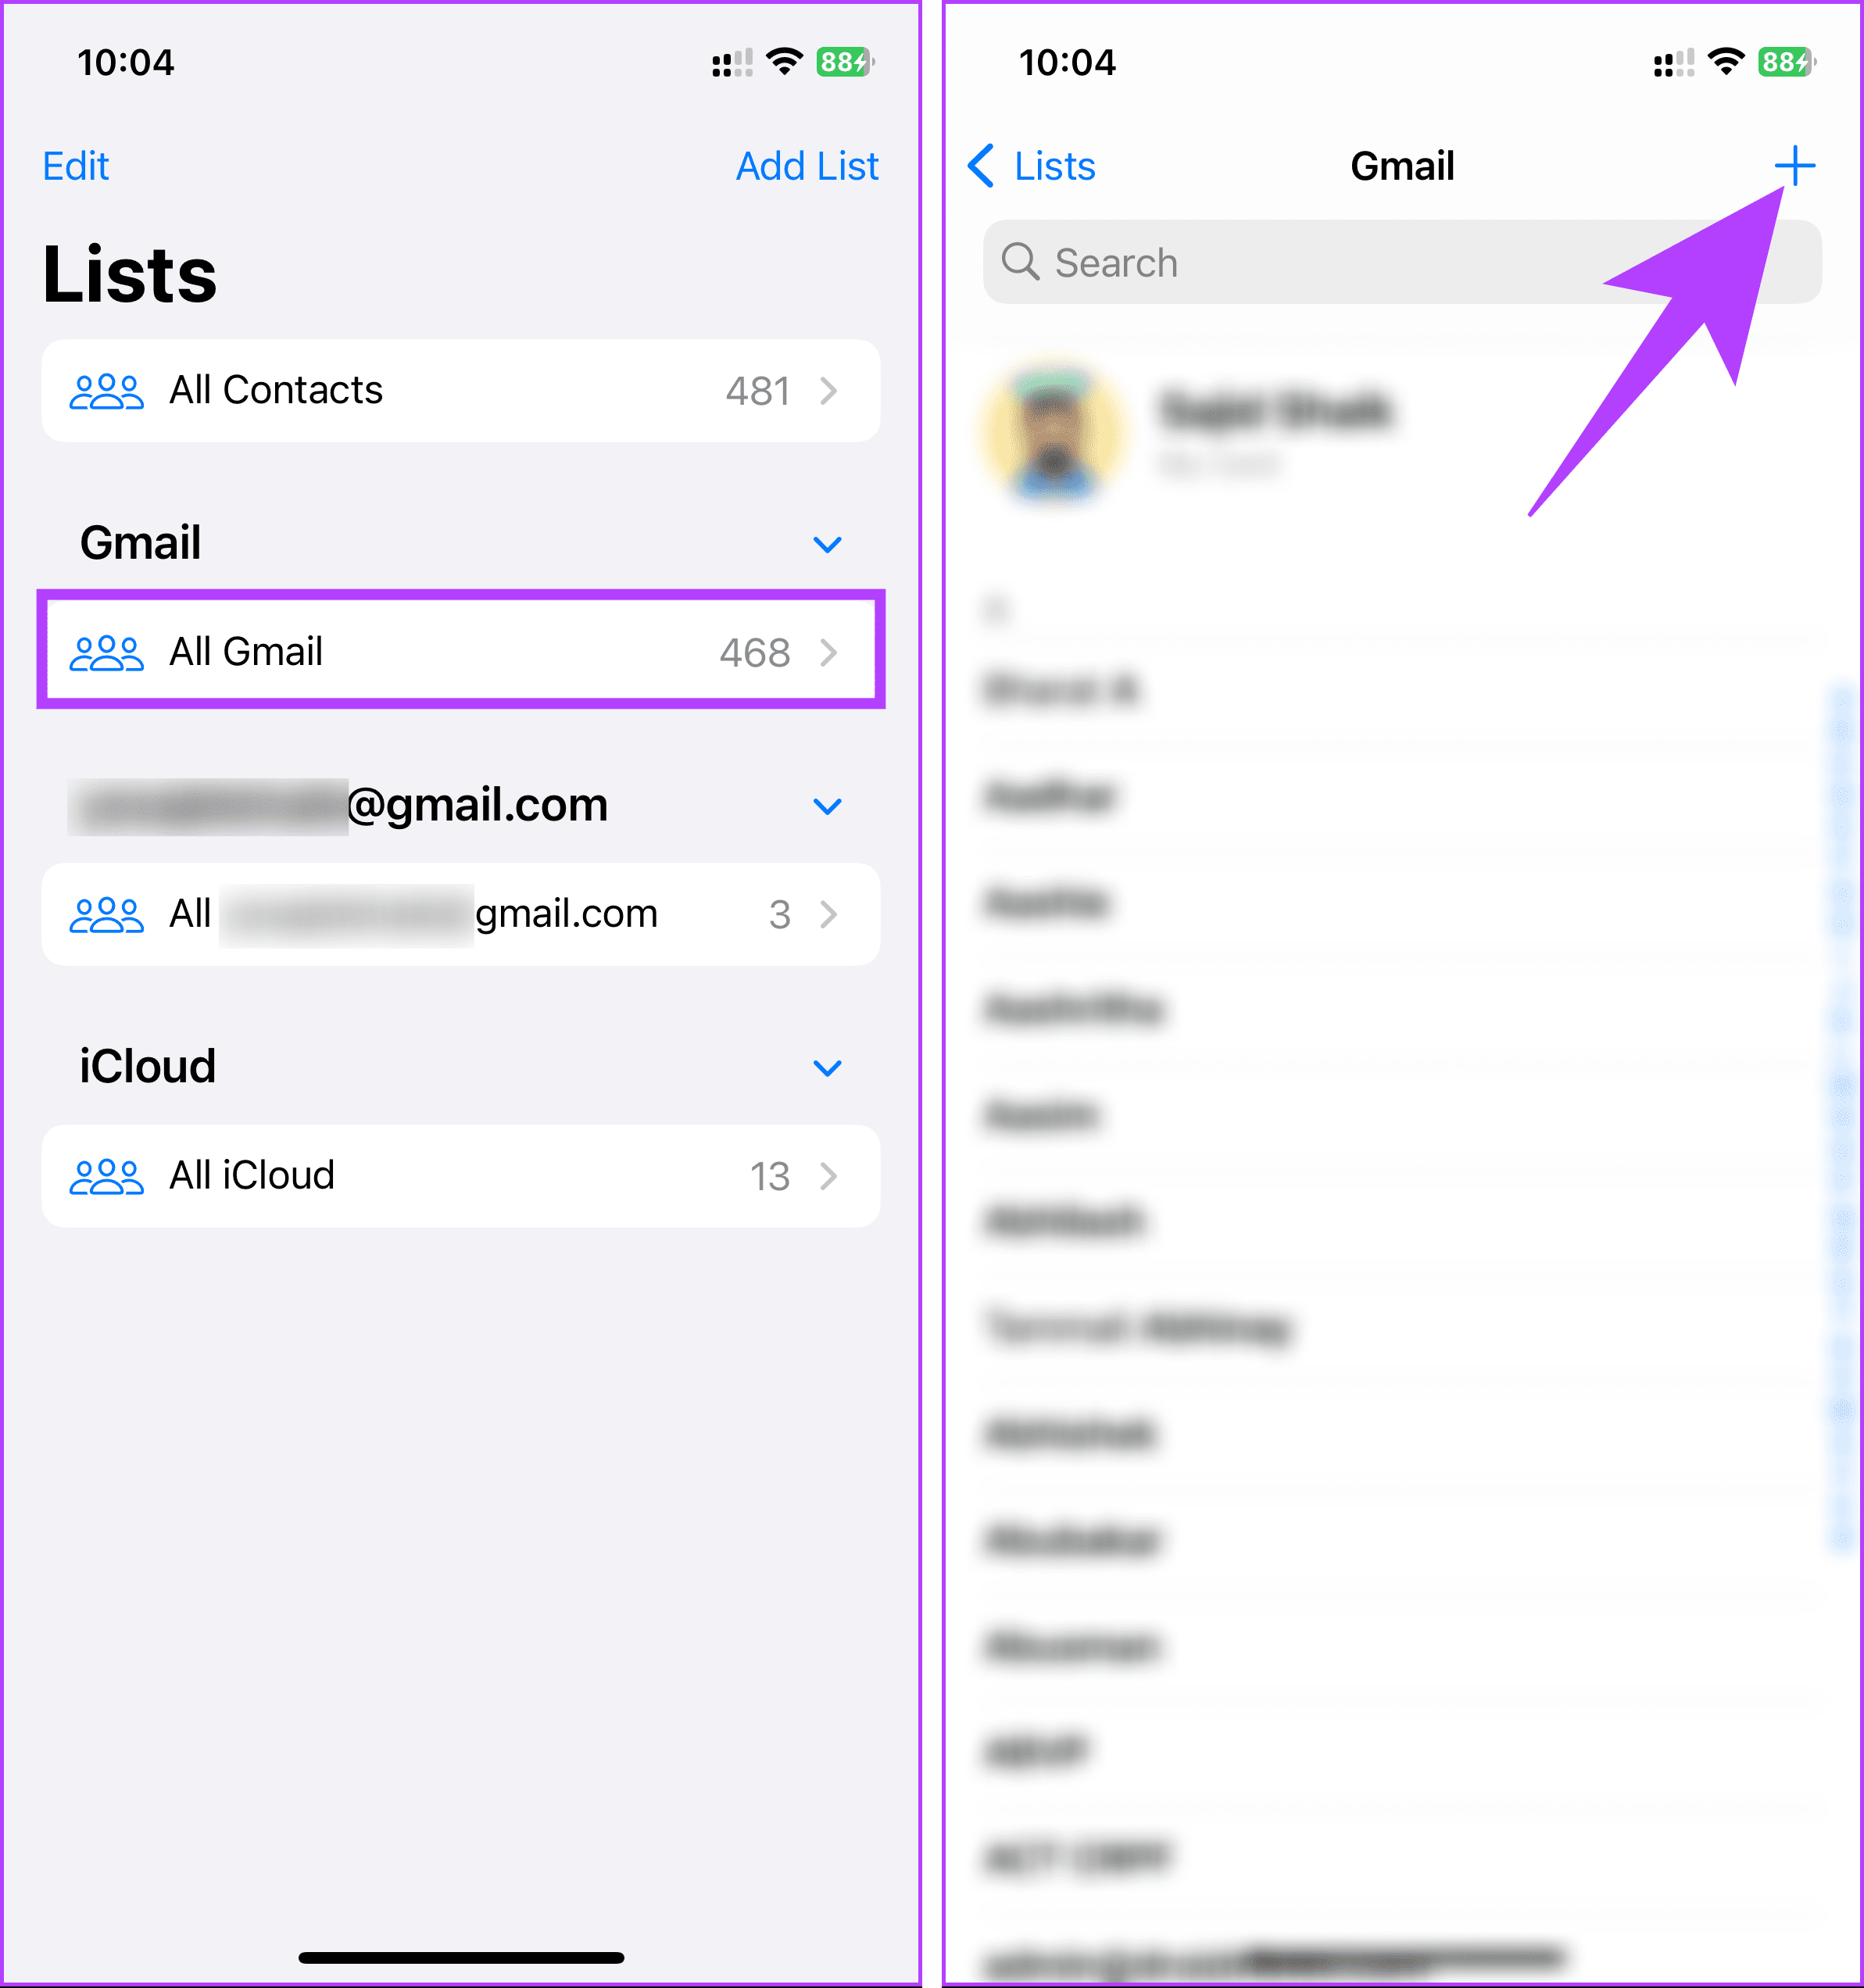
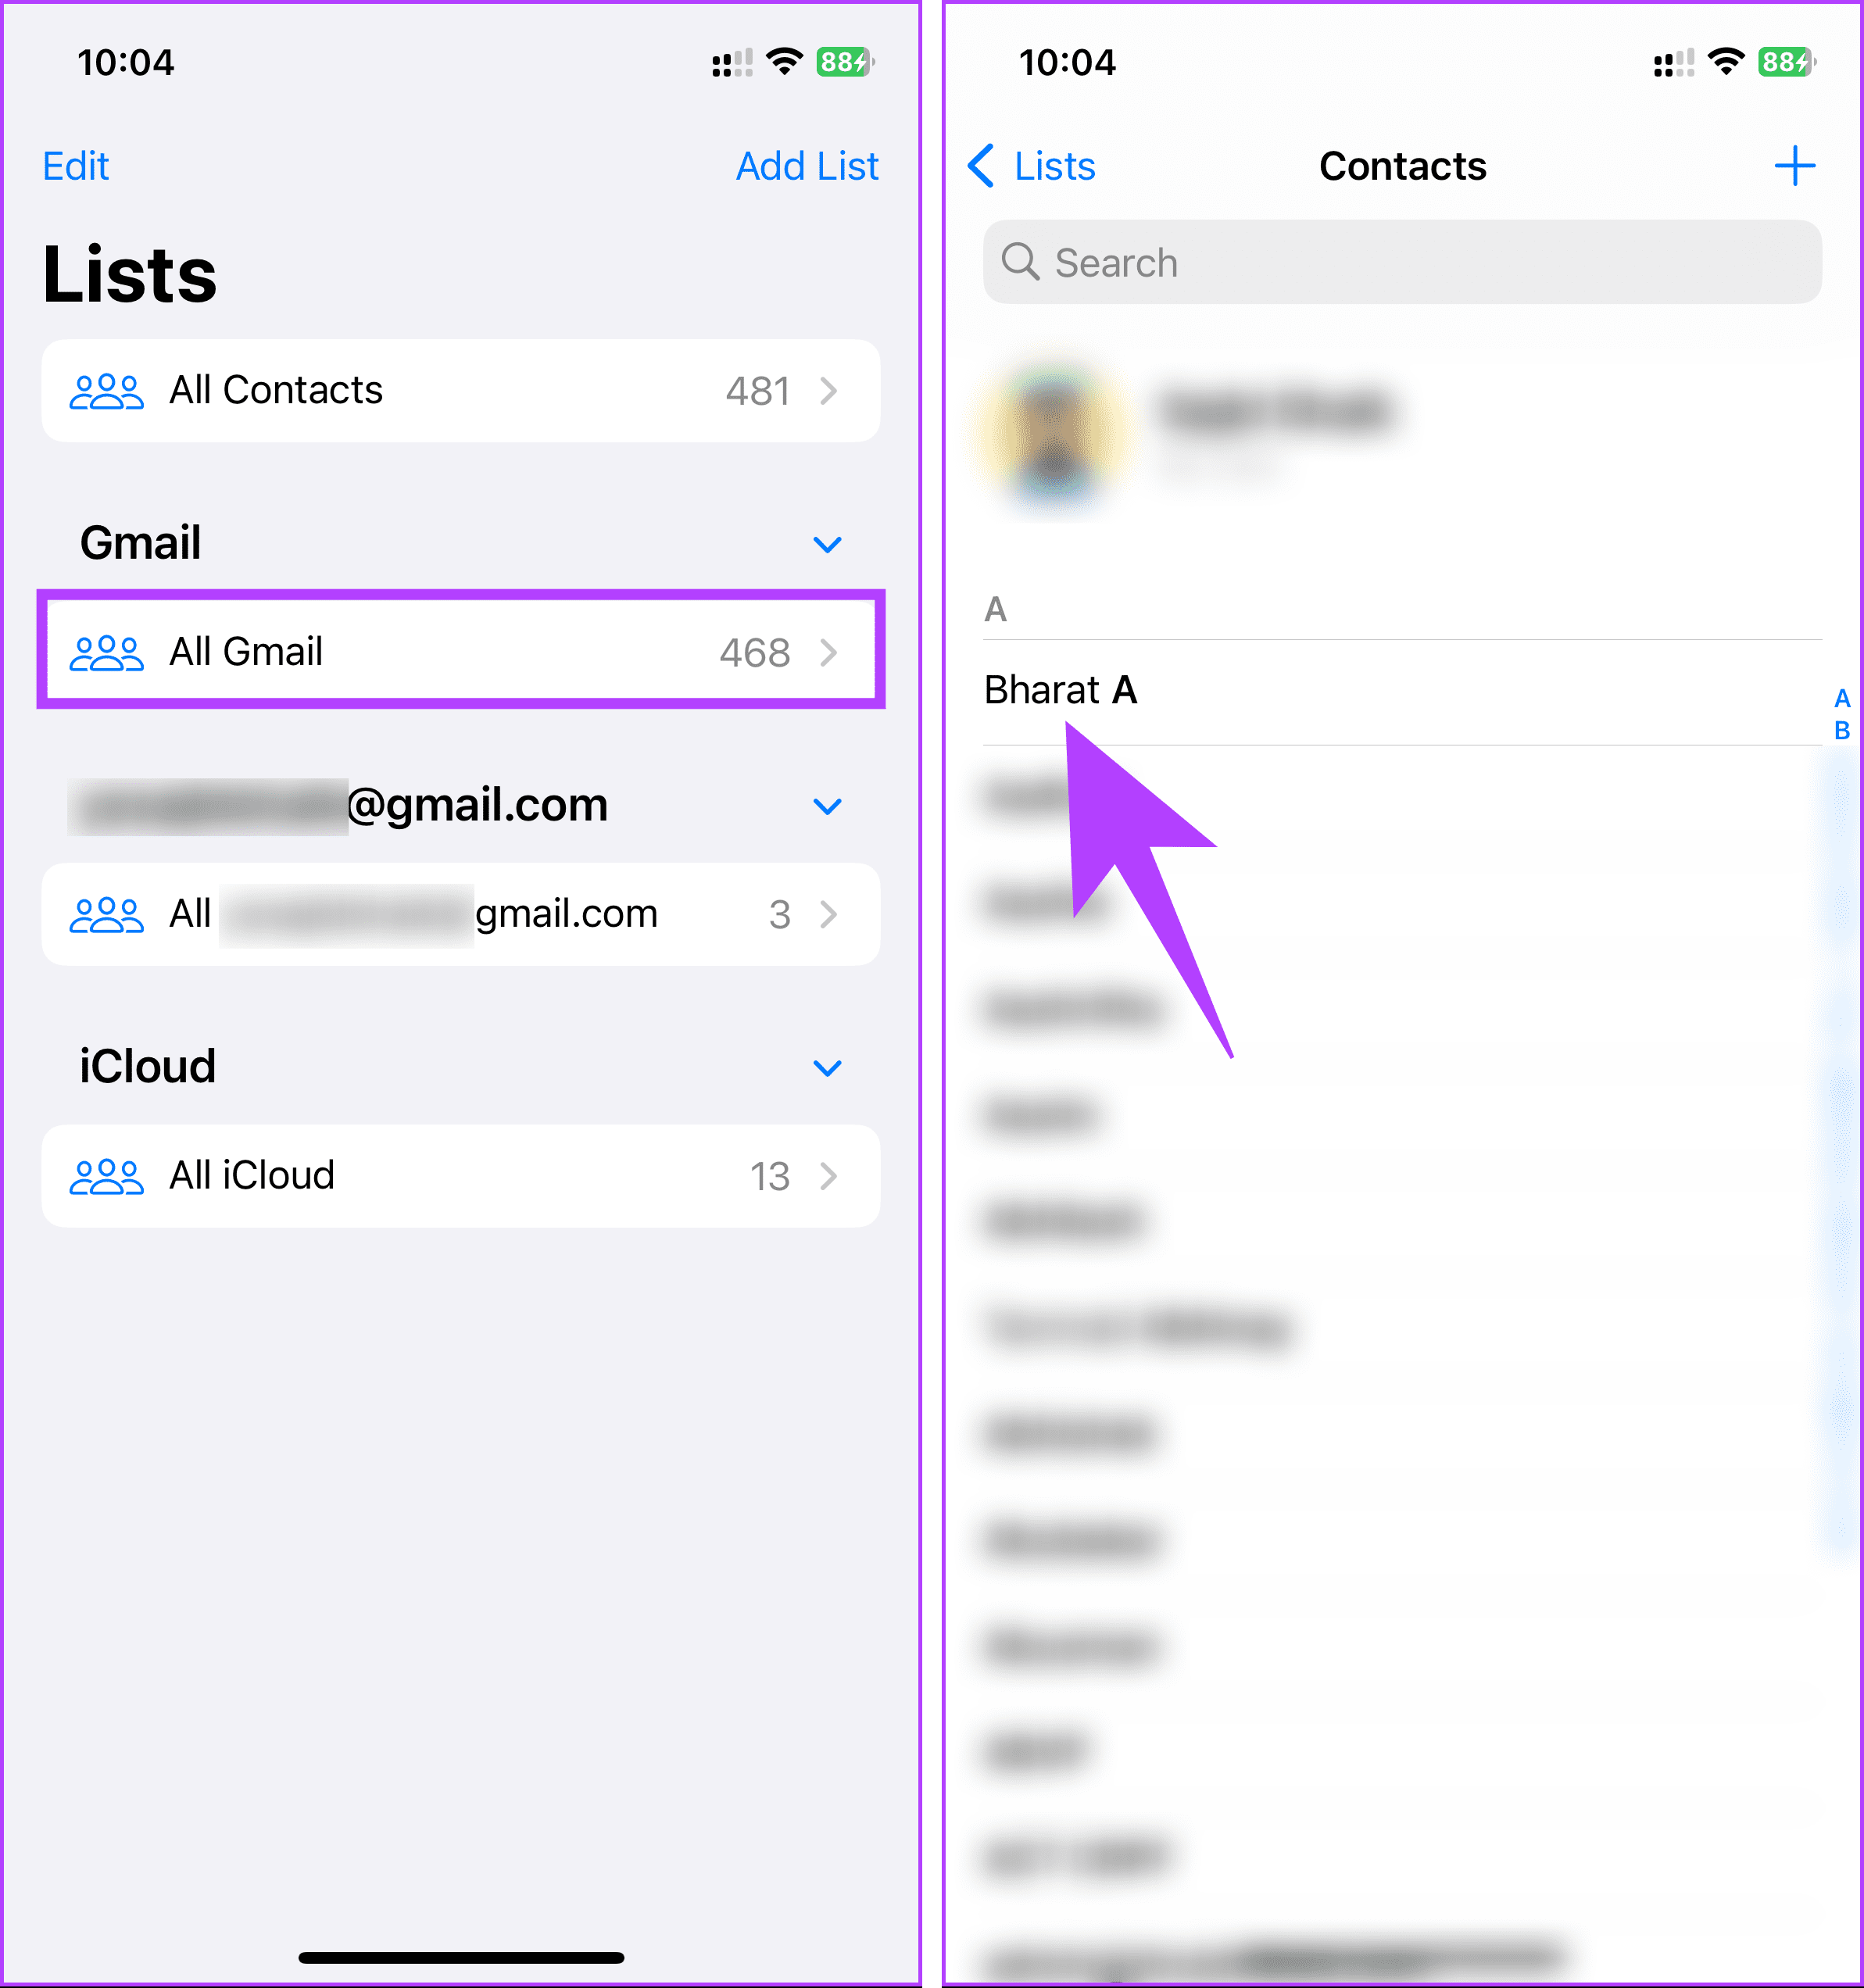
Step 1: Firstly, launch the Contacts app on your iPhone. In the Contacts app, tap on Lists in the top left corner.
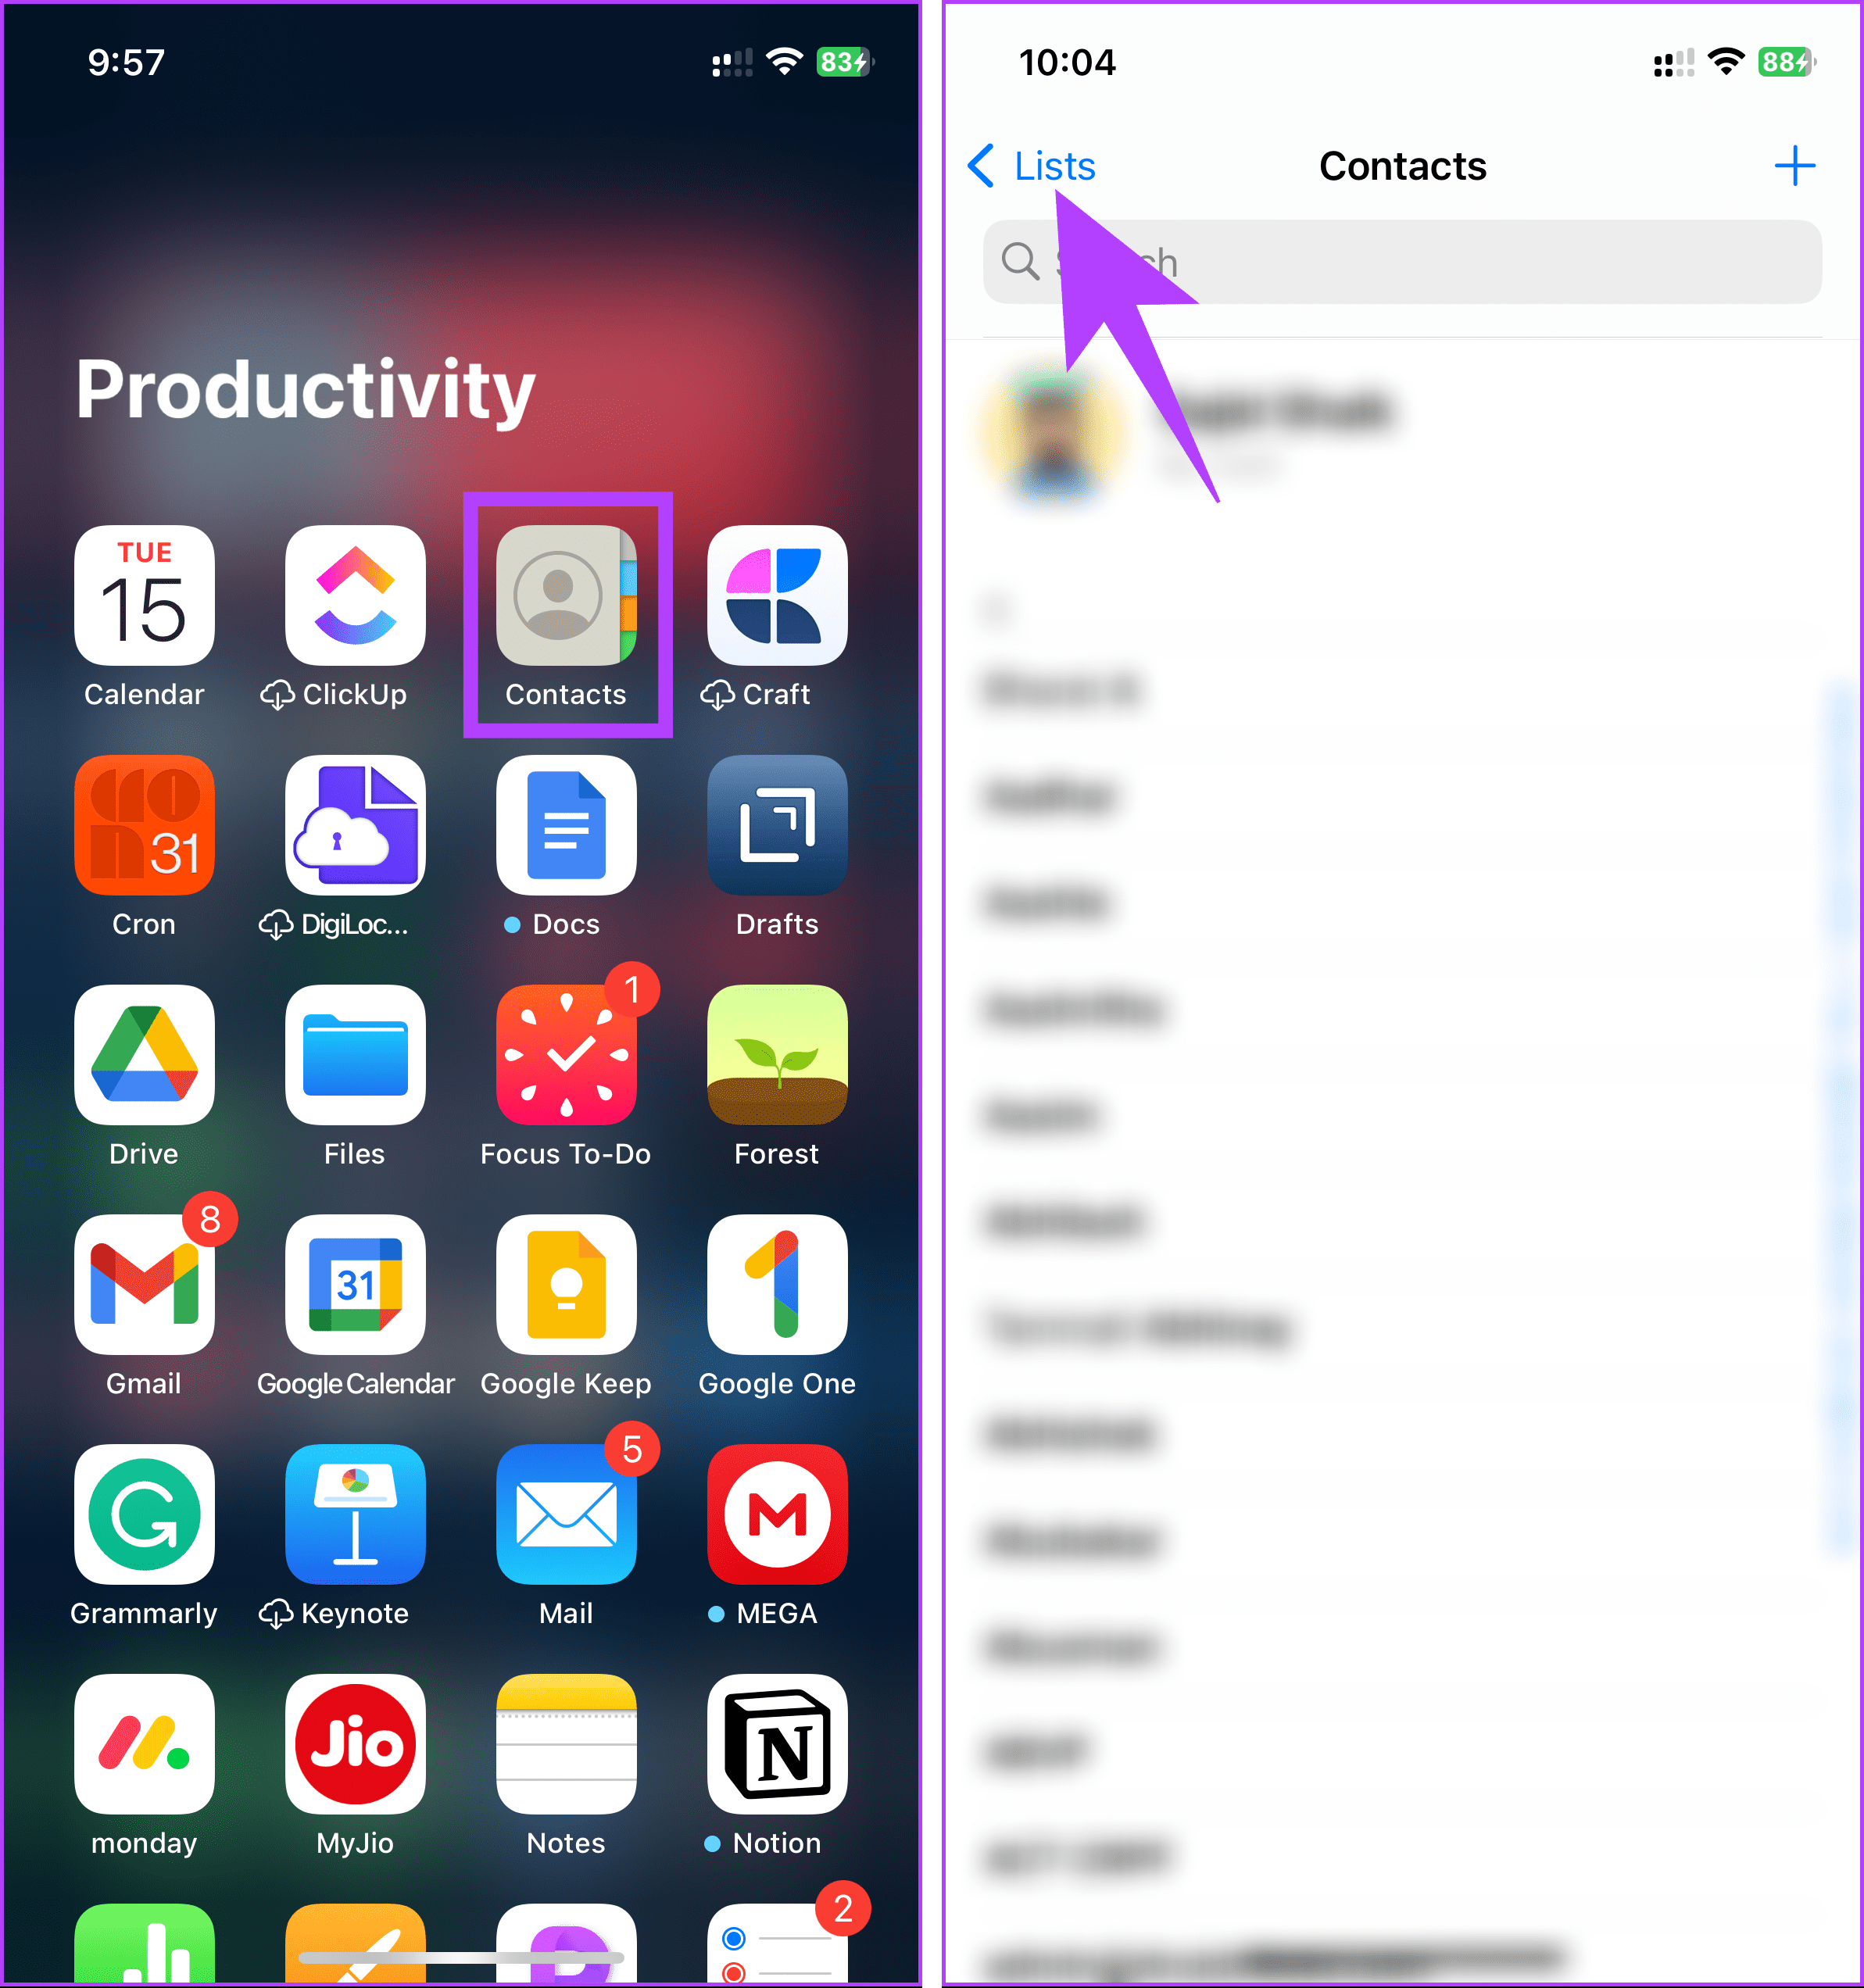
Step 2: Select the account you want to add your new contacts to from the list of accounts. We are choosing the All Gmail option, but you can choose your preferred account.
Step 3: You will be brought to the contacts list under All Gmail. Now, tap the Plus (+) button in the top right corner.
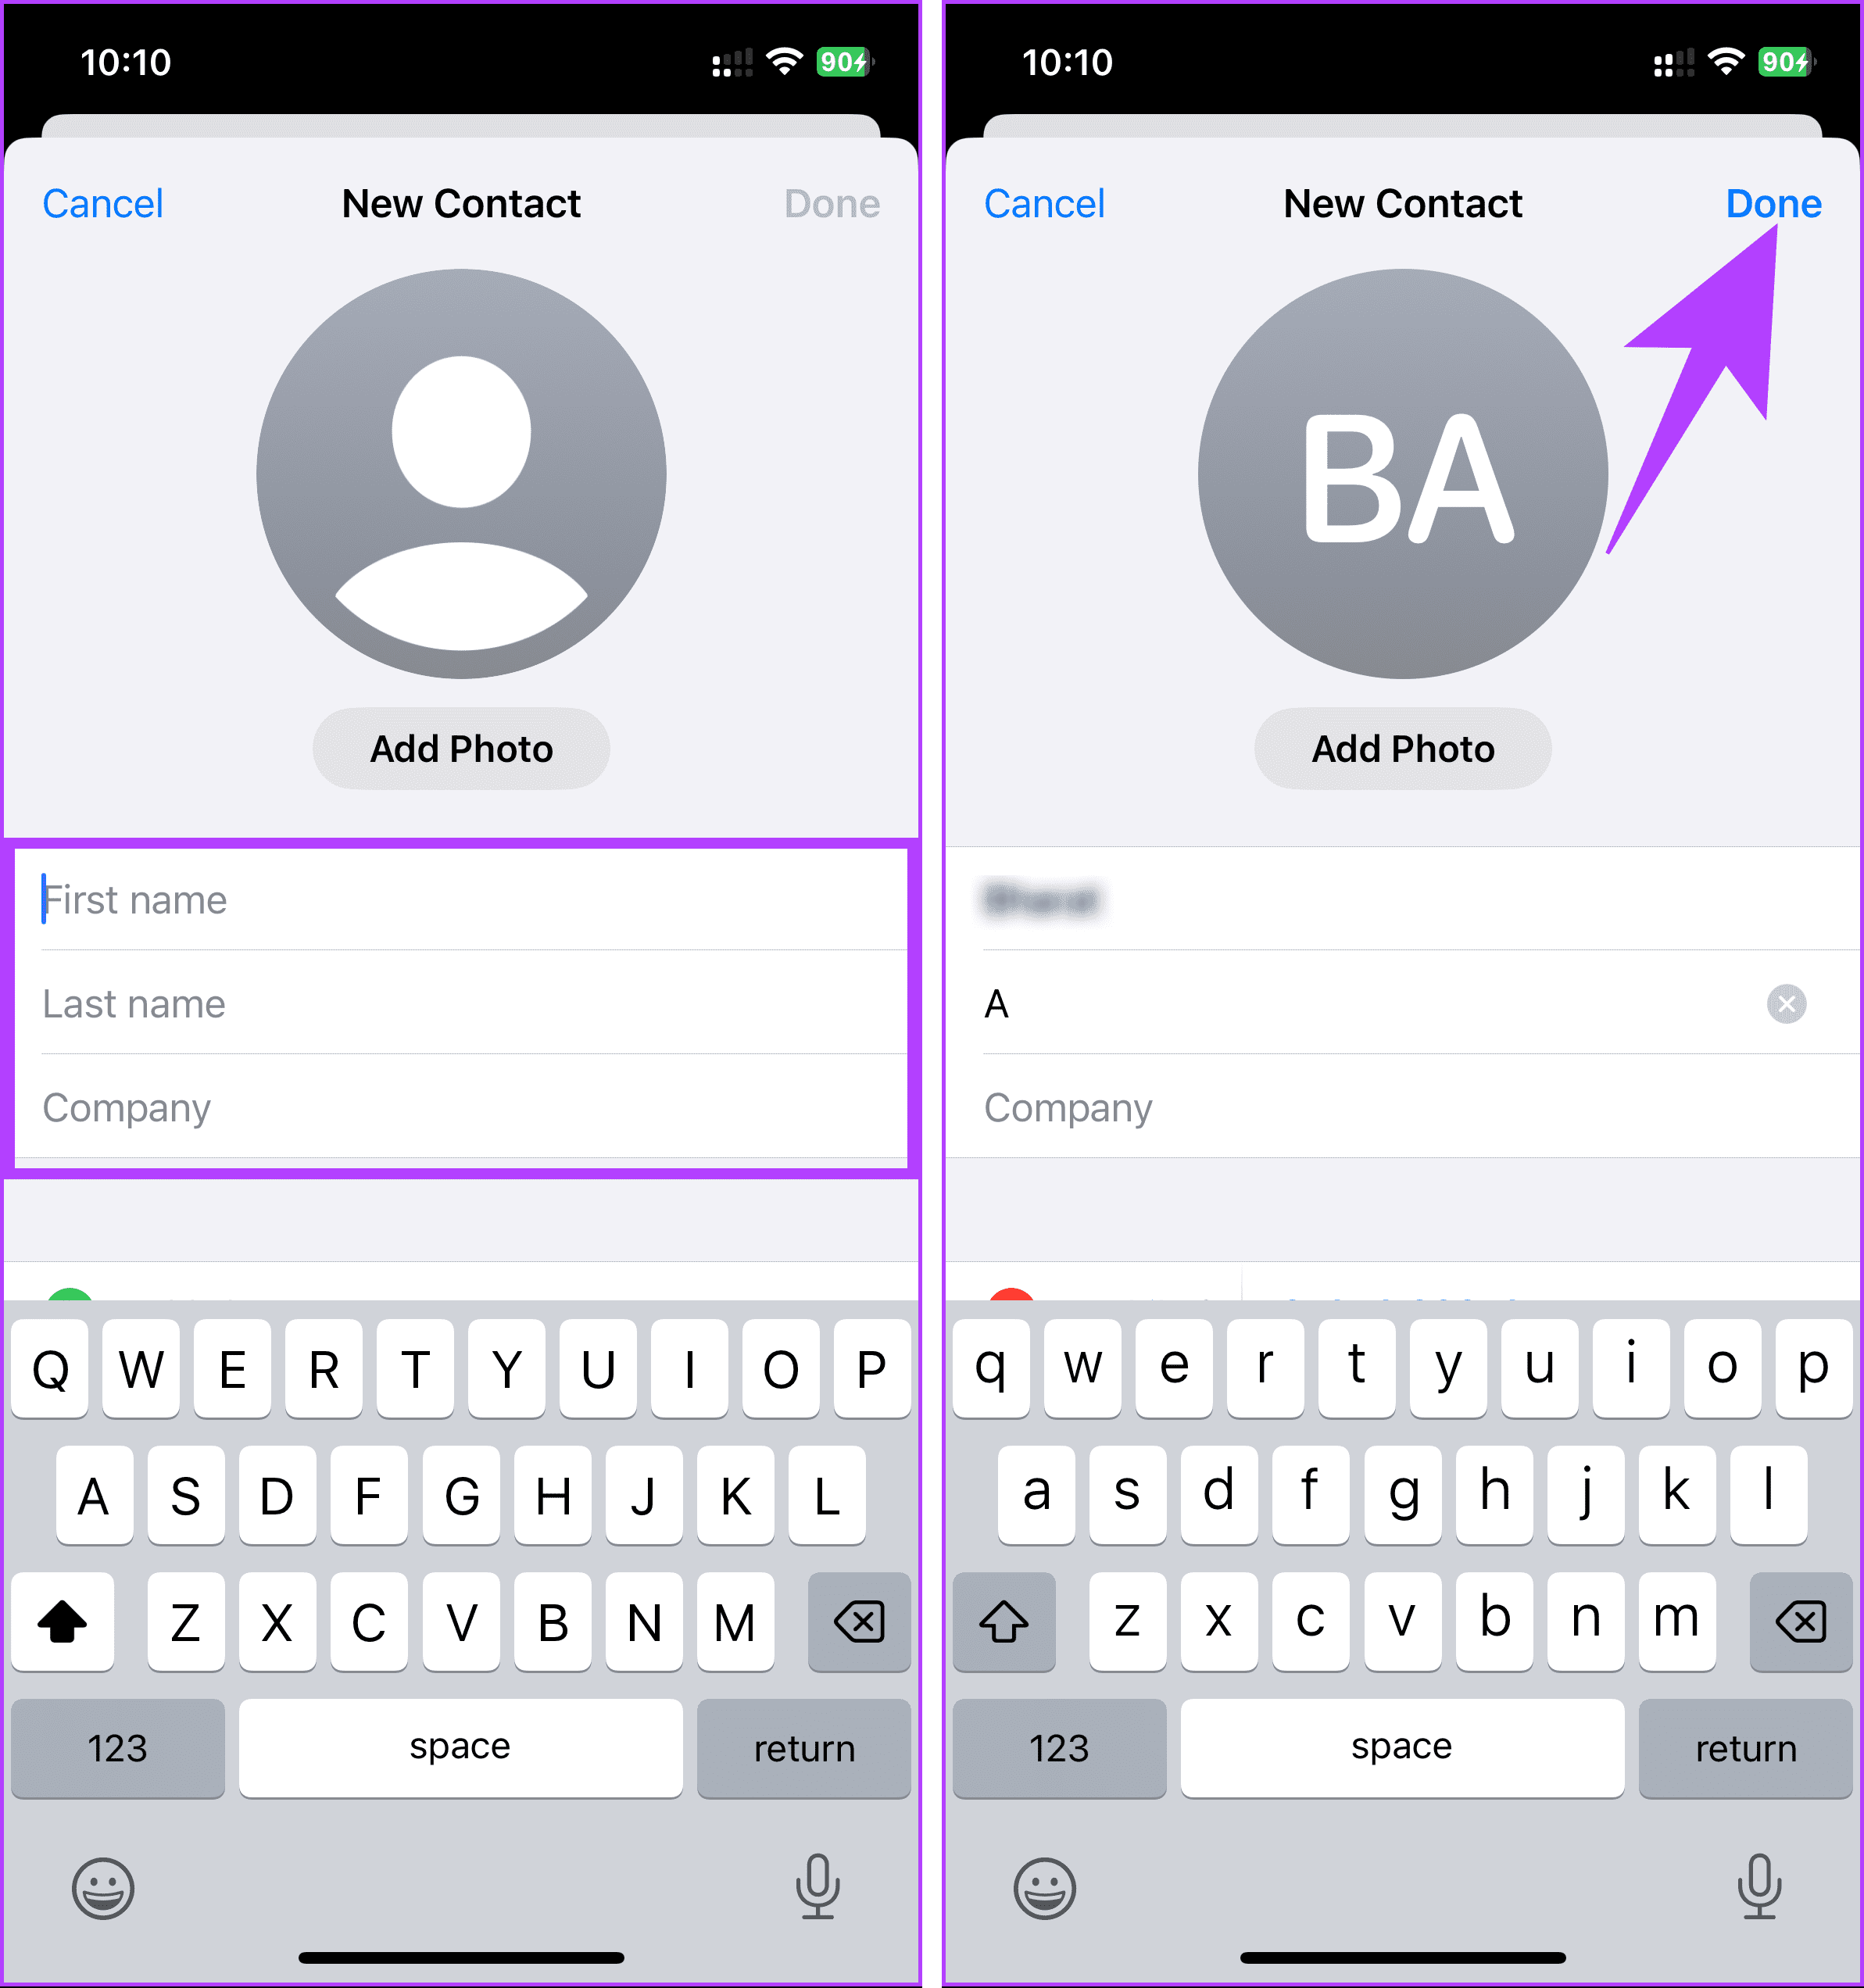
Step 4: In the New Contact form, enter all the details, such as first name, last name, phone number, and so on, of your new contact.
Step 5: Once done, tap Done in the top right corner.
There you go. You have added a contact to your Gmail account list on your iOS device. If this method is too long or you don’t want to go through the hassle of adding a contact to your device, you can do it directly from Gmail; keep reading.
Also Read: How to transfer your Google Contacts to iPhone via iCloud
How to Add a Contact From a Received Email
Have you ever received an email from someone you later wanted to add as a contact? You don’t have to go through the long steps mentioned above. Instead, follow the steps below.
Note: The steps are similar across different devices running the Gmail app, but we will use an Android device for demonstration purposes.
Step 1: Open the Gmail app on your device. Navigate to the email from the person you want to add to your contacts.
Step 2: Once the email opens, tap on the profile image. From the bottom sheet, tap the ‘Add to Contacts’ icon in the right-hand corner.
Note: If you are on the web version, hover over the person’s profile picture.
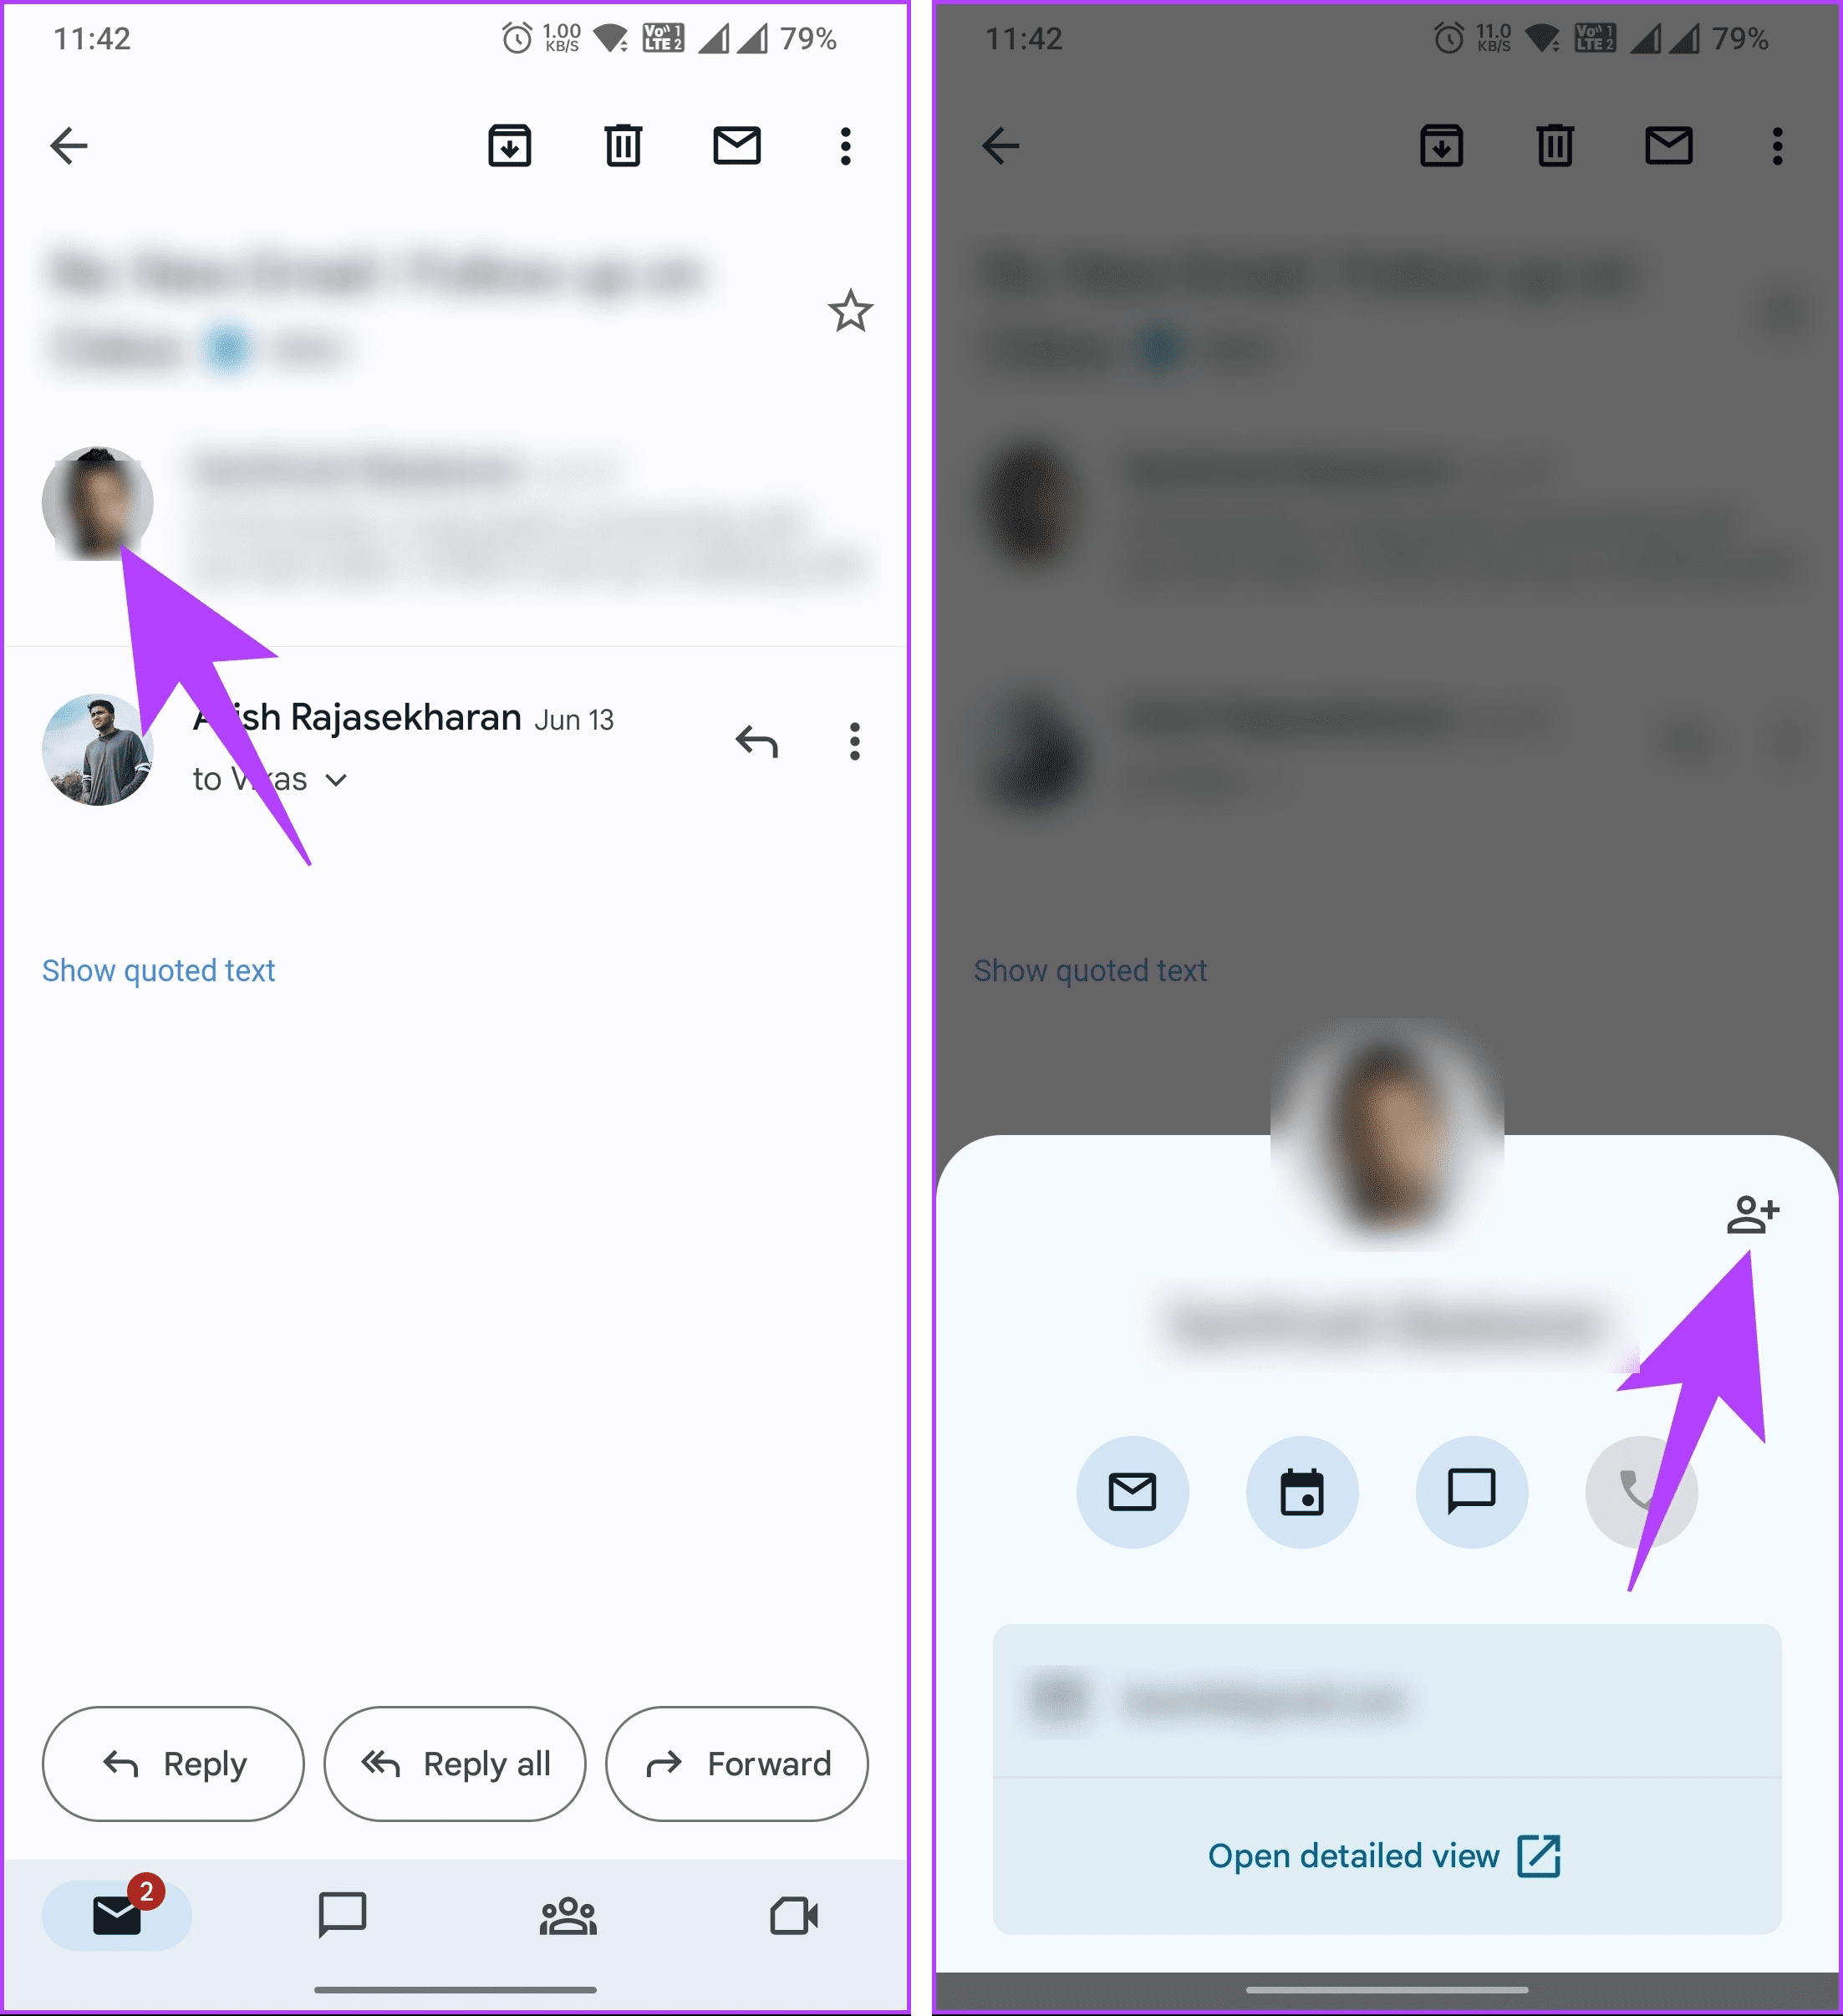
Step 3: Gmail fetches all the details, such as name and email address. Make the necessary changes and tap Save.
What if you already have a contact added to your Gmail account but want to edit specific details or delete the contact? Continue reading.
How to Edit or Delete Your Gmail Contacts
Gmail contact details can be reviewed, changed, or deleted fairly easily. It is important to note that once you change or delete a contact, it will no longer exist (unless you pull it out from Trash) in your Google account, and because it is linked to contacts and synced universally, you cannot have the contact on one device while removing it from another.
Therefore, we recommend backing up your contacts before following these steps. Let’s begin with the steps for the desktop.
On Desktop
Step 1: Launch your favorite browser on your Windows, Mac, or Linux computer. Go to Google Contacts, and log in with your credentials.
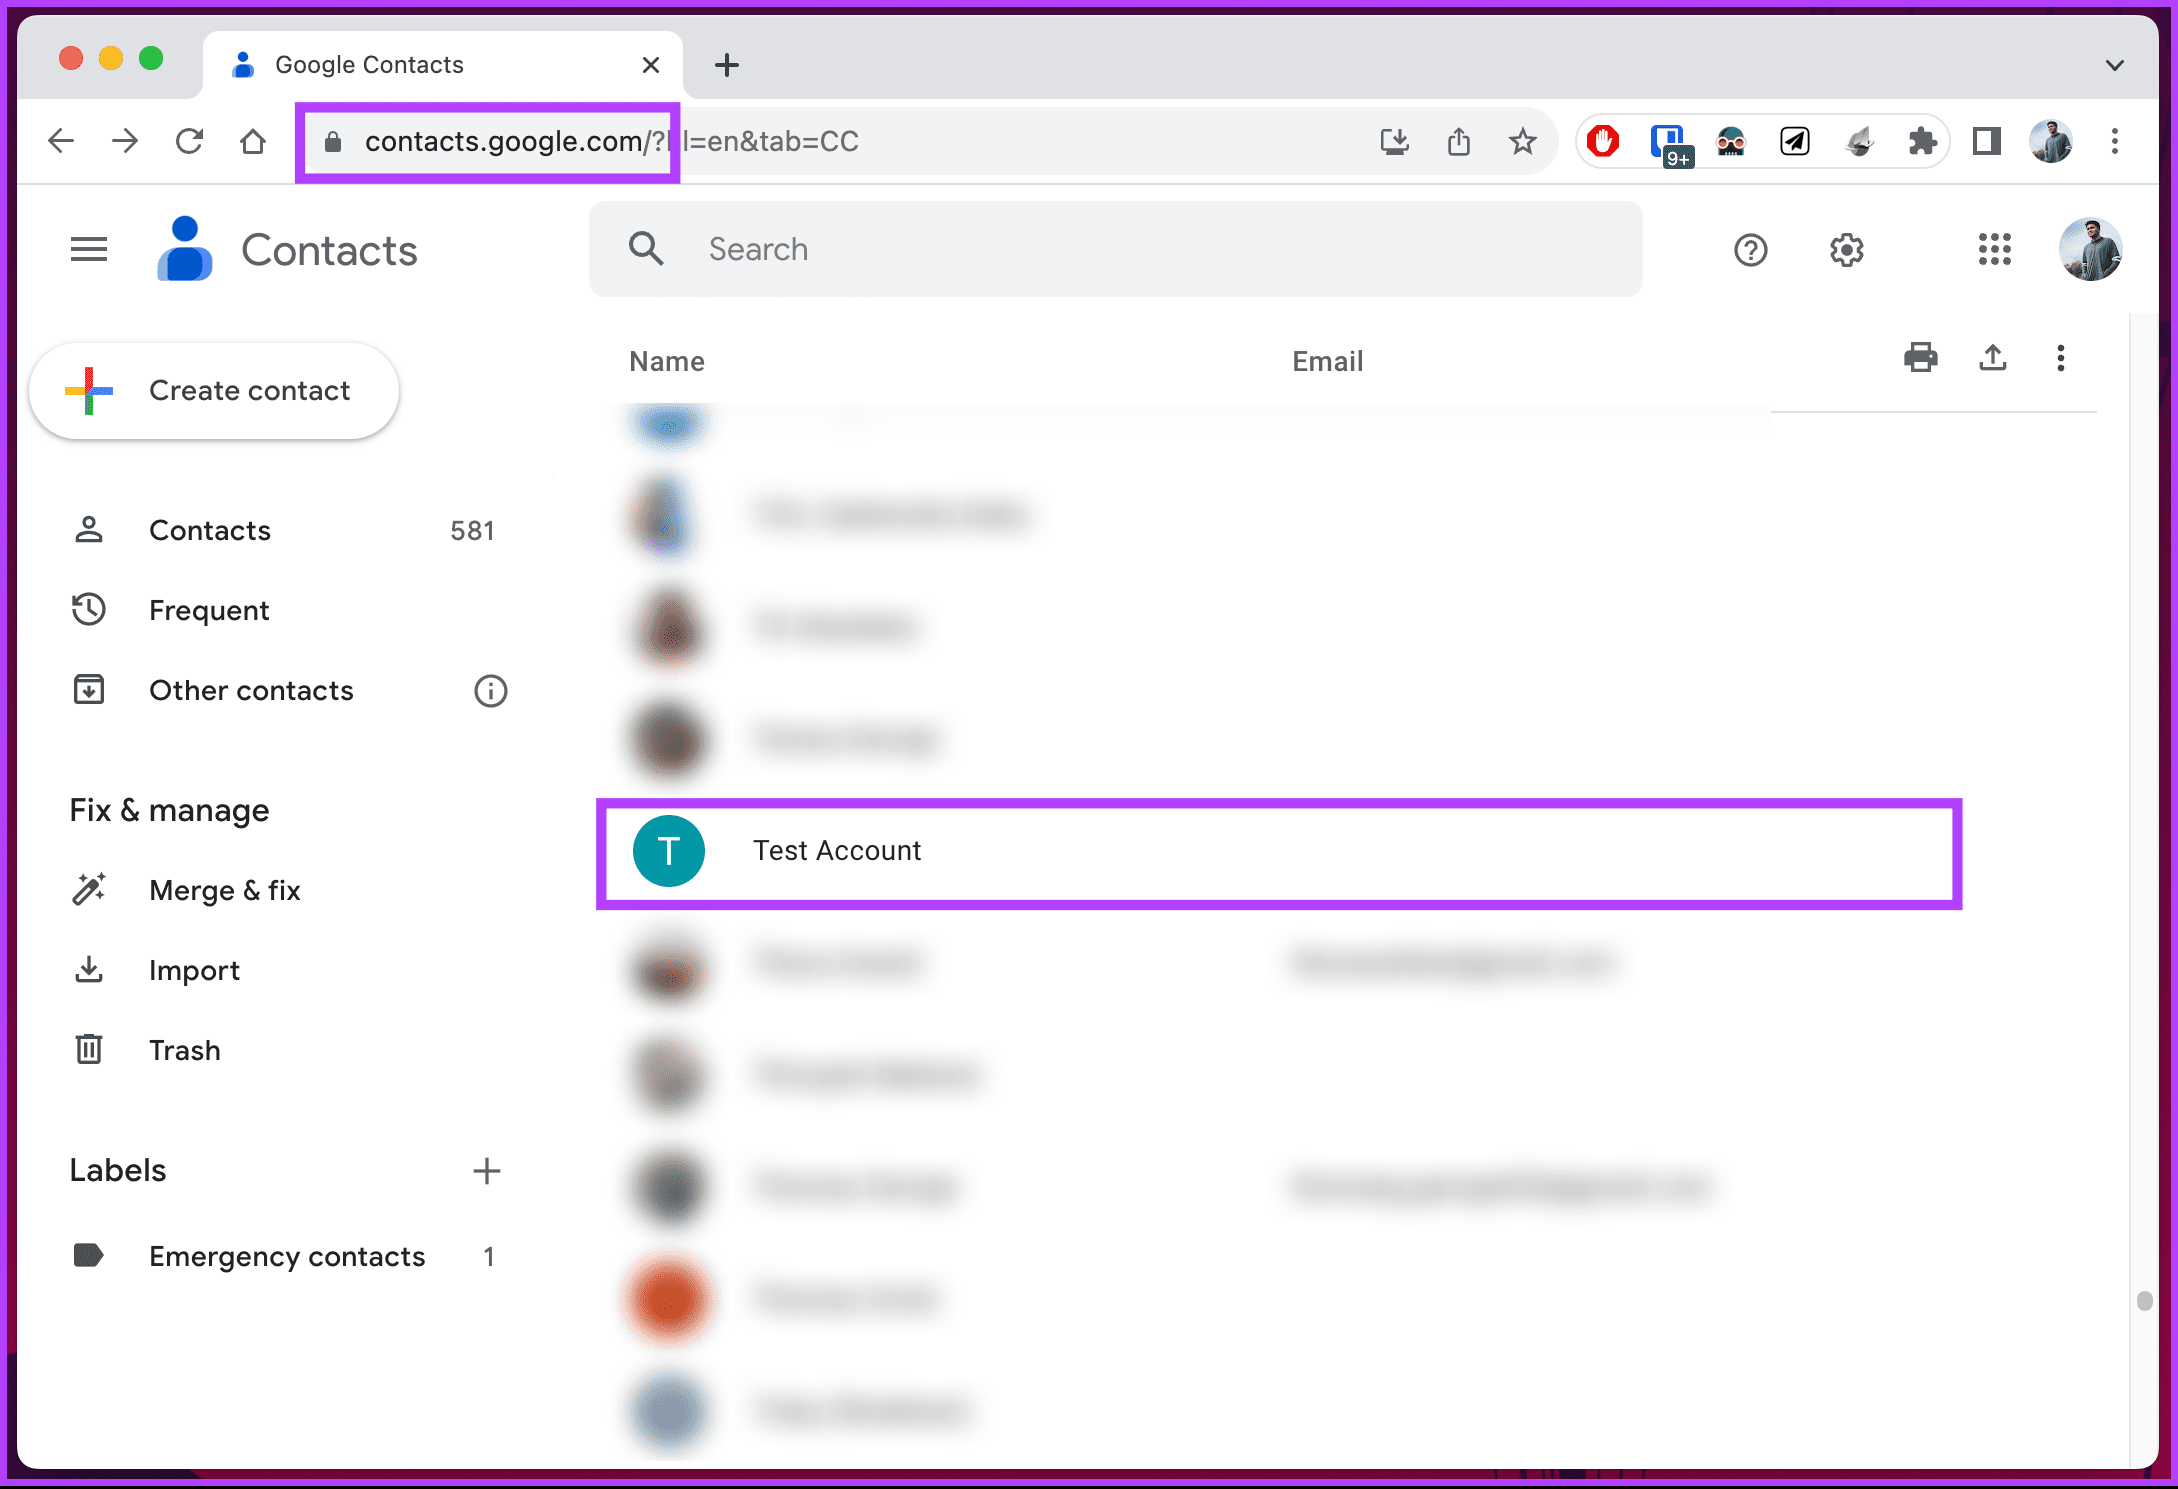
Step 2: Choose the contact you want to update or delete from the list and click on it.
Note: You can directly go to the Edit section by hovering over the contact details and clicking the pencil (Edit contact) tool.
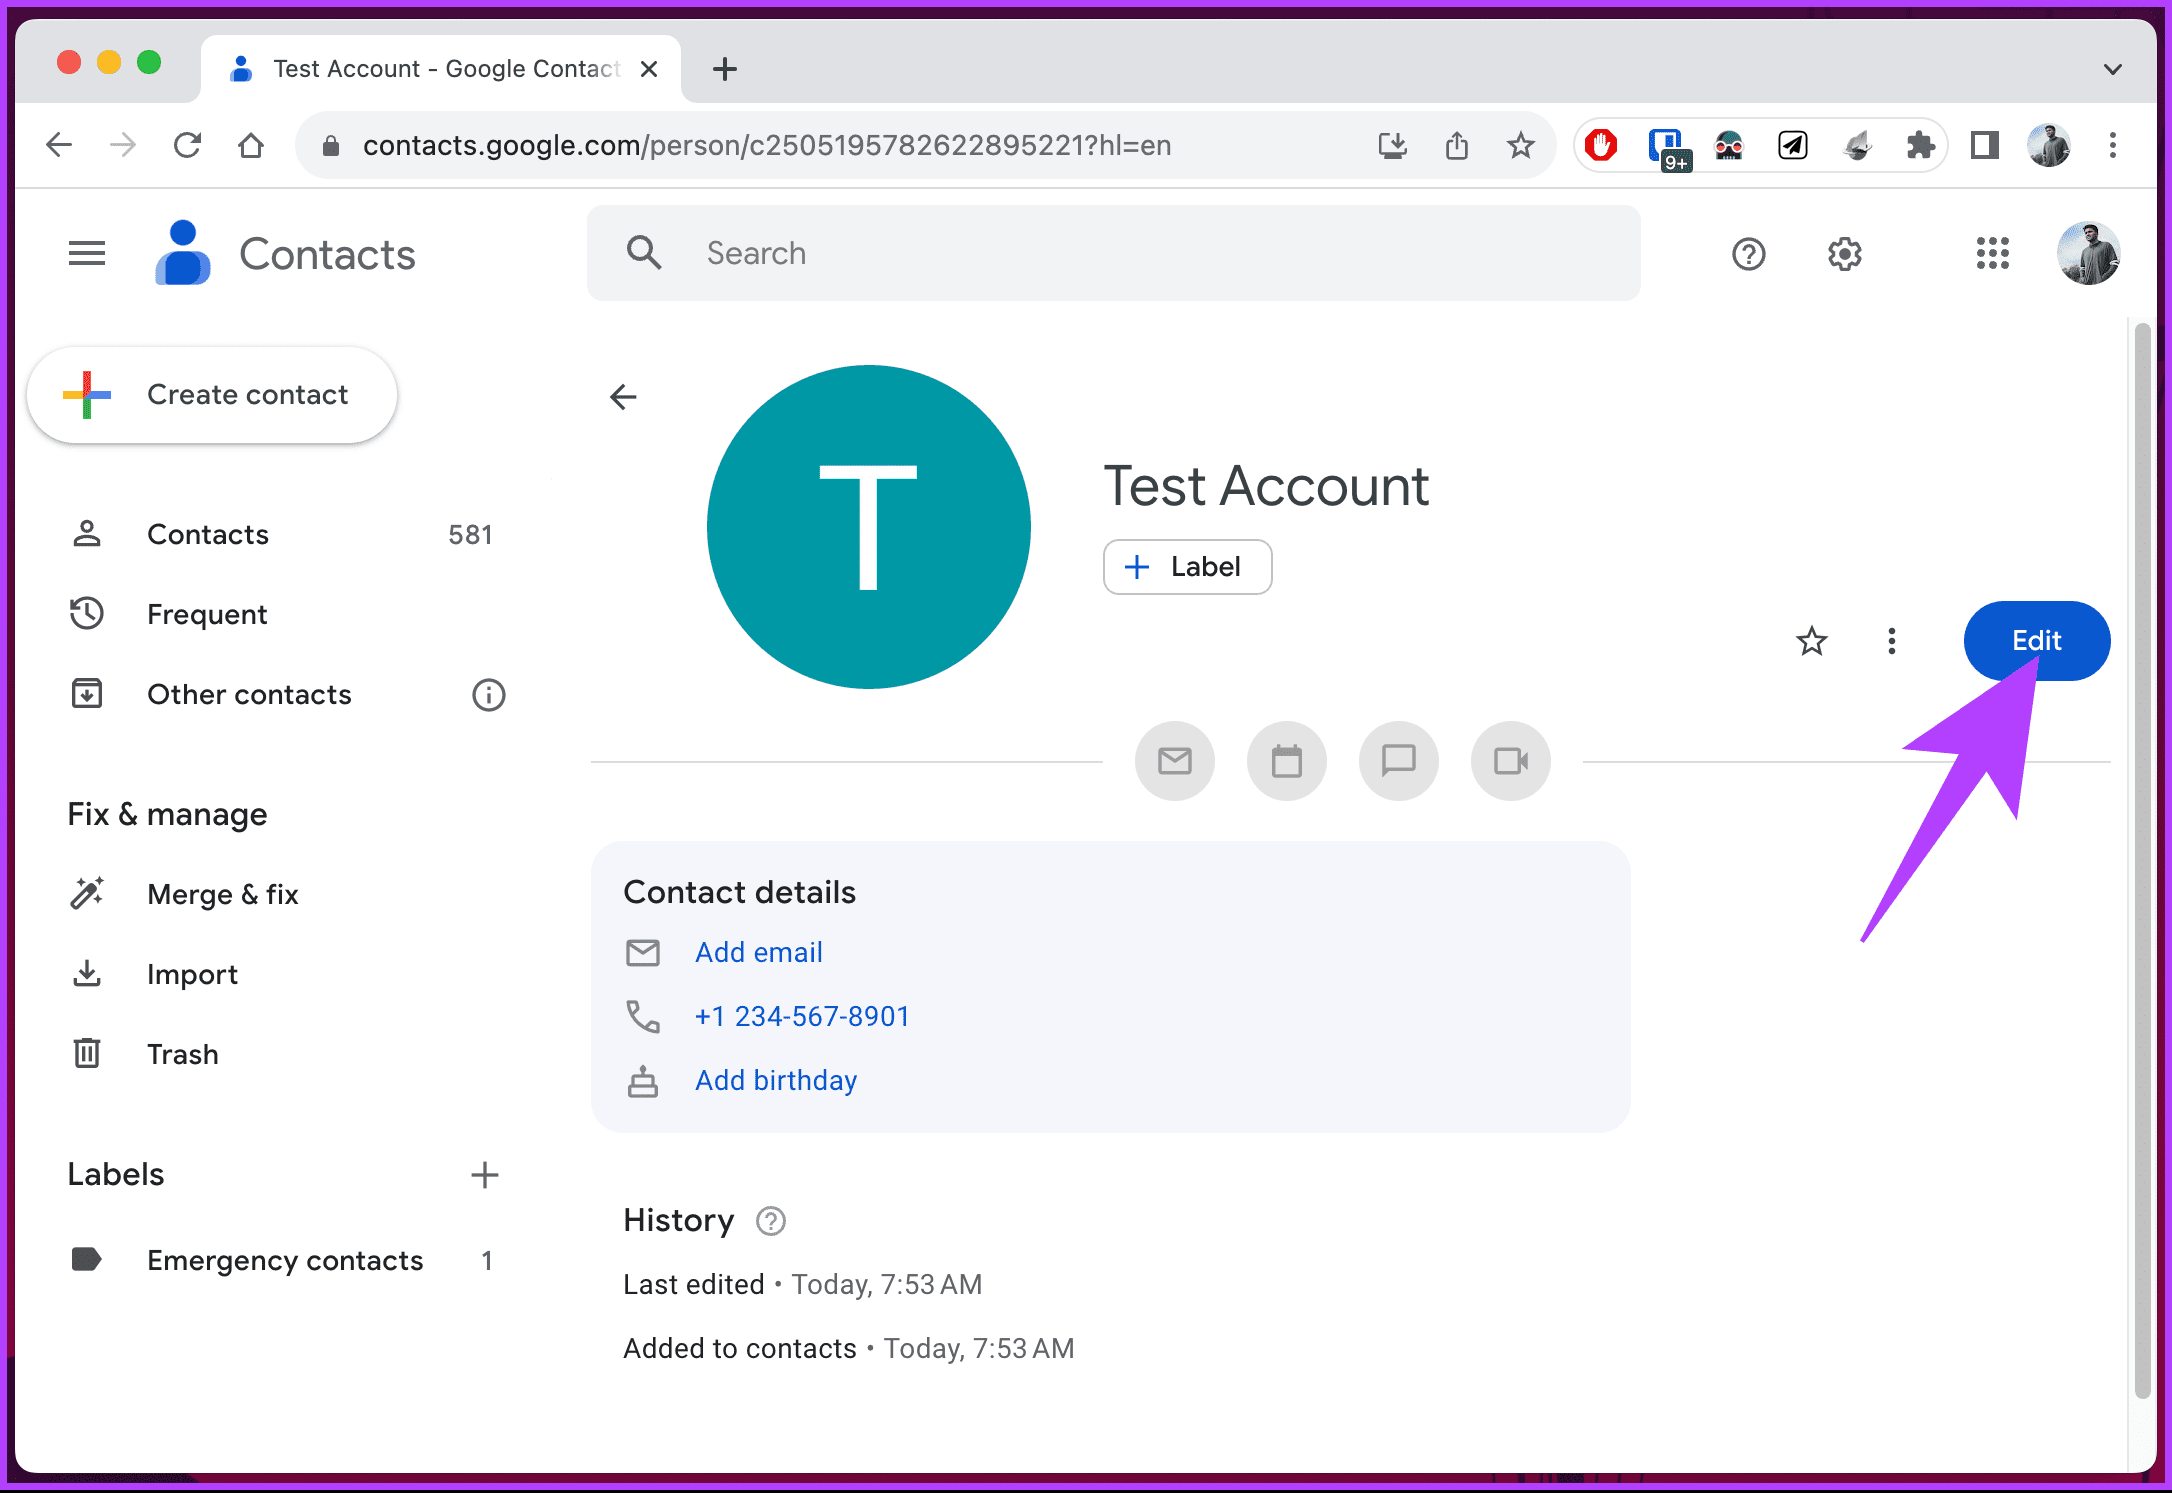
Step 3: Select Edit in the top-right corner of the contact details.
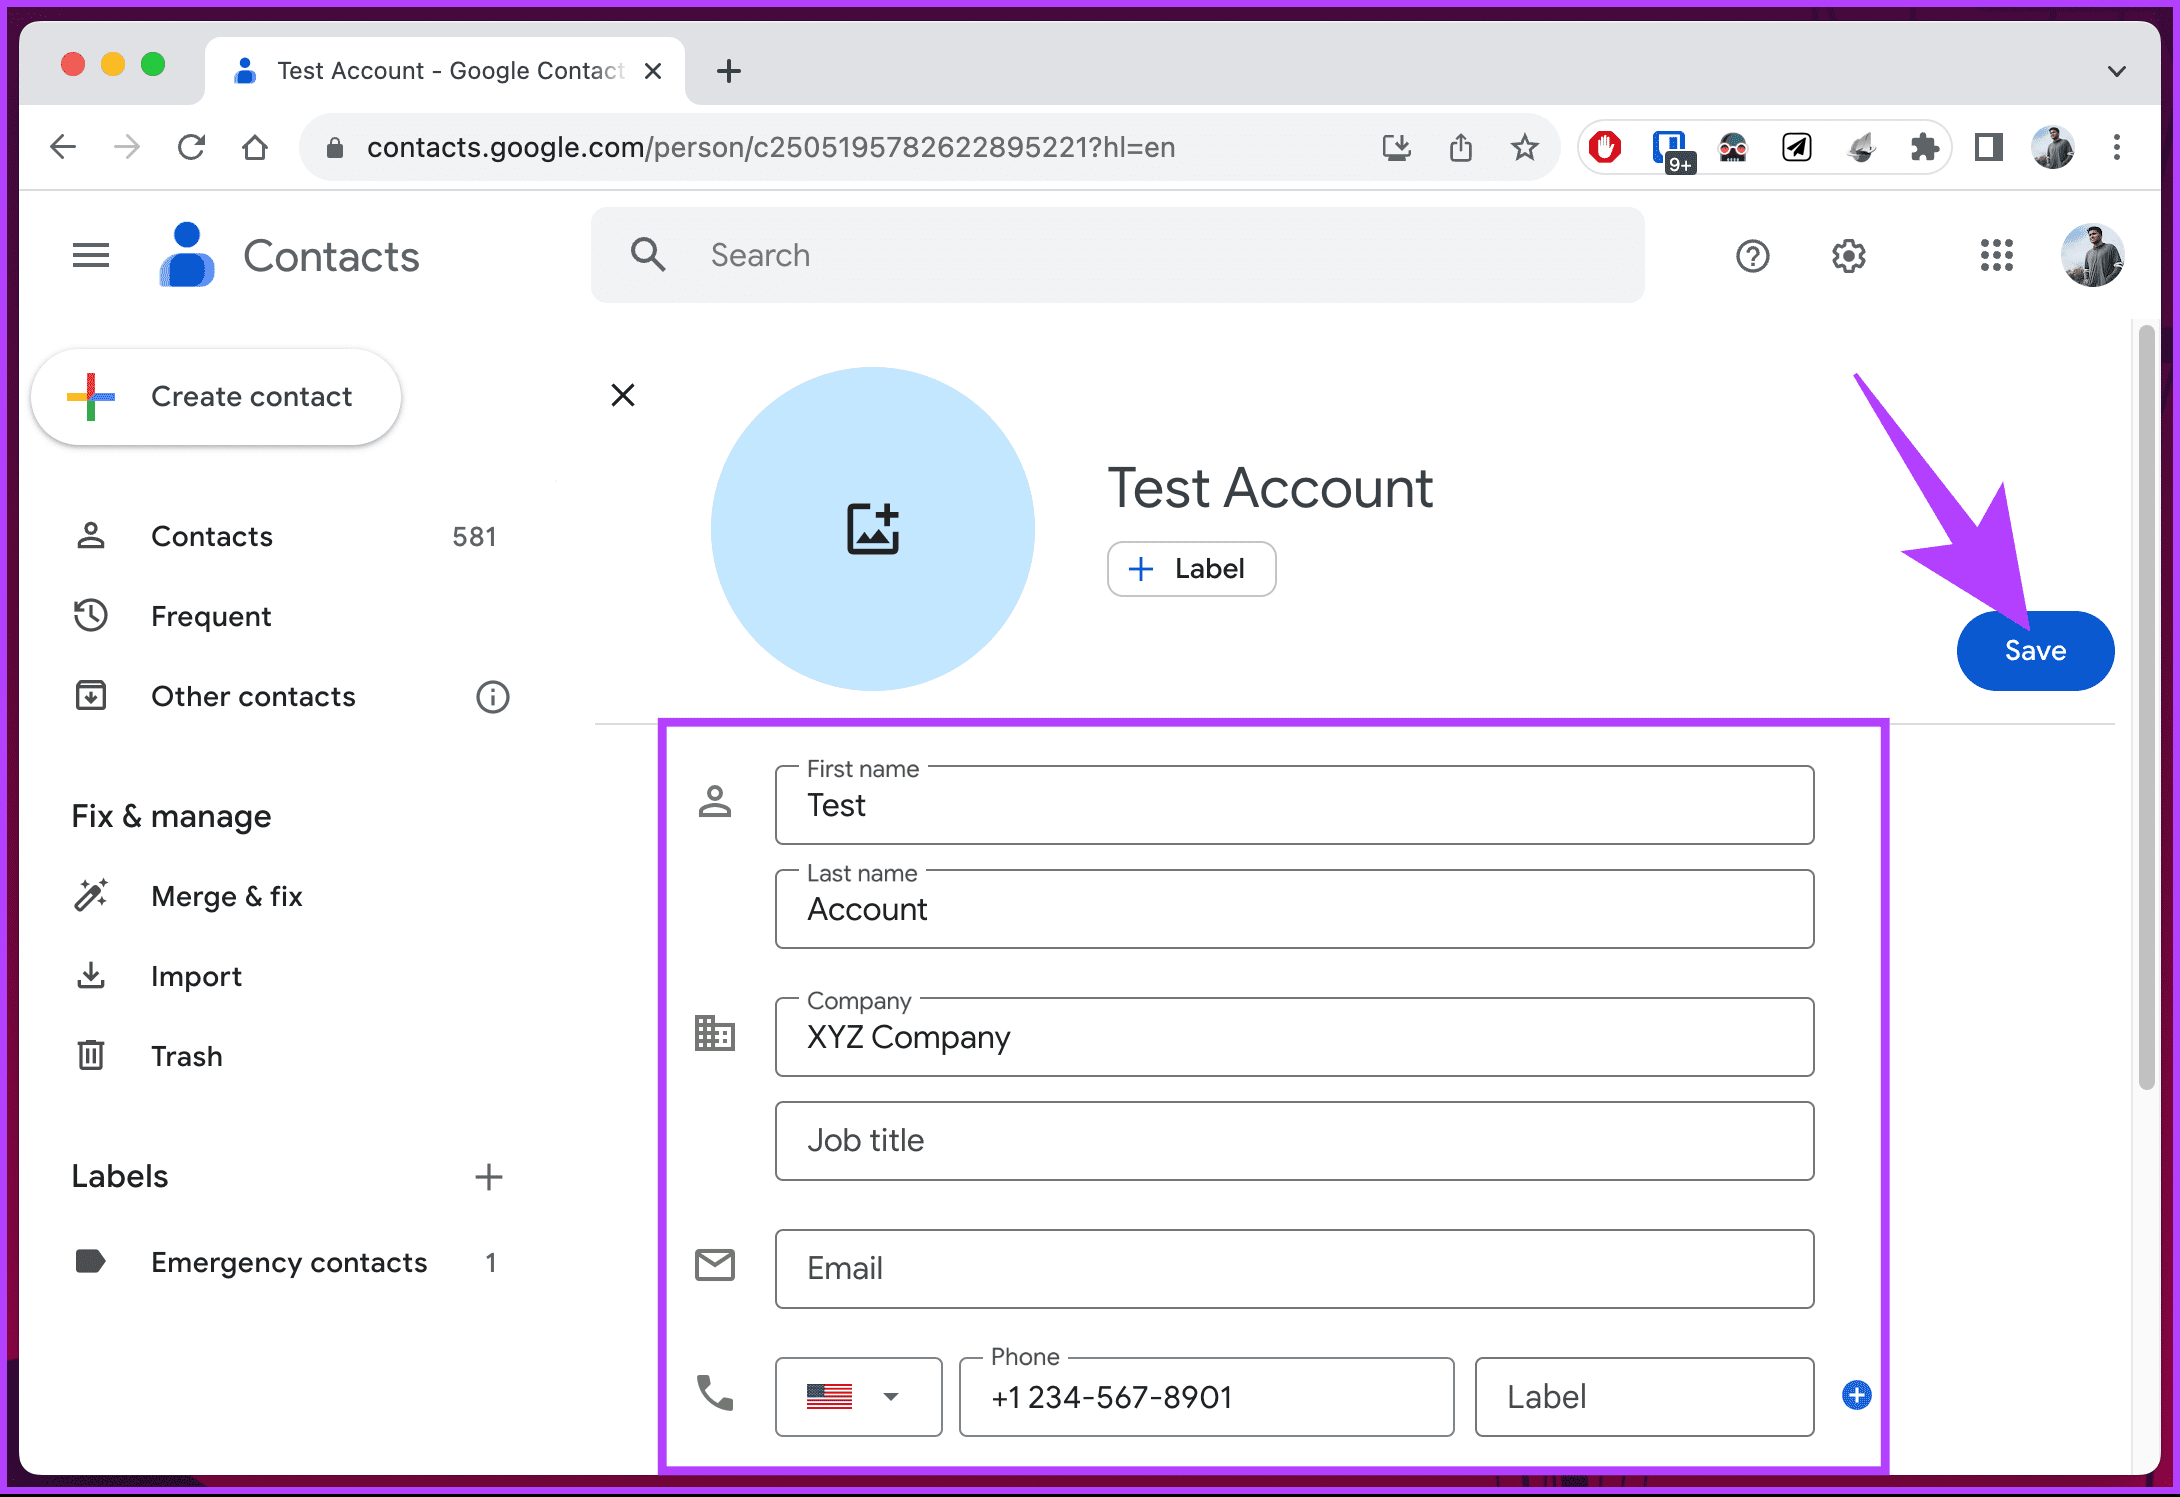
Step 4: Now, change or add the details you want and hit Save at the top-right corner to apply the changes.
If you want to delete or remove a contact, continue with the below steps.
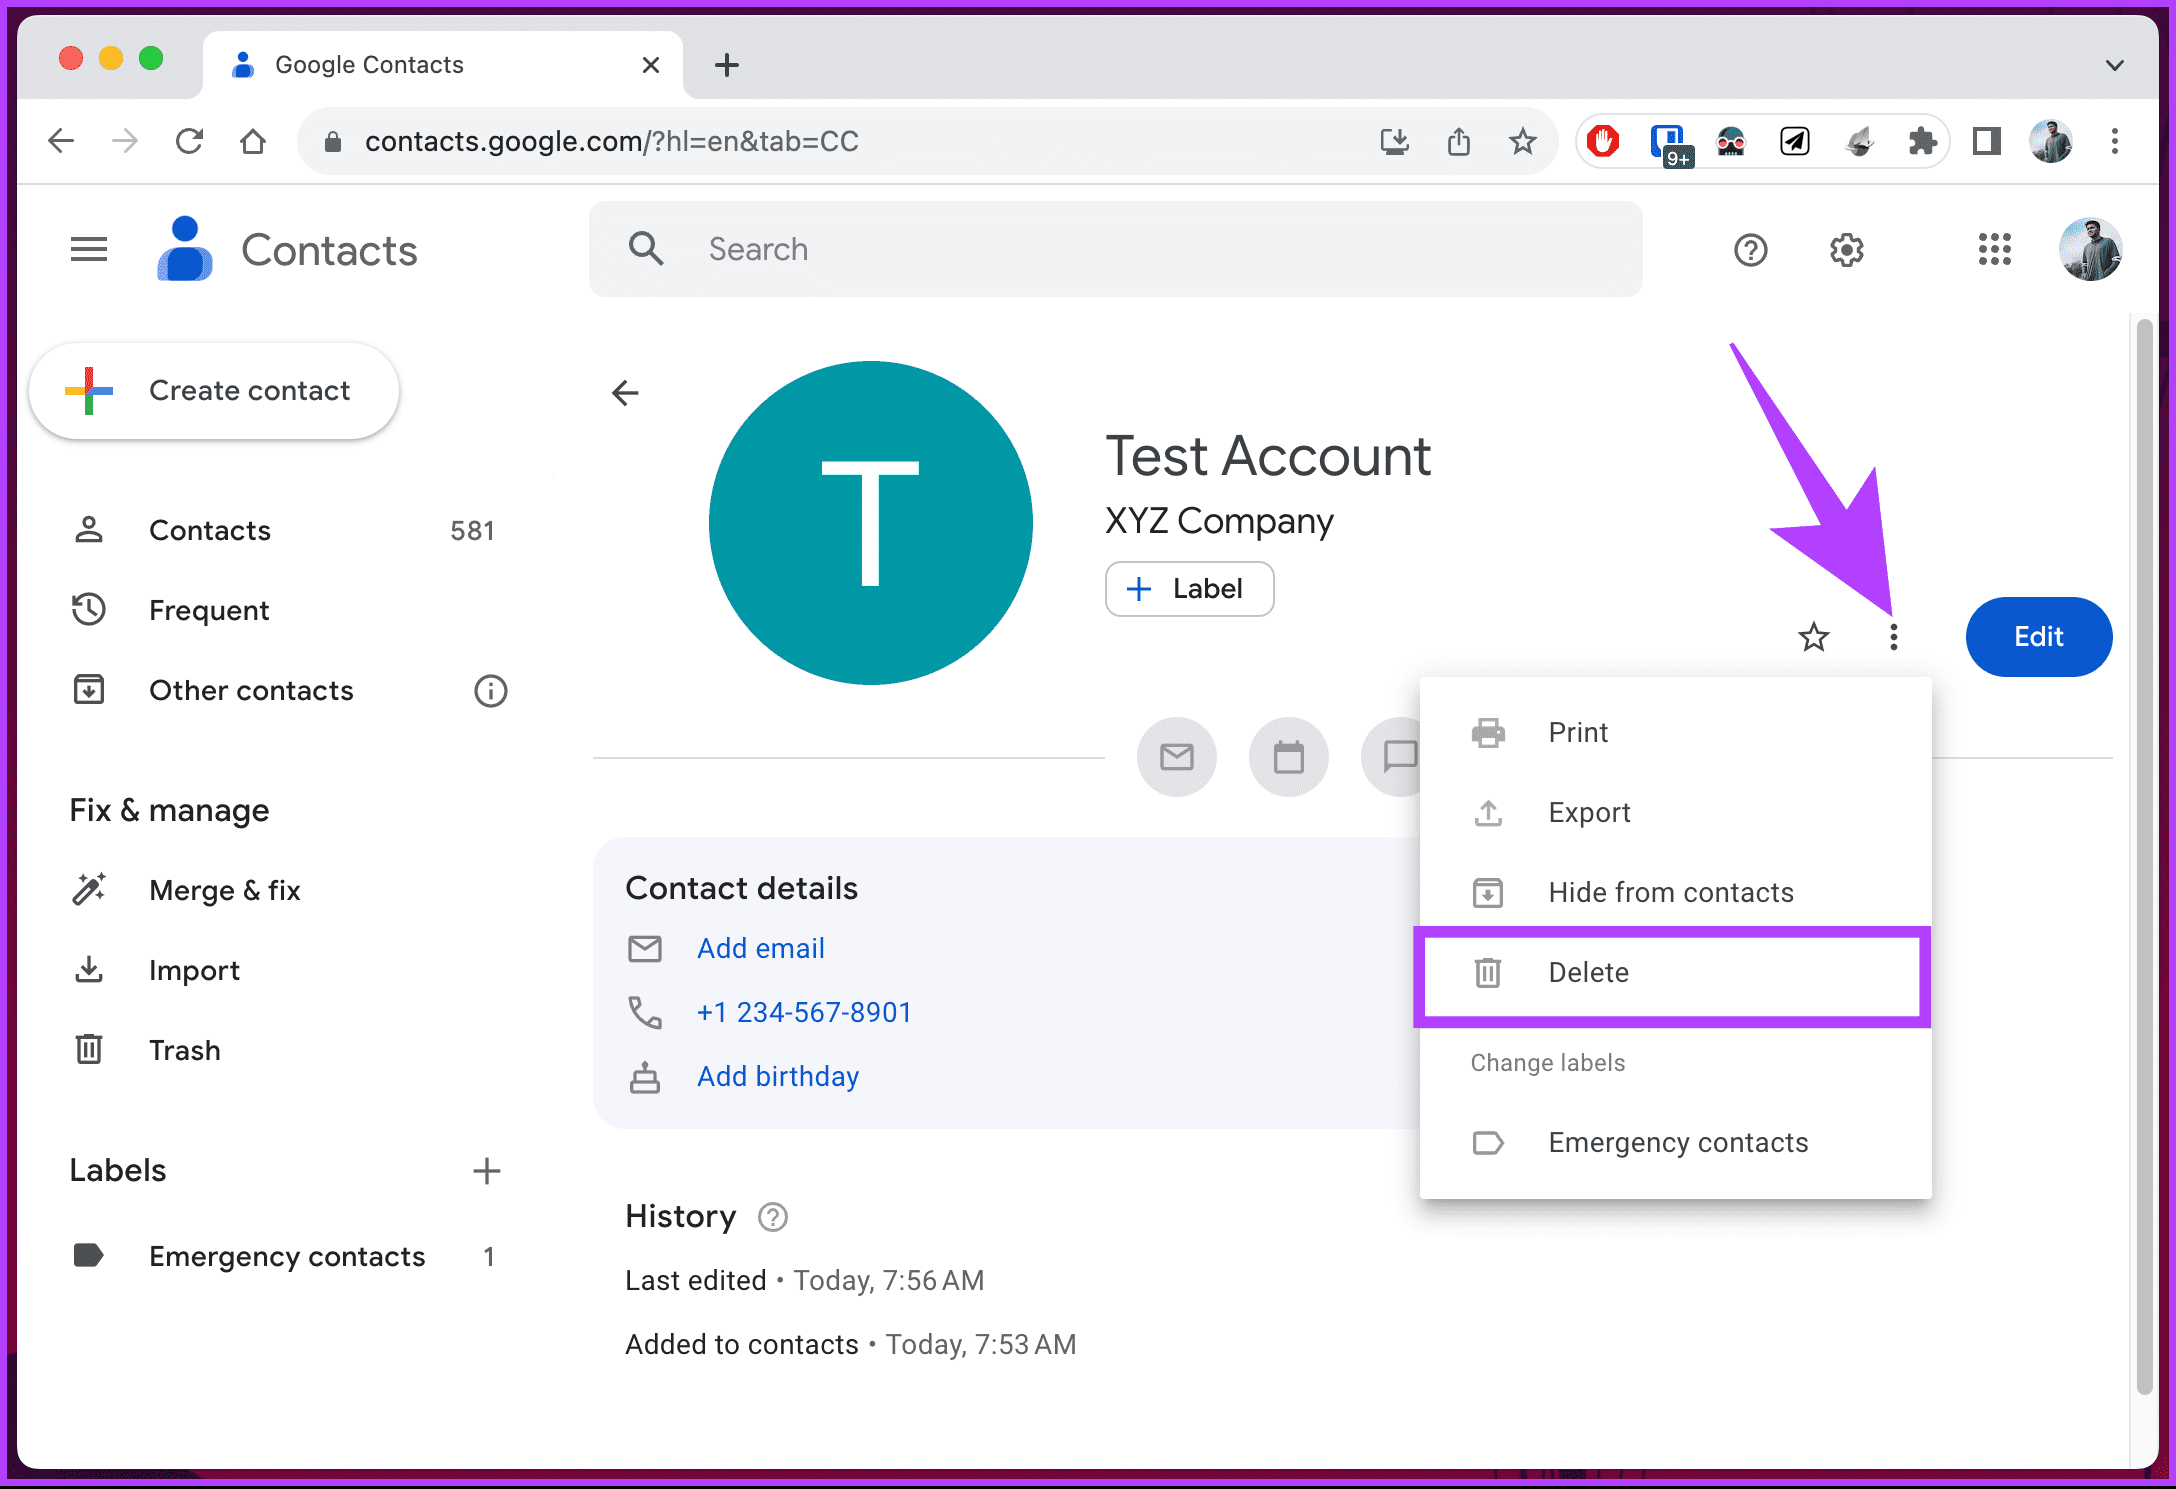
Step 5: Click on the three-dot icon in the top right corner of the contact page.
Step 6: Select Delete from the drop-down menu.
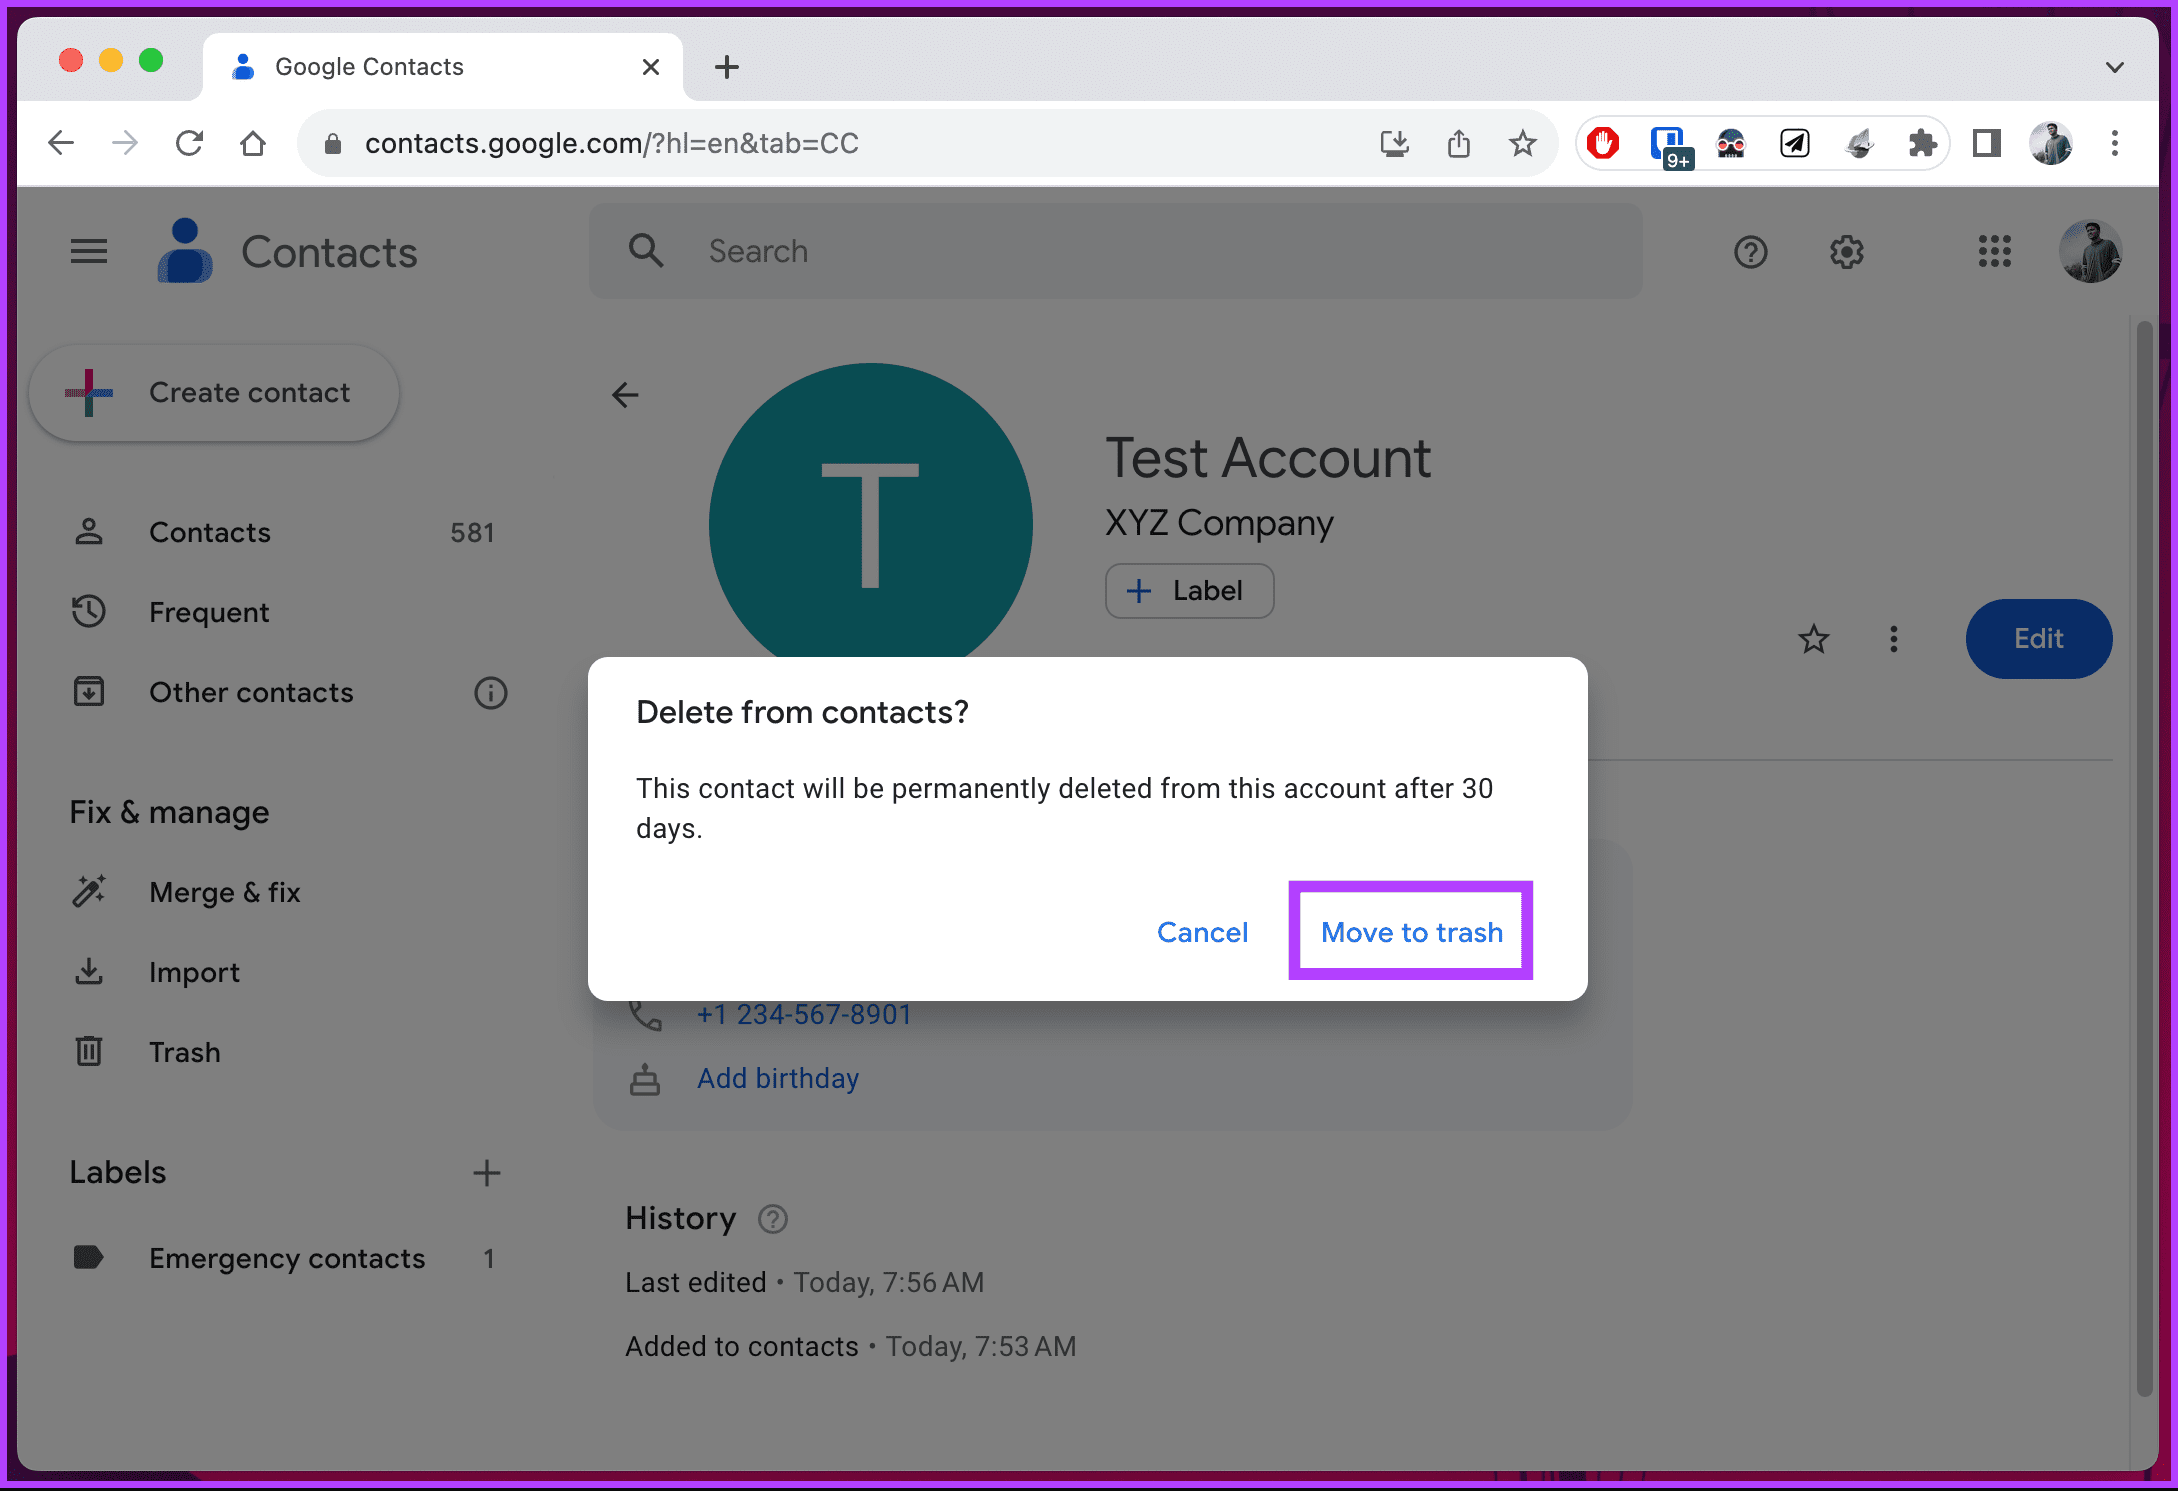
Step 7: In the ‘Delete from contacts’ pop-up, choose ‘Move to trash’.
There you go. You have edited or deleted the contact based on your preferences. If you can’t access your computer and want to do the same using Android, continue reading.
On Android
Step 1: Open the Contacts app on your device. Navigate to the contact you want to update or remove and tap on it.

Step 2: In the contact info, tap the pencil (Edit contact) button in the top navigation bar.
Step 3: Under the Edit contact screen, make the changes, and tap Save to submit the new information.
If, for some reason, you want to delete the contact, continue with the below steps.

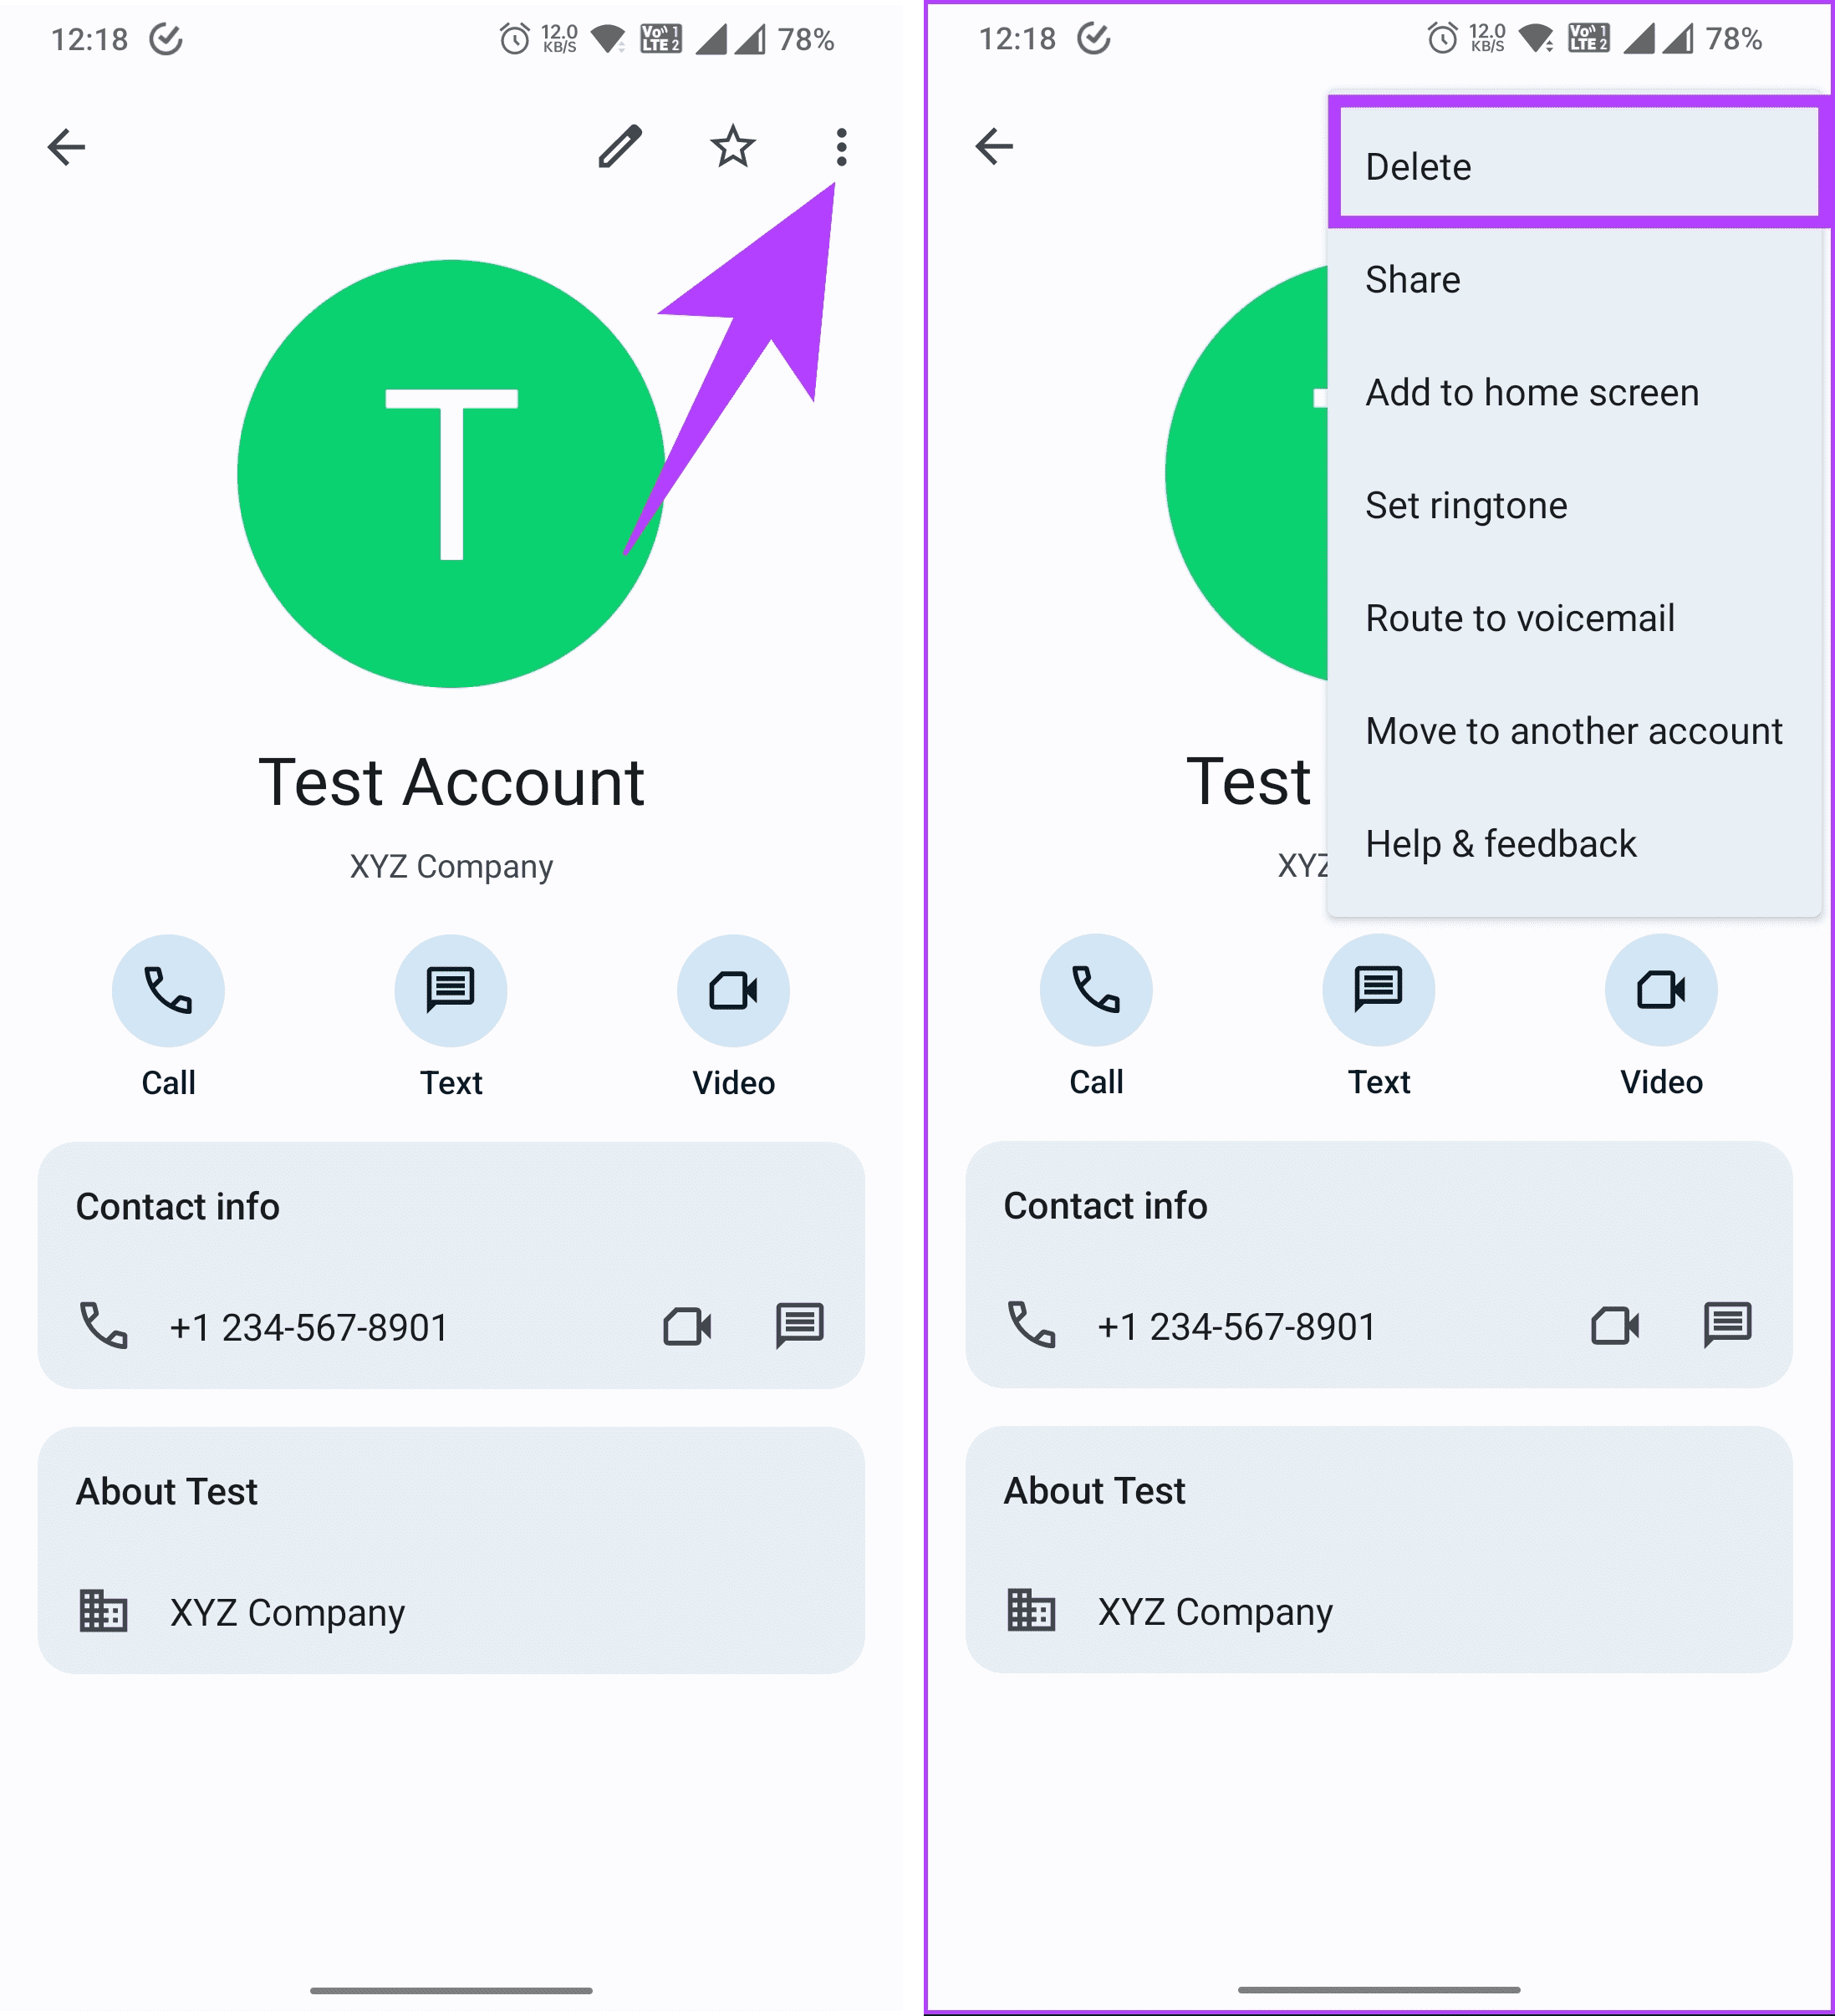
Step 4: Tap on the three-dot icon in the top right corner, and from the drop-down menu, choose Delete.
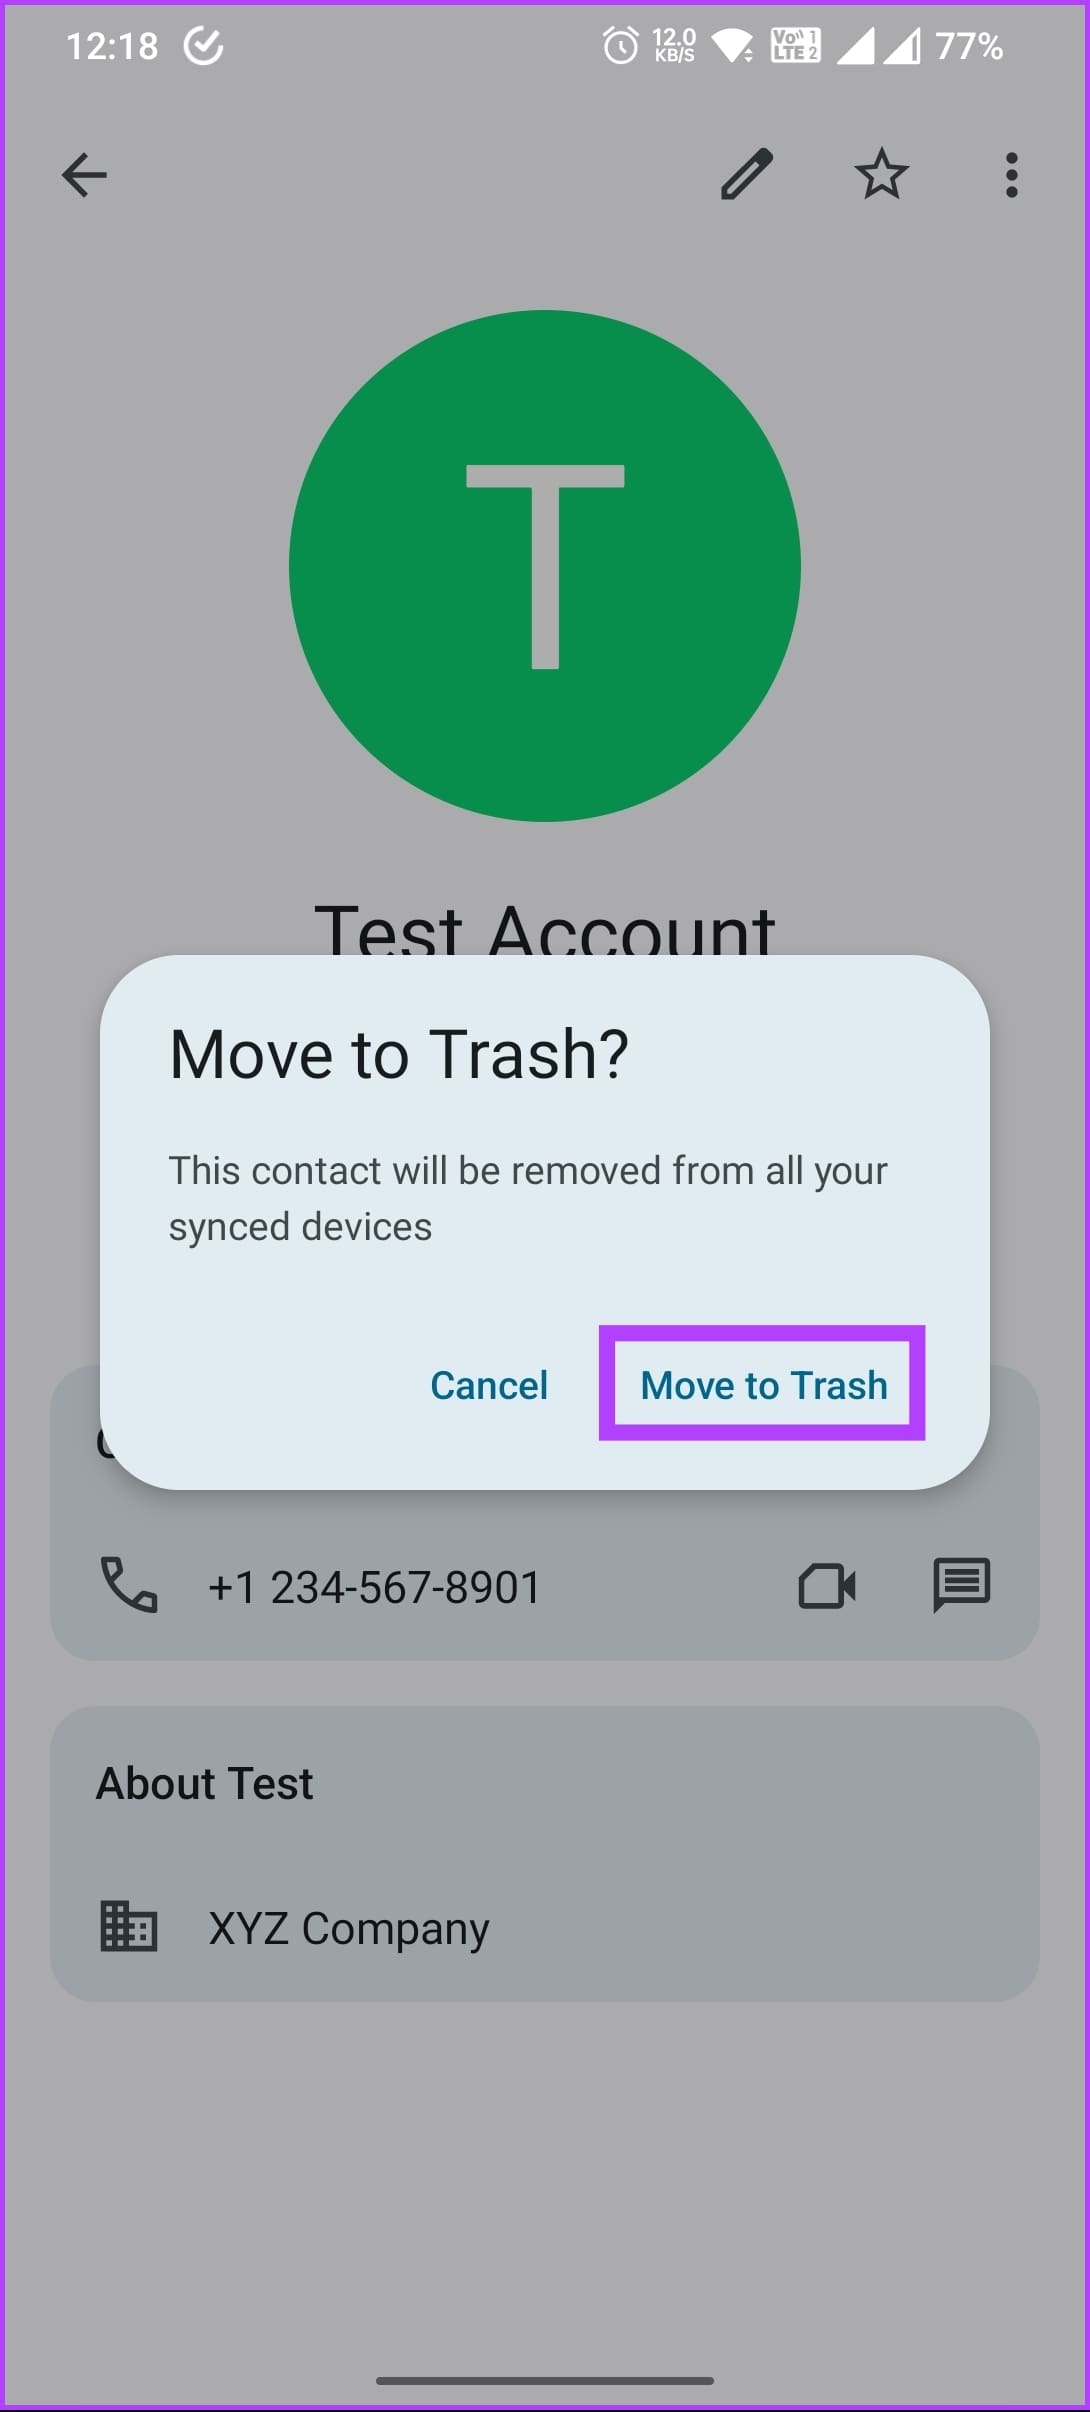
Step 5: Select ‘Move to Trash’ to remove the contact in the pop-up.
That’s it. The contact you selected is now gone from your Gmail account.
Also Read: How to backup contacts on any Android phone
On iOS
If you have synced all your Google contacts with your iPhone, you can use the Apple Contacts app on your iPhone to update or remove a contact from your Gmail account. Follow the instructions below.
Step 1: Open the Contacts app on your iPhone or iPad and navigate to the Lists from the top left corner.
Step 2: Under Lists, choose the account from which you want to edit or delete the contact information and tap on it.
Note: For demonstration, we are opting to go with All Gmail.
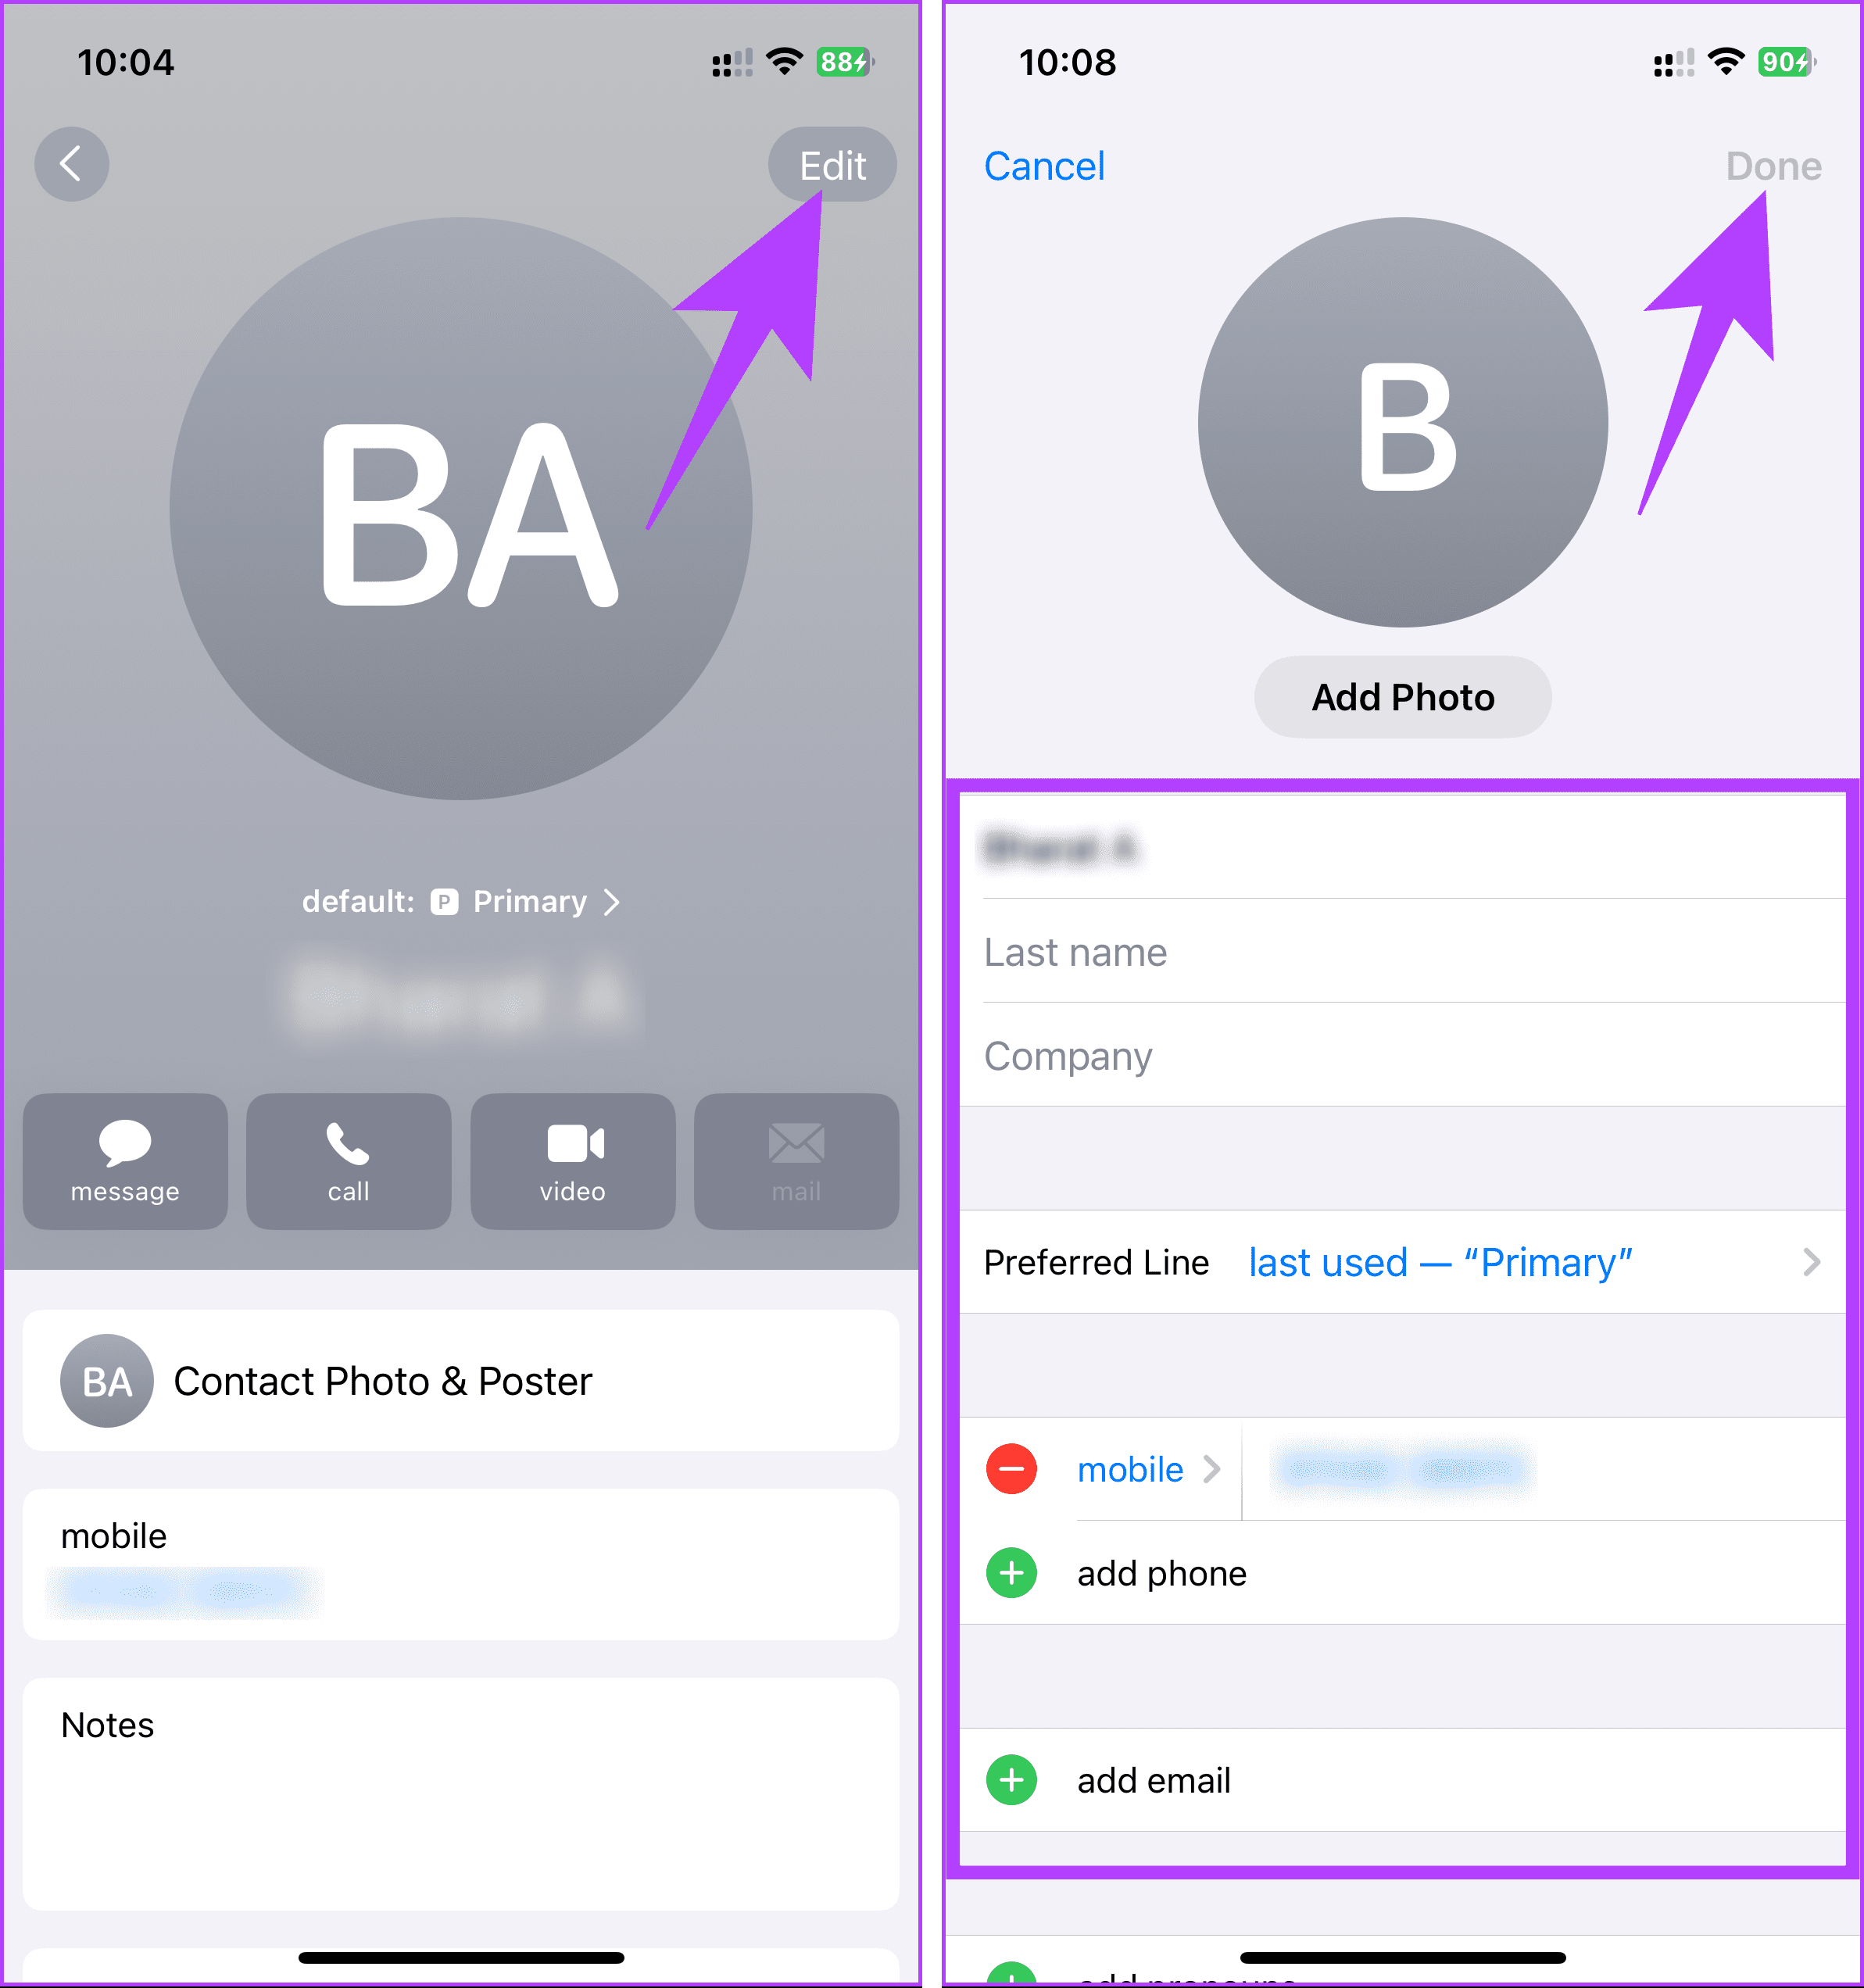
Step 3: Scroll through the contacts list and tap on the one you want to edit or delete.
Step 4: Choose Edit in the top right corner and enter or change the contact details. Once you are satisfied, tap Done in the top right corner.
Step 5: If you want to remove the selected contact, scroll down to the bottom and tap Delete Contact. In the bottom sheet, choose Delete Contact.
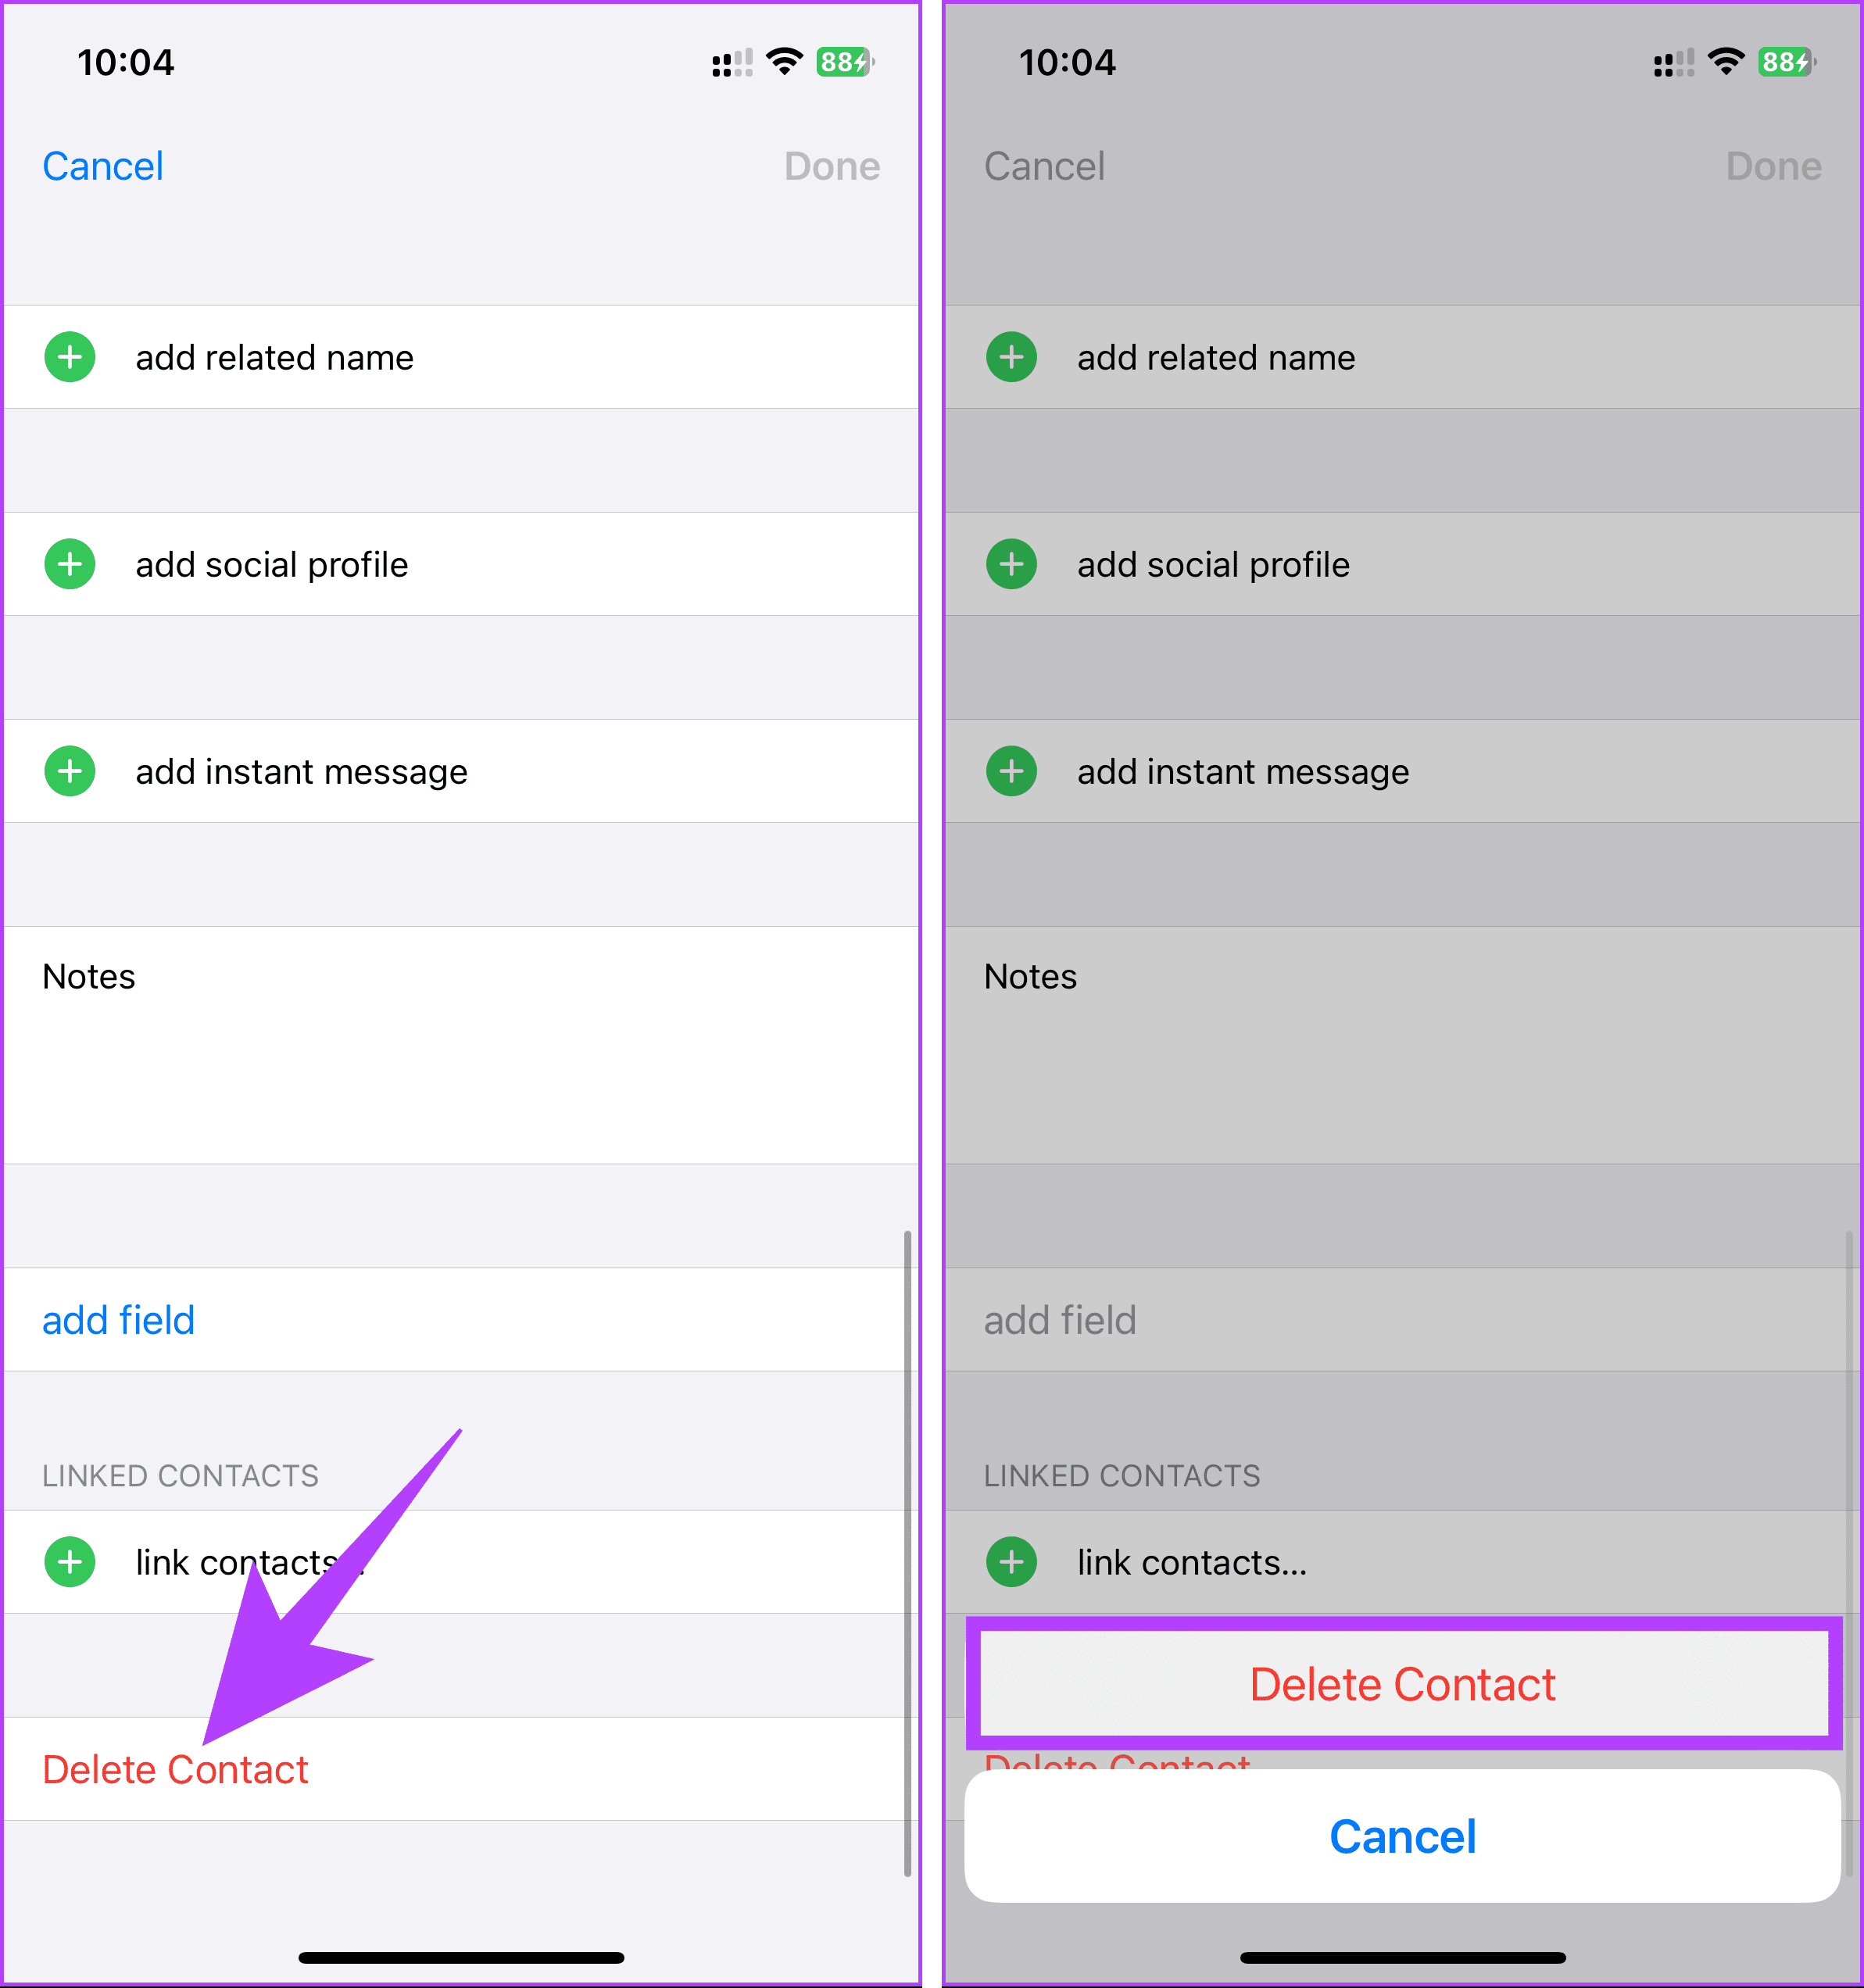
There you go. You have edited or successfully removed the contact from your synced list of Gmail contacts.
FAQs on Gmail Contacts
Yes, you can import contacts from other sources into Gmail. In the Contacts section, click on the Import button and follow the instructions to upload a CSV or vCard file containing your contacts.
Yes, deleting a contact in Gmail will remove it from your Google Account and associated services.
No, there’s no specific or official limit to the number of contacts you can have in Gmail. However, it’s always a good practice to manage your contacts and keep them up to date.
Yes, adding a contact in Gmail is essentially adding it to Google Contacts, as they are closely integrated services.
Make Changes to Your Contacts
Now that you know how to add, edit, or delete contacts in Gmail, you can control your contacts, whether you’ve met new people, changed jobs, or want to keep them organized. You may also want to read how to stop syncing Google Contacts to iPhone.
Was this helpful?
Last updated on 21 August, 2023
Read Next
 Google Contacts vs Samsung Contacts: Which App Is Best for Saving and Managing Contacts
Apart from phones running Stock Android, all other Android phones have their own set of basic apps.
Google Contacts vs Samsung Contacts: Which App Is Best for Saving and Managing Contacts
Apart from phones running Stock Android, all other Android phones have their own set of basic apps.
 iCloud Contacts vs Google Contacts: Where Should You Save Contacts on Your iPhone
When you are using an Android phone, one prefers using Google Contacts to store and manage contacts.
iCloud Contacts vs Google Contacts: Where Should You Save Contacts on Your iPhone
When you are using an Android phone, one prefers using Google Contacts to store and manage contacts.
 How to Edit or Cancel a Scheduled Email in Gmail
How to Edit a Scheduled Email in Gmail During the time between scheduling and sending an email, you can edit or reschedule the content as needed.
How to Edit or Cancel a Scheduled Email in Gmail
How to Edit a Scheduled Email in Gmail During the time between scheduling and sending an email, you can edit or reschedule the content as needed.
 How to Use Google Contacts Instead of Samsung Contacts
Samsung Galaxy phones carry a lot of pre-loaded apps, and some of them you'll rarely use.
How to Use Google Contacts Instead of Samsung Contacts
Samsung Galaxy phones carry a lot of pre-loaded apps, and some of them you'll rarely use.
 How to Create, Edit, and Delete Dropdown Lists in Google Sheets
How to Create a Dropdown List on Google Sheets Here's how to create a dropdown list on Google Sheets by manually adding the options.
How to Create, Edit, and Delete Dropdown Lists in Google Sheets
How to Create a Dropdown List on Google Sheets Here's how to create a dropdown list on Google Sheets by manually adding the options.
 How to Delete Telegram Contacts on iPhone, Android, or PC
How to Delete Telegram Contacts on Android 1.
How to Delete Telegram Contacts on iPhone, Android, or PC
How to Delete Telegram Contacts on Android 1.
 2 Ways to Import Gmail Contacts to iPhone
If you have recently switched to an iPhone and are wondering how to get all your Gmail (or Google) contacts on iPhone, worry not.
2 Ways to Import Gmail Contacts to iPhone
If you have recently switched to an iPhone and are wondering how to get all your Gmail (or Google) contacts on iPhone, worry not.
 How to Draw, Add and Edit Shapes in Microsoft Word
How to Add a Shape in Microsoft Word To insert a shape in Word, you can choose between two options.
How to Draw, Add and Edit Shapes in Microsoft Word
How to Add a Shape in Microsoft Word To insert a shape in Word, you can choose between two options.
The article above may contain affiliate links which help support Guiding Tech. The content remains unbiased and authentic and will never affect our editorial integrity.