How to Rotate a Video and View It on Windows Media Player
If you wish to rotate a video just for viewing purposes. You can use the Windows Media Player app.
Note: This does not permanently rotate the video. It only changes the orientation while you view it, and the video file retains the original settings.
Step 1: Right-click on the video and hover your mouse over Open with. Select Media Player from the list of options.
Your video will now open in the Media Player app.

Step 2: Once the video is open, click on the three buttons in the bottom-right corner, select Video Settings, and select Rotate Video.
The app will rotate your video by 90 degrees in the clockwise direction. You can click the Rotate video button until the desired rotation is obtained.
You can now play the video in the Media Player app to watch it in the rotated orientation.

But if you wish to rotate the video permanently and save it in that particular orientation, you will have to edit the video and render it after the rotation. Here’s how to do it.
How to Rotate and Save a Video in Windows 11
Method 1: Use Video Editor in Windows 11
If you don’t find the Video Editor app on your Windows 11 PC – move to the next section.
Step 1: Open the Video Editor app from the start menu. Select the New video project, and enter a name for your project.
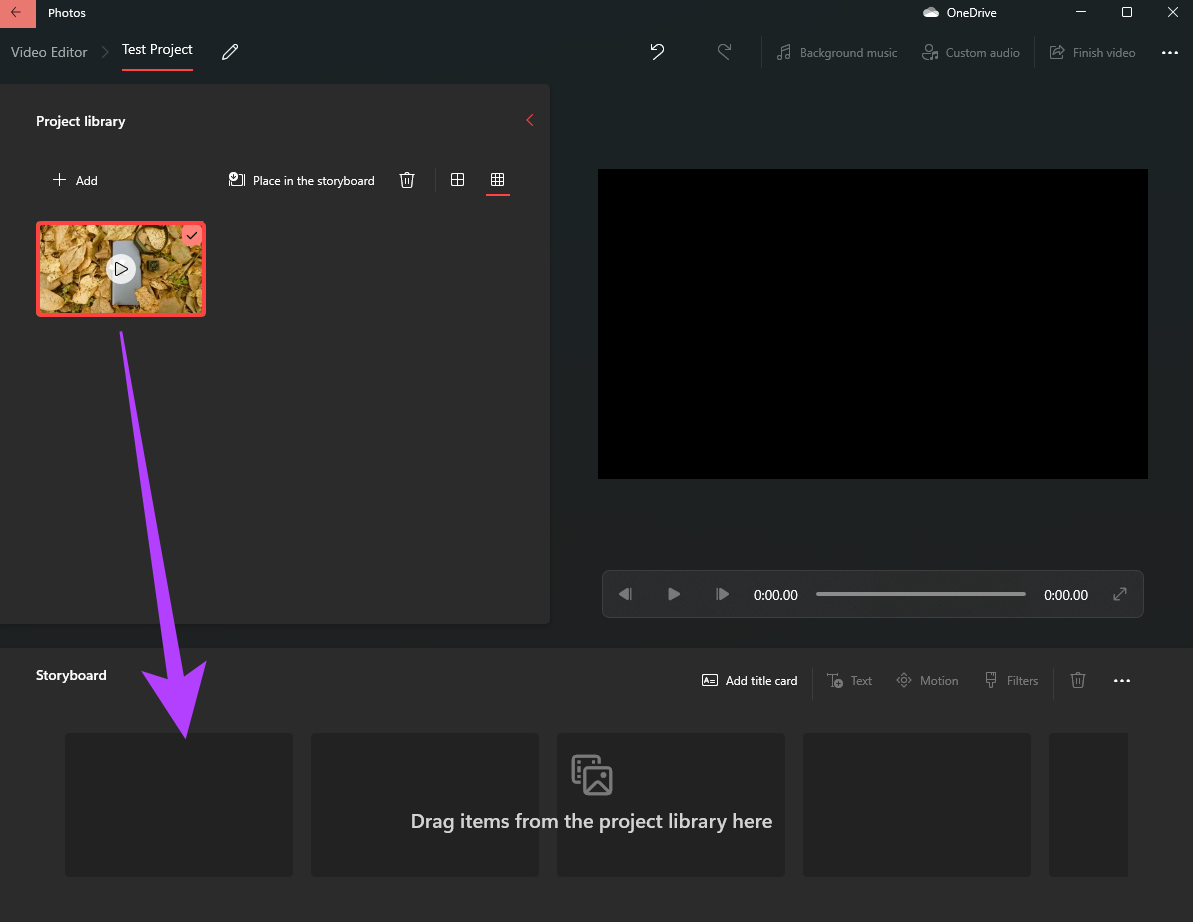
Step 2: Click on the red Add button to import the video you want to rotate. Select From this PC and browse, and add the video from a folder.

Step 3: Drag the video you just added to the bottom of the editor.
Step 4: Now, click on the video at the bottom and then select the Rotate button in the toolbar.
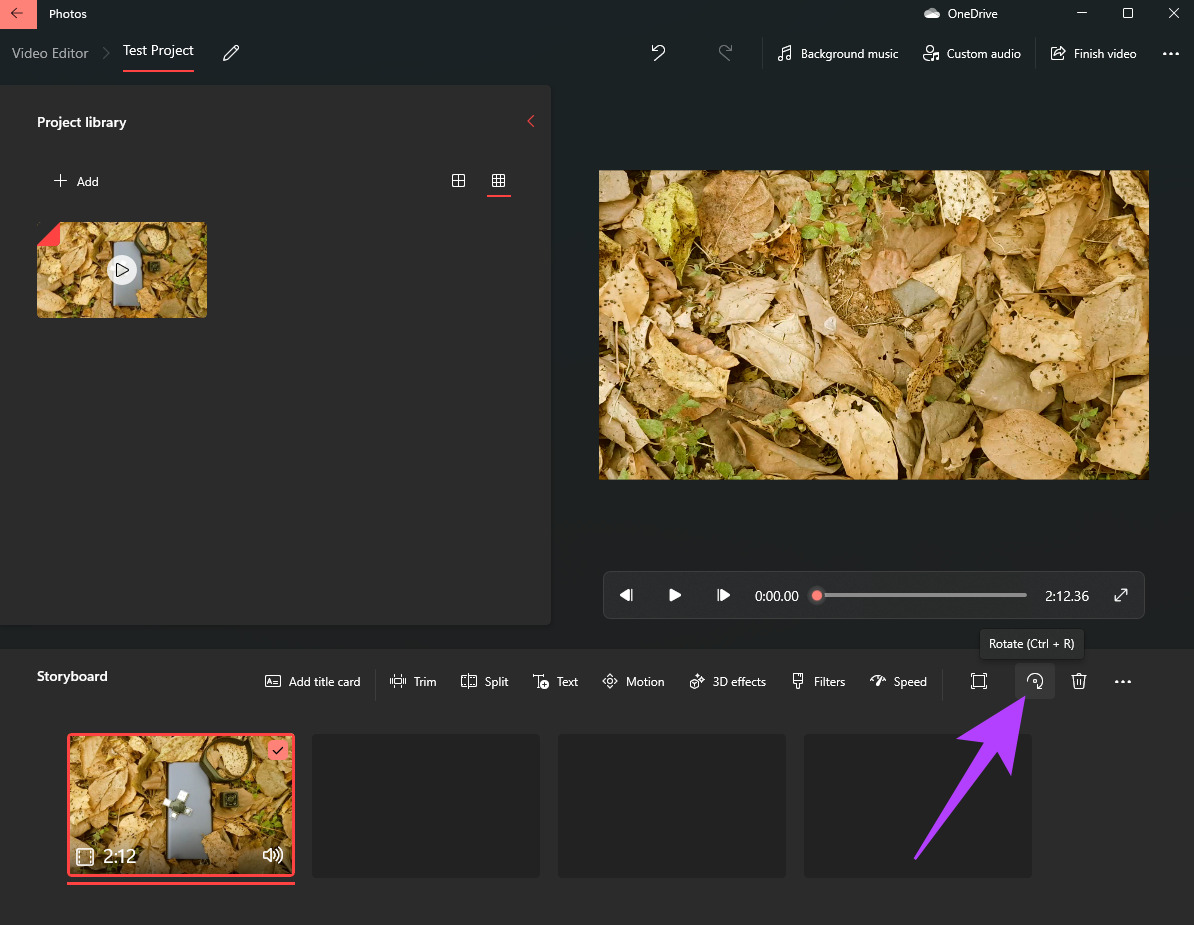
The app will rotate your video by 90 degrees in the clockwise direction. Click on the rotate button again if you wish to rotate the video further.
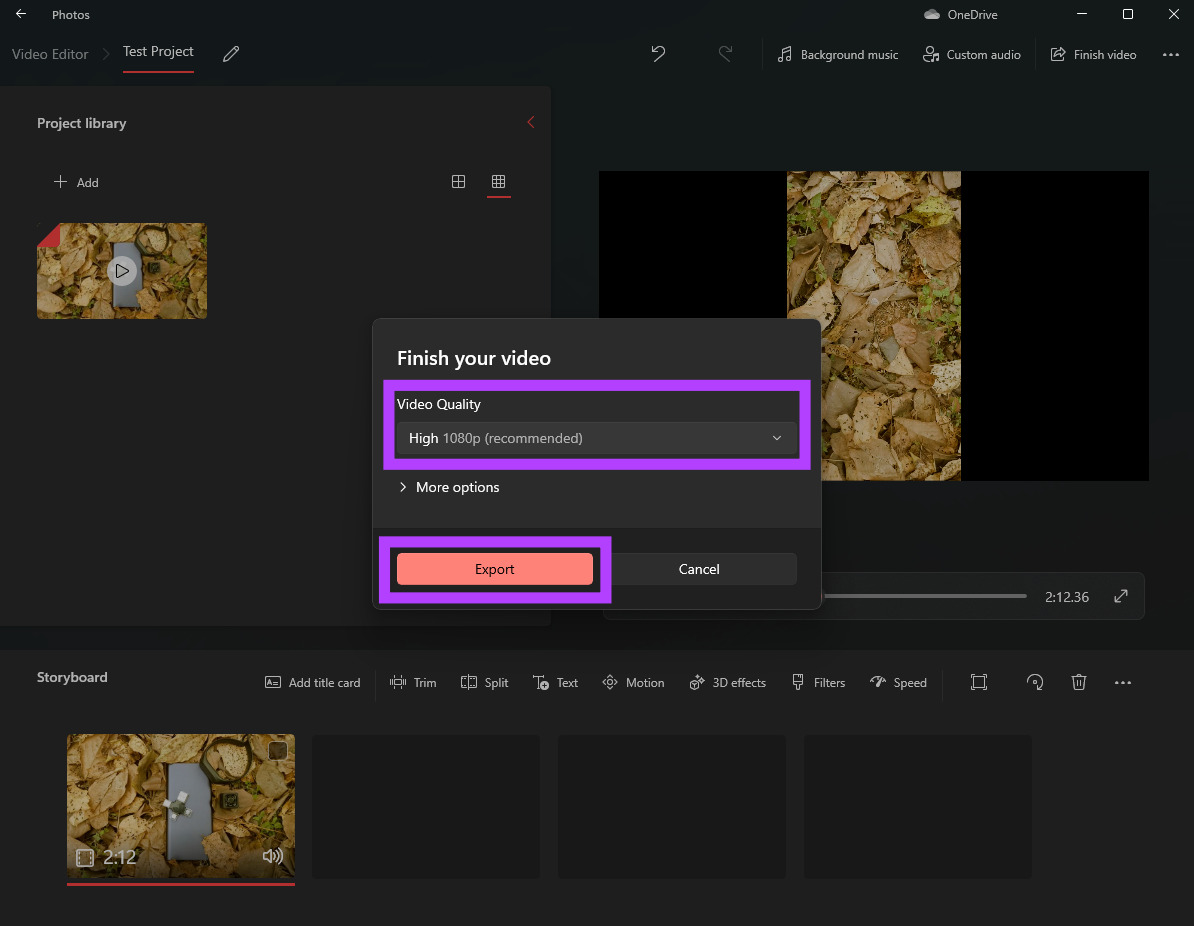
Step 5: Once you’re satisfied with the rotation, click on the Finish video button in the top-right corner.

Step 6: Select the Video quality as High and click on Export. Choose the destination where you wish to save the video and select Export again.
Wait for the export process to complete. The time taken to export the video will depend on the duration of the video as well as the processing power in your computer.
After the video is exported, you can play it via any media player of your choice and it will play in the saved orientation.
Method 2: Use Microsoft Clipchamp to Edit and Rotate a Video: In Newer Versions of Windows 11
In the latest versions of Windows 11, the default Video Editor on Windows has been replaced by Microsoft Clipchamp.
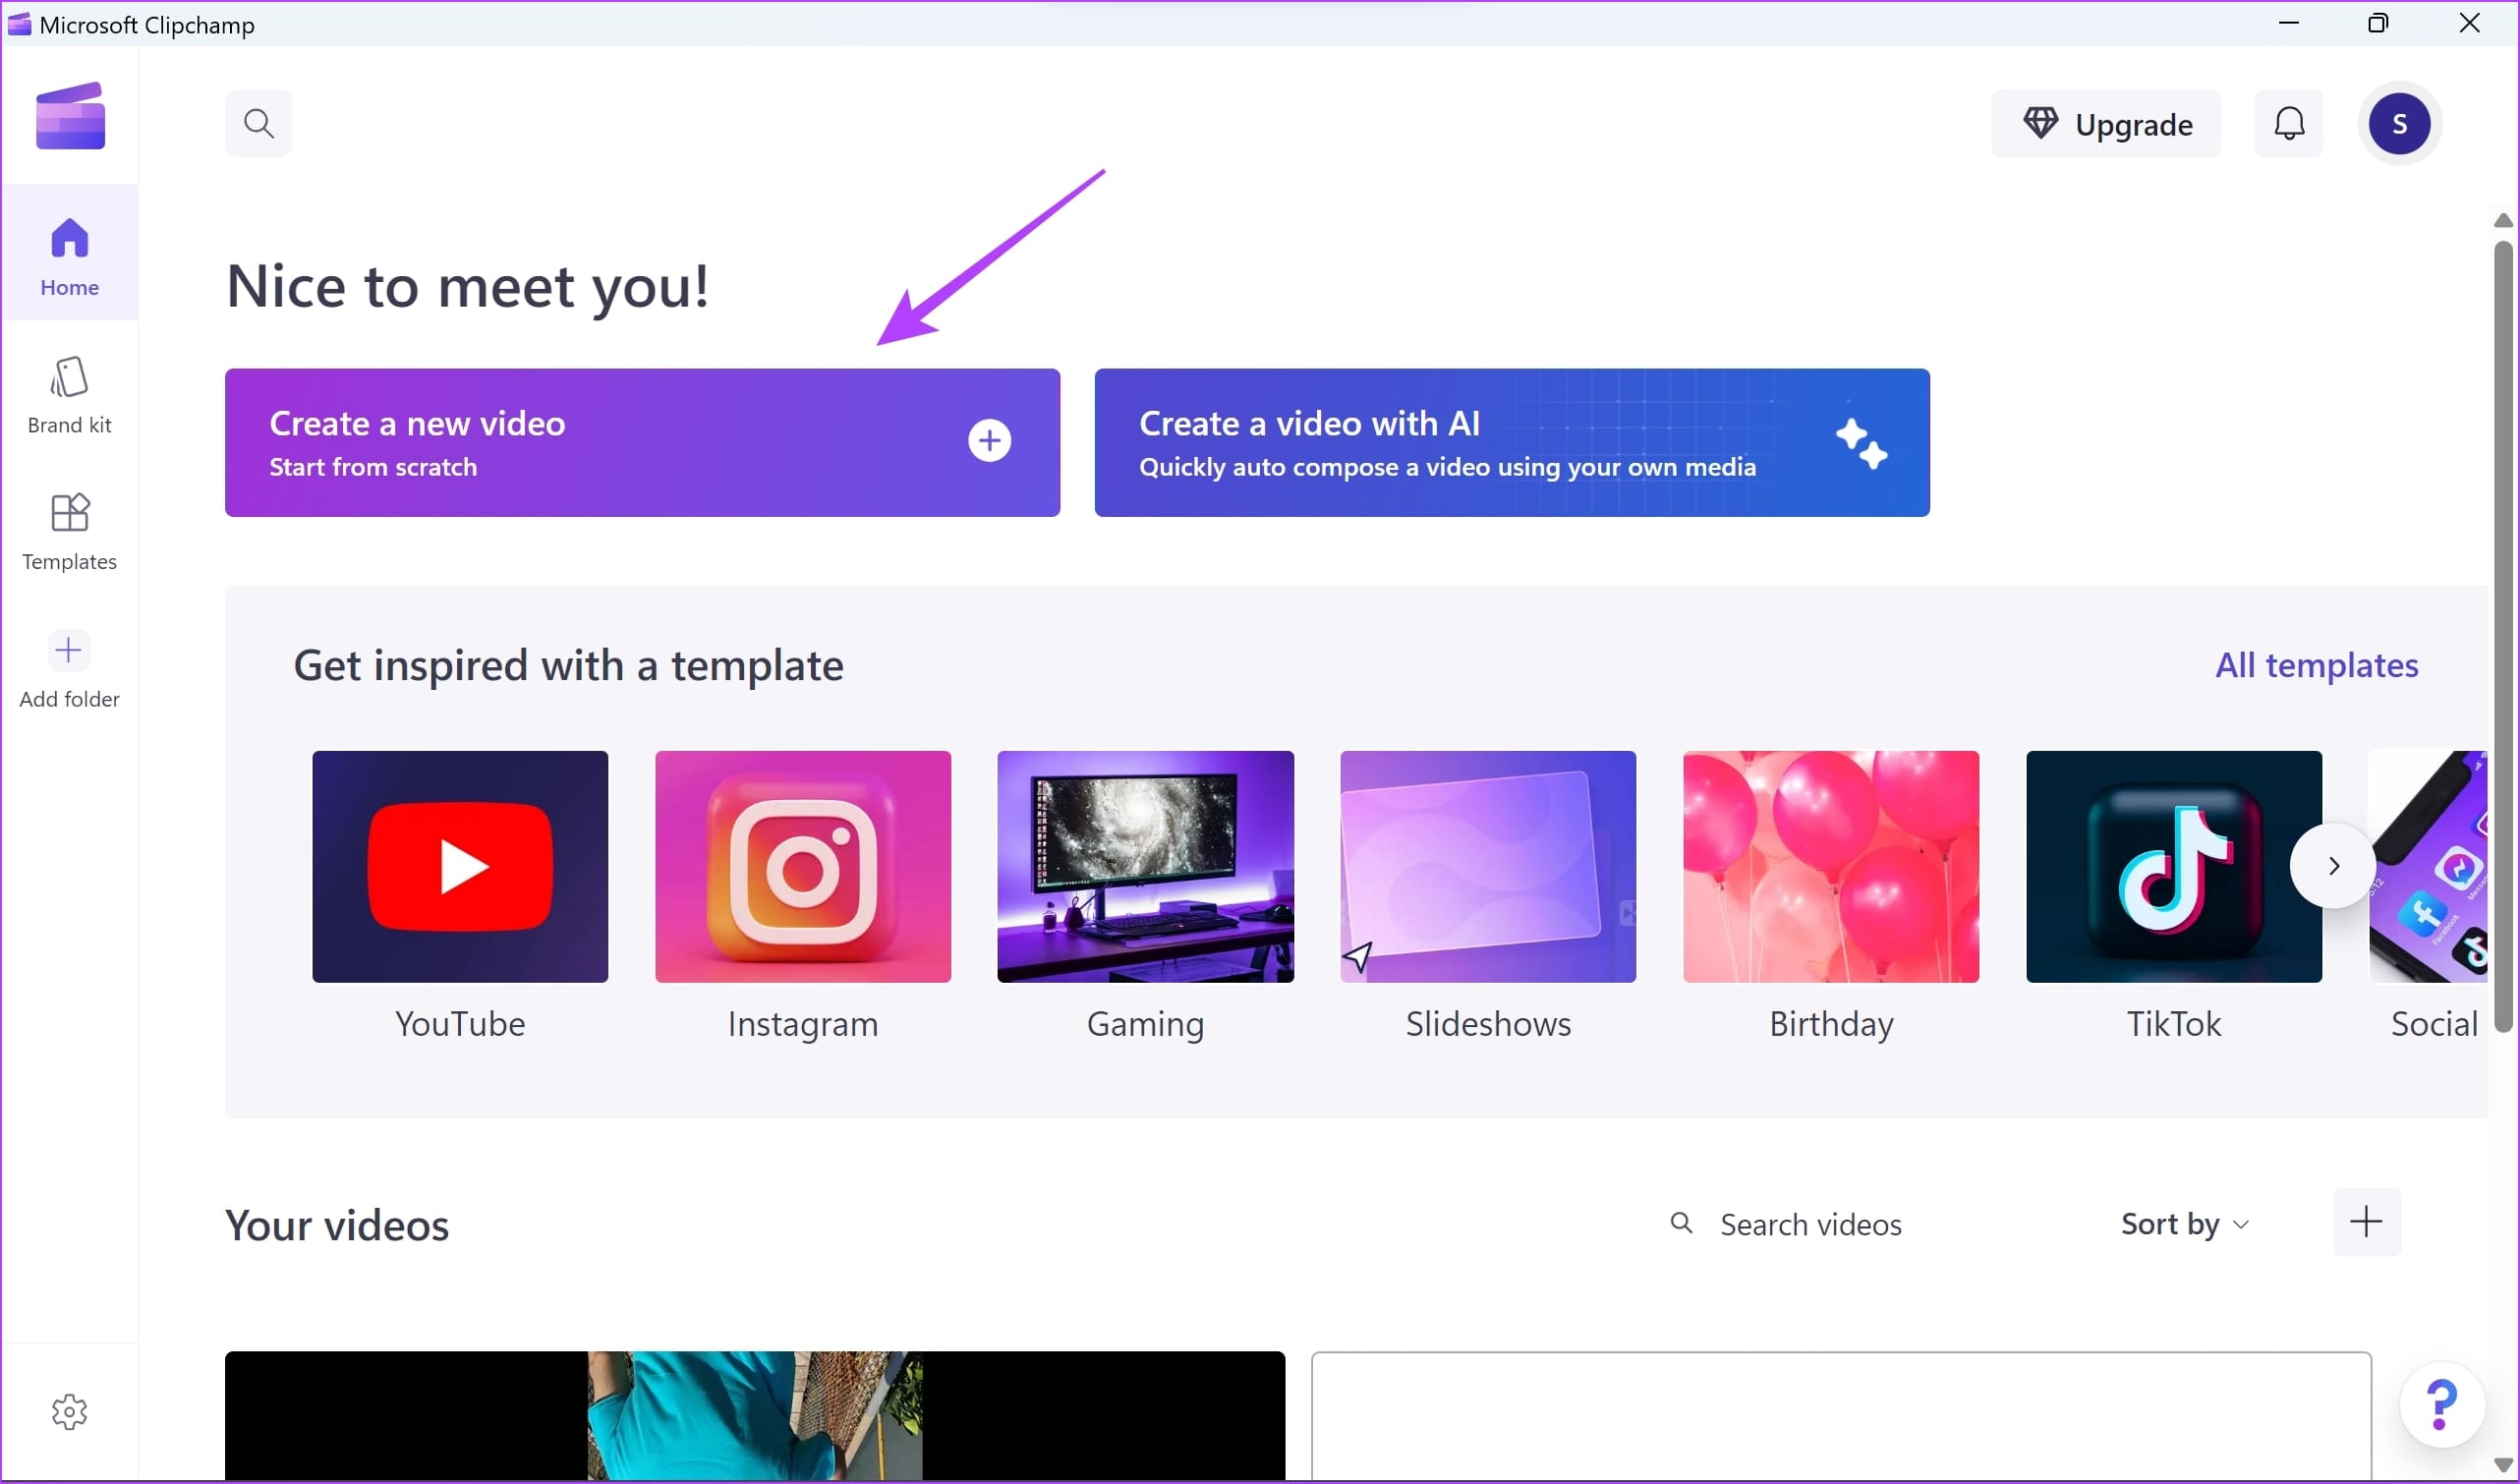
Step 1: Open Microsoft Clipchamp from the Start menu. If you cannot find the app, you can install it from the Microsoft Store. Click on Create a new video.
Step 2: Click on Import media. Select the video you want to rotate.

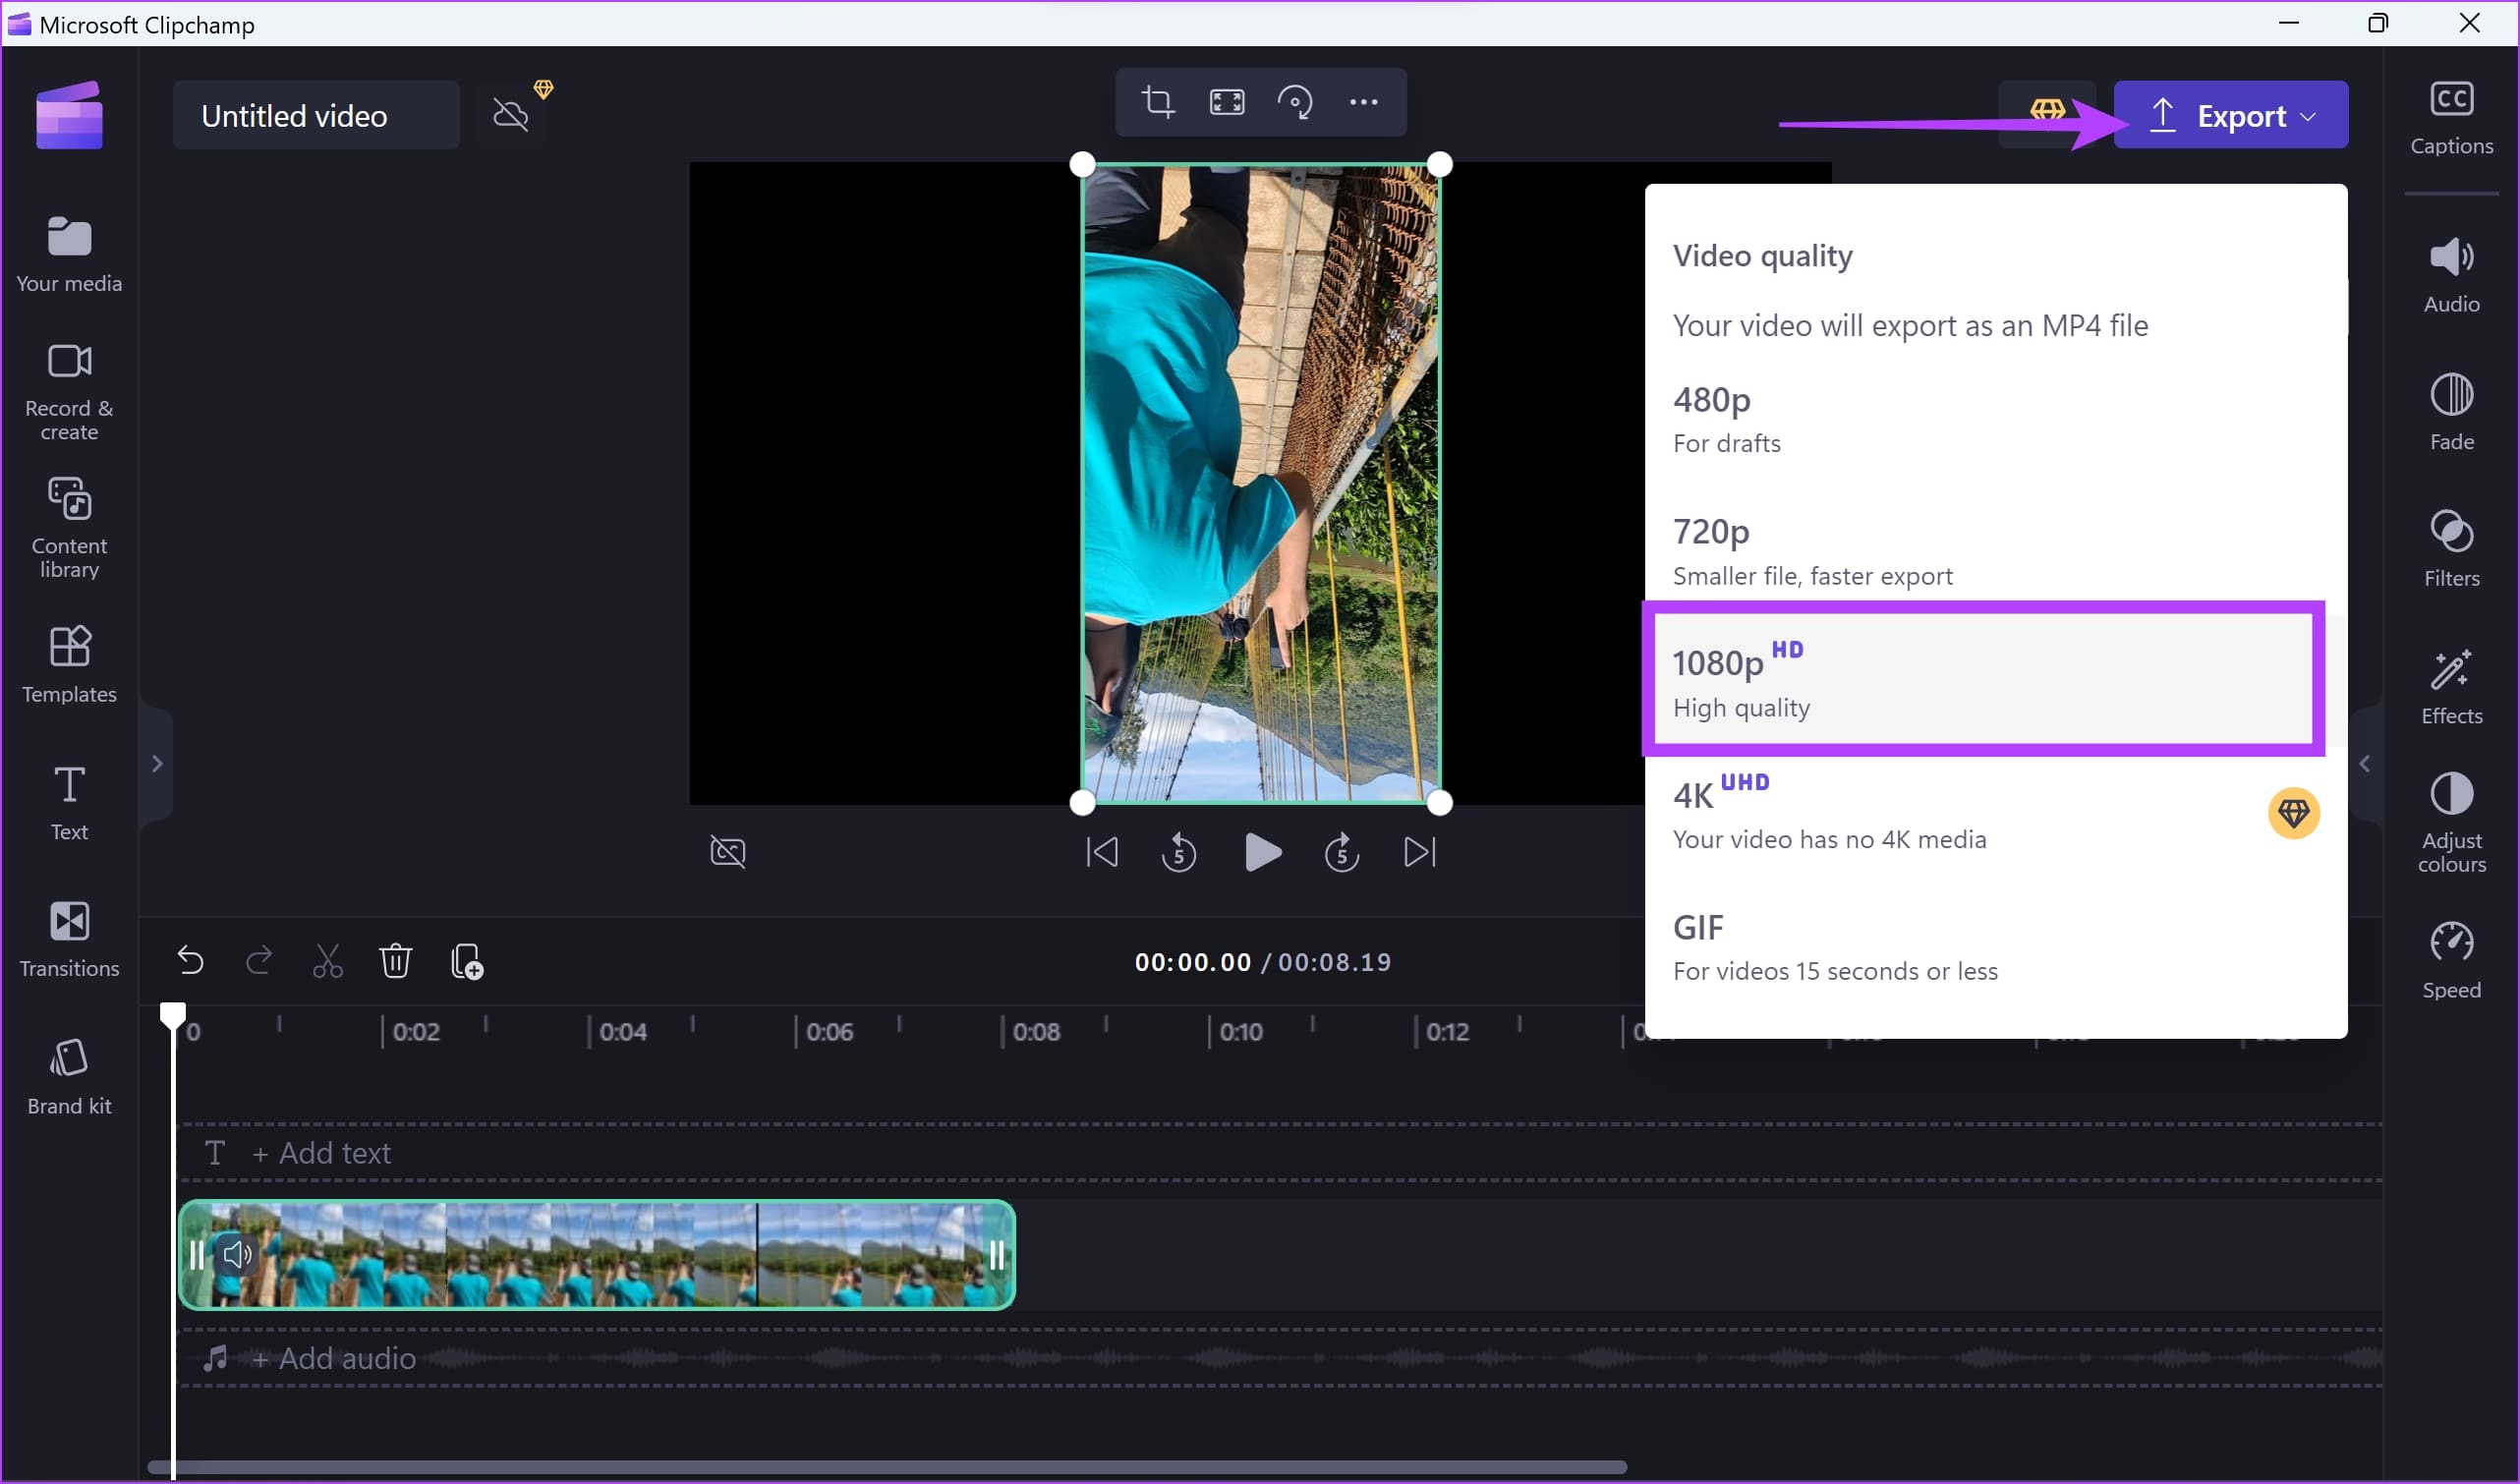
Step 3: Click on the rotate button. This will flip the video by a value of 90 degrees. You can repeat the process until you achieve the desired result.

Step 4: Once you rotate the video, click on Export. Select the export quality.
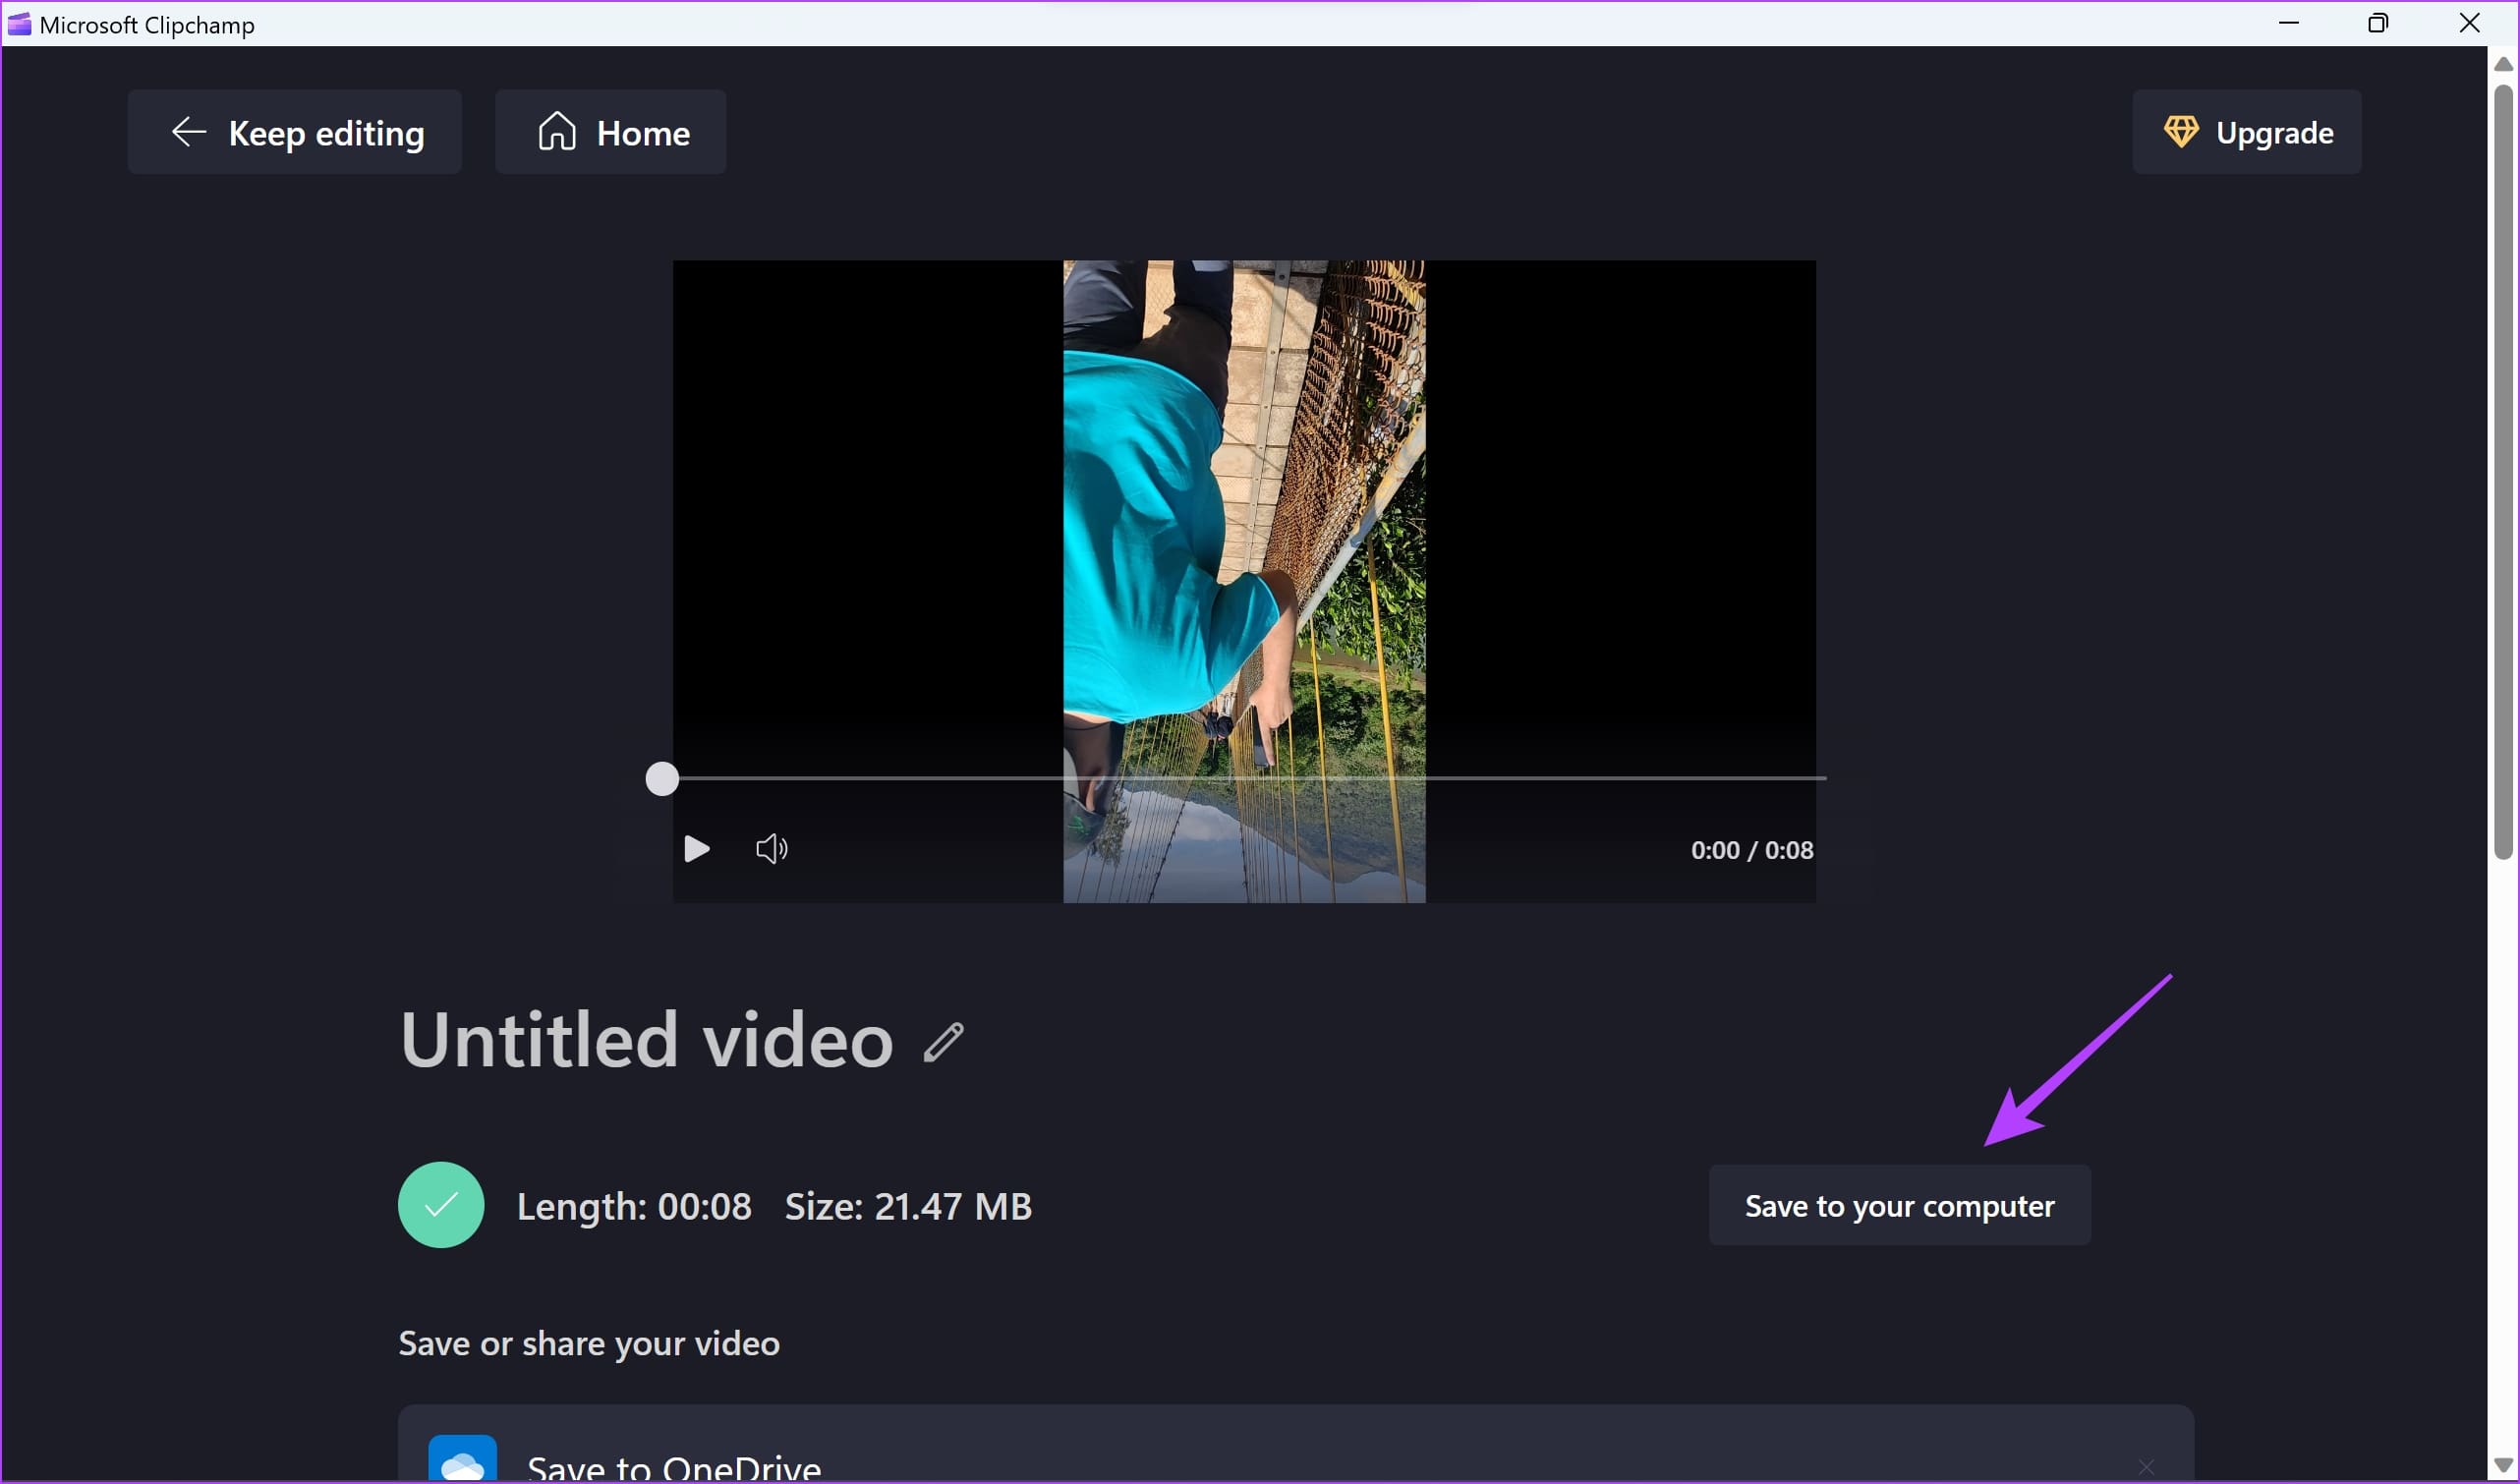
Step 5: Wait for the video to process. Once it is complete, click on Save to your computer. Select the destination folder to save the video.
Also Read: How to compress videos on Windows.
Method 3: Use VLC Media Player to Edit and Save a Copy of Rotated Video
You can also use VLC media player to rotate and save the video. However, with the VLC media player, you can also rotate the video in values other than multiples of 90 degrees.
Step 1: Open the video in the VLC media player. Click on Tools > Effects and Filters in the toolbar.

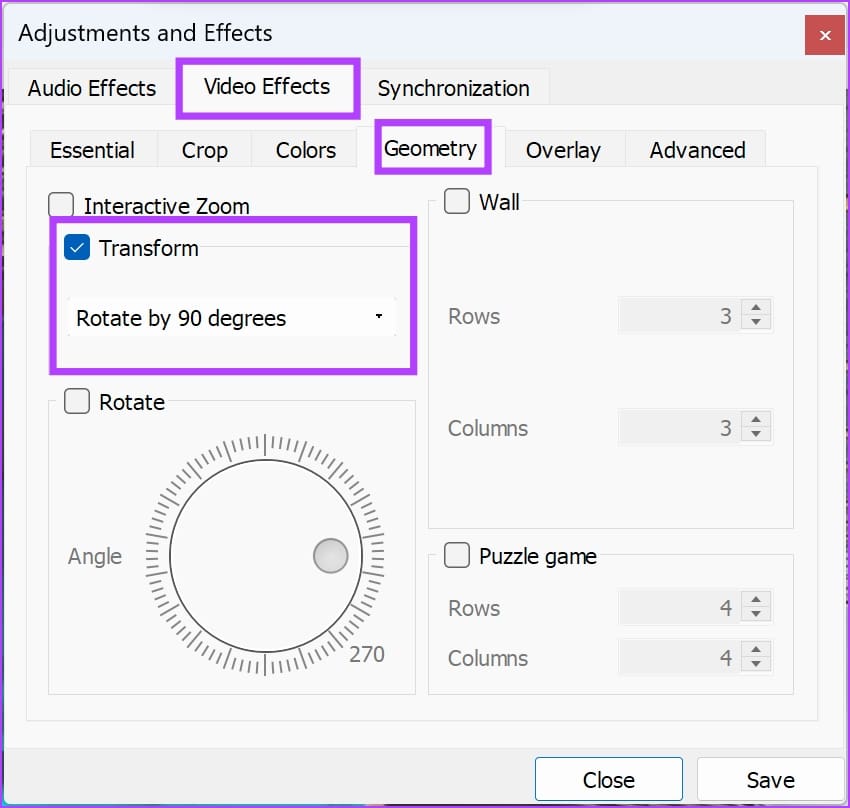
Step 2: Click on Video Effects, and go to the Geometry tab.
- If you want to rotate the video by multiples of 90 degrees, check the box for Transform, click on Rotate by 90 degrees, and select your desired option.
- If you want to rotate your video by a custom angle value, uncheck Transform, check Rotate, and rotate the dial to a custom angle value.
However, make sure to check the preview of the rotated video in the background.
Step 3: Click on Save once the changes are made.

Now, you will have to enable a few options that’ll help you export the video while retaining the transformation (video rotation) settings. However, you will only have to do this the very first time you are rotating and exporting a video on VLC.
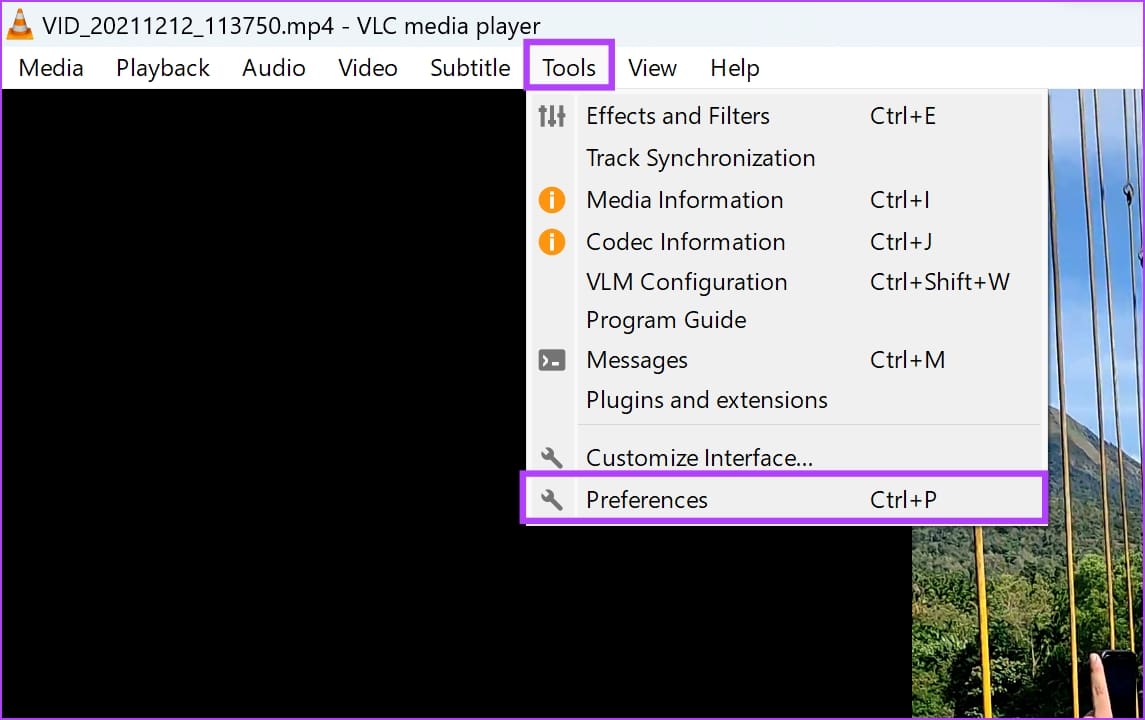
Step 4: Click on Tools > Preferences.
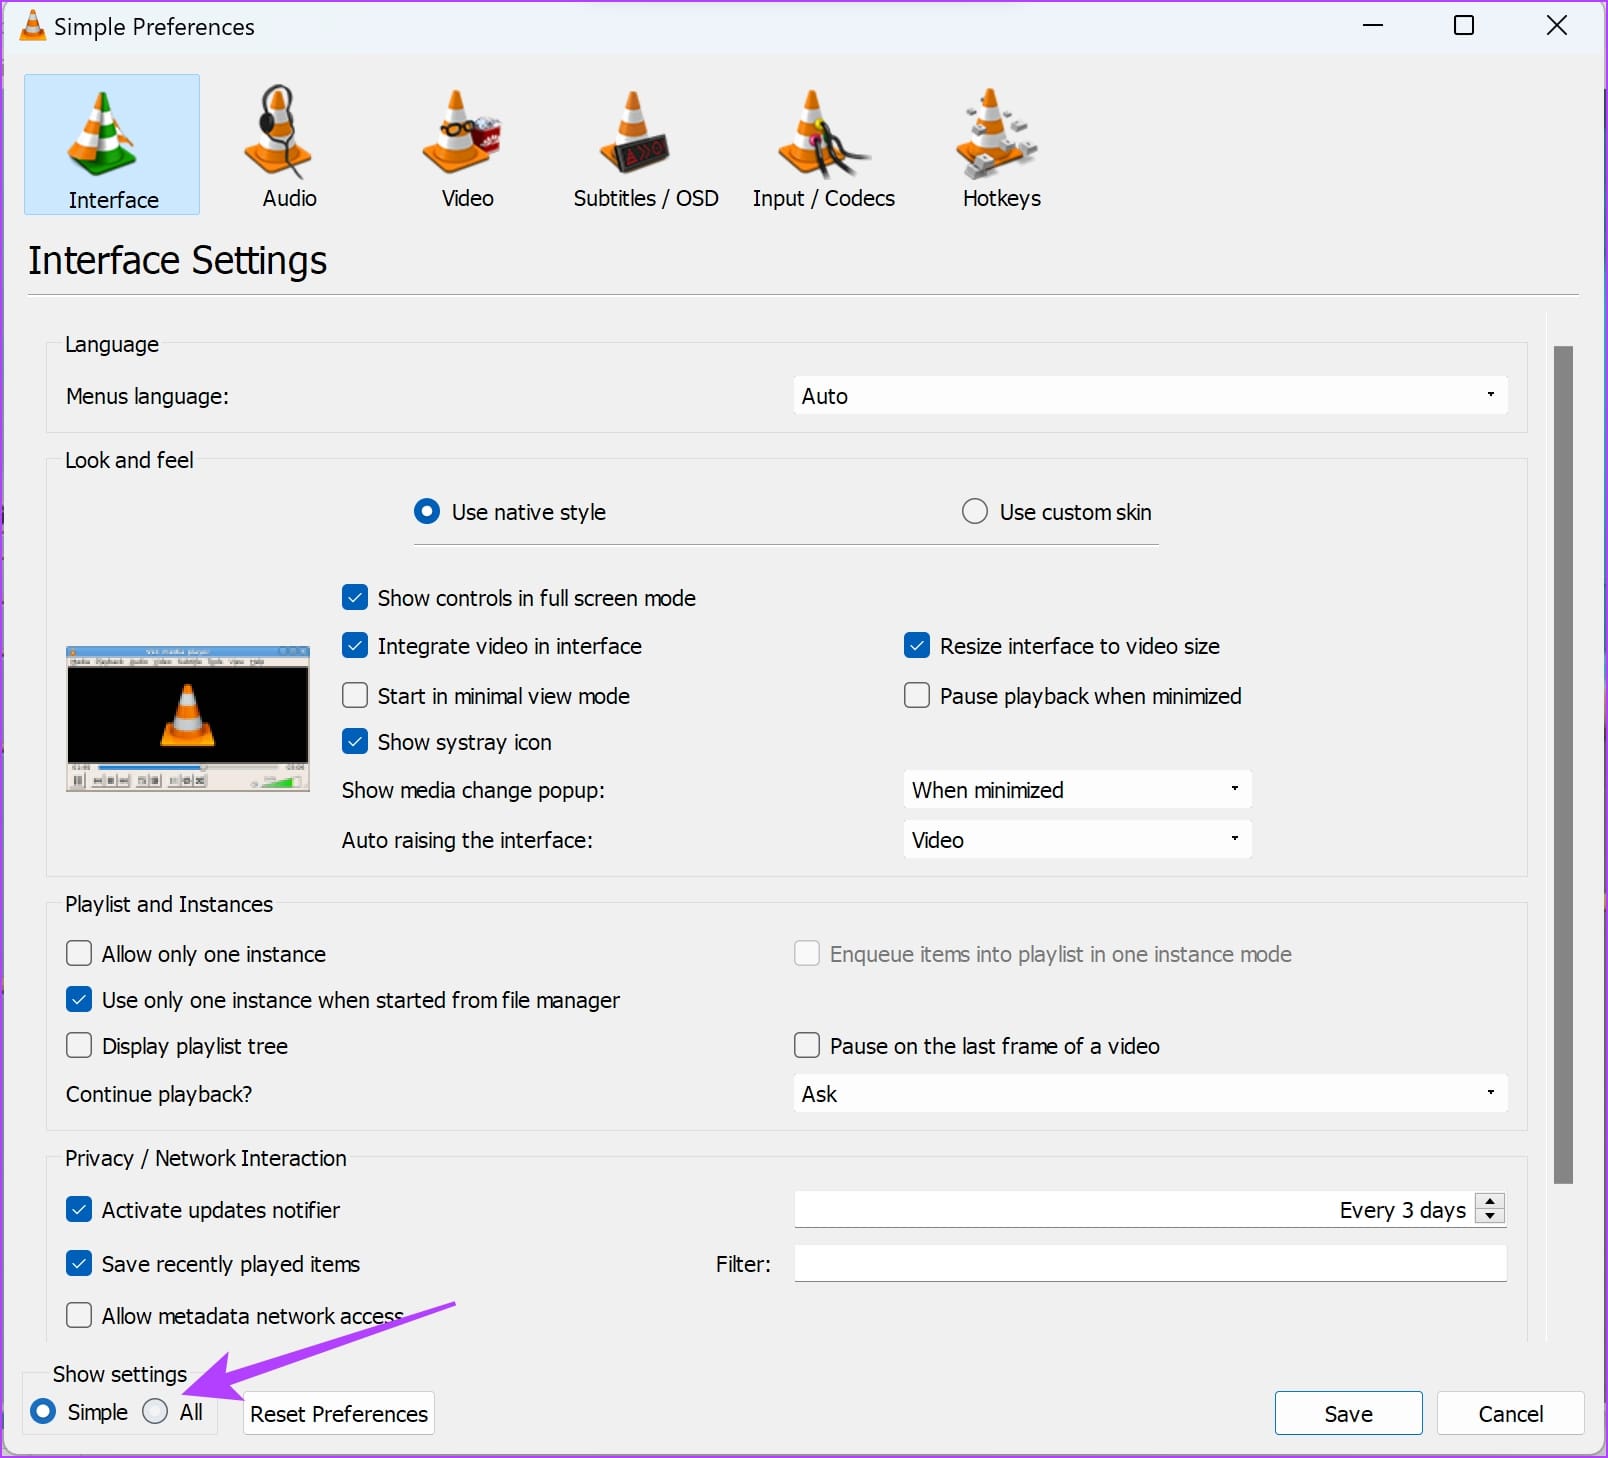
Step 5: Check the box for All to view the Advanced settings panel in the VLC media player.
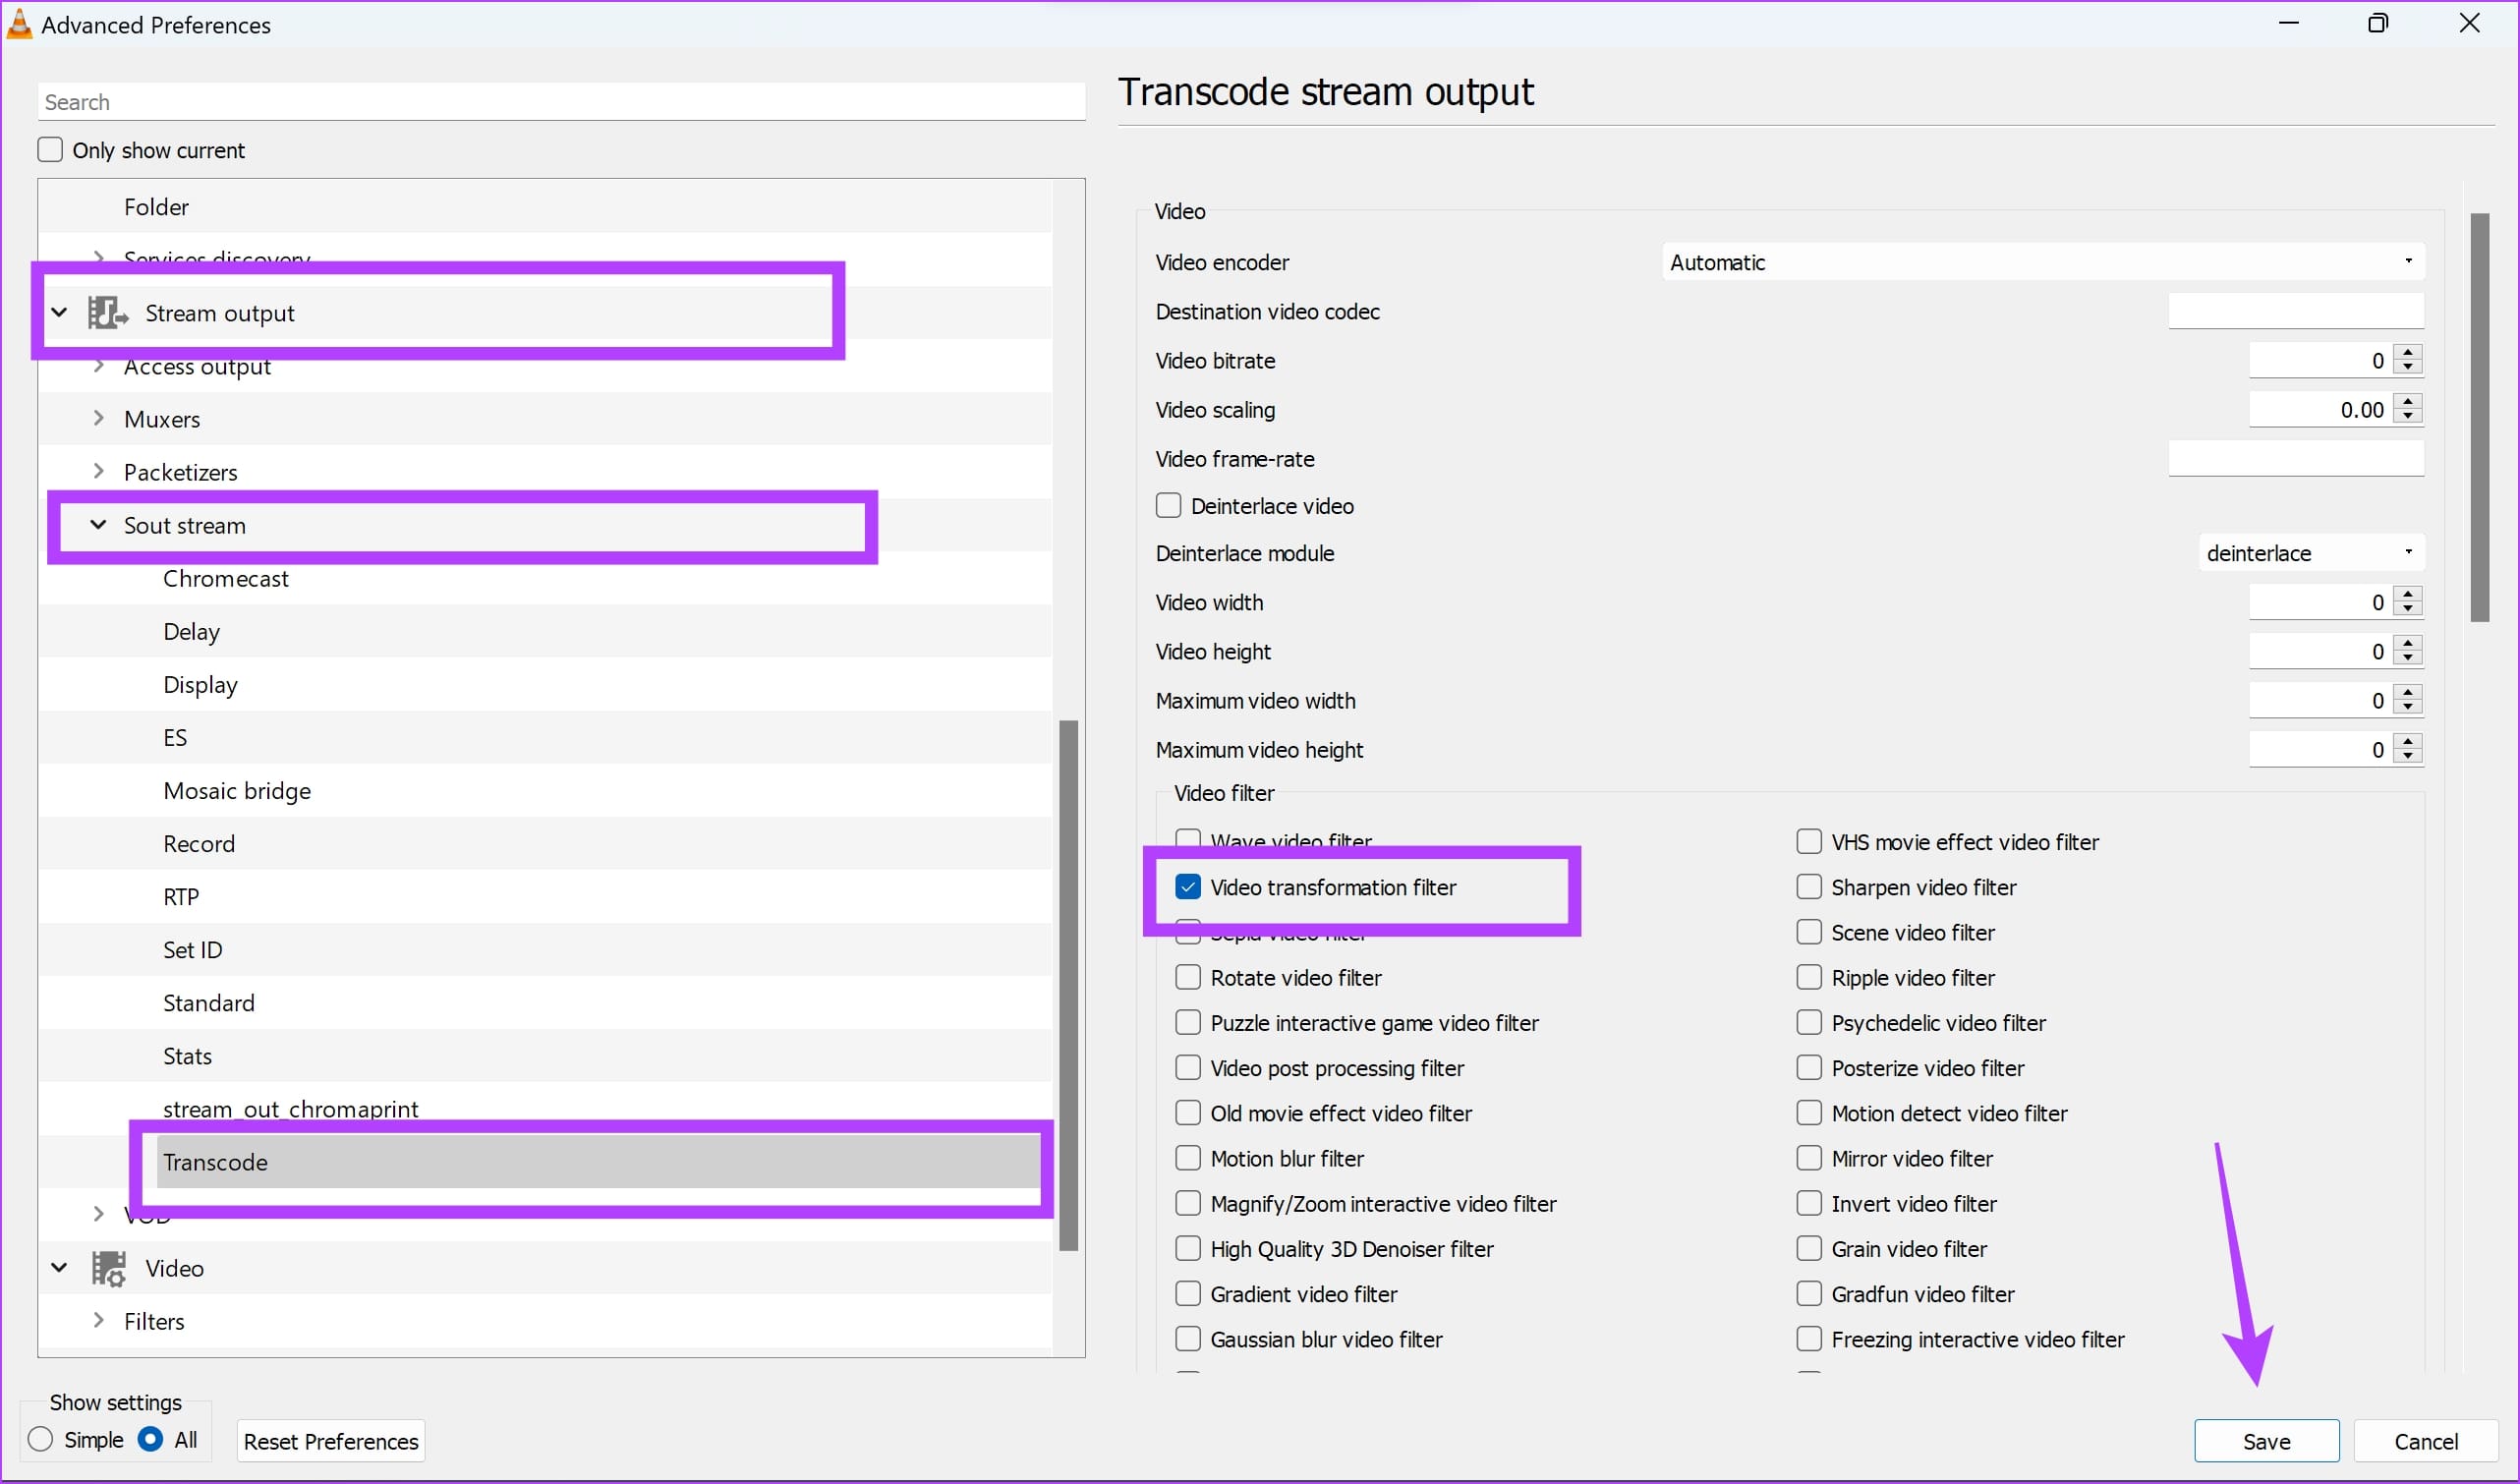
Step 6: Now select Stream Output > Sout stream > Transcode.
Step 7: Check the box for the Video transformation filter and click on Save.
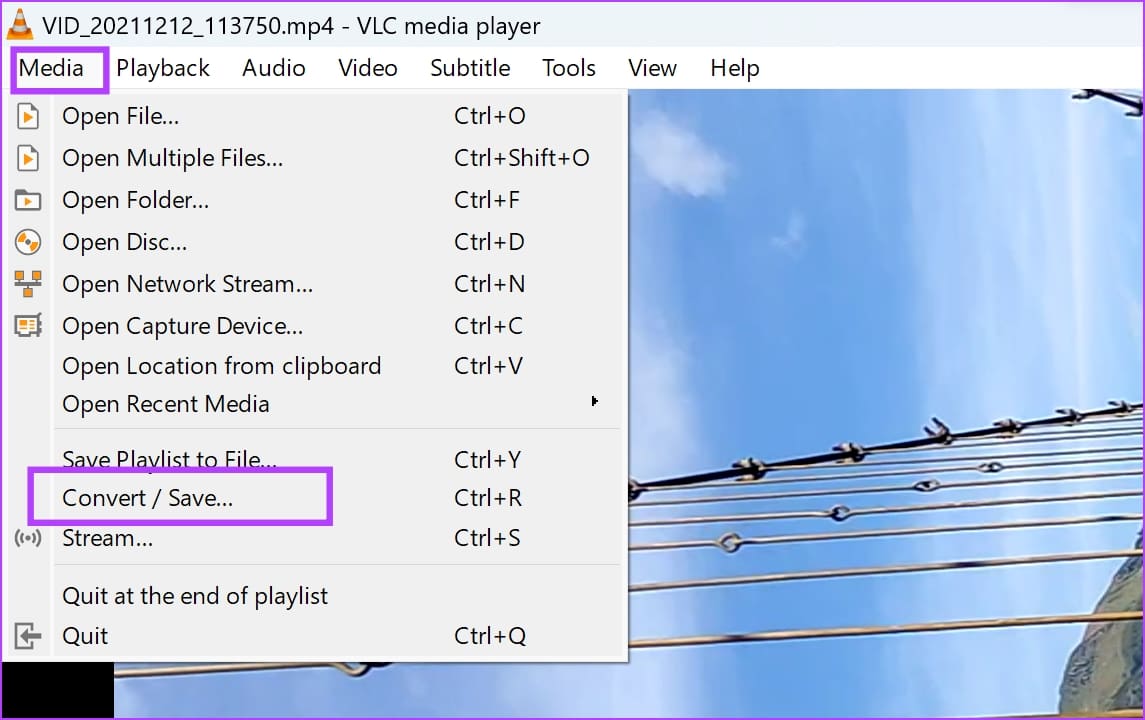
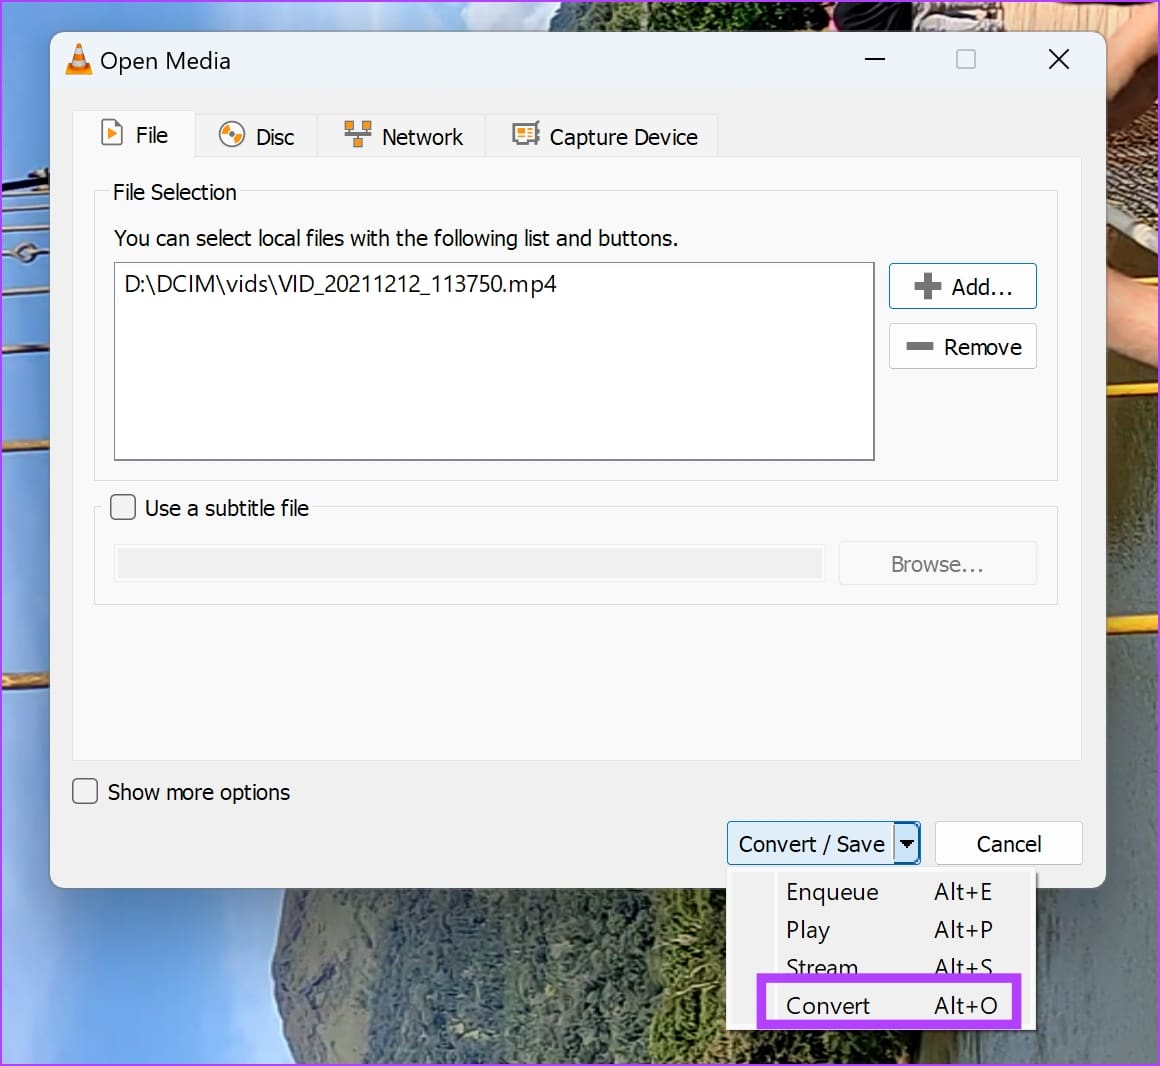
Step 8: Click on Media in the toolbar, and select Convert/Save.
Step 9: Click on Add, and select the video you’ve just rotated from the file explorer.
This may seem redundant given the video is already open. But that’s just how VLC works.
Step 10: Once you’ve selected the video, click on the dropdown menu on Convert/Save.

Step 11: Now, click on Convert.
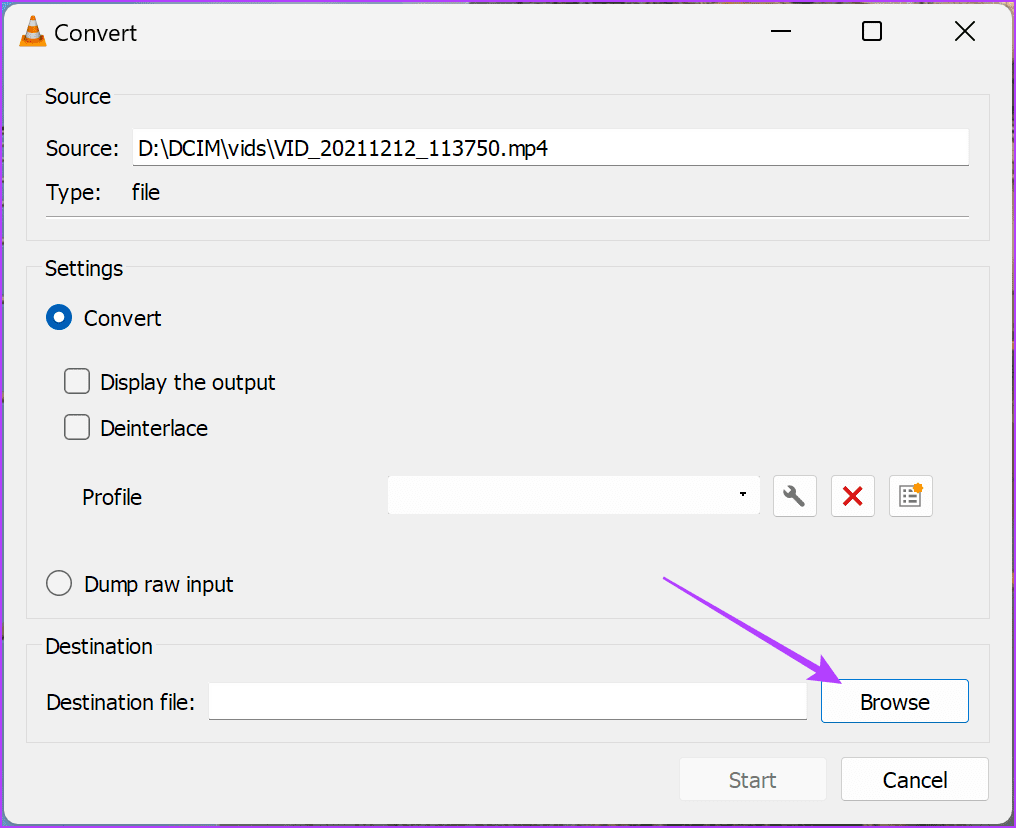
Step 12: Click on Browse to select the folder where you want to save the rotated video.
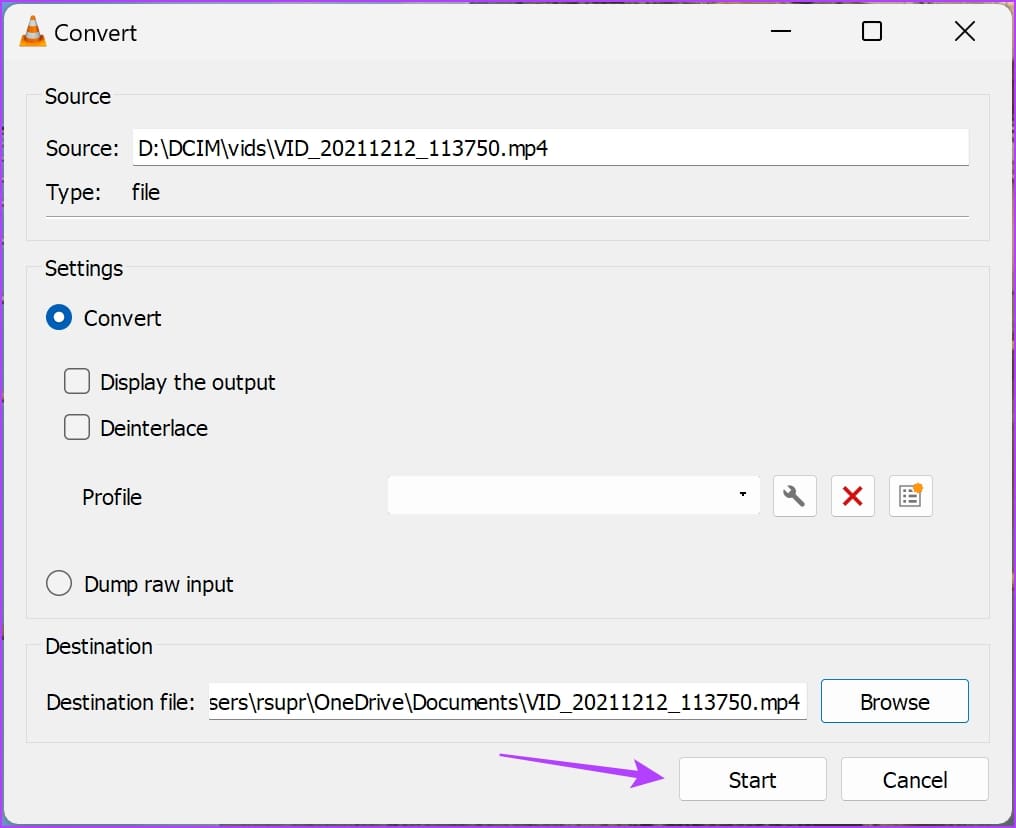
Step 13: Once you select the destination folder, tap on Start. This will start the conversion, and save the video.
Was this helpful?
Last updated on 13 May, 2024
Read Next
 4 Ways to Rotate Screen in Windows 11
Method 1: Use Screen Rotation Hotkeys You can quickly change screen orientation in Windows 11 with hotkeys without a mouse.
4 Ways to Rotate Screen in Windows 11
Method 1: Use Screen Rotation Hotkeys You can quickly change screen orientation in Windows 11 with hotkeys without a mouse.
 2 Ways to Fix Auto Rotate Not Working on iPhone
https://youtu.be/S_vIJ_3hn1s Try Basic Fixes Turn off the screen rotation lock: Ensure that the rotation lock is turned off on your iPhone: swipe down from the top right > tap the
2 Ways to Fix Auto Rotate Not Working on iPhone
https://youtu.be/S_vIJ_3hn1s Try Basic Fixes Turn off the screen rotation lock: Ensure that the rotation lock is turned off on your iPhone: swipe down from the top right > tap the
 4 Ways to Fix Auto Rotate Not Working on Android
Try Basic Fixes Remove your phone’s case: Start by removing your phone’s case and see if that gets the auto-rotate feature to work.
4 Ways to Fix Auto Rotate Not Working on Android
Try Basic Fixes Remove your phone’s case: Start by removing your phone’s case and see if that gets the auto-rotate feature to work.
 3 Ways to Rotate an Image in Google Docs
Method 1: Rotate an Image Using Rotation Control Google Docs lets you freely rotate a picture using rotational control.
3 Ways to Rotate an Image in Google Docs
Method 1: Rotate an Image Using Rotation Control Google Docs lets you freely rotate a picture using rotational control.
 8 Ways to Fix iPad Screen Won’t Rotate
You've downloaded a new Netflix series to watch on your 8-hour flight journey.
8 Ways to Fix iPad Screen Won’t Rotate
You've downloaded a new Netflix series to watch on your 8-hour flight journey.
 How to Quickly Rotate an Image on Mobile and Computer
How to Rotate an Image iPhone The Photos app has a built-in powerful editor that helps you rotate an image.
How to Quickly Rotate an Image on Mobile and Computer
How to Rotate an Image iPhone The Photos app has a built-in powerful editor that helps you rotate an image.
 3 Ways to Fix Telegram Videos Not Playing on Windows 11
Fix 1: Download Telegram Videos Without Glitches First, here's how to download Telegram videos without problems on your PC.
3 Ways to Fix Telegram Videos Not Playing on Windows 11
Fix 1: Download Telegram Videos Without Glitches First, here's how to download Telegram videos without problems on your PC.
 3 Ways to Fix Videos Not Playing on Windows 11
Fix 1: Run Video Playback Troubleshooter If you also face playback issues on other media players, turn to Windows troubleshooters for help.
3 Ways to Fix Videos Not Playing on Windows 11
Fix 1: Run Video Playback Troubleshooter If you also face playback issues on other media players, turn to Windows troubleshooters for help.
The article above may contain affiliate links which help support Guiding Tech. The content remains unbiased and authentic and will never affect our editorial integrity.