You might be used to Windows swapping the names of your external hard drives and USBs, but what happens when your recovery partition, which should only be used in emergencies, suddenly appears as a writable drive with its very own drive letter?
This article will be your guide to restoring your recovery partition to its intended role.
The Invisible Friend

If you’re suddenly dealing with a recovery partition that seems to be doing something other than its assigned role, you might be wondering what’s happening. The recovery partition is created automatically by Windows and is a way for the operating system to restore itself to a previous working state (or factory settings) in case of emergency. This partition houses the Windows Recovery Environment (WinRE).
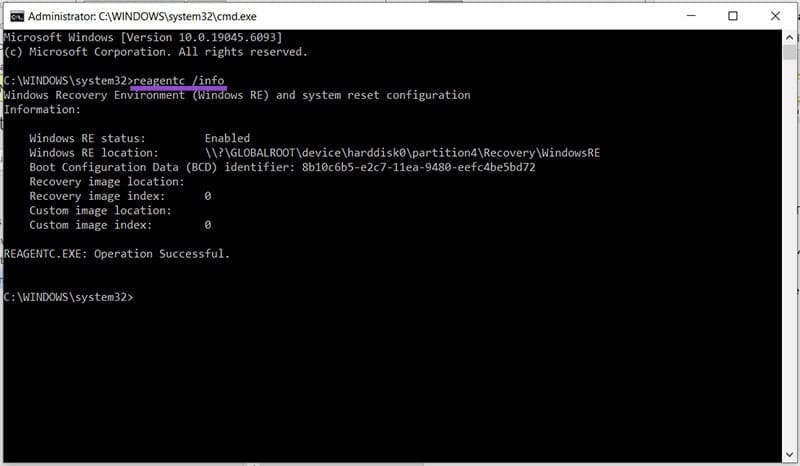
It’s a very useful partition to have. As you can see from the above image, it appears at the end of your main drive, behind the EFI partition and the main partition. On a normal drive, your main partition should be the only one with a drive letter assigned.
But what happens when it isn’t?
What to Do When Windows 11 Keeps Assigning a Drive Letter to the Recovery Partition
If your recovery partition suddenly has a drive letter and is showing up in File Explorer, this is most likely a problem of missing hidden attributes. The drive is no longer hidden or unmounted. It might also be that an update or disk clone has altered the metadata of your hard drive. Data on this drive is crucial and shouldn’t be overwritten or deleted. Let’s look at some fixes to this problem.
Remove the Letter via Command Prompt
Command Prompt is a tool with many different uses. Today, we’ll be using it to remove the letter from your recovery partition. Here’s how:
Step 1. Open the Run dialog (Win + R) and type “cmd.” Press (Ctrl + Shift + Enter) to run as Administrator.
Step 2. The WinRE’s status and location can be checked by typing “reagentc /info” and pressing “Enter.” If the partition location (“Windows RE Location:”) shows a letter instead of a number, you’ll need to fix things.
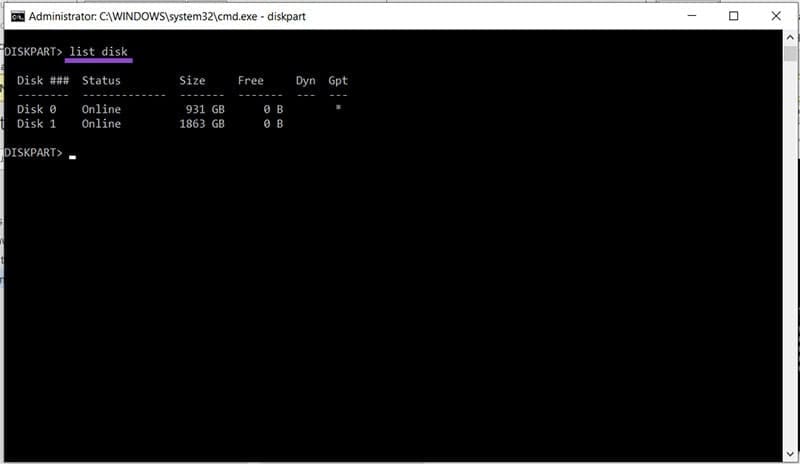
Step 3. Type “diskpart” to open the DiskPart tool in the Command Prompt.

Step 4. Type “list volume” to see the current list of drives on your machine.

Step 5. If you see your recovery partition listed with a drive letter, type “select volume [number]”.
Step 6. Type “remove letter [letter] to get rid of the partition letter.
If the recovery partition doesn’t show up at the volume level, you’ll need to go deeper and access the partition level:
Step 1. In DiskPart, type “list disk” and press “Enter.”
Step 2. Type “select disk [number]” to choose the disk with the partition.
Step 3. View all partitions by typing “list partition”
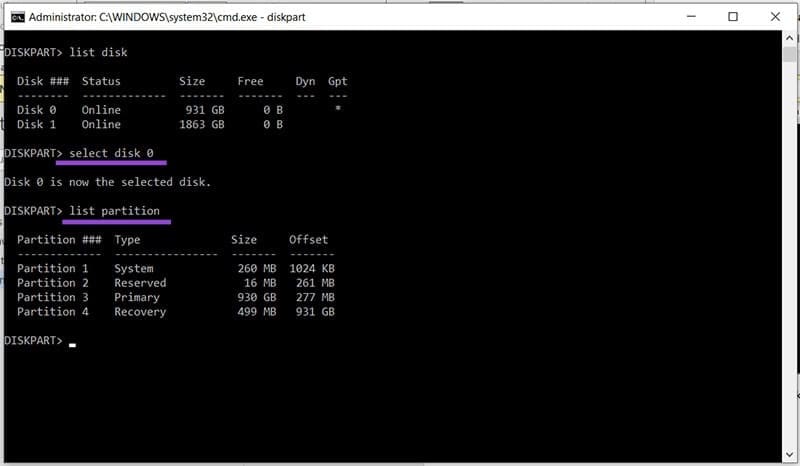
Step 4. Look for the partition labeled “recovery” under “Type” and type “remove letter [letter]” if there’s a drive letter.
Hide the Drive
If you keep seeing the recovery partition popping up, then you should hide it to prevent files from being overwritten. Here’s how to hide it using Command Prompt:
Step 1. Type “diskpart” into the Command Prompt to begin the tool.
Step 2. Select the partition (see above) and then type “set id=de94bba4-06d1-4d40-a16a-bfd50179d6ac override” to remind the partition of its proper identity.
Step 3. Type “gpt attributes=0x8000000000000001” to set the recovery partition to hidden and read-only.
Step 4. Your partition should now be unlisted from File Explorer.
Unmount the Drive
You can also hide the drive by unmounting it in the Command Prompt. Here’s how:
Step 1. Open the Command Prompt, type “mountvol [driveletter]: /d” and press “Enter.”
Step 2. Check that the drive is no longer showing in File Explorer.
Was this helpful?
Last updated on 01 August, 2025
Read Next
 Reviewing the Free EaseUS Data Recovery Software For Windows
Till date, we have talked about quite a few file recovery tools that help us to restore files that are deleted accidentally from our computer.
Reviewing the Free EaseUS Data Recovery Software For Windows
Till date, we have talked about quite a few file recovery tools that help us to restore files that are deleted accidentally from our computer.
 GT Explains: Difference Between Recovery Drive and System Image in Windows 10
Windows offers multiple ways to take a backup of your precious data on your computer.
GT Explains: Difference Between Recovery Drive and System Image in Windows 10
Windows offers multiple ways to take a backup of your precious data on your computer.
 How to Create and Use a Recovery Drive on Windows 11
How to Create a Windows 11 USB Recovery Drive Microsoft bundles the Recovery Drive app in Windows 11 to help you create a recovery disk.
How to Create and Use a Recovery Drive on Windows 11
How to Create a Windows 11 USB Recovery Drive Microsoft bundles the Recovery Drive app in Windows 11 to help you create a recovery disk.
 5 Ways to Fix ‘We Can’t Create a Recovery Drive’ Error in Windows 11
Basic Fixes Close and restart the Recovery Drive app: Launch the Task Manager app by pressing Ctrl + Shift + Esc.
5 Ways to Fix ‘We Can’t Create a Recovery Drive’ Error in Windows 11
Basic Fixes Close and restart the Recovery Drive app: Launch the Task Manager app by pressing Ctrl + Shift + Esc.
 A Complete Guide to Fixing Android Recovery Mode Not Working
When was the last time your Android phone struggled to boot into Recovery mode?
A Complete Guide to Fixing Android Recovery Mode Not Working
When was the last time your Android phone struggled to boot into Recovery mode?
 A Guide to Fixing Mac Not Connecting to Wi-Fi in macOS Recovery
If your Mac acts up or keeps crashing, the built-in Recovery mode can be useful.
A Guide to Fixing Mac Not Connecting to Wi-Fi in macOS Recovery
If your Mac acts up or keeps crashing, the built-in Recovery mode can be useful.
 6 Ways to Fix Print Spooler Keeps Stopping on Windows 10 and Windows 11
Fix 1: Run Printer Troubleshooter Windows comes with a dedicated printer troubleshooter that can automatically diagnose and fix any printing issues on your PC.
6 Ways to Fix Print Spooler Keeps Stopping on Windows 10 and Windows 11
Fix 1: Run Printer Troubleshooter Windows comes with a dedicated printer troubleshooter that can automatically diagnose and fix any printing issues on your PC.
 Windows Focus Assist (Windows 11) Keeps Turning On – How to Fix It
Usually, not getting notifications while you’re hard at work is a good thing.
Windows Focus Assist (Windows 11) Keeps Turning On – How to Fix It
Usually, not getting notifications while you’re hard at work is a good thing.
The article above may contain affiliate links which help support Guiding Tech. The content remains unbiased and authentic and will never affect our editorial integrity.