Drive letters are a way for Windows to avoid path conflicts with other volumes and create an easy roadmap for apps and files to be saved and edited. Occasionally, though, in the case of external storage, Windows 11 may sometimes change drive letters. This can range from annoying to detrimental to your system.
In this article, we’ll be showing you a few ways to change your drive letters back.
What to Do When the Windows 11 Drive Letter Changed
Giving drives a different letter is a pretty common practice for external devices. Depending on the order in which a drive is plugged in, Windows assigns a letter on a first-come, first-served basis.
Sometimes system drives and their partitions may also be rearranged, which can cause no end of trouble for programs and their pathing.
To get your mislabeled drive back on the correct path (so to speak), there are a few ways to relabel things back to the way they were. Let’s get started:
Plug in Your Drive
Here’s a quick solution. If you have two or more external drives connected to your PC, you might find the drive letters jumbled around. A quick fix can be to disconnect all the drives, then reconnect them in the order you want letters assigned to them.
Relabel With Disk Management
Disk Management is the go-to utility for managing all things storage-related, from partitions to cloning. It’s also a quick and easy way to relabel drives and partitions. Here’s what to do:
Step 1. Open up the Search Bar and type in “Disk Management.”
Step 2. Click the option “Create and format hard disk partitions.”
Step 3. In the Disk Management window, you’ll see all current drives, partitions, and their respective letters. To change a letter, right-click the volume or partition you want to relabel and click “Change Drive Letter and Paths…” from the context menu.

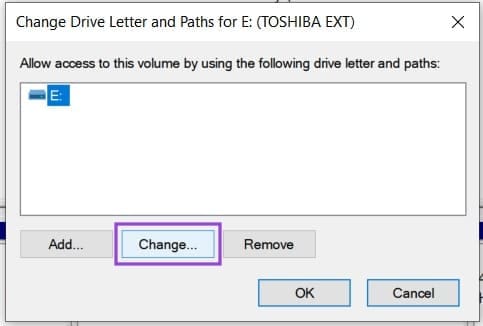
Step 4. In the window that pops up, click the “Change” button.
Step 5. In the next window that pops up, ensure that “Assign the following drive letter” is selected and choose the new drive letter from the drop-down list next to it.
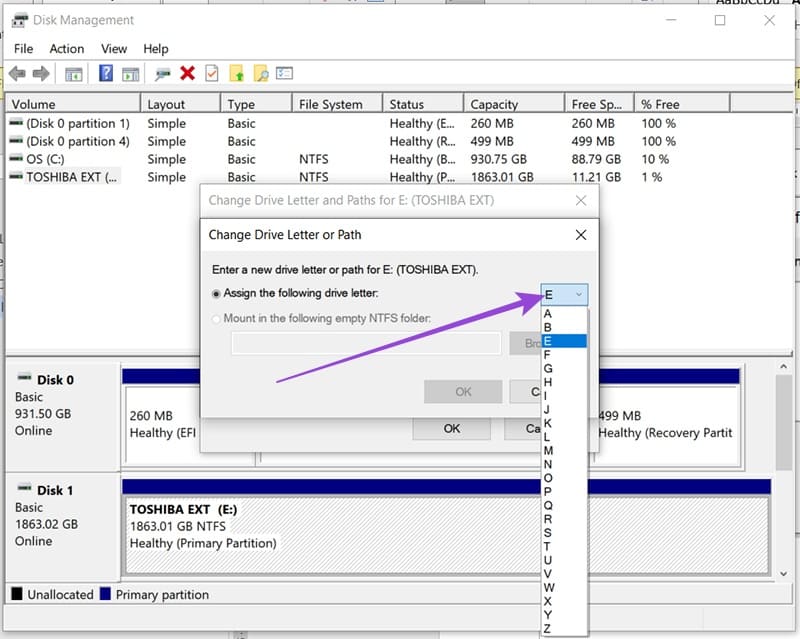
Step 6. Click “OK” once you’re done, confirm the warning that tells you some programs might no longer work correctly, and the drive should be relabeled.
Using Command Prompt and DiskPart
DiskPart is a command-line tool that can run in Command Prompt. It’s an excellent, if a little user-unfriendly, way to sort out drive and partition issues. You can also use this method to relabel a drive. Here’s how:
Step 1. Open the Run dialog box (Win + R) and enter “cmd” before pressing (Ctrl + Shift + Enter) to run the tool as Administrator.
Step 2. Once you’re in the Command Prompt, type “diskpart” and click “Enter” to start DiskPart.

Step 3. To see all current volumes on your drive, type “list volume” and press “Enter.”

Step 4. Select the volume you want to change by typing “select volume [volume number]” and press “Enter.”

Step 5. Give it a new letter by typing “assign letter=[desired letter]” and press “Enter.”
Your volume should be relabeled.
For a partition to be relabeled, the process is quite similar:
Step 1. In DiskPart, type “list disk” and press “Enter.”
Step 2. Then type “select disk [number]” and press “Enter.”

Step 3. Type “list partition” and press “Enter” to see all partitions on the disk.
Step 4. Type “select partition [number]” and reassign the letter by typing “assign letter=[desired letter]” before pressing “Enter.”
Was this helpful?
Last updated on 03 August, 2025
Read Next
 Windows 11 Keeps Assigning Drive Letter to Recovery Partition
You might be used to Windows swapping the names of your external hard drives and USBs, but what happens when your recovery partition, which should only be used in emergencies,
Windows 11 Keeps Assigning Drive Letter to Recovery Partition
You might be used to Windows swapping the names of your external hard drives and USBs, but what happens when your recovery partition, which should only be used in emergencies,
 3 Ways to Change Priority Levels for Programs on Windows 10 and Windows 11
When Should You Change the Priority Level of a Program By default, Windows 11 assigns different priority levels to each process based on its importance.
3 Ways to Change Priority Levels for Programs on Windows 10 and Windows 11
When Should You Change the Priority Level of a Program By default, Windows 11 assigns different priority levels to each process based on its importance.
 How to Change Microsoft Account on Windows 10
All Microsoft products and services are connected to your Microsoft account.
How to Change Microsoft Account on Windows 10
All Microsoft products and services are connected to your Microsoft account.
 Top 3 Ways to Change Windows 10 Keyboard to US
When you unbox a new Windows computer, you can choose and add your preferred keyboard layout and language during set up.
Top 3 Ways to Change Windows 10 Keyboard to US
When you unbox a new Windows computer, you can choose and add your preferred keyboard layout and language during set up.
 How to Change Mouse Sensitivity (DPI) and Other Settings in Windows 11
Method 1: Increase or Decrease Mouse Sensitivity Sensitivity in a mouse can be anything, from how fast it moves across the screen to how fast it reacts when double-clicking.
How to Change Mouse Sensitivity (DPI) and Other Settings in Windows 11
Method 1: Increase or Decrease Mouse Sensitivity Sensitivity in a mouse can be anything, from how fast it moves across the screen to how fast it reacts when double-clicking.
 5 Fixes for Unable to Change Desktop Background on Windows
Fix 1: Ensure Windows Is Activated Although you can use an unactivated version of Windows 10 or 11, there are a few limitations.
5 Fixes for Unable to Change Desktop Background on Windows
Fix 1: Ensure Windows Is Activated Although you can use an unactivated version of Windows 10 or 11, there are a few limitations.
 How to Change Epic Games Install Location on Windows
Where Are Epic Games Installed on Your System?
How to Change Epic Games Install Location on Windows
Where Are Epic Games Installed on Your System?
 Top 4 Ways to Change New Outlook Back to Old (Classic View) Outlook on Windows and Mac
The new Outlook app for desktop boasts a modern and simplified design, aligning it more closely with the web version of Microsoft Outlook.
Top 4 Ways to Change New Outlook Back to Old (Classic View) Outlook on Windows and Mac
The new Outlook app for desktop boasts a modern and simplified design, aligning it more closely with the web version of Microsoft Outlook.
The article above may contain affiliate links which help support Guiding Tech. The content remains unbiased and authentic and will never affect our editorial integrity.