External hard drives and storage solutions like thumb drives are useful for transferring documents without having to rely on the cloud. However, you do need to be careful to insert and remove them correctly. In some cases, drives need to be safely ejected before you can unplug them.
If you force the device to disconnect, or simply unplug the cable without safely ejecting it, the drive may stall or even become corrupted. The result is that your Windows machine may not recognize the drive next time you plug it in.
Here are some fixes you can try when your external drive not recognized after force eject.
External Hard Drive Not Recognized After Force Eject: Potential Causes and Fixes
When you plug a device into your Windows computer, you can safely eject it from the system tray.
Step 1. Click the upward-pointing arrow to show hidden icons, then right-click the “Safely Remove Hardware and Eject Media” icon. Click on the upward-pointing arrow on the left of the system tray to find this option.
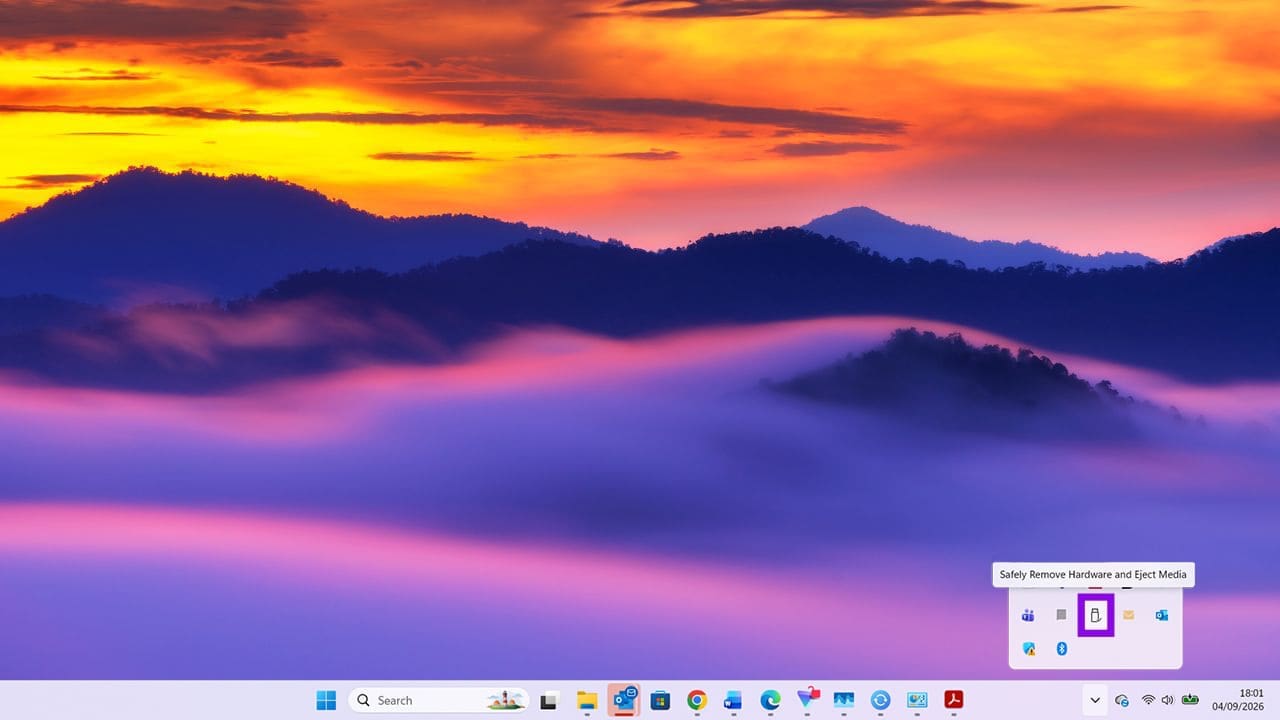
Step 2. Right-click the “Safely Remove Hardware and Eject Media” icon and select “Open Devices and Printers.”

Step 3. By default, you will normally see any Bluetooth devices you have connected. To find other external devices, click “View more devices.”

Step 4. If you’re using an external hard drive or a similar device like an SD card reader, you will now see an option for “Mass Storage Device.”

Step 5. Click on the drop-down arrow, and click “Remove” next to “Remove this device.”
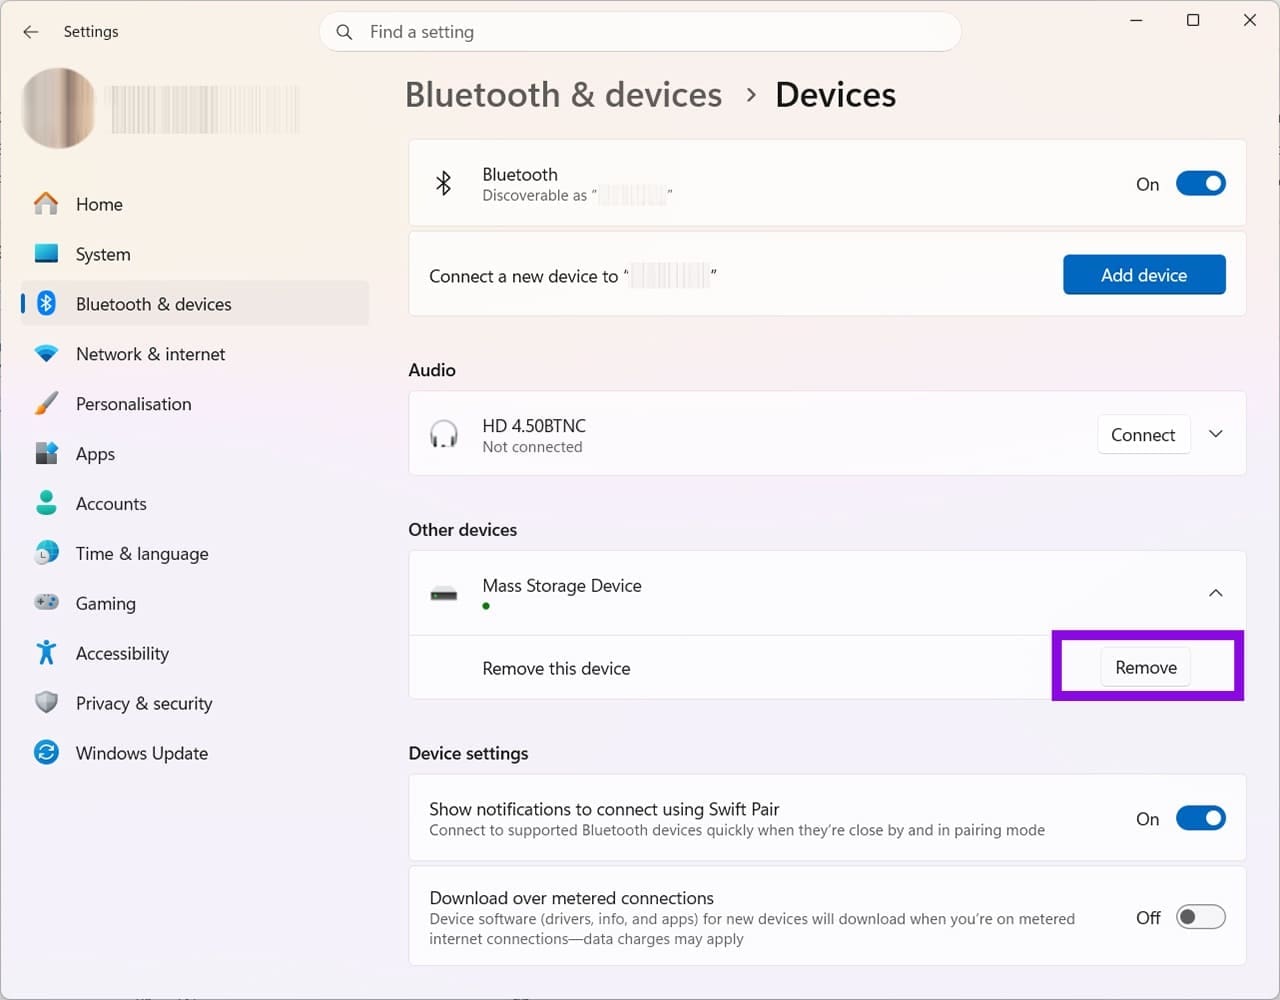
Step 6. You can now safely unplug the device, as Windows has confirmed that it is safe to remove.
External Device Not Recognized: Fix No. 1 – Wait and Reboot
If you then plug your drive in and nothing happens, it could be because you unplugged it before Windows had finished using the device. The drive or USB connection may have become unresponsive, preventing Windows from recognizing the new connection.
To fix this, make sure the drive is unplugged from any power supply. Shut down your Windows machine and wait a few moments. Reboot the computer, and wait until everything has fully booted up before trying to connect the external device again. In some cases, the power cycle and reboot can clear a temporary connection or USB controller problem, allowing Windows to recognize the device again.
If the problem persists, try the following:
- Try connecting the drive via a different USB port
- Use a different USB cable
- Test the external device on a different computer
If the device works on a different computer, this offers the reassurance that your drive is not permanently corrupted. You may need to force your computer to recognize the drive.
External Device Not Recognized: Fix No. 2 – Change the Drive Letter
Renaming the drive may force Windows to recognize it.
Step 1. Start by pressing Windows + X to bring up the Quick Link Menu, and choose the option for “Disk Management.”

Step 2. If Windows detects the drive, you should be able to see it at the bottom of the window that opens up.
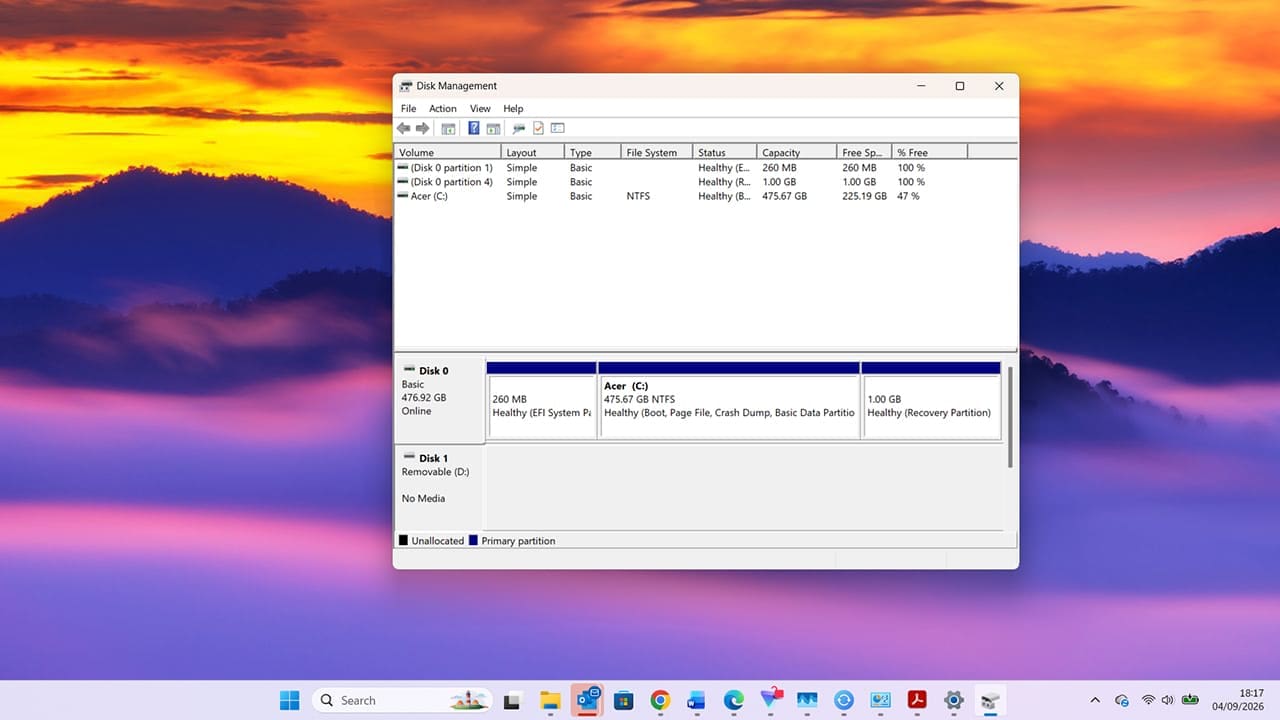
Step 3. Right-click the volume and choose “Change Drive Letter and Paths.”

Step 4. Click “Change.”

Step 5. Choose an unused drive letter.
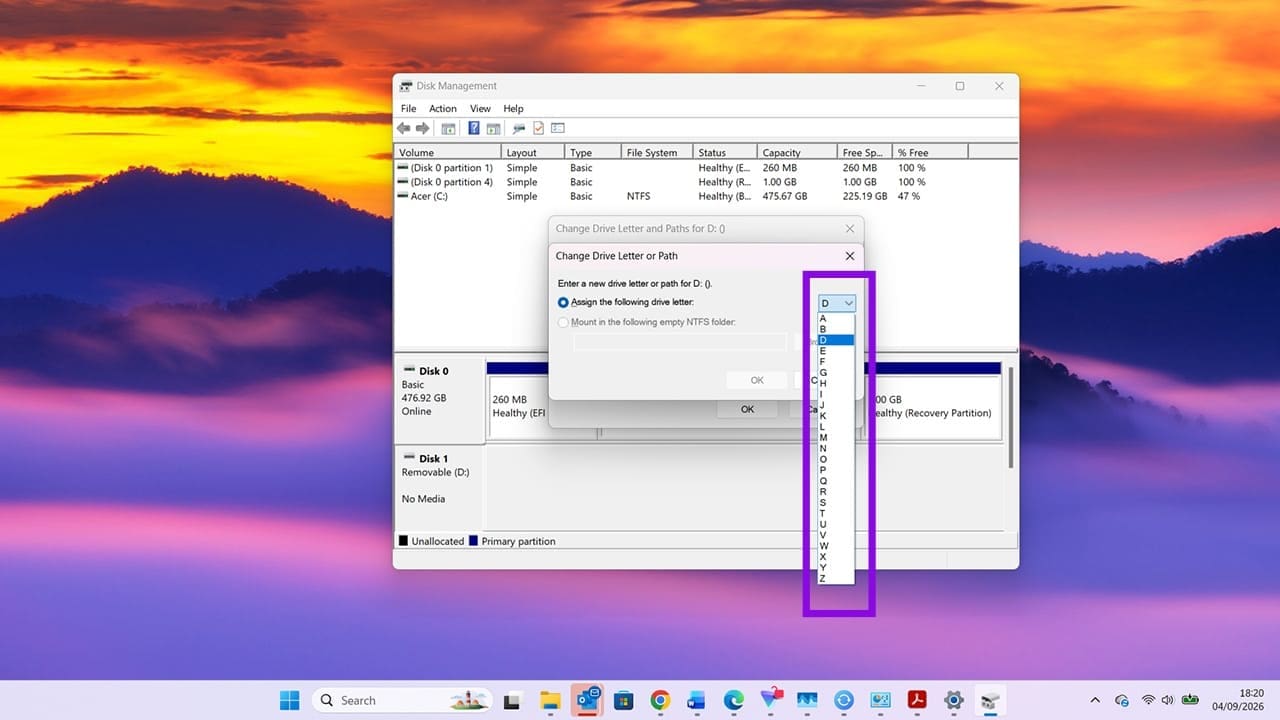
Step 6. Press “OK,” and you should now be able to access your external drive with no issues.
Was this helpful?
Last updated on 08 September, 2026
Read Next
 3 Ways to Fix ‘Not Recognized as an Internal or External Command’ Error in Windows
Basic Fixes Run CMD in admin mode: Some commands require an elevated Command Prompt window to run properly.
3 Ways to Fix ‘Not Recognized as an Internal or External Command’ Error in Windows
Basic Fixes Run CMD in admin mode: Some commands require an elevated Command Prompt window to run properly.
 3 Fixes for Fire TV Stick Not Recognized by TV
Basic Fixes Connect to the same Wi-Fi network: Your Fire TV Stick and TV are connected to the same Wi-Fi network.
3 Fixes for Fire TV Stick Not Recognized by TV
Basic Fixes Connect to the same Wi-Fi network: Your Fire TV Stick and TV are connected to the same Wi-Fi network.
 9 Best Ways to Fix iPhone Not Recognized by Computer
While iCloud is the convenient way to backup media files, and iPhone data, some still use the data cable and iTunes on PC to update iOS, transfer photos/videos, restore the
9 Best Ways to Fix iPhone Not Recognized by Computer
While iCloud is the convenient way to backup media files, and iPhone data, some still use the data cable and iTunes on PC to update iOS, transfer photos/videos, restore the
 Why Is My USB Device Listed as Unknown in Windows 11?
It’s never fun to have to try every USB port on your PC in the hope that one of them detects your device.
Why Is My USB Device Listed as Unknown in Windows 11?
It’s never fun to have to try every USB port on your PC in the hope that one of them detects your device.
 3 Best Ways to Adjust Brightness on External Monitor in Windows 10
One can easily adjust the screen brightness of their Windows 10 laptop or computer using the slider in the Action Center or with buttons on the keyboard.
3 Best Ways to Adjust Brightness on External Monitor in Windows 10
One can easily adjust the screen brightness of their Windows 10 laptop or computer using the slider in the Action Center or with buttons on the keyboard.
 3 Fixes When an External Hard Drive Is Not Showing up in Windows 11
https://youtu.be/zu_eLoLltq4 Basic Fixes: Try another USB port: Your current port may be faulty, and using a different one may be effective.
3 Fixes When an External Hard Drive Is Not Showing up in Windows 11
https://youtu.be/zu_eLoLltq4 Basic Fixes: Try another USB port: Your current port may be faulty, and using a different one may be effective.
 How to Close Your Laptop and Use External Monitor on Windows
How to Connect and Use External Monitor Your attempt to use your external monitor with a closed laptop will work if you use the correct display configuration.
How to Close Your Laptop and Use External Monitor on Windows
How to Connect and Use External Monitor Your attempt to use your external monitor with a closed laptop will work if you use the correct display configuration.
 How to Boot Windows From an External SSD
If you’re looking to install Windows from scratch, the good news is that it’s easy to do with any external drive, including an SSD.
How to Boot Windows From an External SSD
If you’re looking to install Windows from scratch, the good news is that it’s easy to do with any external drive, including an SSD.
The article above may contain affiliate links which help support Guiding Tech. The content remains unbiased and authentic and will never affect our editorial integrity.