If you’re finding that your PC’s USB ports are not recognizing anything you’re putting in them, then you might be searching for fixes. Thankfully, we’ve got some. This article will show you some troubleshooting steps for USB ports not detecting devices (Windows 11).
How to Fix USB Ports Not Detecting Devices (Windows 11)
If your USB ports are not recognizing devices, there can be a few causes behind this, including hardware issues like damaged ports to software troubles like corrupted drivers. We’ve got some troubleshooters below to help:
Restart Your Machine
Let’s start simple and a little obvious. Restarting your machine can be a quick fix for a whole lot of software issues and doesn’t take too long to complete. Reboot your machine and see if the issue persists.
Inspect Your USB Device and Ports
Another common cause of devices not being recognized is damage to the port or plug itself. Inspect both your device and PC for any signs of damage or wear. Try another device or another port to see if this solves the problem.
Check Power Management Settings
Another big culprit in non-functioning ports is Power Management, which sometimes disables them to save battery life. To check that this isn’t happening to you, here’s what to do:
Step 1. Type “Power Management” into the Windows search bar and choose “Edit power plan” when it pops up.
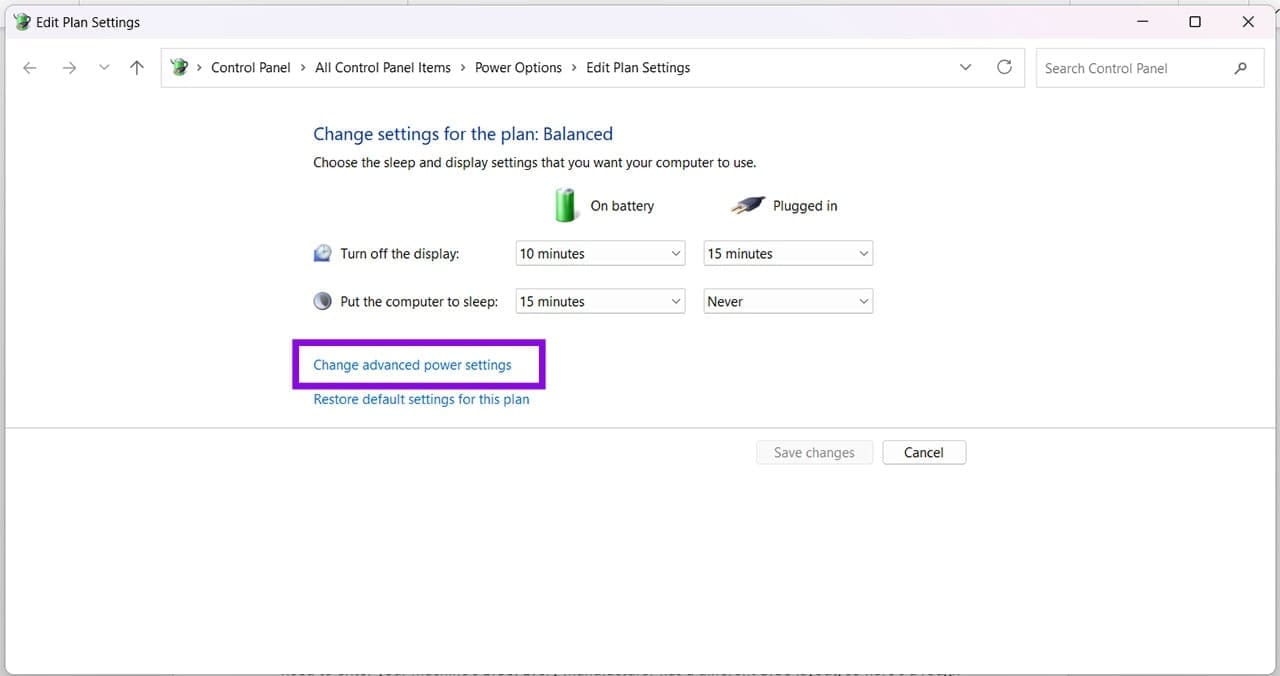
Step 2. Click “Change advanced power settings” in the next window.
Step 3. In the Power Options window, click “USB selective suspend setting.”
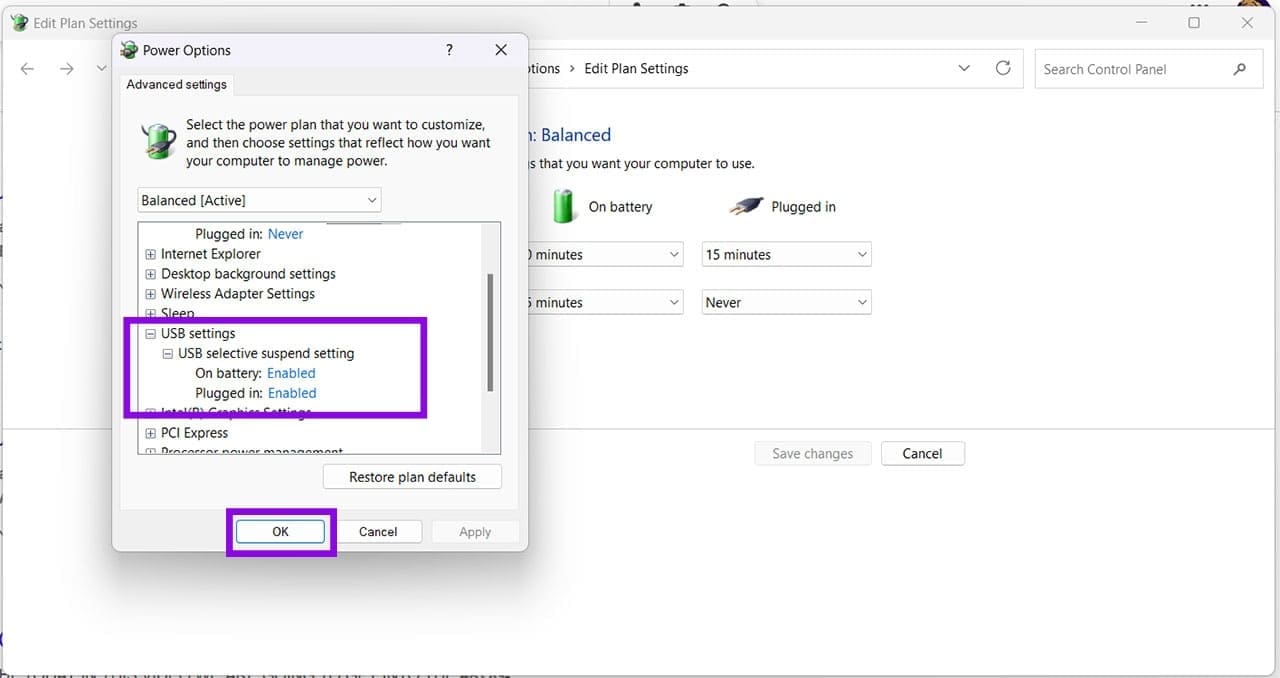
Step 4. Ensure that both “On battery” and “Plugged in” are set to “Disabled” while troubleshooting.
Step 5. Click “OK” to finalize and test your ports again.
Update Software
USB issues are just as easily caused by faulty software as hardware. It’s important to ensure that your version of Windows 11 is fully up to date, which you can do via Settings and Windows Update.

Another key area is the USB drivers. Here’s how to update them:
Step 1. Open the Run Dialog (Win + R) and type “devmgmt.msc” into the box before hitting “Enter.”
Step 2. Scroll down to “Universal serial bus controllers” and click to open the dropdown list.
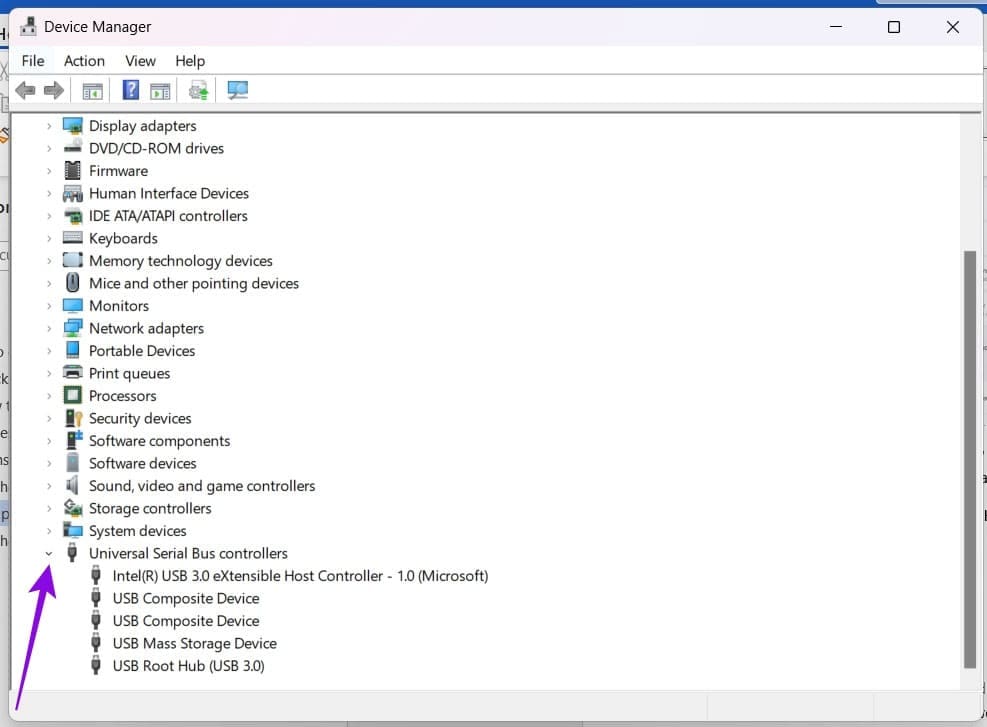
Step 3. Right-click each in turn, and select “Update drivers” from the context menu.
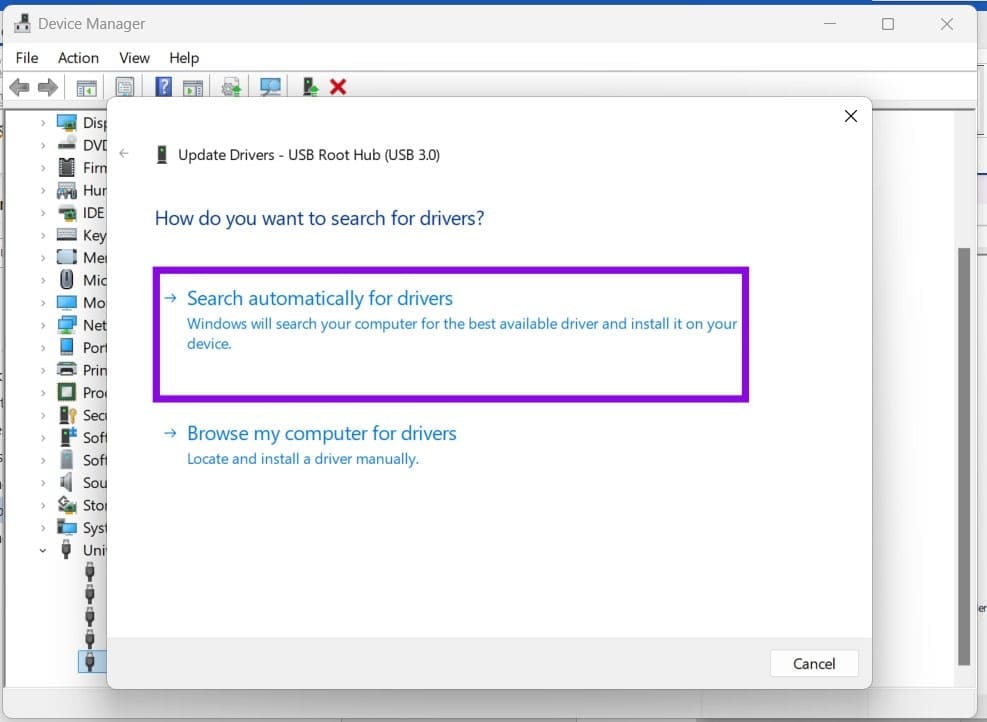
Step 4. Choose “Search automatically for drivers.” If there are any that are found, you can follow the steps to install them.
Step 5. If this doesn’t work, you can uninstall each driver one by one before restarting the PC. Windows will automatically find the latest drivers and install them.
Check Your BIOS
Sometimes, USB ports can be disabled at a more fundamental level, i.e., the BIOS. To check this, you’ll need to enter your machine’s BIOS. Every manufacturer has a different BIOS layout, so here’s a rough guide:
Step 1. Restart your machine, and when you see the manufacturer logo appear, press the BIOS key, which is commonly Delete, F2, F10, F12, or Esc, depending on your manufacturer.
Step 2. In the BIOS menu, look for a USB configuration menu.
Step 3. Ensure that any option to enable the USB ports is toggled on.
Step 4. Save your changes and boot your PC.
Was this helpful?
Last updated on 14 July, 2026
Read Next
 6 Fixes for “Gaming Features Aren’t Available for the Windows Desktop” Error
Fix 1: Update the Game Bar App and Open It From Microsoft Store Several users on a Microsoft community post reported fixing the error almost instantly by updating the Game
6 Fixes for “Gaming Features Aren’t Available for the Windows Desktop” Error
Fix 1: Update the Game Bar App and Open It From Microsoft Store Several users on a Microsoft community post reported fixing the error almost instantly by updating the Game
 4 Ways to Disable USB Ports on Windows
Method 1: Disable USB Ports Using Device Manager Device Manager is a handy utility that lets you manage all the hardware devices connected to your system.
4 Ways to Disable USB Ports on Windows
Method 1: Disable USB Ports Using Device Manager Device Manager is a handy utility that lets you manage all the hardware devices connected to your system.
 Fake Your Way Out of Anything With These Fake Call Apps
1.
Fake Your Way Out of Anything With These Fake Call Apps
1.
 4 Fixes for Can’t Purchase Anything on Roblox
Try Basic Fixes Use a different payment method: Roblox supports all major credit and debit cards, prepaid credit cards, and PayPal for payments.
4 Fixes for Can’t Purchase Anything on Roblox
Try Basic Fixes Use a different payment method: Roblox supports all major credit and debit cards, prepaid credit cards, and PayPal for payments.
 Chats Aren’t Loading in Microsoft Teams – 4 Fixes
Having an issue where chats aren’t loading in Teams?
Chats Aren’t Loading in Microsoft Teams – 4 Fixes
Having an issue where chats aren’t loading in Teams?
 Why Aren’t Special Characters Displaying Correctly in Outlook
There are plenty of symbols and characters we use in our emails every day, not to mention those that other people and countries use into the bargain.
Why Aren’t Special Characters Displaying Correctly in Outlook
There are plenty of symbols and characters we use in our emails every day, not to mention those that other people and countries use into the bargain.
 4 Best USB-C Chargers With Multiple Ports That You Can Buy
If you have several USB-C accessories, such as laptops, smartphones, or wireless earphones, investing in a USB-C charger with multiple ports is ideal.
4 Best USB-C Chargers With Multiple Ports That You Can Buy
If you have several USB-C accessories, such as laptops, smartphones, or wireless earphones, investing in a USB-C charger with multiple ports is ideal.
 Windows 11 Not Detecting Your Wireless Keyboard? Here’s What to Do
Wireless keyboards – as well as other wireless accessories – don’t always work as intended.
Windows 11 Not Detecting Your Wireless Keyboard? Here’s What to Do
Wireless keyboards – as well as other wireless accessories – don’t always work as intended.
The article above may contain affiliate links which help support Guiding Tech. The content remains unbiased and authentic and will never affect our editorial integrity.