If your File Explorer keeps crashing, you might see the screen go completely blank or be unable to access files from the toolbar. It’s one of the worst possible issues to have, especially if File Explorer keeps crashing, no matter what apps you have open. Here are some troubleshooting steps that may help.
Fix 1 – Restart the Application if File Explorer Keeps Crashing
File Explorer is much more than the window that you see when browsing files, so you need to make sure you stop the underlying process to reset its internal cache and solve glitches.
Step 1. Open the Task Manager (you can use “Ctrl + Alt + Delete” and select it if you don’t see the toolbar).
Step 2. In the “Processes” tab (which should open by default), right-click on “Windows Explorer” and select “Restart.”
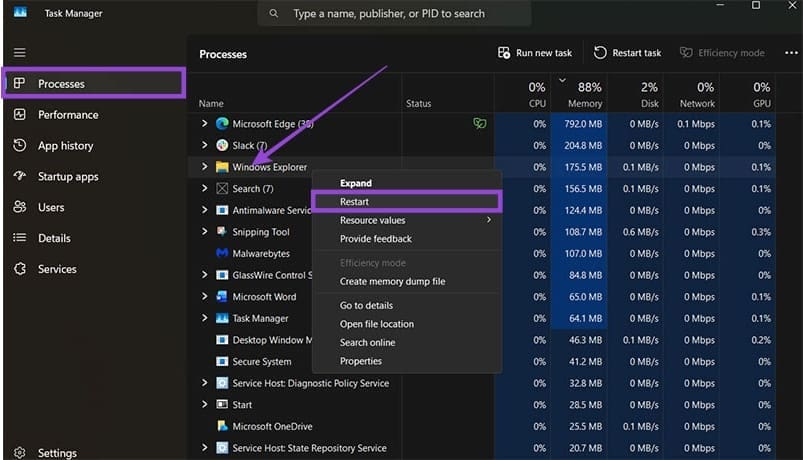
Step 3. Repeat this for the “explorer.exe” process if you can see it.
Fix 2 – Resetting File Explorer’s Cache
If File Explorer crashes, it could indicate that it has a lot of garbage files in its cache, taking up space.
Step 1. Open File Explorer.
Step 2. Click on the three dots in the toolbar at the top and click on “Options.”
Step 3. Under “Clear File Explorer history,” click on the “Clear” button.
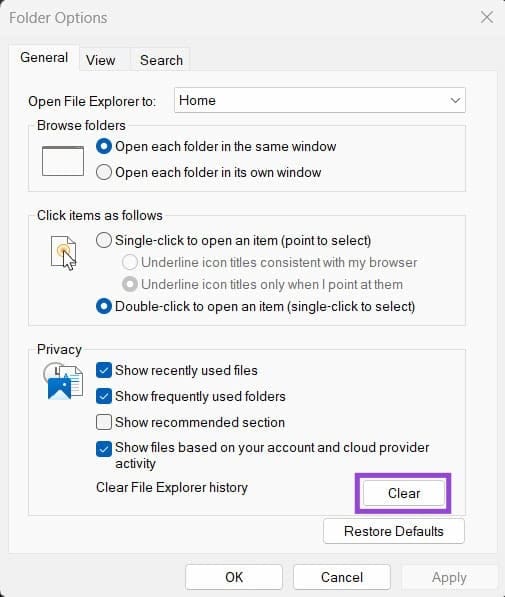
Step 4. Press “Apply” if you can, then click on “OK” to exit.
Step 5. You may need to restart your PC.
Fix 3 – Turn Off Preview and Thumbnails
Thumbnails and file previews can use up too much memory and cause File Explorer to crash if you have multiple programs running.
Step 1. Open File Explorer and click on the “View” tab in the toolbar.
Step 2. Deselect the option “Preview pane.”

Step 3. Click on the three-dots icon and select “Options.”
Step 4. Go to the “View” tab in the dialog window and check “Always show icons, never thumbnails.”
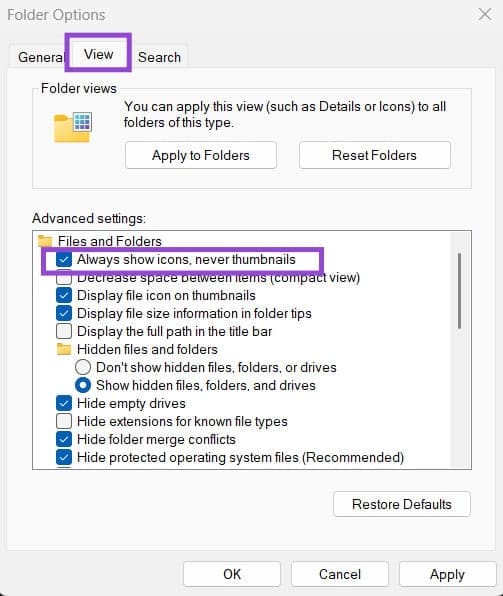
Step 5. Click on “Apply” and then on “OK.”
Fix 4 – Rebuild the Search Index
File Explorer uses Windows Search for indexing, but when that fails, it can lead to the issue where File Explorer keeps crashing or stuttering. To fix this:
Step 1. Open Settings with “Win + I.”
Step 2. Go to the “Privacy and security” tab and select “Search.”
Step 3. Scroll down and select “Advanced indexing options.”
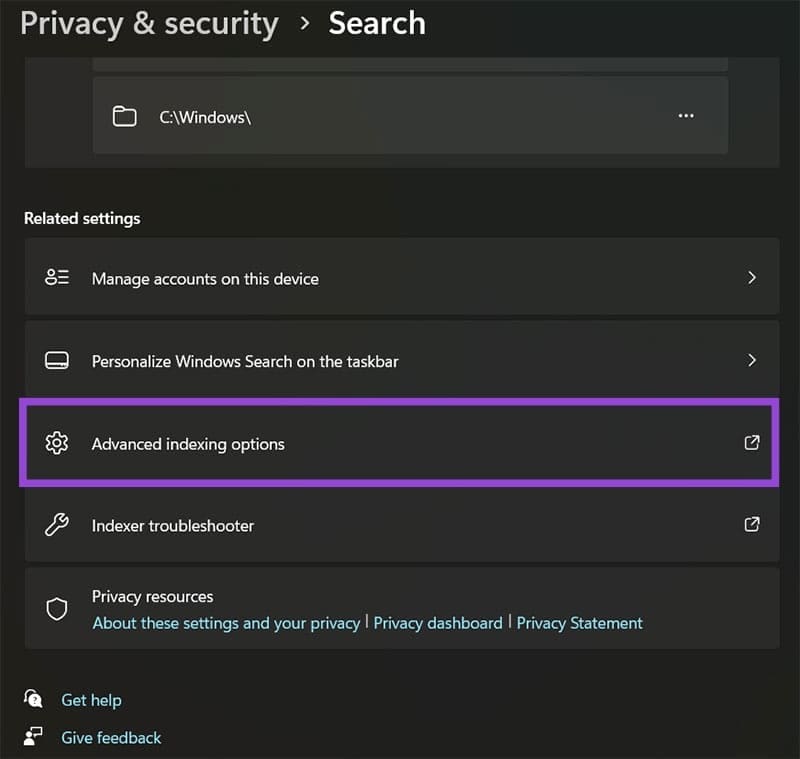
Step 4. Click on “Advanced” in the first dialog window, then on “Rebuild” in the second dialogue window, and wait for the process to finish. After that, click on “OK” to exit the window. You may need to restart the PC.

Fix 5 – Repair System Files
You can use a built-in system utility to detect corrupted system files and re-download them from the internet.
Step 1. Open the Terminal as an admin and go to the Command Prompt (or search for the Command Prompt and open it as administrator).
Step 2. Type in or paste the following command, then hit “Enter:”
sfc /scannow
Step 3. Wait for the process to finish, which might take a while.
Was this helpful?
Last updated on 18 January, 2026
Read Next
 4 Ways to Fix Word Keeps Crashing on Windows
Basic Fixes Restart PC: Restart your PC to eliminate any temporary bugs and glitches.
4 Ways to Fix Word Keeps Crashing on Windows
Basic Fixes Restart PC: Restart your PC to eliminate any temporary bugs and glitches.
 Top 10 Ways to Fix Google Chrome Keeps Freezing or Crashing on Windows 10
Google Chrome is the go-to browser of millions across the world.
Top 10 Ways to Fix Google Chrome Keeps Freezing or Crashing on Windows 10
Google Chrome is the go-to browser of millions across the world.
 5 Ways to Fix Spotify Keeps Crashing Issue on Windows
Basic Fixes Restart Spotify: Open the Task Manager, right-click on Spotify, and select End Task.
5 Ways to Fix Spotify Keeps Crashing Issue on Windows
Basic Fixes Restart Spotify: Open the Task Manager, right-click on Spotify, and select End Task.
 5 Ways to Fix Discord Keeps Crashing on Windows Computer
https://youtu.be/_uU0Ob5vTWM Try Basic Fixes End Discord processes using Task Manager: Press Ctrl + Shift + Esc keys to open Task Manager.
5 Ways to Fix Discord Keeps Crashing on Windows Computer
https://youtu.be/_uU0Ob5vTWM Try Basic Fixes End Discord processes using Task Manager: Press Ctrl + Shift + Esc keys to open Task Manager.
 5 Ways to Fix Android Messages Keeps Crashing Issue
Basic Fixes: Restart Phone: Start the troubleshooting process by restarting your phone.
5 Ways to Fix Android Messages Keeps Crashing Issue
Basic Fixes: Restart Phone: Start the troubleshooting process by restarting your phone.
 4 Fixes if Facebook Messenger Keeps Crashing on Android and iPhone
Basic Fixes Update the Messenger app: Using an outdated version of an app can cause it to behave strangely.
4 Fixes if Facebook Messenger Keeps Crashing on Android and iPhone
Basic Fixes Update the Messenger app: Using an outdated version of an app can cause it to behave strangely.
 3 Ways to Fix Telegram Keeps Crashing on Android and iPhone
Try Basic Fixes Force stop and reopen Telegram: When an app on your phone starts misbehaving, the first thing to do is force close it and open it again.
3 Ways to Fix Telegram Keeps Crashing on Android and iPhone
Try Basic Fixes Force stop and reopen Telegram: When an app on your phone starts misbehaving, the first thing to do is force close it and open it again.
 3 Ways to Fix if YouTube Keeps Crashing on Android
https://youtu.be/q1GnaH9pC58 Basic Fixes Free up storage space: The YouTube app requires sufficient storage space to stream content on your Android.
3 Ways to Fix if YouTube Keeps Crashing on Android
https://youtu.be/q1GnaH9pC58 Basic Fixes Free up storage space: The YouTube app requires sufficient storage space to stream content on your Android.
The article above may contain affiliate links which help support Guiding Tech. The content remains unbiased and authentic and will never affect our editorial integrity.

