Samsung finally announced the Galaxy S24 series, which has all-new hardware and flashy cameras. It also has the latest OneUI 6.1 based on Android 14, packed with plenty of hidden features and nifty tips and tricks. However, one of the more advertised features is the AI Generative Edit on the Galaxy S24 lineup. Similar to the Google Pixel 8 series, Samsung has used AI to help users edit their images easily.
The best part is that it uses Imagen 2, Google’s advanced text-to-image diffusion technology. As a result, you get to use Generative Edit to harness the power of AI to manipulate your photos seamlessly, opening a world of creative possibilities for photographers of all levels.
In this guide, we’ll show you how to use Generative Edit on the Samsung Galaxy S24 series smartphones to master its diverse tools and unlock your photographic potential. So, let’s get to it.
How to Enable Generative Edit on Samsung Galaxy S24
Before you can use the AI capabilities to leverage Generative Edit on your photos, you must enable the feature. Thankfully, it’s fairly easy. Head over to Settings > Advanced features and tap on Advanced intelligence.

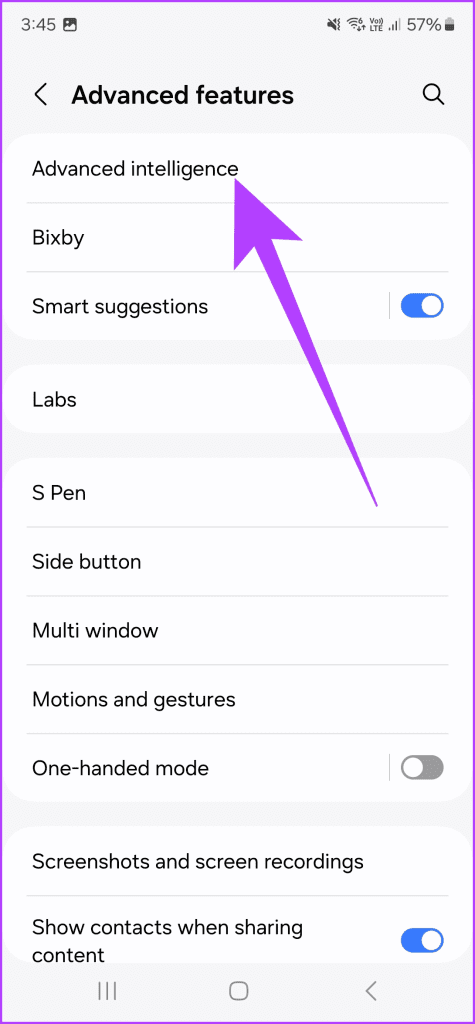
Here, scroll down and tap on Photo Editor. Finally, enable the toggle for Generative edit.


And that’s it. You’re now ready to use Generative Edit on your Galaxy S24 device.
How to Use Generative Edit on Samsung Galaxy S24
1. Add Background Blur
One of the biggest advancements in smartphone photography has been the portrait mode. However, sometimes, you forget to switch the camera to portrait mode. If you wish to add bokeh to an already clicked image, Galaxy S24 comes with an option to do so.
Open the image you wish to edit inside the Gallery app. Then, tap on the info icon in the bottom bar. Alternatively, swipe up on the screen to reveal the information about the photo. Then, tap on ‘Background blur’.
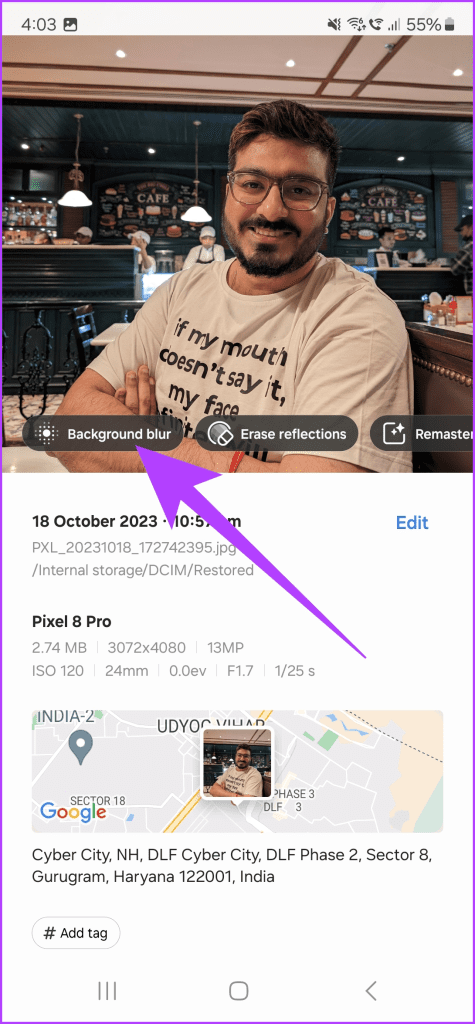
The phone should now analyze the subject and automatically give you the option to adjust the background bokeh from levels of 0 to 7. The higher the number, the more background blur there will be.


Just set the blur as you like and tap on Save to save the edited image.
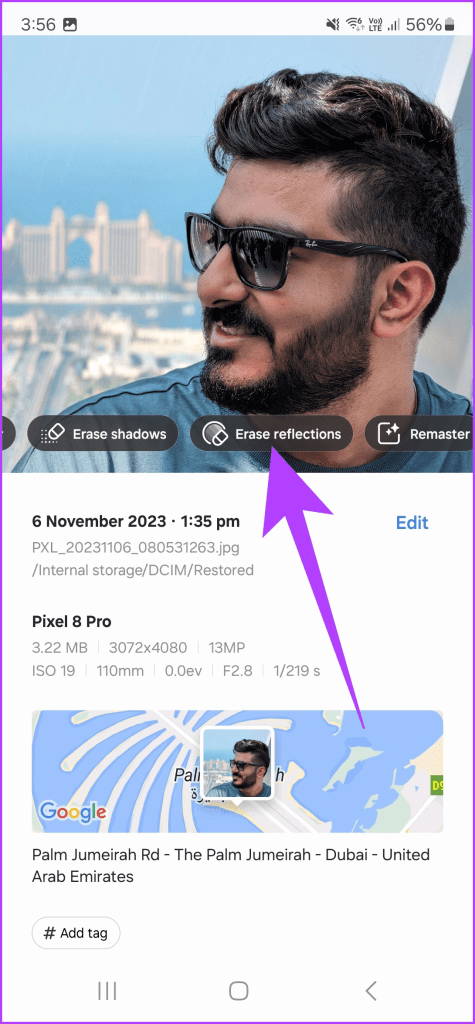
2. Remove Shadows and Reflections
Let’s start with the basics. It’s nice to have shots taken under direct sunlight, but that can often result in unwanted shadows. On the other hand, there are times when you have unwanted reflections as part of the image, too. Thankfully, Galaxy S24 series has AI-powered photo editing right inside the gallery. Here’s how to use generative photo editing to banish distracting shadows and unwanted reflections.
Once again, start by opening the image you wish to edit inside the Gallery app. Then, tap on the info icon in the bottom bar. The S24’s AI will now analyze the image and automatically present you with options for erasing the shadows or the reflections.

If you wish to remove the shadows, tap on ‘Erase shadows’. The phone’s AI will automatically search and remove the shadows from the image. You can then save the image by tapping on Save.


Similarly, to remove the reflections, tap on ‘Erase reflections’. The AI will search and remove all reflections from the image.

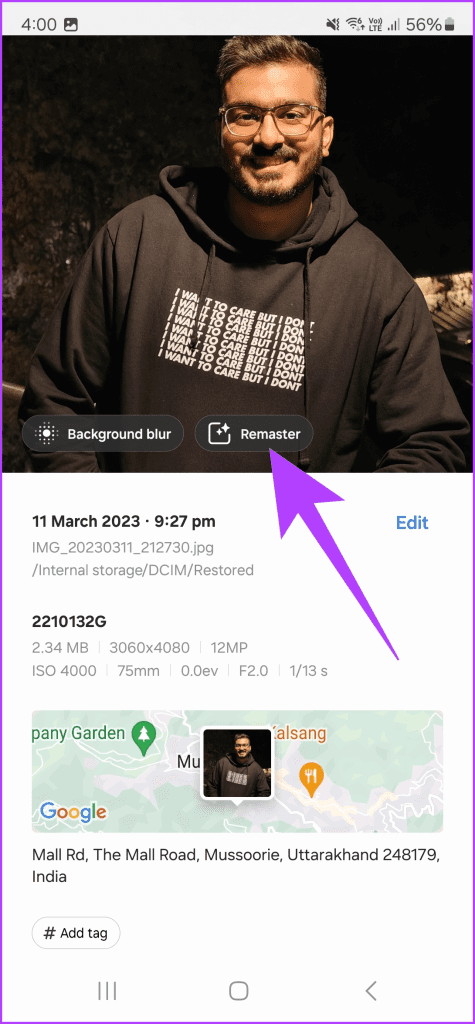
3. Remaster using AI
Besides these, Galaxy S24 series also comes with an advanced editor that can breathe new life into your old photos with a single tap. Samsung calls it the Remaster feature, and it’s easy to use. Imagine editing various factors like brightness, color tone, structure, and much more. Instead of you doing it in a photo editor, your phone does it automatically for you.
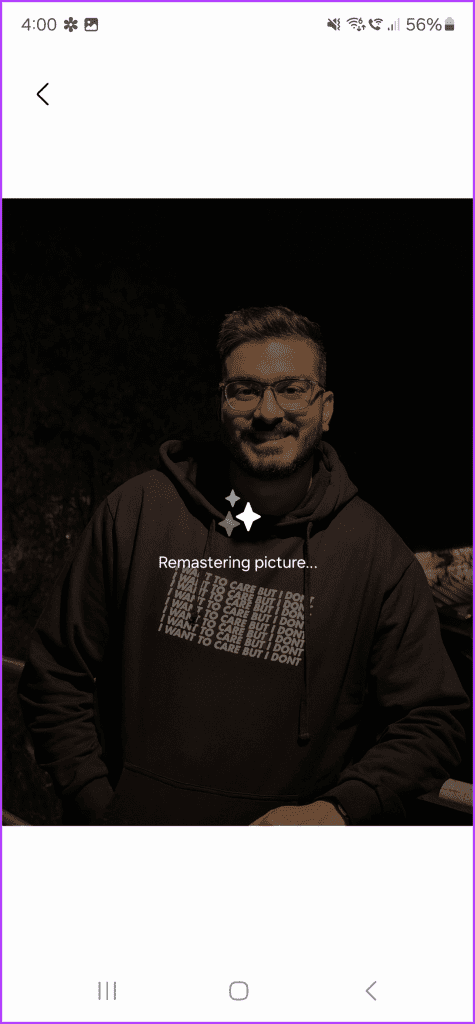
To use it, open the image you wish to edit and tap on the info icon. Then, tap on the Remaster option.
And that’s it. Now, sit back and watch the AI analyze your photo, enhancing its colors, sharpening details, and correcting any exposure issues. The result will be a vibrant, revitalized version of your photo, like a fresh coat of paint for your cherished memories.

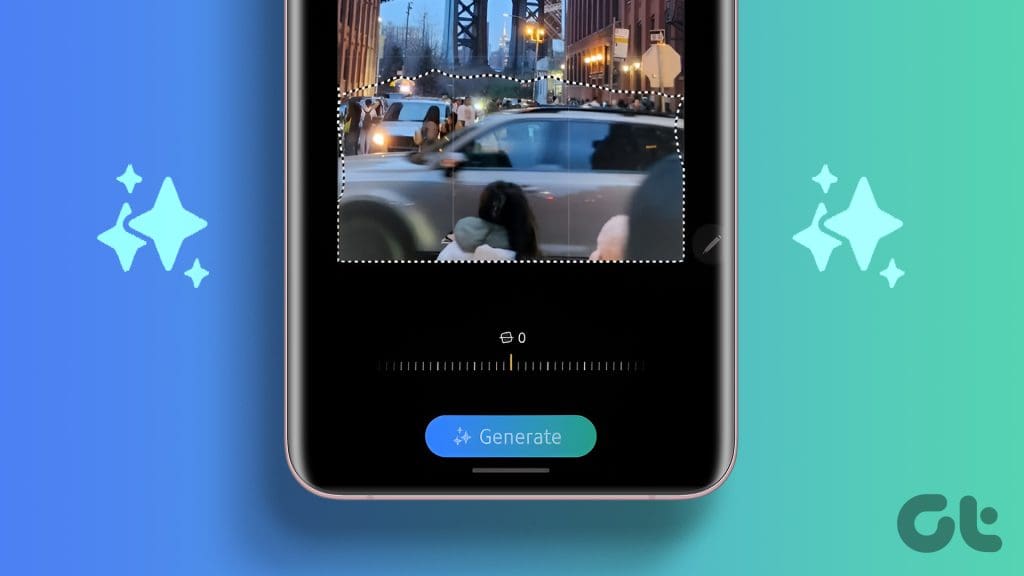
4. Use Generative Edit and Generative Fill
Finally, there’s Generative Edit, which works similarly to the Magic Editor on the Pixel 8 Pro. Using this, you can resize, remove, and reposition objects in photos, and the Generative photo editing feature will recreate the image most naturally.
To use it, open the image inside the Gallery app and tap on the Edit icon. Then, tap on the Generative Edit icon as shown.
You can now highlight the object you wish to edit. Simply circling it should suffice in most cases; the AI will automatically snap to the edges. Once done, you can tap and hold on to the selection to move it around, resize it, or remove it by tapping on the erase button.

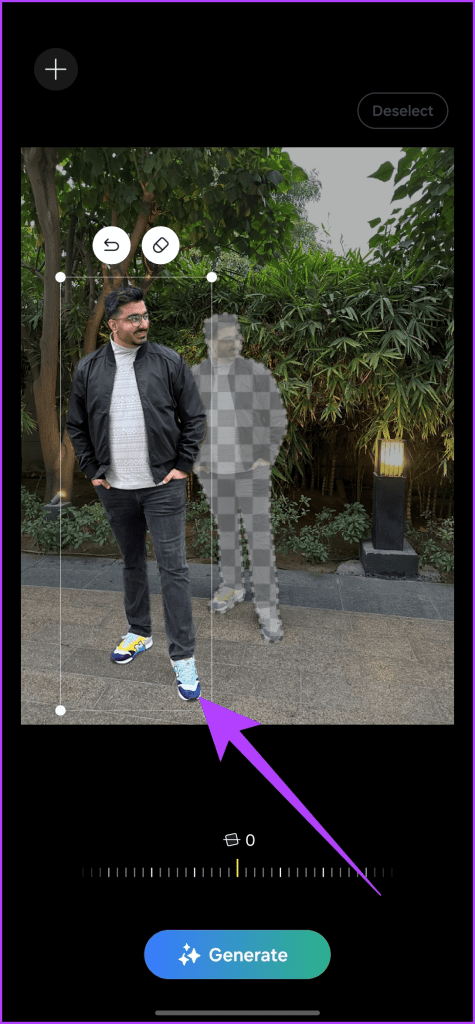
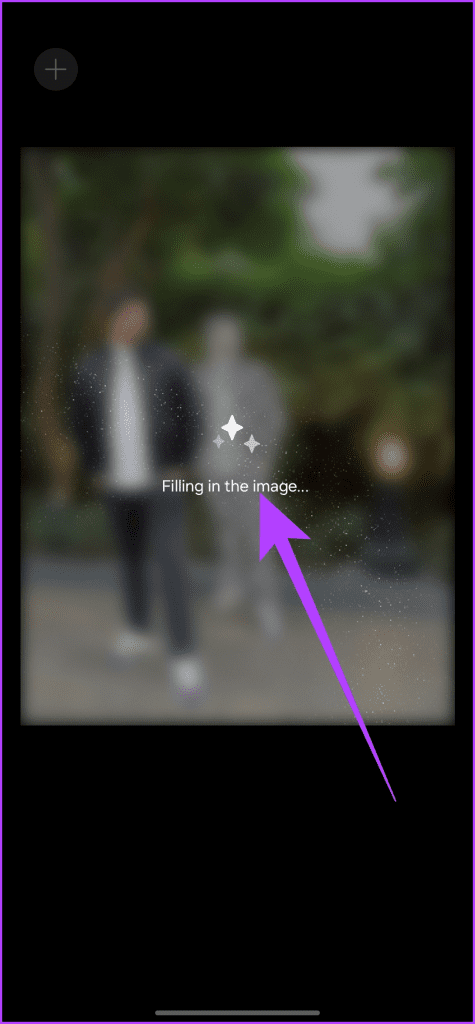
Once you’re happy with the changes, tap on the Generate button. The AI will then fill in the remaining spaces of the image.

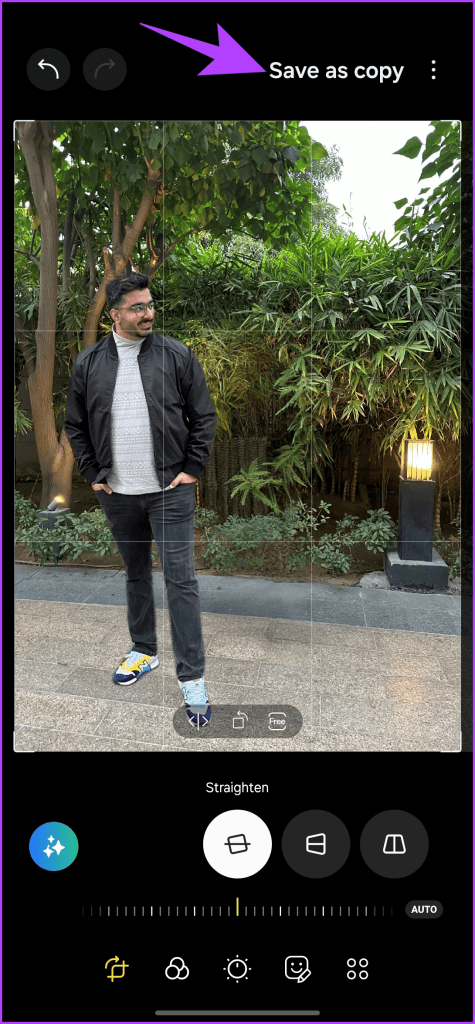
And that’s it. Just tap on Done, followed by ‘Save as copy’ to save the modified version of the image to your device.

Master Generative Edit on Galaxy S24 Series
With Generative Edit on your Samsung Galaxy S24, the boundaries between reality and artistic vision blur. You no longer have to do the extra work to click the perfect shot. In most cases, the phone can do the job for you. What’s more? You can use Generate Edit on the Galaxy S24 for images taken on other smartphones.
However, remember that the edits may not be perfect in some cases, and the final image can be softer. As such, always spend time selecting the subject properly and fine-tuning the image as much as possible. Remember, the possibilities are endless, limited by your imagination. So, unleash your inner artist and embrace the transformative power of Generative Edit on your Samsung Galaxy S24 series device.
Was this helpful?
Last updated on 07 February, 2024
Read Next
 5 Best Screen Protectors for Samsung Galaxy S24 and S24 Plus
If you recently got a Samsung flagship, one of the best investments you can make to keep your new phone looking new is to get a screen protector for the
5 Best Screen Protectors for Samsung Galaxy S24 and S24 Plus
If you recently got a Samsung flagship, one of the best investments you can make to keep your new phone looking new is to get a screen protector for the
 Samsung Galaxy S24 and S24 Plus Review: Good, Not Great
Samsung unveils three new flagship models in its Galaxy S-series range every year.
Samsung Galaxy S24 and S24 Plus Review: Good, Not Great
Samsung unveils three new flagship models in its Galaxy S-series range every year.
 Top 11 Tips to Customize Home Screen on Samsung Galaxy S24 Series
Samsung's One UI is known for being one of the most feature-rich Android skins available.
Top 11 Tips to Customize Home Screen on Samsung Galaxy S24 Series
Samsung's One UI is known for being one of the most feature-rich Android skins available.
 6 Best Wireless Chargers for Samsung Galaxy S24 Series
No matter how fast wired charging gets, nothing beats the convenience of placing your phone on a wireless charger and seeing it juice up.
6 Best Wireless Chargers for Samsung Galaxy S24 Series
No matter how fast wired charging gets, nothing beats the convenience of placing your phone on a wireless charger and seeing it juice up.
 6 Best Fast Chargers for Samsung Galaxy S24 Series
Although the Galaxy S24 series brings several additions both in terms of hardware and software, Samsung continues to skip the adapter in the retail box.
6 Best Fast Chargers for Samsung Galaxy S24 Series
Although the Galaxy S24 series brings several additions both in terms of hardware and software, Samsung continues to skip the adapter in the retail box.
 Download Cool Samsung Galaxy S24 Series Wallpapers (4K)
As mentioned in our Samsung Galaxy S24 Ultra review, "Galaxy S24 Ultra looks to be a proper winner from Samsung." The case is mostly the same for the rest of the
Download Cool Samsung Galaxy S24 Series Wallpapers (4K)
As mentioned in our Samsung Galaxy S24 Ultra review, "Galaxy S24 Ultra looks to be a proper winner from Samsung." The case is mostly the same for the rest of the
 6 Best Clear Cases for Samsung Galaxy S24 Series
Samsung has opted for muted colors on the Galaxy S24 series.
6 Best Clear Cases for Samsung Galaxy S24 Series
Samsung has opted for muted colors on the Galaxy S24 series.
 Is Upgrading to the Samsung Galaxy S24 Ultra Flagship for the S Pen Worth It
Even since the introduction of the Galaxy S20 series, Samsung has been offering an Ultra model alongside the standard and the plus variants of its flagship smartphones.
Is Upgrading to the Samsung Galaxy S24 Ultra Flagship for the S Pen Worth It
Even since the introduction of the Galaxy S20 series, Samsung has been offering an Ultra model alongside the standard and the plus variants of its flagship smartphones.
The article above may contain affiliate links which help support Guiding Tech. The content remains unbiased and authentic and will never affect our editorial integrity.