While Microsoft Teams is jam-packed with useful features, the software puts a huge question mark over the overall reliability. Sometimes, the screen-sharing stops working, the app flashes a white screen on launch and at times, it won’t even open on the desktop. If you are facing the latter issue, read along to troubleshoot Teams not opening on Mac.

It can be baffling when Microsoft Teams doesn’t work whenever you launch it on your Mac. Here’s how to get Microsoft Teams up and running on Mac.
1. Force Quit Teams
Well, this is the first thing you should try, if you haven’t already. If Teams is misbehaving on Mac, you can force quit the app and try relaunching it. Here’s how.
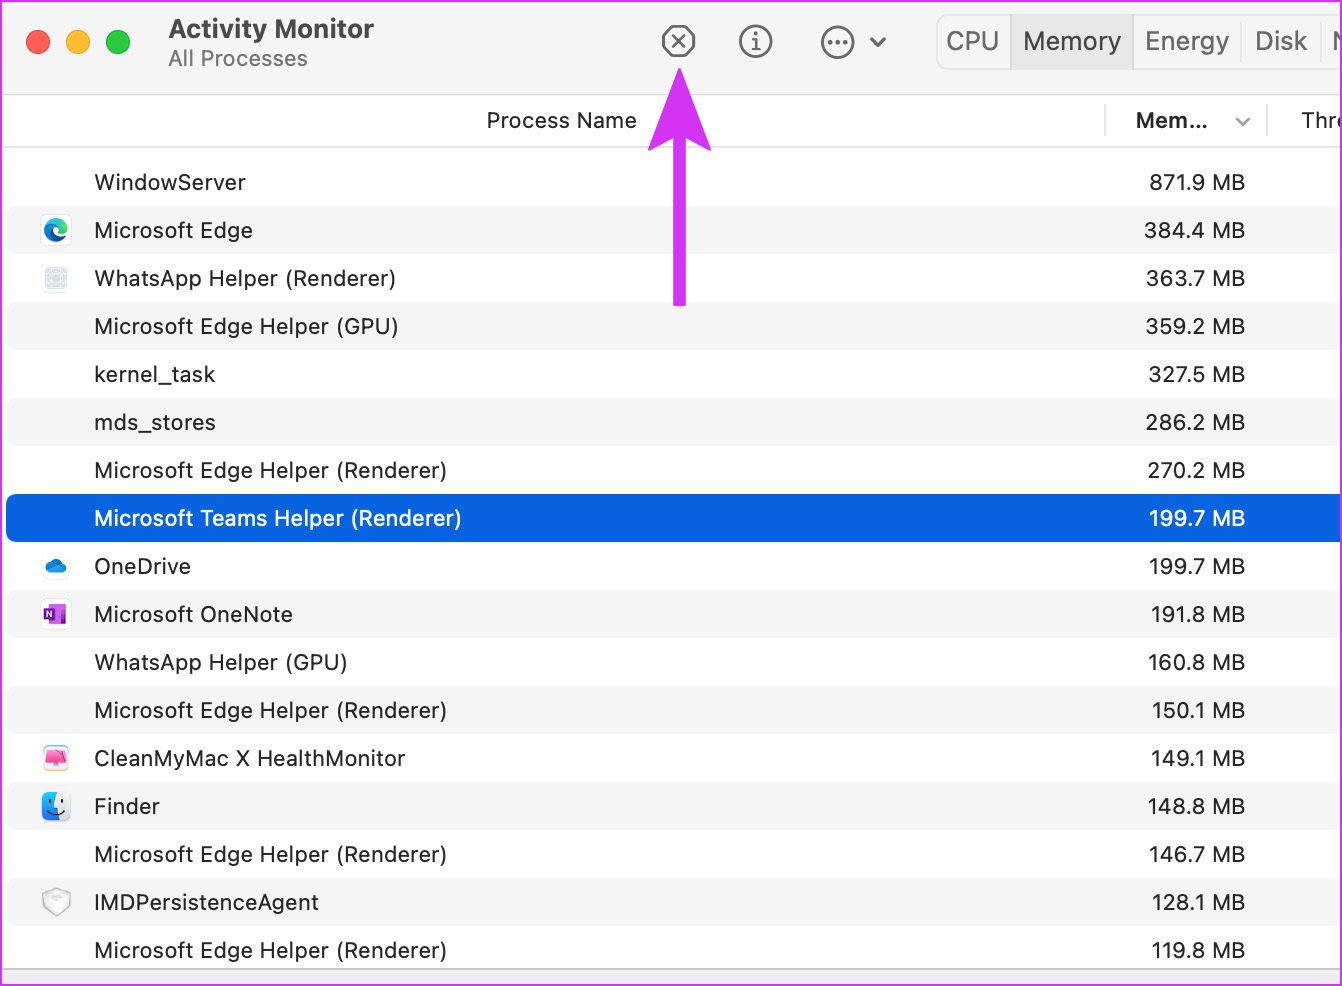
Step 1: Press the command + space keys and search for Activity Monitor.
Step 2: Hit Return and open the app.
Step 3: Find Microsoft Teams from the list and click on the x mark at the top.
Open Teams app to check if it functions normally.
2. Delete Teams Cache
Corrupt Teams cache on Mac can result in Teams not opening on Mac. First, you need to force quit Microsoft Teams using the trick above and then follow the steps below to delete the cache.
Step 1: Open Finder on Mac and select Go in the menu bar.
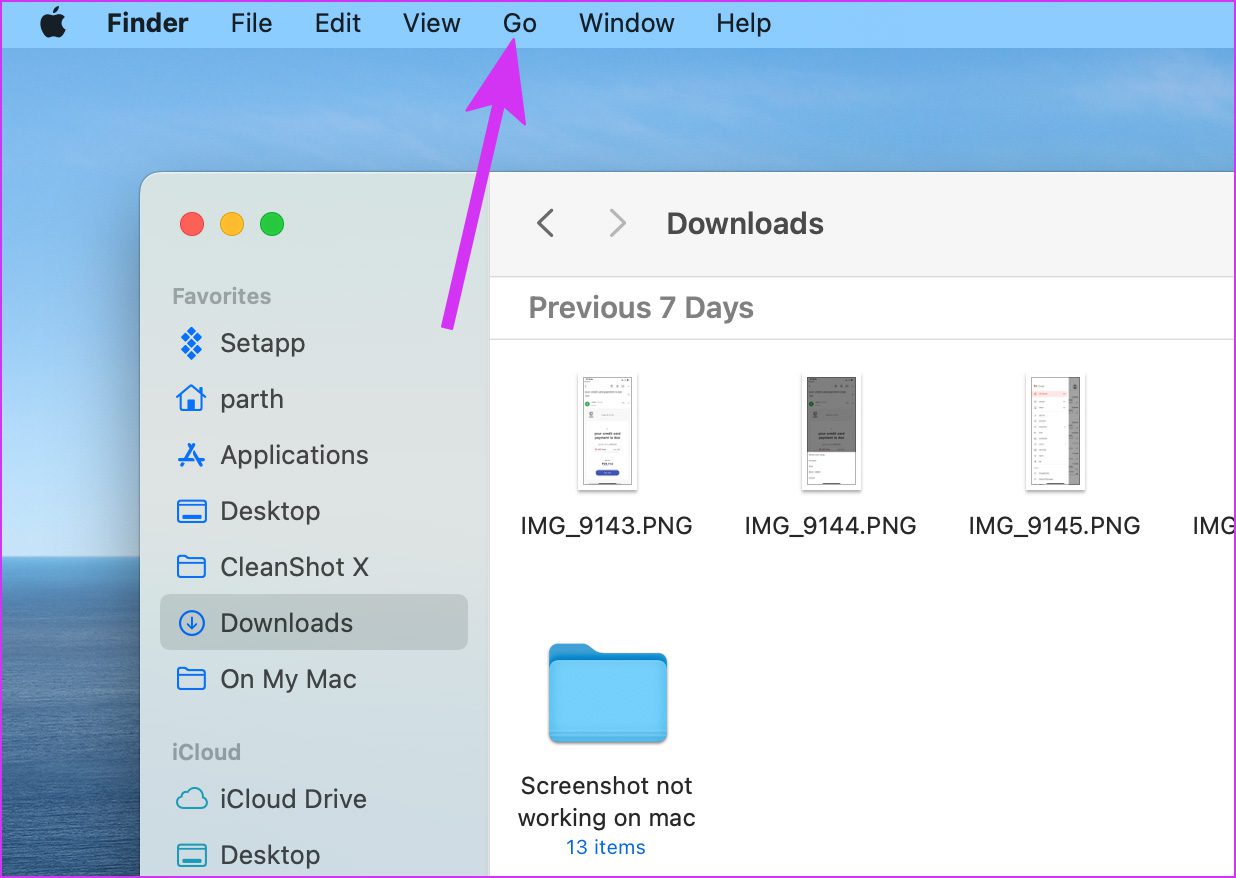
Step 2: Click on Go to Folder.

Step 3: Paste the following path into it:
~/Library/Application Support/Microsoft

Step 4: Select the Teams folder and move it to trash.

Step 5: Press Command + Space to open Spotlight Search, type Keychain Access and hit Return to launch the app.
Step 6: Search for Microsoft at the top and select Microsoft Teams Identity Cache entry.

Step 7: Right-click on the Microsoft Teams Identities Cache and delete the entry.

Click on the Apple icon in the top-left corner on the menu bar and select Restart. Start using Teams again.
3. Reinstall Teams
Another option is to reinstall Microsoft Teams on Mac. Here’s how you can uninstall Teams and download it again.
Step 1: Open Finder on Mac and go to the Applications menu.
Step 2: Find Microsoft Teams in the list and select it.

Step 3: Right-click on the app icon and select Move to Trash.

Step 4: Download Microsoft Teams directly from the company’s website.
Follow the on-screen instructions to install Teams on Mac. Open the app and sign in using Microsoft account credentials.
4. Open Microsoft Teams Using an Invite Link
When you receive an invite to join an organization, you get an email for the same. Return to the email inbox and find the invite link. Click on the Teams invite link and it will open the organization in the Teams app again.
5. Disconnect VPN
Most paid VPN services offer fast servers around the world. While some freemium ones don’t have hundreds of servers to deliver good internet speeds. When you are working with such VPN services, you might face issues with installed apps on Mac including Microsoft Teams. Or probably you forgot about using VPN.

Also, when Teams detect an unusual IP address from your Mac (due to VPN), it might block the app access to verify user identity. Open the VPN app on your Mac and disable it.
6. Quit Other Apps
This trick is most applicable to Macs with less than 8GB of RAM. If you are using memory-intensive apps like Outlook, Teams, on Mac, you might end up with little to no RAM on Mac.
macOS does come with memory swapping to use the SSD storage as RAM but even that can’t be sufficient at times. Simply hitting the ‘x’ mark in the app menu bar doesn’t close it completely on the Mac. To free up RAM for Teams on Mac, you need to use the Activity Monitor.
Step 1: Open Activity Monitor on Mac (refer to the first trick at the top).
Step 2: Find apps that are consuming high memory on Mac. Select an app and click on x mark at the top.
Repeat the same for all unnecessary apps running on Mac.
7. Open Teams at Startup
If Microsoft Teams is a vital part of your work, you can open the app right at the Mac startup.
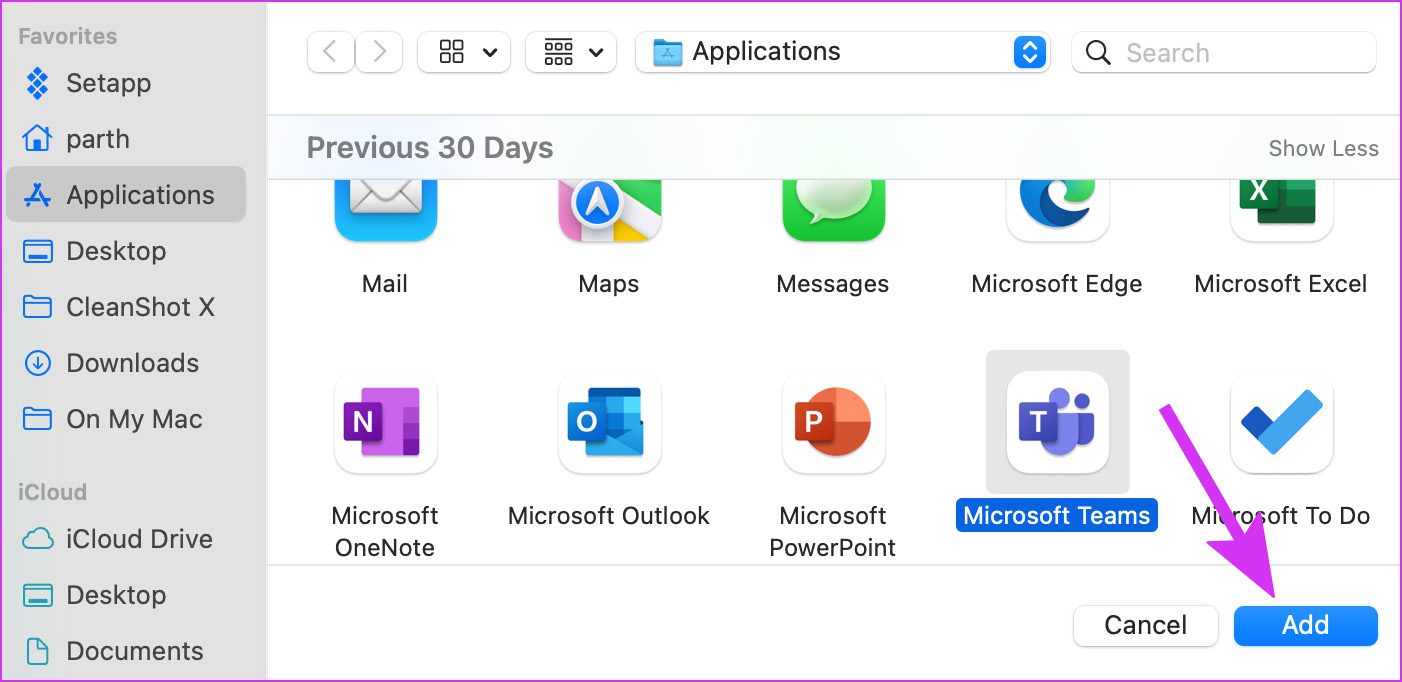
Step 1: Click on the Apple icon in the top-left corner and select System Preferences from the menu.

Step 2: Select Users & Groups.

Step 3: Click on Login Items tab.

Step 4: Click on the + icon at the bottom and select Teams from the Applications menu.
From now on, Teams will launch at Mac startup and stop throwing errors.
8. Check Microsoft Teams Status
Microsoft services including Teams doesn’t win any awards in terms of reliability. If the app servers are facing outage, you won’t be able to open the app on Mac.
Head to Downdetector and search for Teams. If others are facing the same, you will see high outage graphs. Wait for Microsoft to resolve the issues from the server-end.
9. Use Microsoft Teams Web
Microsoft Teams is available on the web as well. If you are still facing issues with the Teams Mac app, you can temporarily switch to Teams web and take time-sensitive calls and reply to messages on priority.
Make Microsoft Teams Up and Running on Mac
Microsoft Teams not opening on Mac can waste your productivity hours. Instead of tracking team updates from your phone, you can try the tricks above and fix Teams not launching on Mac. Do let us know the trick that troubleshoots the issue for you.
Was this helpful?
Last updated on 07 April, 2022
8 Comments
Leave a Reply
Read Next
 3 Ways to Fix Microsoft Teams Not Loading or Opening
Basic Fixes Check for downtime: Servers can be down, as many people worldwide rely on Teams.
3 Ways to Fix Microsoft Teams Not Loading or Opening
Basic Fixes Check for downtime: Servers can be down, as many people worldwide rely on Teams.
 Top 4 Ways to Fix Microsoft Teams Notifications Not Working on Mac
Basic Fixes Check Microsoft Teams Status: If Microsoft suffers from an outage, you might want to confirm the issue via Downdetector.
Top 4 Ways to Fix Microsoft Teams Notifications Not Working on Mac
Basic Fixes Check Microsoft Teams Status: If Microsoft suffers from an outage, you might want to confirm the issue via Downdetector.
 5 Ways to Fix Microsoft Excel Not Opening on Mac
Basic Fixes Check your Microsoft subscription: Visit your Microsoft 365 account and check your subscription status.
5 Ways to Fix Microsoft Excel Not Opening on Mac
Basic Fixes Check your Microsoft subscription: Visit your Microsoft 365 account and check your subscription status.
 4 Ways to Fix Microsoft PowerPoint Not Opening on Mac
Basic Fixes Check file compatibility: The file type of your presentation should be compatible with PowerPoint that supports PPTX, PPSX or ODP.
4 Ways to Fix Microsoft PowerPoint Not Opening on Mac
Basic Fixes Check file compatibility: The file type of your presentation should be compatible with PowerPoint that supports PPTX, PPSX or ODP.
 Top 9 Ways to Fix Microsoft Store Not Opening on Windows 10
Microsoft plans to revamp its Store on Windows from scratch sometime in the future.
Top 9 Ways to Fix Microsoft Store Not Opening on Windows 10
Microsoft plans to revamp its Store on Windows from scratch sometime in the future.
 Top 10 Ways to Fix Microsoft Edge Not Opening on Windows
Microsoft Edge has been nothing short of outstanding since the switchover from EdgeHTML to Chromium.
Top 10 Ways to Fix Microsoft Edge Not Opening on Windows
Microsoft Edge has been nothing short of outstanding since the switchover from EdgeHTML to Chromium.
 How to Stop Teams From Opening on Startup (or Uninstall It)
Method 1: Disable Microsoft Teams From Its Settings If you want to keep Teams installed on your PC but prefer to launch it manually when necessary, follow the steps below.
How to Stop Teams From Opening on Startup (or Uninstall It)
Method 1: Disable Microsoft Teams From Its Settings If you want to keep Teams installed on your PC but prefer to launch it manually when necessary, follow the steps below.
The article above may contain affiliate links which help support Guiding Tech. The content remains unbiased and authentic and will never affect our editorial integrity.

can we make a meeting and you fix it for me ?
SOLVED
I use version m1 2021 (MacOs Monterey 12.5.1).
The only way I was able to solve the problem (of opening Teams), is to download a previous version from the microsoft website (pkg version 1.4.00.2781)
https://statics.teams.microsoft.com/production-osx/1.4.00.2781/Teams_osx.pkg
Thanks Adryano, this was also the only thing that worked for me.
Amazing how it works!!!
I had been struggling with the issue that Teams opens, but closes abruptly before I could enter login info.
I tried re-installing but same issue.
This time i tried step “2. Delete Teams Cache” and then reinstalled. Worked.
Kudos.
Let me know if i can buy you a coffee.
A- M -A -Z-ING≥…it works! I have been trying for 6 months to fix This issue . It was deleting the CACHE, as simple as that!
Microsoft is no help whatsoever…..and each blame each other…
I just did the delete the cache step, and it worked! Thank you so much for this. Hopefully it doesn’t happen again.
I am having problems opening Teams on my Mac. I followed the steps layer out in the advise.
But I came to the point that I cannot delete the cache (Microsoft Teams Identities Cache and delete the entry.) I tried bu there is no way that I can touch these entries.
Could you advise me please?
Thanks!
This has been so helpful for me. Teams not opening was giving me loads of trouble, but I deleted the cache as you suggested and voila! all sorted!
Well done to you on good step-by-step instructions.
Let me know if I can buy you a coffee.