Try Basic Fixes
- Check the microphone connection: If you’re using an external microphone on your PC, check its physical connection to see if it’s connected properly. Further, ensure that it’s plugged into the correct audio jack if your PC has separate audio ports for input and output. Likewise, if it’s a USB mic, try connecting it to a different USB port.
- Unmute the mic: If your microphone has a physical mute switch, ensure you turn it off. If the microphone not working issue on your Windows device is limited to a specific app, such as Microsoft Teams or Zoom, the issue may be related to that app.
Fix 1: Enable the Microphone
Next, check if you’ve accidentally disabled the microphone adapter on your PC. To do so, access the Device Manager.
Step 1: Press the Windows key + X to open the Power User menu and select Device Manager from the list.

Step 2: Double-click on Audio inputs and outputs to expand. Right-click on Microphone and select Enable device.

If the microphone is already enabled, try disabling and enabling it again. After that, check if the issue persists.
Fix 2: Allow Apps to Use Your Microphone
If the issue remains after enabling the microphone, the apps on your PC may not have the required permission to access the microphone. Here’s how to change that.
Step 1: Press the Windows key + I to launch the Settings app and go to Privacy & security > App permissions > Microphone.

Step 2: Enable the toggle for Microphone access and Let apps access your microphone.

Step 3: Scroll down to ensure that your favorite apps have access to the microphone.

Fix 3: Check the Default Audio Input Device and Volume
If you’ve connected several audio devices to your PC, double-check if your preferred microphone is set as the default audio input device. Here’s how to do it.
Step 1: Right-click on the speaker icon on the taskbar and select Sound settings from the resulting menu.

Step 2: Under Input, choose your preferred microphone and check its volume.

Fix 4: Restart the Windows Audio Service
Windows Audio is a system service that manages all your audio devices, including the microphone. If this service is not running properly, you could experience issues like the one discussed here. Try restarting the Windows Audio service on your PC and see if that gets the microphone working again.
Step 1: Click the search icon on the taskbar, type services, and press Enter.

Step 2: In the Services window, scroll down to locate and right-click on the Windows Audio service. Select Restart from the list.

Fix 5: Run Windows Troubleshooter
Windows troubleshooters can help you diagnose and fix most system-related issues on your PC. So, if the microphone is still not working despite enabling all the right settings, run the Recording Audio troubleshooter on Windows 11. Here are the steps for the same.
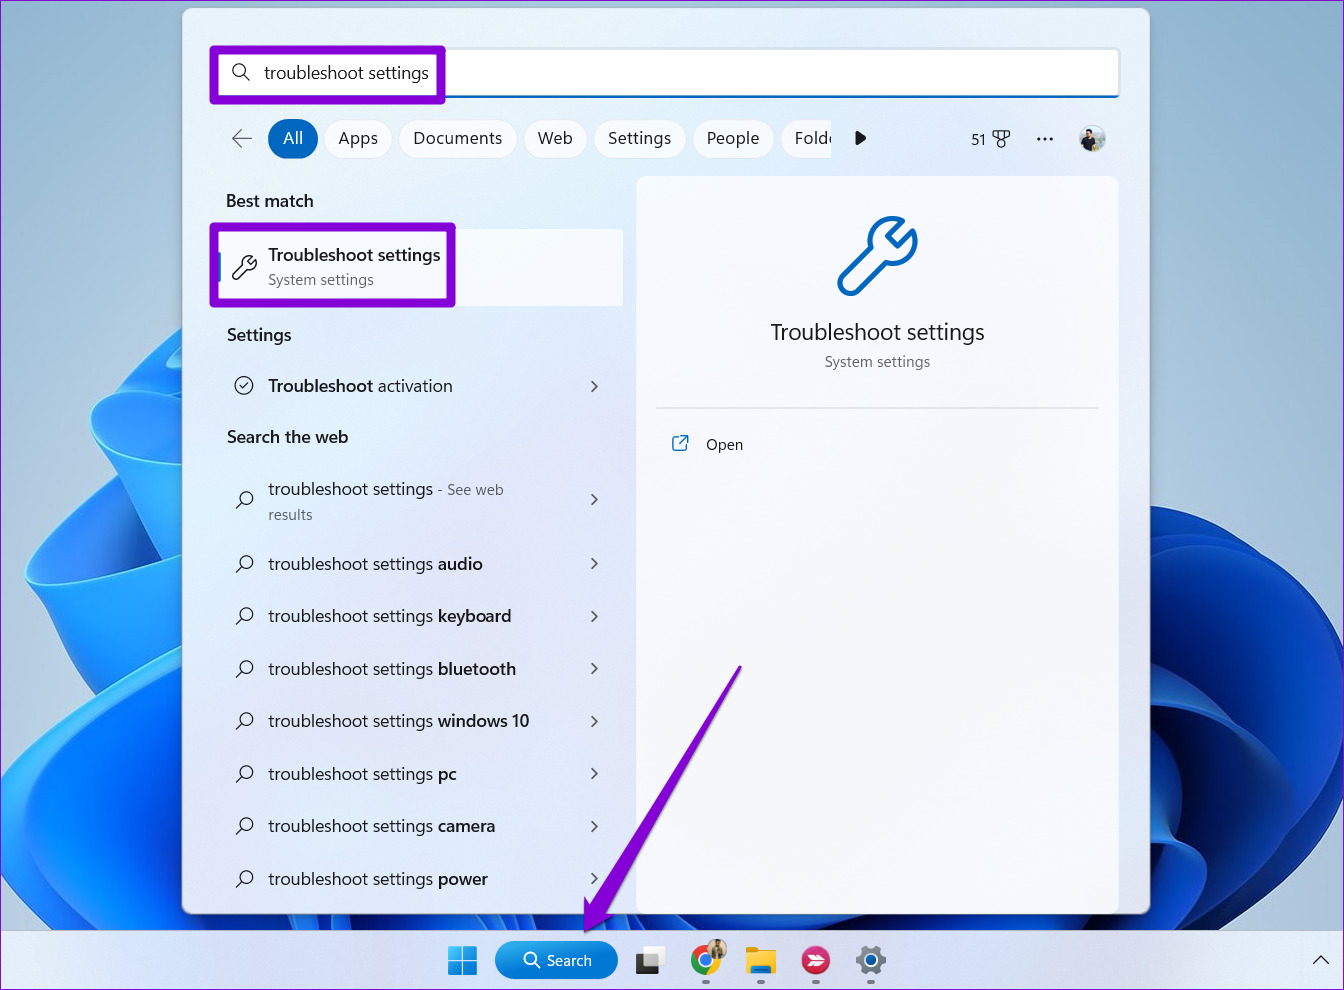
Step 1: Click the search icon on the taskbar, type troubleshoot settings in the box, and press Enter.
Step 2: Go to Other troubleshooters.

Step 3: Click the Run button next to Recording Audio and follow the on-screen instructions to finish the process.

Fix 6: Update or Reinstall Microphone Drivers
Outdated or missing microphone drivers on your PC can also cause such anomalies. If that’s the case, try updating microphone drivers manually and see if that improves the situation.
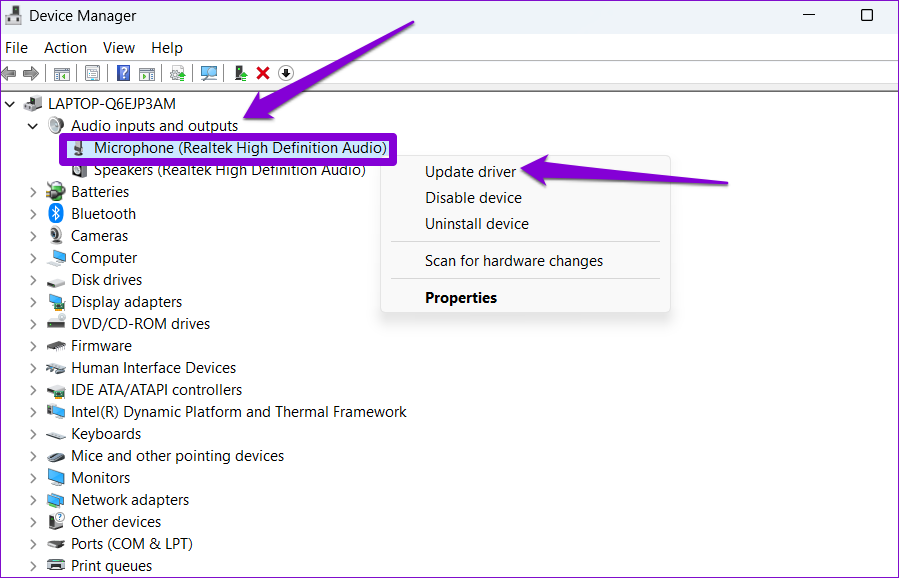
Step 1: Open Device Manager using the search menu.
Step 2: Expand Audio inputs and outputs, right-click on your microphone, and select Update driver.
From there, follow the on-screen instructions to update the driver. If the issue persists, use Device Manager to uninstall the microphone driver from your PC.

Once removed, restart your PC, and Windows should install the missing driver on boot. After that, your microphone should work as before.
Fix 7: Disable Exclusive Mode for Your Microphone
It’s possible that one of the apps or programs running on your PC is messing with the microphone and causing problems. If you suspect that to be the case, you can prevent apps from taking exclusive control of your microphone by following the steps below.
Step 1: Press the Windows key + R to open the Run dialog. Type mmsys.cpl in the text field and press Enter.
Step 2: Switch to the Recording tab and double-click on your microphone to open its properties.

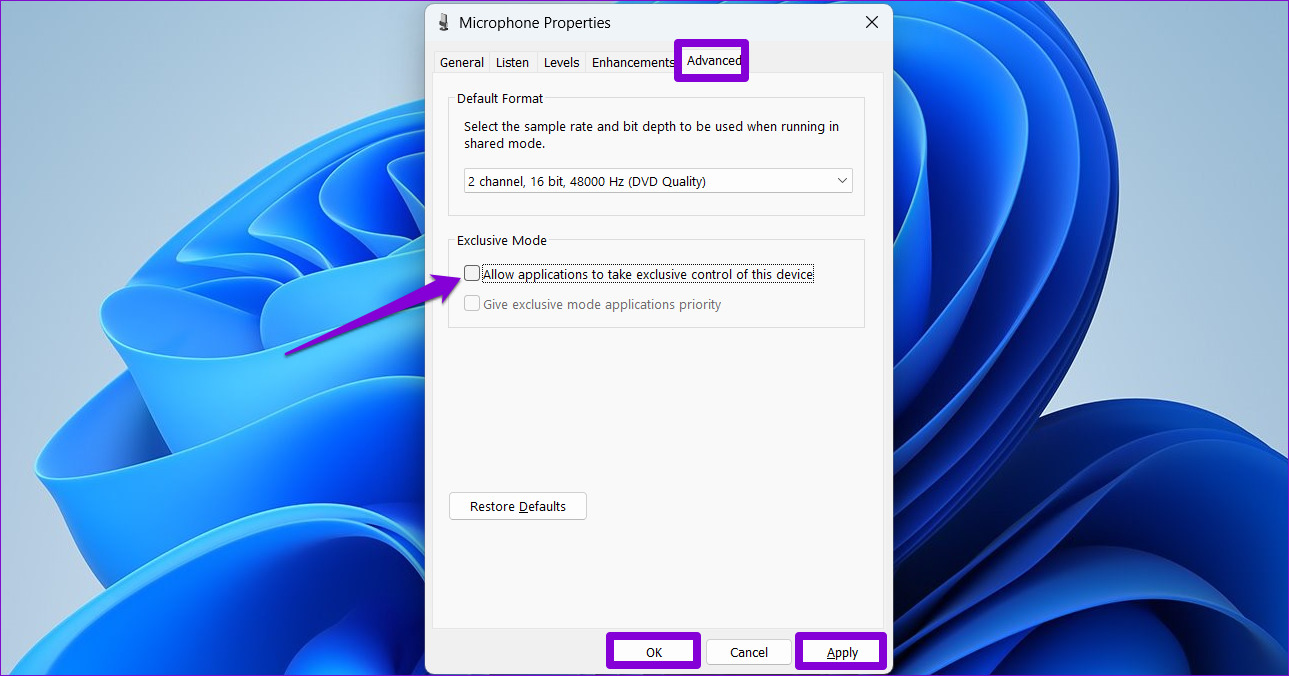
Step 3: Under the Advanced tab, uncheck the Allow applications to take exclusive control of this device box. Then, hit Apply > OK.
Was this helpful?
Last updated on 02 September, 2024
1 Comment
Leave a Reply
Read Next
 Top 10 Ways to Fix Google Meet Microphone Not Working on Windows and Mac
For the most part, Google Meet offers a seamless browser-based video conferencing experience on both Windows and macOS.
Top 10 Ways to Fix Google Meet Microphone Not Working on Windows and Mac
For the most part, Google Meet offers a seamless browser-based video conferencing experience on both Windows and macOS.
 5 Best Fixes for Microsoft Teams Microphone Not Working on Windows 10
More businesses and organizations now use Microsoft Teams to manage their teams working from office or remotely.
5 Best Fixes for Microsoft Teams Microphone Not Working on Windows 10
More businesses and organizations now use Microsoft Teams to manage their teams working from office or remotely.
 6 Fixes for Zoom Microphone Not Working on Windows 11/10
Basic Fixes You Should Try Restart the Zoom app and Windows PC.
6 Fixes for Zoom Microphone Not Working on Windows 11/10
Basic Fixes You Should Try Restart the Zoom app and Windows PC.
 4 Fixes for Microphone Not Working in WhatsApp on Windows 11
Basic Fixes Check if WhatsApp is down: Go to DownDetector and check the status of WhatsApp servers.
4 Fixes for Microphone Not Working in WhatsApp on Windows 11
Basic Fixes Check if WhatsApp is down: Go to DownDetector and check the status of WhatsApp servers.
 8 Fixes for Microphone Not Working in Xbox Game Bar on Windows 11
Basic Fixes Reconnect the external microphone: Plug out the external connected microphone, wait a few seconds, and reconnect it.
8 Fixes for Microphone Not Working in Xbox Game Bar on Windows 11
Basic Fixes Reconnect the external microphone: Plug out the external connected microphone, wait a few seconds, and reconnect it.
 6 Ways to Fix Windows Not Detecting Microphone in Headset
Basic Fixes Check cable and Bluetooth connection: Check the microphone and its wire for significant damage on either side.
6 Ways to Fix Windows Not Detecting Microphone in Headset
Basic Fixes Check cable and Bluetooth connection: Check the microphone and its wire for significant damage on either side.
 5 Ways to Fix Microphone Not Working on iPhone
Try Basic Fixes Unplug all the accessories and disable Bluetooth: One of the external accessories connected to your iPhone may be causing problems with the microphone.
5 Ways to Fix Microphone Not Working on iPhone
Try Basic Fixes Unplug all the accessories and disable Bluetooth: One of the external accessories connected to your iPhone may be causing problems with the microphone.
 4 Ways to Fix Microphone Not Working on iPad
Basic Fixes: Check the microphone on the iPad: To check the device's microphone, open the camera app on your iPad and record a video.
4 Ways to Fix Microphone Not Working on iPad
Basic Fixes: Check the microphone on the iPad: To check the device's microphone, open the camera app on your iPad and record a video.
The article above may contain affiliate links which help support Guiding Tech. The content remains unbiased and authentic and will never affect our editorial integrity.

Thank you so much bro!
Wish you everything best!