Haven’t we all gone through the experience where you sat down to show your recent vacation pictures to your friends, and just as you click on the folder the thumbnails take ages to load on your Windows PC. That can turn out to be quite an exasperating affair, especially if you have to locate a few important photos quickly.

That issue is more rampant in systems carrying plenty of media files inside folders. In a normal scenario, Windows 10 keeps a cache of the thumbnail files for your files and folders. So, when you open a folder, the contents are ready for you to view.
With time, this cache slowly starts bloating as new files are added to the system. And that is one of the reasons that Windows File Explorer takes its own sweet time to display the thumbnails. Or, in the worst-case scenario, your system shows the incorrect previews of the files.
Thankfully, the changes are not permanent, and with the right solution, one can rectify this issue quickly. In this post, we will explore four different ways to speed up the thumbnail loading time in Windows 10.
If you are lucky, you’d need to do only one of the fixes for the issue to be rectified, while in others, you may need to try all the three.
1. Through Group Policy
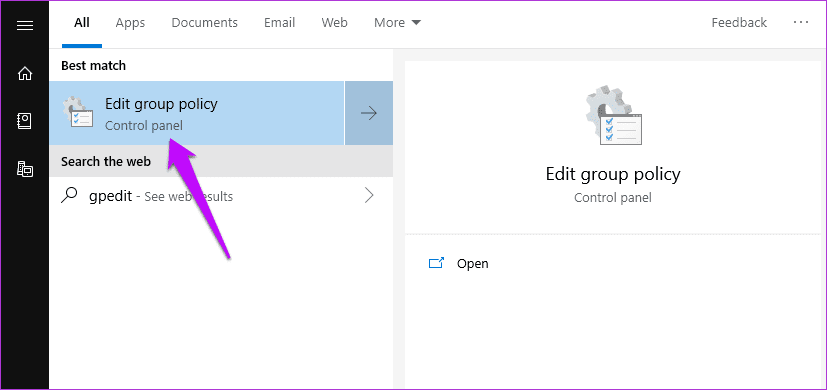
Step 1: Open Group Policy by typing Edit Group Policy (or gpedit.msc) in the Start menu. As you may already know, Windows Group Policy has a set of advanced local settings that you can tweak, provided you know your way around them.
Step 2: Once inside, navigate to User Configuration > Windows Components > File Explorer.

Step 3: Now, search for the ‘Turn off the caching of thumbnails…’ option. The chances are that this option will be either in the Not Configured state or disabled.
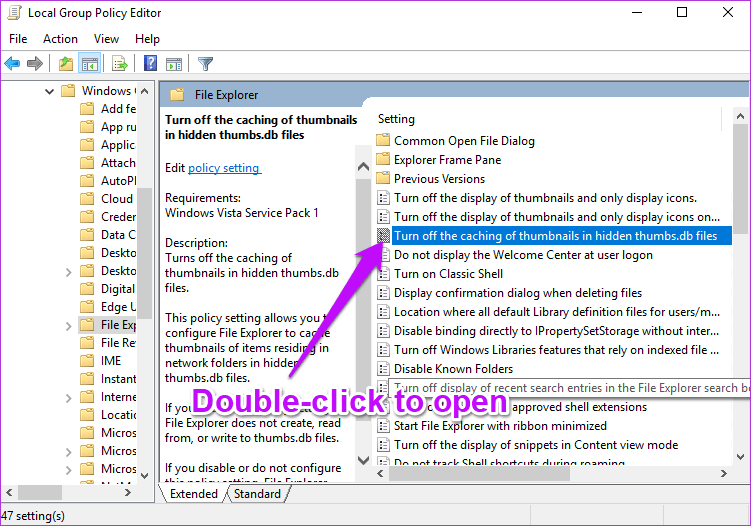
All you have to do is select Enabled and hit the Apply button.

Once you have applied the above, reboot your computer for the above changes to take effect.
2. Through the Control Panel Settings
Next, we have to make sure that your system is posed to show all the thumbnails of files and folders. To do so, follow the steps below.
Step 1: Open the Control Panel of your system and head over to System and Security > System, and click on the Advanced system settings.

Step 2: Select the Advanced tab and select Settings under Performance.

Here, you just have to make sure that the ‘Show thumbnails instead of icons’ option is enabled. If it’s not, check the box and hit OK.
3. Check the Registry Values
Last but not least, you may want to edit the Registry values. Quite obviously, your system has a ton of maintenance tools that runs automatically. And as you may have suspected, one of its jobs is to clean up the File Explorer’s cache regularly.
Just like your browser and your phone, clearing up the cache makes new space, which is good from the storage point of view. But at the same time, the File Explorer also has to reload the cache, which ends up consuming time.
Hence, if you’re really frustrated with the slow load time, you may want to tweak the values a little so that the Disk Cleanup job is not triggered for the thumbnail cache. Usually, the Disk Cleanup job (going by the name of SilentCleanup) picks up the autorun job with values 1. Naturally, if you change it to 0, it’ll cause the job to skip these keys.
To do so, open the Registry Editor by typing Regedit on the start menu.

Note: The Windows Registry contains all the settings and configurations used by your Windows system. Hence, it’s vital that you take a proper backup of the registry values
Next, navigate your way around to the following path,
HKLM\SOFTWARE\Microsoft\Windows\CurrentVersion\Explorer\VolumeCaches
Here you’ll see two values, Default and Autorun. All you have to do is set the Autorun’s DWORD value to 0.
Do so for the following path as well,
HKLM\SOFTWARE\WOW6432Node\Microsoft\Windows\CurrentVersion\Explorer\VolumeCaches\Thumbnail Cache
Once done, reboot the PC to make the changes take effect.
4. Change the Thumbnail Cache Size
You may also want to increase the cache size if you do have the habit of keeping all your pictures and images under a single folder. And as you might have guessed, the way is through the registry values.
Open the Registry, and navigate to the path below,
HKEY_LOCAL_MACHINE\SOFTWARE\Microsoft\Windows\CurrentVersion\Explore
Once done, right click on an empty space and select New. Next, select New > String value and add the term, Max Cached Icons.

Now add the value 4096 and hit the OK button. This tweak will create a 4MB cache file.

If you want a slightly bigger cache file, you can update this update the value to 8192 as well. By default, the icon cache size in Windows is around 500KB.
Explore Folders like a Pro
Waiting for the File Explorer to load the image and file previews can be an annoying affair. The frustration mounts all the more, especially when you have to to get work done soon. So which of these fixes worked for you? Do let us know in the comments section below.
Next up: Have a Windows 10 tablet? Get the most out of it by going through the tips and tricks below.
Was this helpful?
Last updated on 07 February, 2022
Read Next
 How to Change Folder Thumbnail in Windows 11
How to Change the Folder Thumbnail in Windows By default, Windows picks a folder thumbnail or picture automatically based on the folder's content.
How to Change Folder Thumbnail in Windows 11
How to Change the Folder Thumbnail in Windows By default, Windows picks a folder thumbnail or picture automatically based on the folder's content.
 3 Ways to Disable Taskbar Thumbnail Preview in Windows 11
Method 1: Disable Taskbar Thumbnail Preview Using the Settings App The Settings app is the primary destination for making important changes to your Windows PC.
3 Ways to Disable Taskbar Thumbnail Preview in Windows 11
Method 1: Disable Taskbar Thumbnail Preview Using the Settings App The Settings app is the primary destination for making important changes to your Windows PC.
 How to Display Internet Speed on Taskbar in Windows
https://youtu.be/m62gwMYvYVk Download Internet Speed Meter for Windows for Real-Time Monitoring To show internet speed in the taskbar on Windows, you will have to download a dedicated app known as NetSpeedMonitor.
How to Display Internet Speed on Taskbar in Windows
https://youtu.be/m62gwMYvYVk Download Internet Speed Meter for Windows for Real-Time Monitoring To show internet speed in the taskbar on Windows, you will have to download a dedicated app known as NetSpeedMonitor.
 8 Ways to Fix Slow Internet Speed on Windows 11
https://youtu.be/JSqfxm-5XZI Fix 1: Turn Off the Metered Connection Setting your internet connection as metered on Windows can prevent apps from using the internet proficiently, leading to slow internet speeds.
8 Ways to Fix Slow Internet Speed on Windows 11
https://youtu.be/JSqfxm-5XZI Fix 1: Turn Off the Metered Connection Setting your internet connection as metered on Windows can prevent apps from using the internet proficiently, leading to slow internet speeds.
 4 Ways to Fix Slow Download Speed in Epic Games Launcher on Windows 11
https://youtu.be/w8E4d-rCMUQ Basic Fixes: Check the Epic Server Status: Epic Games Launcher also relies on multiple servers to operate, and It’s possible that a server might be out of order or
4 Ways to Fix Slow Download Speed in Epic Games Launcher on Windows 11
https://youtu.be/w8E4d-rCMUQ Basic Fixes: Check the Epic Server Status: Epic Games Launcher also relies on multiple servers to operate, and It’s possible that a server might be out of order or
 3 Ways to Check RAM Speed on Windows 11
Method 1: Check RAM Speed From the Task Manager The Task Manager app allows you to view your computer's core hardware details, such as RAM speed, besides monitoring system processes
3 Ways to Check RAM Speed on Windows 11
Method 1: Check RAM Speed From the Task Manager The Task Manager app allows you to view your computer's core hardware details, such as RAM speed, besides monitoring system processes
 How to Increase Downloading Speed in Xbox App for Windows 11
Try These Things First Restart the Xbox app: At times, the Xbox app might misbehave and cause issues like slow downloading speed due to a temporary glitch or bug.
How to Increase Downloading Speed in Xbox App for Windows 11
Try These Things First Restart the Xbox app: At times, the Xbox app might misbehave and cause issues like slow downloading speed due to a temporary glitch or bug.
 4 Ways to Fix Ethernet Speed Capped at 100Mbps on Windows 11
Basic Fixes: Ensure your router and plan support 100Mbps: Connect to your Wi-Fi network and run a speed test via Fast.
4 Ways to Fix Ethernet Speed Capped at 100Mbps on Windows 11
Basic Fixes: Ensure your router and plan support 100Mbps: Connect to your Wi-Fi network and run a speed test via Fast.
The article above may contain affiliate links which help support Guiding Tech. The content remains unbiased and authentic and will never affect our editorial integrity.