Method 1: Use the Shortcuts App
You can create side-by-side photos on your iPhone using the Shortcuts app by using an existing shortcut or creating one yourself.
1. Using Existing Shortcut
Step 1: Open the Shortcuts app on your iPhone. Tap on the Gallery tab at the bottom and type grid in the search bar. Tap on the (+) icon on the Photo Grid shortcut to install it.
Step 2: Now, go to the Shortcuts tab and tap on the newly installed Photo Grid shortcut. Tap on the two photos that you want to combine horizontally. Tap on the Add button.
Step 3: Tap on the small down arrow at the top and select Save to Photos.
Alternatively, tap the Share icon at the bottom and select Save Image to download it on your iPhone.

The drawback of this method is that it doesn’t let you adjust the spacing between the images or put more than two images side by side. You can create a shortcut yourself to overcome these shortcomings.
2. Create a Shortcut
When you create a shortcut to combine photos on your iPhone, you can set the spacing and also choose the mode (horizontal/vertical) to combine photos.
Step 1: Open the Shortcuts app on your iPhone. Tap on the (+) icon at the top, followed by the Add Action button.
Step 2: Tap on the search bar and type Select Photos. Tap on Select Photos from the search results.
Step 3: Tap on the blue arrow icon next to Select Photos and enable the toggle next to Select Multiple.

Step 4: Tap on the search bar and type Combine images.
By default, photos will be combined horizontally. If you want to merge them vertically or decide later, tap on Horizontally and select Ask Each Time.
Step 5: Search and select Save to Photo Album. Finally, tap on Done to create the photo collage shortcut.
Tip: You can also rename the shortcut by tapping on the small arrow at the top.

Step 6: Now, whenever you want to do side-by-side photos on your iPhone, follow these steps:
- Open the Shortcuts app and tap on the created shortcut.
- Select the photos you want to combine and press the Add button.
- If you want to put them side by side, select Horizontally. Or, if you want to put one above the other, select Vertically.

If the app closes while creating a shortcut, check our guide to fix the Shortcuts app crashing on your iPhone.
Method 2: Combine iPhone Images Using Third-Party Apps
You can also use third-party apps offering additional features like adding borders, changing spacing, etc.
1. Using the InShot App
Step 1: Install and open the InShot app on your iPhone. Tap on the Collage button.
Step 2: Select the photos you want to merge and tap the checkmark icon to go ahead.
Step 3: Tap on the Layout tab to change the layout of your photos. Tap on Border to change the border size and style. Tap on the checkmark icon to proceed.

Step 4: Tap on the Canvas tab, followed by Background.
Step 5: Then, choose a background/border color for your picture. You can also make other adjustments to your photo, like adding stickers, text, effects, etc. Once done, tap on the Share icon at the top to download the image on your phone.

2. Using the Layout App
The Layout app not only lets you merge photos for Instagram but also use them outside of Instagram.
Step 1: Install and open the Layout from the Instagram app on your iPhone. Grant permission to access your photos.
Step 2: Select the photo you want to put side by side. Scroll through the layouts at the top and choose the layout where two images appear side by side.
Step 3: On the image edit screen, drag the blue bar (present in the middle) left or right to adjust the size of the photos.
Step 4: Tap on Borders from the tools at the bottom to add a border to your photo. Tap on Save to download the image on your iPhone.

Method 3: Use Online Tools to Combine Two Photos
You can also use free online tools like Tinywow to put two pictures together on iPhone, as shown below:
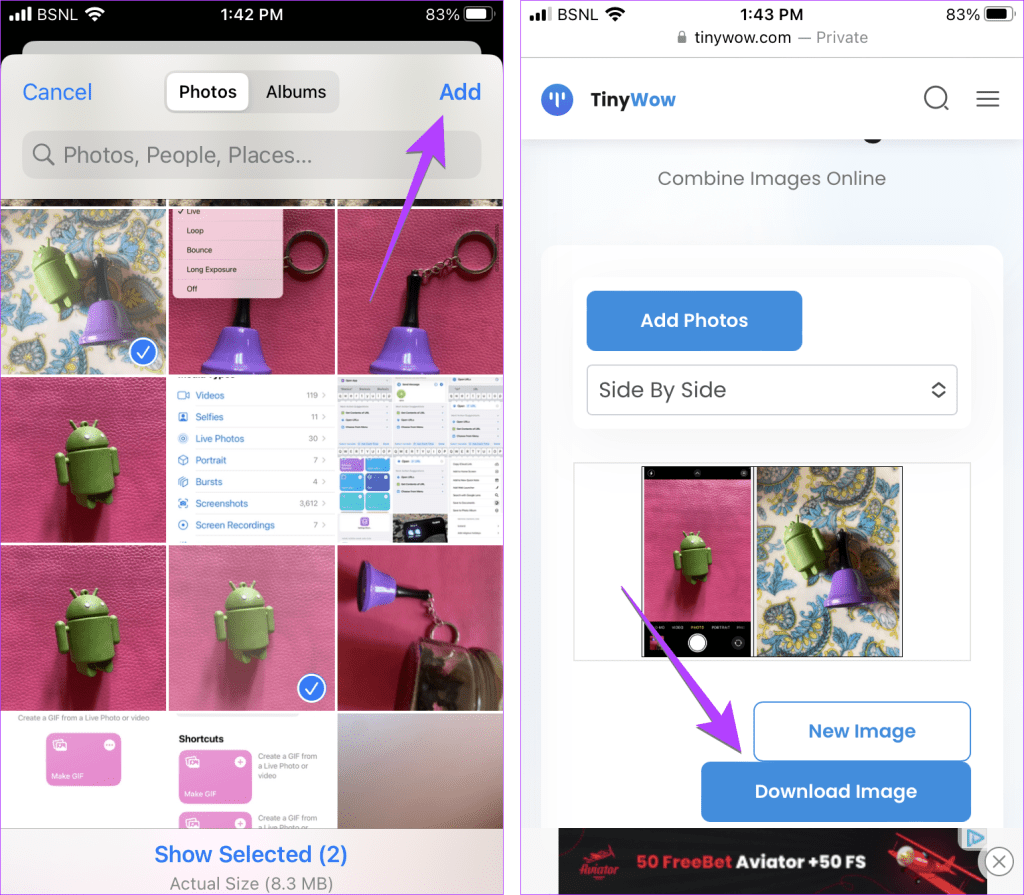
Step 1: Open Tiny Wow on your iPhone browser and tap on the Add Photos button > Upload from PC or Mobile.

Step 2: Select the two photos you want to keep side by side and press the Add button. The two images will be merged into one. Tap Download Image.
Step 3: Enter the captcha and wait for the Download pop-up. It might take around 10-15 seconds. Tap on Download.
The image will be saved in the Downloads folder in the Files app.
Was this helpful?
Last updated on 04 April, 2024
Read Next
 Top 6 Ways to Fix Chrome Side-by-Side Configuration Is Incorrect in Windows
Fix 1: Run System File Checker Step 1: Click the Start menu, search for Command Prompt, and open it.
Top 6 Ways to Fix Chrome Side-by-Side Configuration Is Incorrect in Windows
Fix 1: Run System File Checker Step 1: Click the Start menu, search for Command Prompt, and open it.
 How to Compare Two PDF Files Side by Side
Method 1: Using Adobe Acrobat On Your Desktop The best way to compare two PDF files side by side on your desktop is with the help of Adobe Acrobat.
How to Compare Two PDF Files Side by Side
Method 1: Using Adobe Acrobat On Your Desktop The best way to compare two PDF files side by side on your desktop is with the help of Adobe Acrobat.
 How to View Multiple Worksheets Side-by-Side in Excel
How to View Two Excel Worksheets Side-by-Side View Two Worksheets in the Same Excel Workbook Side-by-Side Step 1: From your PC's Start menu or Taskbar, click the Microsoft Excel app
How to View Multiple Worksheets Side-by-Side in Excel
How to View Two Excel Worksheets Side-by-Side View Two Worksheets in the Same Excel Workbook Side-by-Side Step 1: From your PC's Start menu or Taskbar, click the Microsoft Excel app
 How to Close Apps on Apple Watch (Without Side Button)
How to Close Open Apps The watchOS 10 update removed the side button for launching recent applications, and many users are struggling to find a way out.
How to Close Apps on Apple Watch (Without Side Button)
How to Close Open Apps The watchOS 10 update removed the side button for launching recent applications, and many users are struggling to find a way out.
 5 Ways to Fix Google Photos App Not Showing All Photos
Basic Fixes Check your network connection - Ensure your phone is connected to a good internet connection.
5 Ways to Fix Google Photos App Not Showing All Photos
Basic Fixes Check your network connection - Ensure your phone is connected to a good internet connection.
 How to Move Photos From iPhone to Google Photos
Method 1.
How to Move Photos From iPhone to Google Photos
Method 1.
 7 Best Gaming Mouse with Side Buttons
If you often play games, you must already know that a mouse with just two buttons and a scroll wheel doesn't quite cut it.
7 Best Gaming Mouse with Side Buttons
If you often play games, you must already know that a mouse with just two buttons and a scroll wheel doesn't quite cut it.
The article above may contain affiliate links which help support Guiding Tech. The content remains unbiased and authentic and will never affect our editorial integrity.

