How to Create Nested Bulleted Lists
If you want to create a list without the checkboxes, you can go with the bulleted lists. The items in this list will be automatically prefixed with a bullet point. Google Keep supports three bullet formats: dash (-), asterisks or star (*), and dot.
Note: The steps to create a nested bulleted list remains the same across mobile apps as well as the web app.
Step 1: To create a bulleted list, open the note in Google Keep and type dash/hyphen (-) or star (*) followed by space. Then, type your first list item. Now, to add new items, press Enter. You will see that Google Keep automatically adds a bullet point.


If you have entered a dash (-), all bullet points will have a dash (–) before them, and similarly, if you go with an asterisk/star (*), all will have a dot before them (.). Basically, when you press the space after star (*), it will turn into a dot. If you want to go with the star format, press Backspace once.
Step 2: Now, to convert it to a nested bullet list, first tap on any point where you want to create a sub-list. Here, press Backspace to remove the automatically created bullet point.


Step 3: Next, using the Spacebar, add spaces to indent the position of the sublist. You can add as many spaces as you want. Once at the required position, use the above method to create a list i.e. type dash (–) or star (*) followed by space and the first list item.
Then press Enter to create a second sub-item and so on.
How to Create Nested To-Do Lists
To-Do lists, as is obvious, are the lists with checkboxes. You can complete the tasks or the items by tapping on the checkbox.
Android or iOS
Step 1: To create a To-Do list from scratch, tap on the Checkbox icon at the bottom row. Then, start adding all your items one by one.

Step 2: To convert this to a nested To-Do list, simply swipe right on the last entry. This will convert it to a sub-entry.
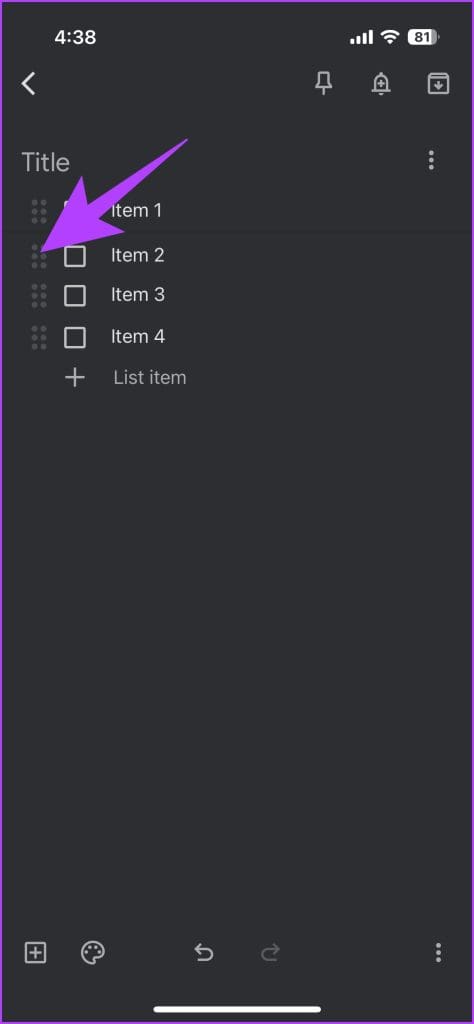

Step 3: You can repeat these steps for each entry. To revert it, simply swipe left on an entry.
Web App
Step 1: Similar to the mobile app version, click on the Checkbox icon to create a new To-Do list. Inside, add the entries as you like.

Step 2: To indent a list item using the keyboard shortcut, keep the mouse pointer on it and press Ctrl + ] to move it towards the right.

Step 3: Similarly, to remove the sublist, press Ctrl + [. This will move the item towards the left.
Alternatively, you can drag the entry left or right using your mouse cursor if need be.
FAQs
Using nested lists helps organize tasks and notes hierarchically, making complex information easier to manage and understand.
Yes, you can share your nested lists with others by adding collaborators to your note.
Yes, you can drag and drop items to rearrange them within a nested list on both mobile and desktop versions.
Was this helpful?
Last updated on 27 August, 2024
Read Next
 Google Drive Sharing Permissions Explained: A Detailed Guide
Types of Sharing Permissions in Google Drive When you're not sharing the file/folder it is set to Restricted, i.e., only you can view and edit the file.
Google Drive Sharing Permissions Explained: A Detailed Guide
Types of Sharing Permissions in Google Drive When you're not sharing the file/folder it is set to Restricted, i.e., only you can view and edit the file.
 Google Photos Link Sharing Permissions and Settings Explained: A Detailed Guide
Recently, a controversial post appeared on the internet that said ‘photos in Google Photos are semi-public,’ which is both true and false.
Google Photos Link Sharing Permissions and Settings Explained: A Detailed Guide
Recently, a controversial post appeared on the internet that said ‘photos in Google Photos are semi-public,’ which is both true and false.
 How to Hyperlink in Google Docs: A Detailed Guide
Hyperlinks help connect one document with another.
How to Hyperlink in Google Docs: A Detailed Guide
Hyperlinks help connect one document with another.
 12 Things to Know About Instagram Quiz Sticker: A Detailed Guide
1.
12 Things to Know About Instagram Quiz Sticker: A Detailed Guide
1.
 How to Turn off Ads on Instagram: A Detailed Guide
Are you tired of annoying or irrelevant Instagram ads and want to eliminate them from your Instagram feed?
How to Turn off Ads on Instagram: A Detailed Guide
Are you tired of annoying or irrelevant Instagram ads and want to eliminate them from your Instagram feed?
 A Detailed Guide to Fixing AirPods Not Switching to Noise Cancellation
The AirPods Pro features Active Noise Cancellation, and that's what makes them better over AirPods.
A Detailed Guide to Fixing AirPods Not Switching to Noise Cancellation
The AirPods Pro features Active Noise Cancellation, and that's what makes them better over AirPods.
 A Detailed Guide to Fixing Mac Booting With Black Screen Issues
Clicking the power button on your MacBook should light up the screen and keyboard, play a startup chime, display the Apple logo, and finally, boot into the authentication screen where
A Detailed Guide to Fixing Mac Booting With Black Screen Issues
Clicking the power button on your MacBook should light up the screen and keyboard, play a startup chime, display the Apple logo, and finally, boot into the authentication screen where
 How to Use the Compass App on iPhone: A Detailed Guide
How to Use the iPhone Compass Rotate your iPhone to see the direction your iPhone is pointing towards.
How to Use the Compass App on iPhone: A Detailed Guide
How to Use the iPhone Compass Rotate your iPhone to see the direction your iPhone is pointing towards.
The article above may contain affiliate links which help support Guiding Tech. The content remains unbiased and authentic and will never affect our editorial integrity.