In the case of a monitor not displaying full screen, Windows 11 users may find this a relatively common issue, especially if they’ve recently plugged in a new monitor or updated their graphics settings. Here are the most common fixes that should help.
What Causes a Monitor Not Full Screen Windows 11
Windows normally reads a monitor’s supported resolutions and refresh rates automatically and picks the best match. However, in some cases, the display resolution or scale in Windows might not match the monitor’s native pixel grid, leaving black bars or an image that doesn’t fill the panel. The monitor itself may also have its own aspect ratio or “screen fit” setting, accessible through its physical buttons, that overrides whatever Windows sends it.
Cables and connections can be the cause, where an older HDMI cable might not support the bandwidth a 4K or high-refresh-rate signal needs, causing Windows to fall back to a lower, non-native resolution.
Fix 1 – Fix the Resolution and Scaling in Settings for Monitor Not Displaying Full Screen Windows 11
This is the most basic fix that should be attempted first as it “grounds” the display settings.
Step 1. Right-click an empty area of the desktop and select “Display settings.”
Step 2. In the “Scale & layout” section, set “Display resolution” to the option marked “(Recommended).” This is typically 1920 × 1080 for a 1080p monitor or 3840 × 2160 for 4K.

Step 3. Set “Scale” to its recommended percentage. Only switch to custom scaling if the recommended value still leaves parts of the screen unused.
Fix 2 – Check the Monitor’s Built-In Display Settings
Step 1. Use the physical buttons on your monitor to open its on-screen display menu.
Step 2. Look for a setting labeled “Aspect Ratio,” “Screen Size,” or “Scaling.”
Step 3. Set it to “Full,” “Wide,” or “16:9.” If you’re using a TV as a monitor, look for the same option under “Screen Fit” or “Full 100%” in the TV’s own picture settings.
This menu bypasses Windows entirely, so it’s worth checking even if your Windows display settings already look correct.
Fix 3 – Check Cables and Multi-Monitor Settings
Step 1. Unplug and reconnect your HDMI, DisplayPort, or USB-C cable at both ends.
Step 2. If you’re using a high-resolution or high-refresh rate monitor, check if you have an HDMI 2.1 or DisplayPort 1.4 cable.
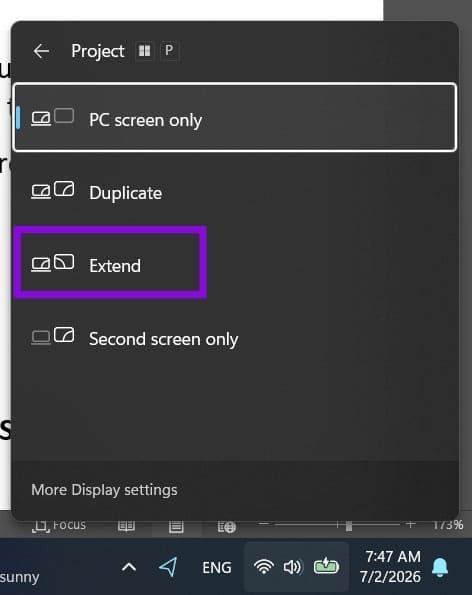
Step 3. If you have more than one monitor connected, press “Win + P” and confirm you’re using “Extend” rather than “Duplicate.”
Step 4. Go to Settings and to “System” and “Display,” then select each monitor individually to confirm its resolution and refresh rate match what it actually supports.
Fix 4 – Update or Reinstall the Graphics Driver
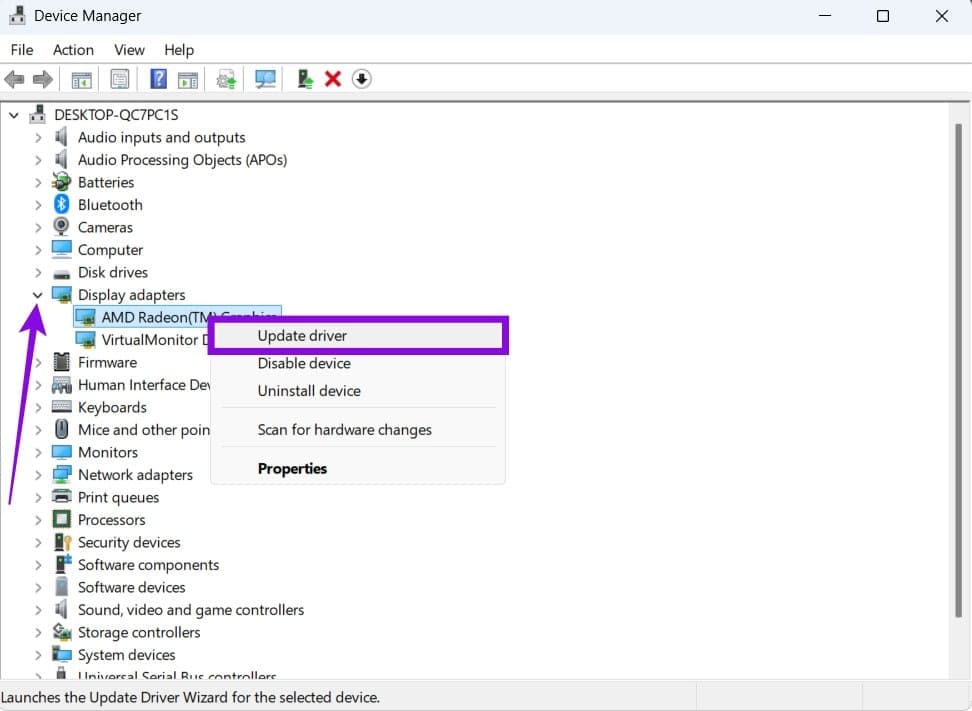
Step 1. Right-click the Start button and choose “DeviceManager.”
Step 2. Expand “Display adapters,” right-click your graphics card, and select “Update driver.”
Step 3. Choose “Search automatically for drivers.”
If that doesn’t find anything newer, download the latest driver directly from NVIDIA, AMD, or Intel’s website for a clean reinstall, or use your graphics driver app if you have one.
Fix 5 – Override Scaling in Your GPU’s Control Panel
Your graphics card’s own software can override Windows’ scaling settings entirely, so it’s worth checking directly.
For NVIDIA: Open the NVIDIA panel (available on the right-click context menu), then go to “Display” and choose “Adjust desktop size and position.” From here, select “Full-screen” as the scaling mode, and check “Override the scaling mode set by games and programs.”
For AMD: Open AMD Adrenalin or AMD Software, go to Display in the Settings tab, then toggle “GPU Scaling” on, and set “Scaling Mode” to “Full panel.”
For Intel: Open Intel Graphics Command Center, go to its display scaling options, and set scaling to fill the full screen rather than maintaining aspect ratio.
Fix 6 – Fix a Specific Game or App That Won’t Fill the Screen
If your desktop and every other app fill the screen normally and only one program is the problem, the fix belongs to that program.
Step 1. Check the game or app’s own video or display settings for a “Fullscreen,” “Borderless,” or “Windowed” mode and switch it to full screen.
Step 2. If that doesn’t help, right-click the program’s executable file and choose “Properties,” then go to“Compatibility.”
Step 3. Check “Disable fullscreen optimizations.”
It’s also worth turning off Game Mode (or any “optimizer” feature from your PC manufacturer) to see if that solves the problem with a particular program.
Fix 7 – Registry Edit
Step 1. Hit “Win + R,” type in “regedit,” and hit “Enter.”
Step 2. Navigate to:
HKEY_LOCAL_MACHINE\SYSTEM\CurrentControlSet\Control\GraphicsDrivers\Configuration
Step 3. Look for subfolders beginning with “SIMULATED” or “NOEDID,” then open the “00” folder inside one of them.

Step 4. Find the PrimSurfSize.cx (width) and PrimSurfSize.cy (height) values, switch the options to Decimal mode (this is important), then enter the desired values, for example “1920” and “1080.”
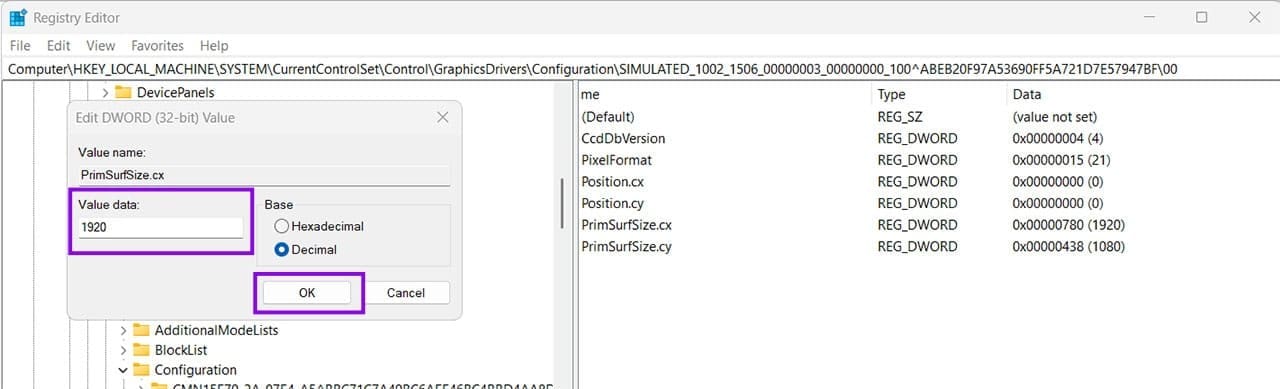
Step 5. Restart your PC.
You should only attempt this if incorrect display values remain after you update the graphics drivers and confirm the monitor’s EDID is being detected. Windows may automatically overwrite these values.
Was this helpful?
Last updated on 06 July, 2026
Read Next
 Top 5 Ways to Fix Microsoft Teams Not Displaying Images on Windows
Preliminary Fixes Check the Internet Connection: A stable internet connection is crucial for Microsoft Teams to properly load images and other media content.
Top 5 Ways to Fix Microsoft Teams Not Displaying Images on Windows
Preliminary Fixes Check the Internet Connection: A stable internet connection is crucial for Microsoft Teams to properly load images and other media content.
 5 Fixes for PowerPoint Not Displaying Pictures on Windows
Try Basic Fixes Remove and add the picture again: Microsoft PowerPoint may fail to load an image if it is not added completely to the presentation file.
5 Fixes for PowerPoint Not Displaying Pictures on Windows
Try Basic Fixes Remove and add the picture again: Microsoft PowerPoint may fail to load an image if it is not added completely to the presentation file.
 How to Take Screenshots of One Monitor on Windows 11 With a Multi-Monitor Setup
Method 1: PikPick Some screenshot tools allow you to configure their settings so that they will only capture screenshots of one monitor.
How to Take Screenshots of One Monitor on Windows 11 With a Multi-Monitor Setup
Method 1: PikPick Some screenshot tools allow you to configure their settings so that they will only capture screenshots of one monitor.
 3 Eays to Fix Windows 10 Full Screen Start Menu When It’s Stuck
Fix 1: Turn off the Full-Screen Setting Microsoft offers a native setting that allows users to switch from the normal Start Menu to the expanded one.
3 Eays to Fix Windows 10 Full Screen Start Menu When It’s Stuck
Fix 1: Turn off the Full-Screen Setting Microsoft offers a native setting that allows users to switch from the normal Start Menu to the expanded one.
 Top 6 Ways to Fix Games Not Opening in Full Screen on Windows 11
Fix 1: Use the Keyboard Shortcut Sometimes, the games may open in windowed mode by default, and you might have hit the Maximize window shortcut on your computer.
Top 6 Ways to Fix Games Not Opening in Full Screen on Windows 11
Fix 1: Use the Keyboard Shortcut Sometimes, the games may open in windowed mode by default, and you might have hit the Maximize window shortcut on your computer.
 How to Fit Full Page to Window By Default in Adobe Acrobat DC and Reader DC
Adobe Acrobat DC and Acrobat Reader DC prefer fitting pages by width.
How to Fit Full Page to Window By Default in Adobe Acrobat DC and Reader DC
Adobe Acrobat DC and Acrobat Reader DC prefer fitting pages by width.
 A Complete Guide to OneDrive Storage and Avoiding Disk Full Error
Microsoft OneDrive, previously known as SkyDrive, is a complete cloud storage solution for Windows users.
A Complete Guide to OneDrive Storage and Avoiding Disk Full Error
Microsoft OneDrive, previously known as SkyDrive, is a complete cloud storage solution for Windows users.
 What to Do If Your Outlook Mailbox is Full
Fix 1: Use the Mailbox Cleanup Tool Microsoft Outlook includes a Mailbox Cleanup tool that can help reduce your mailbox size by deleting old emails quickly.
What to Do If Your Outlook Mailbox is Full
Fix 1: Use the Mailbox Cleanup Tool Microsoft Outlook includes a Mailbox Cleanup tool that can help reduce your mailbox size by deleting old emails quickly.
The article above may contain affiliate links which help support Guiding Tech. The content remains unbiased and authentic and will never affect our editorial integrity.