Basic Ways:
- Using the Search bar: Click on the Search bar, type Network Connections, and open the app from the search results.
- Using Start: Go to the taskbar, right-click on Start, and click on Network Connections to launch the app.
- Via Run command/Files Explorer: Open the Run window or the File Explorer, type Network Connections in the relevant search bar, and press enter to open the Network Connections window.
Method 1: Using the Control Panel
Network Connections is a Control Panel applet nested deep inside the Network and Internet section. So, you can launch the utility from the Control Panel too. Here’s how to do it:
Step 1: Open the Control Panel and click on the Network and Internet option.

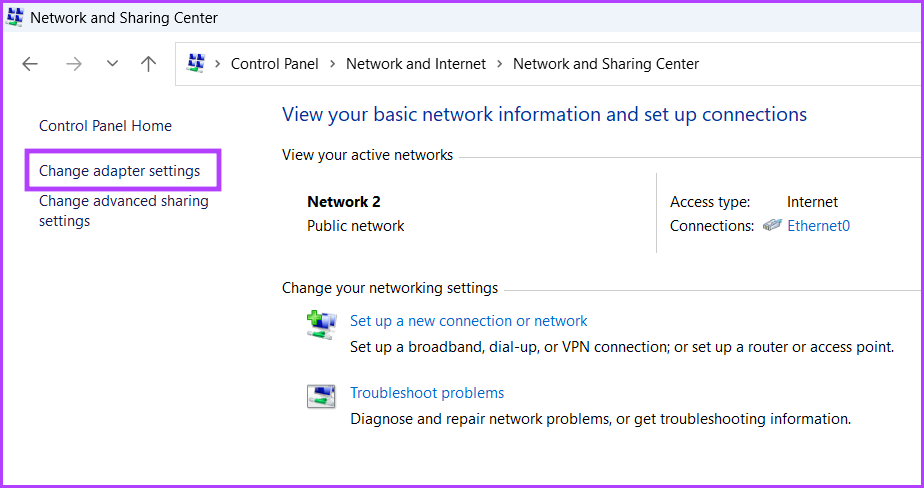
Step 2: Click on Network and Sharing Center.

Step 3: Here, click on Change adapter settings. Network Connections will launch in a separate window.
Also Read: How to fix Windows 10 network connection issues
Method 2: Using the Settings App
Microsoft is slowly moving many Control Panel utilities to the Settings app. There is an elaborate Network setting in the app, which also has a Network Connections section. Here’s how to open it on Windows 11.
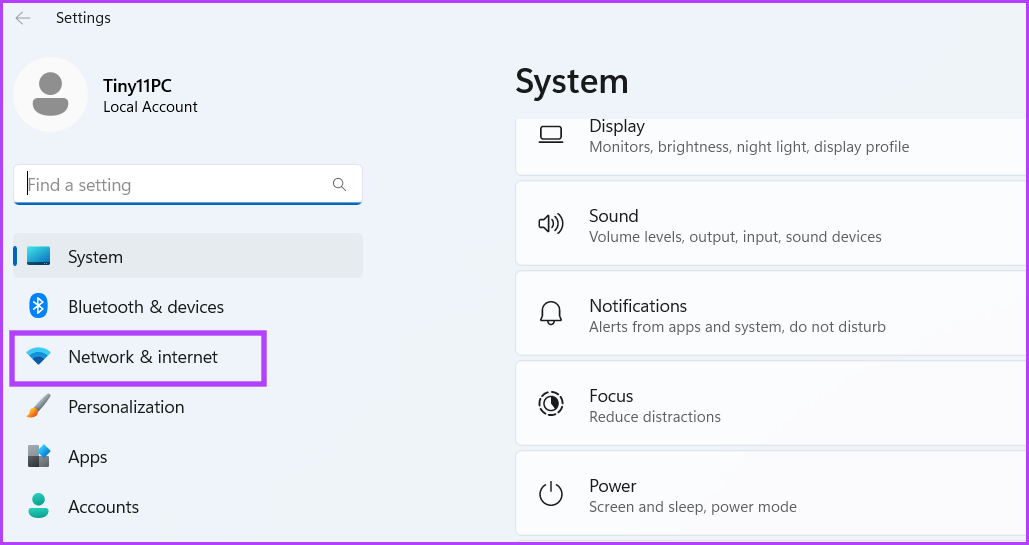
Step 1: Use the Windows + I key to launch Settings. Click on Network & internet.
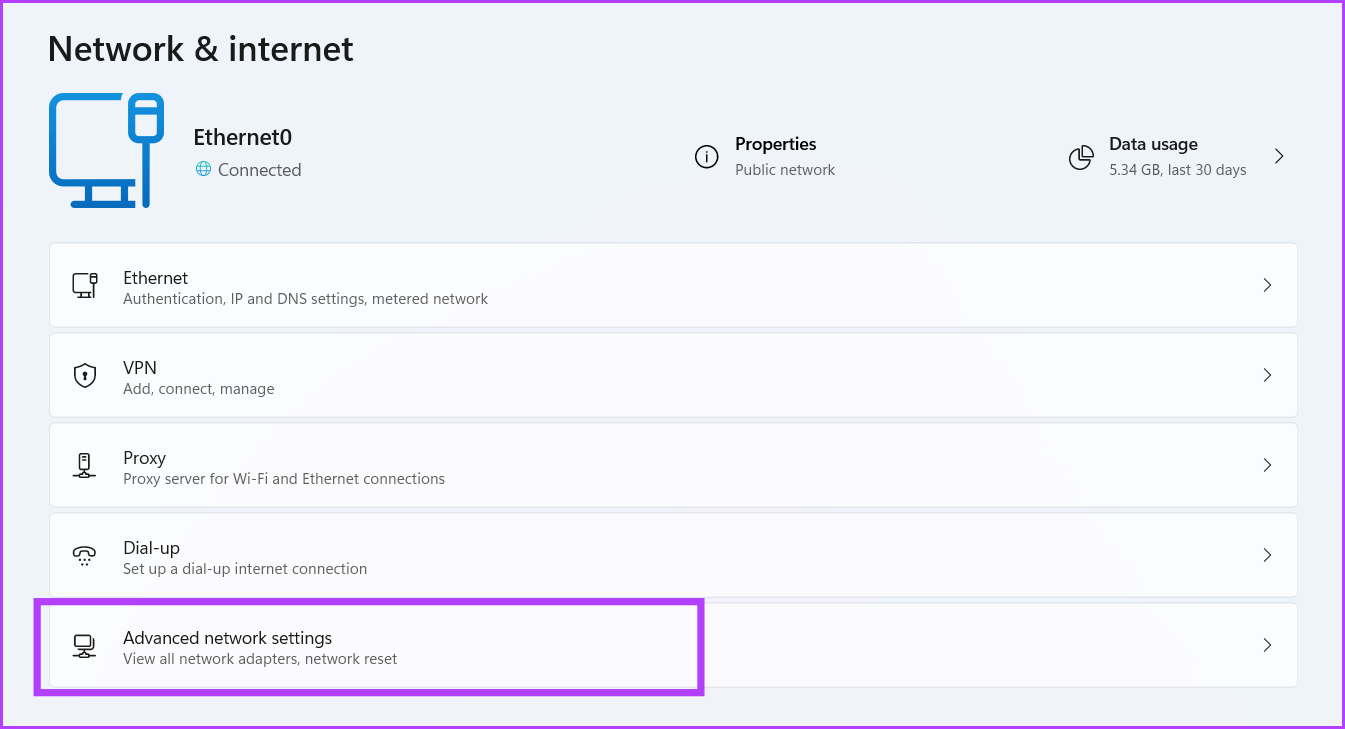
Step 2: Here, click on Advanced network settings. This will open a list of Network adapters.
Method 3: Using Command Prompt or PowerShell
If you love Terminal in Windows 11 and prefer running applications that way, you can launch the Network Connections utility directly using it. Here’s how to open it using Command Prompt and PowerShell.
Via Command Prompt
Step 1: Open Command Prompt, type the following command, and press enter to open the Network Connections window.
ncpa.cpl

Via Windows PowerShell
Step 1: Open Windows PowerShell, type the following command, and press enter.
start-process control netconnections

Method 4: Creating a Desktop Shortcut
Unfortunately, you cannot pin the Network Connections utility to the Start menu or the Taskbar. However, you can create a shortcut for the utility and launch it directly from the desktop. Here’s how.
Step 1: Right-click on the desktop and click on New. Select the Shortcut option.

Step 2: Type the following path and click on Next.
C:\Windows\SysWOW64\ncpa.cpl

Step 3: Name the shortcut and click on Finish to create the shortcut.

Now, double-click on the newly created shortcut whenever you want to open the Network Connections window on your Windows 11 laptop.
Was this helpful?
Last updated on 27 June, 2024
Read Next
 How to Monitor Network Connections in Android in Real-Time
1.
How to Monitor Network Connections in Android in Real-Time
1.
 6 Ways to Fix Multiple Connections to a Server or Shared Resource by the Same User
Network and file sharing issues can be frustrating, especially when encountering errors like 'Multiple Connections to a Server or Shared Resource by the Same User.' In this article, we'll delve
6 Ways to Fix Multiple Connections to a Server or Shared Resource by the Same User
Network and file sharing issues can be frustrating, especially when encountering errors like 'Multiple Connections to a Server or Shared Resource by the Same User.' In this article, we'll delve
 Top 8 Ways to Fix Windows 10 Network Connection Issues
The internet connection is crucial while working from home or enjoying web-based content.
Top 8 Ways to Fix Windows 10 Network Connection Issues
The internet connection is crucial while working from home or enjoying web-based content.
 4 Ways to Fix “Windows Could Not Find a Driver for Your Network Adapter” Error
Fix 1: Enable Network Adapter Windows may fail to communicate with the network adapter if you've previously disabled it.
4 Ways to Fix “Windows Could Not Find a Driver for Your Network Adapter” Error
Fix 1: Enable Network Adapter Windows may fail to communicate with the network adapter if you've previously disabled it.
 5 Ways to Fix Network Discovery Not Working on Windows 11
Fix 1: Enable Network Discovery Your first step is to ensure that your PC's network discovery feature is enabled for both public and private networks.
5 Ways to Fix Network Discovery Not Working on Windows 11
Fix 1: Enable Network Discovery Your first step is to ensure that your PC's network discovery feature is enabled for both public and private networks.
 3 Ways to Check Network Adapter Speed on Windows 11
Method 1: Using the Settings App Besides displaying the network adapter speed, the Settings app also provides information about other connection aspects, such as the network band, MAC address, and
3 Ways to Check Network Adapter Speed on Windows 11
Method 1: Using the Settings App Besides displaying the network adapter speed, the Settings app also provides information about other connection aspects, such as the network band, MAC address, and
 5 Ways to Fix Windows Stuck on “Let’s Connect You to a Network”
Fix 1: Restart the Router and Check the Internet Connectivity Restart your Wi-Fi router, as it essentially refreshes the network connection.
5 Ways to Fix Windows Stuck on “Let’s Connect You to a Network”
Fix 1: Restart the Router and Check the Internet Connectivity Restart your Wi-Fi router, as it essentially refreshes the network connection.
 6 Fixes for “Can’t Connect to This Network” Error on Windows 11
https://youtu.be/fitOVnXrUqE Basic Fixes: Restart Windows and router: Restarting your Windows 11 device will help fix issues occurring due to any temporary bugs or issues.
6 Fixes for “Can’t Connect to This Network” Error on Windows 11
https://youtu.be/fitOVnXrUqE Basic Fixes: Restart Windows and router: Restarting your Windows 11 device will help fix issues occurring due to any temporary bugs or issues.
The article above may contain affiliate links which help support Guiding Tech. The content remains unbiased and authentic and will never affect our editorial integrity.