Method 1: Using Microsoft Edge
Microsoft Edge offers a handy Web Capture tool to snap and annotate screenshots. However, note that the function works in the Edge browser only. If you want to take scrolling screenshots in other apps, jump to the second section.
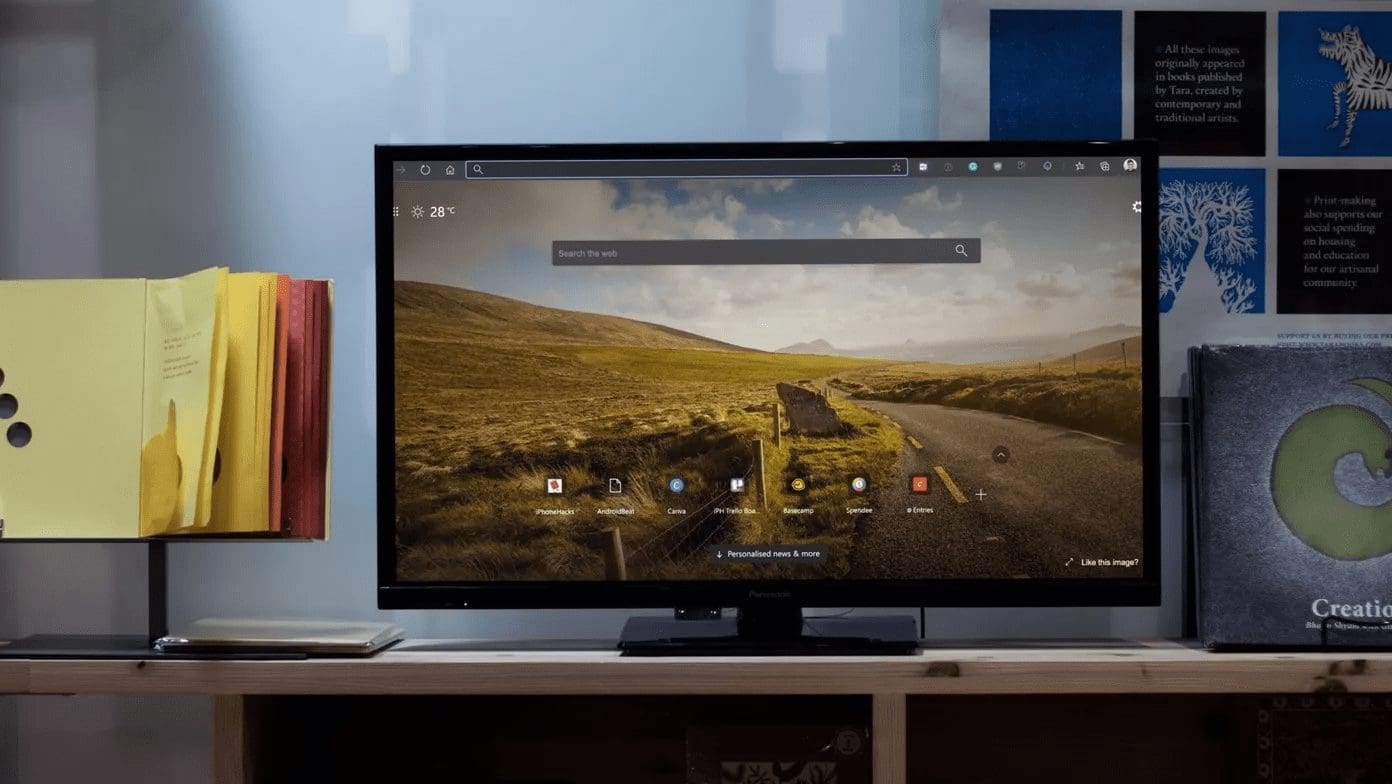
Step 1: Launch Microsoft Edge on your desktop.
Step 2: Visit a website where you want to screenshot whole page.
Step 3: Click the camera icon in the Edge toolbar at the top-right corner. If it’s not visible, press Ctrl + Shift + S.

Step 4: A small toolbar appears at the top. Select Capture area.
Step 5: Use the mouse or trackpad and take a screenshot. You can push it down to the bottom to capture the webpage.
Step 6: After you capture the screenshot, click Copy and share it with everyone.

You can also hit Markup Capture and open the default tool to annotate screenshots, or you can use other annotation tools.
Method 2: Use Browser Extensions
There is no shortage of third-party extensions to capture scrolling screenshots. Scrolling screenshot is one such extension that does the job on Chromium browsers. It receives frequent updates and offers rich features to capture screenshots like a pro. Let’s check it in action.
Step 1: Launch Google Chrome and head to the Scrolling screenshot extension in the Chrome Web Store.
Step 2: Click Add to Chrome. Select Add Extension, and it should appear in the top-right corner.

Step 3: To take a scrolling screenshot on a webpage, click the extension at the top and click Selected Area.

Step 4: Use the mouse or trackpad to scroll to the bottom to expand the screenshot.
Step 5: You can cancel the selection, save the screenshot, or copy it.

The steps above work only in a web browser. If you want to take a scrolling screenshot in other apps, use a third-party solution.
Method 3: Using Third-Party Apps
There is no shortage of third-party screenshot apps on Windows. ShareX is a free and robust open-source offering. The app can be downloaded from the Microsoft Store. Download and install it, and then follow these steps.
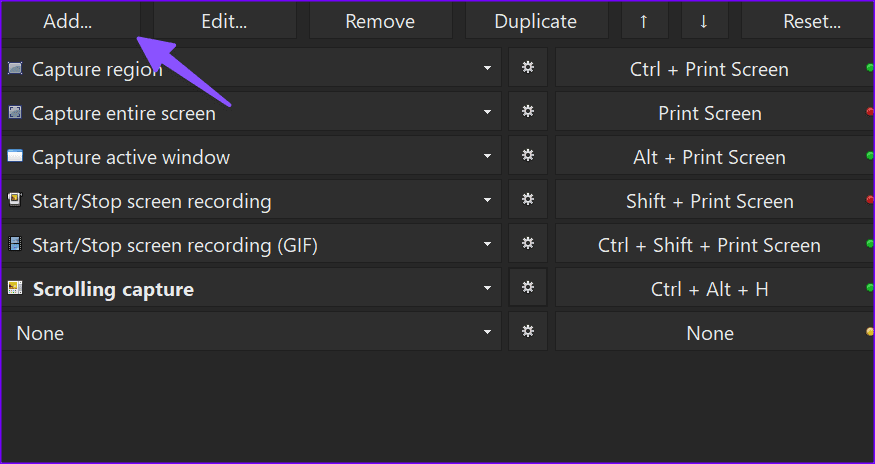
Step 1: Once ShareX runs in the background, click the up arrow icon in the Windows 11 taskbar.
Step 2: Right-click on ShareX and expand Capture. Select Scrolling capture.

Step 3: Check the capture options and make the required changes. Hit Start scrolling capture.

Step 4: ShareX will take a scrolling screenshot and open the Output menu, where you can make changes.

If you frequently take scrolling screenshots with ShareX, assign a hotkey to summon it with your keyboard. Here’s what you need to do.
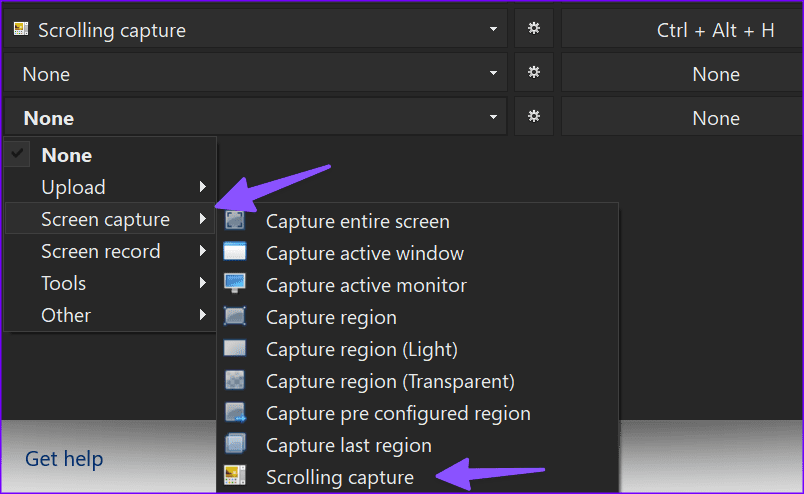
Step 1: Right-click on ShareX in the Windows taskbar tray. Select Hotkey settings.

Step 2: Click Add and expand None. Select Screen capture and click Scrolling Capture.
Step 3: Select the hotkey on the right side and press your preferred key combination.
From now on, you can hit the keyboard shortcut to start scrolling capture on your PC. Snagit is another capable alternative to Snipping Tool that lets you take and annotate scrolling screenshots.
Was this helpful?
Last updated on 08 July, 2024
Read Next
 Best Ways to Capture Scrolling Screenshots on macOS
When you want to capture an entire webpage, document, or any content that extends beyond the visible screen, a scrolling screenshot is the best route.
Best Ways to Capture Scrolling Screenshots on macOS
When you want to capture an entire webpage, document, or any content that extends beyond the visible screen, a scrolling screenshot is the best route.
 How to Take Scrolling (Long) Screenshots on Android
How to Take a Long Screenshot on Samsung Devices Step 1: Press the power button and volume down together.
How to Take Scrolling (Long) Screenshots on Android
How to Take a Long Screenshot on Samsung Devices Step 1: Press the power button and volume down together.
 3 Ways to Fix Mouse Keeps Scrolling Automatically Windows 10 and Windows 11
https://youtu.be/1UZ3PWNr-lE Try Basic Fixes Disconnect and reconnect the mouse: Unplug your mouse cable or wireless adapter from your computer and reconnect it to a different port.
3 Ways to Fix Mouse Keeps Scrolling Automatically Windows 10 and Windows 11
https://youtu.be/1UZ3PWNr-lE Try Basic Fixes Disconnect and reconnect the mouse: Unplug your mouse cable or wireless adapter from your computer and reconnect it to a different port.
 6 Ways to Fix Excel Not Scrolling Smoothly on Windows
Basic Fixes Restart PC: Restart your PC to eliminate temporary bugs and glitches.
6 Ways to Fix Excel Not Scrolling Smoothly on Windows
Basic Fixes Restart PC: Restart your PC to eliminate temporary bugs and glitches.
 4 Ways to Fix Windows Not Taking Screenshots
Fix 1: Close Interfering Apps We often install multiple screenshot software, each taking over the Print screen shortcuts.
4 Ways to Fix Windows Not Taking Screenshots
Fix 1: Close Interfering Apps We often install multiple screenshot software, each taking over the Print screen shortcuts.
 7 Best Ways to Fix Mouse Wheel Scrolls Up When Scrolling Down Issue
Recently, my wireless mouse started throwing tantrums.
7 Best Ways to Fix Mouse Wheel Scrolls Up When Scrolling Down Issue
Recently, my wireless mouse started throwing tantrums.
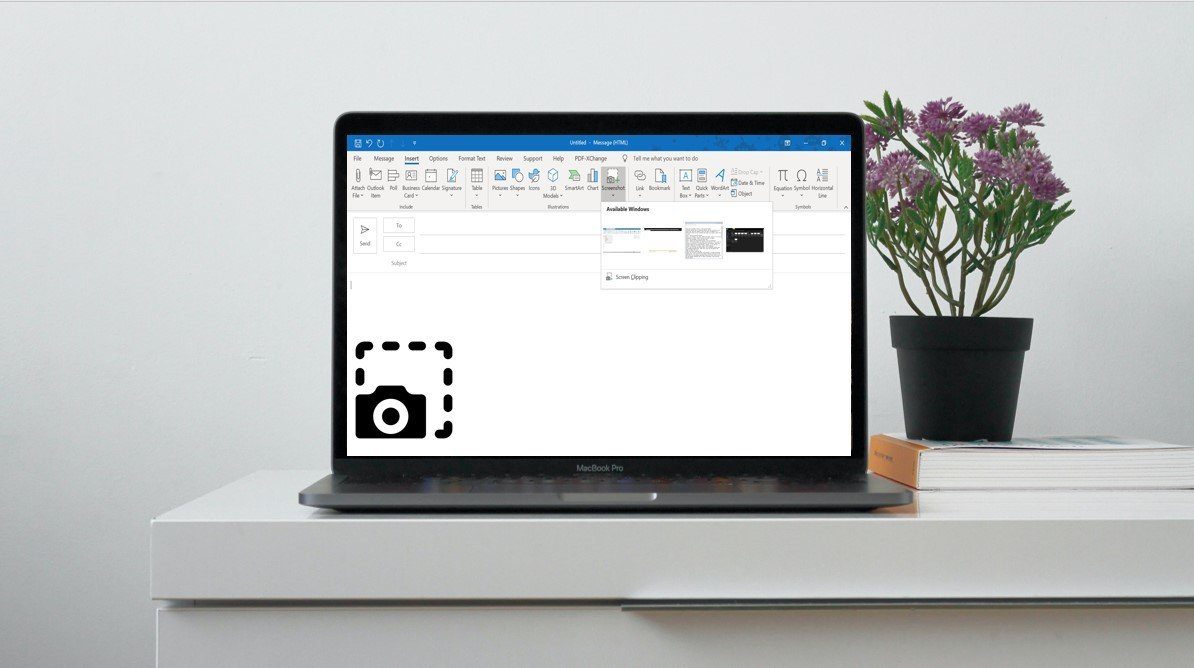 Top 3 Ways to Insert Screenshots in Microsoft Outlook
Screenshots can be very helpful when passing certain information over messages or social media.
Top 3 Ways to Insert Screenshots in Microsoft Outlook
Screenshots can be very helpful when passing certain information over messages or social media.
 2 Tools to Automatically Take Screenshots on Windows PC
Just think for a moment.
2 Tools to Automatically Take Screenshots on Windows PC
Just think for a moment.
The article above may contain affiliate links which help support Guiding Tech. The content remains unbiased and authentic and will never affect our editorial integrity.