How to Use the Microsoft Outlook Search Bar
There are two ways to use the Microsoft Outlook Search bar. You can use the default bar as it appears on your Outlook or click the drop-down in the bar to get its advanced features. Here’s how both options work.
Default Search
The Search bar is typically at the top of the Microsoft Outlook page. The simplified search bar is best used when the search does not involve complex search criteria. For example, if you are using a keyword. Here’s how to use it:
Step 1: Open the Microsoft Outlook website in a browser and log in to your Outlook account. Or you can use the desktop app.
Step 2: Move your cursor to the top of the Outlook page, where the search bar is located.

Step 3: Click the search bar and enter your search keyword.

Step 4: Press the Enter key on your keyboard or click the search icon to run the search.
Advanced Search
Where your Outlook search involves complex requirements, such as searching for a keyword within a subject line from a specific email address, you must use the Advanced Search bar. Here’s how:
Step 1: Click the search bar to expand it.
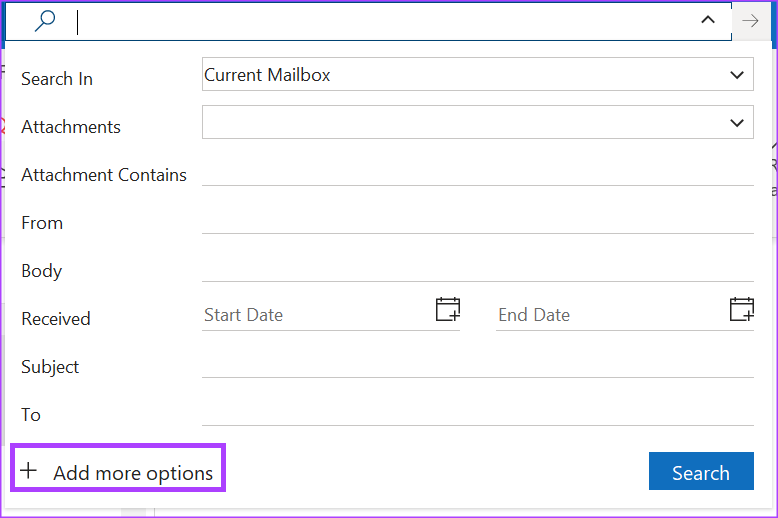
Step 2: Click the drop-down at the end of the expanded search bar. This should show the Advanced Search filters.

Step 3: Using the Advanced Search filters, specify the requirements for your mailbox search. The default features of the Advanced Search filters include:
| Filter | Description | Example |
| Search In | specify the date range of the email for Outlook to show the results of | Inbox Folder, Junk Folder, Drafts Folder, Sent Items Folder etc. |
| From | specify text in the title of the email for Outlook to show the results of | from: Maria or from: maria@outlook.com |
| To | specify a recipient name or email address in the to line for Outlook to show the results of | to: Maria or to: maria@outlook.com |
| CC | specify a recipient name or email address in the cc line for Outlook to show the results of | CC: Maria or CC: maria@outlook.com |
| Subject | specify the date range of the email for Outlook to show the results of | subject: testing |
| Keywords | specify the date range of the email for Outlook to show the results of | keywords: Pre |
| Date from | specify the date range of the email for Outlook to show results of | 7 Feb 2023 to 30 June 2023 |
| Attachments | tick the box for Outlook to show only results with attachments | tick for yes, untick for no |
Step 4: Click the Search button to complete your search.

How to Edit the Microsoft Outlook Advanced Search Filters
You can include additional search filters in the Microsoft Outlook advanced search bar. However, this only works for the Outlook app. Here’s what you should do:
Step 1: Click the drop-down menu at the end of the expanded search bar to display the Advanced Search filters.

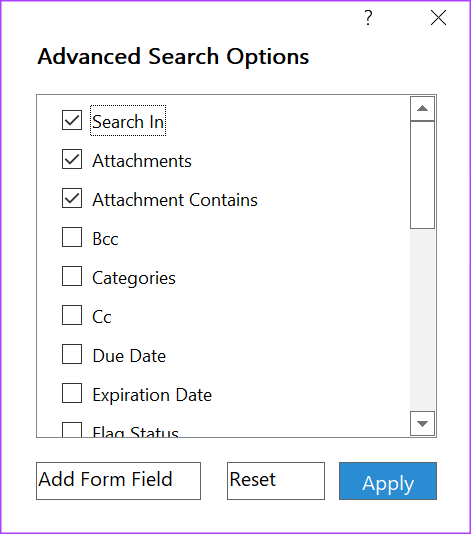
Step 2: Click Add more options at the bottom left of the window to launch the Advanced Search Options dialog box.
Step 3: Now, check the boxes next to your preferred filters.
Step 4: Click Apply to save your changes after selecting your preferred filters.
How to Refine Search Results in Microsoft Outlook Using Search Operators
In Outlook, you can use certain words and symbols to make your search results more precise. These symbols or words are referred to as search operators. Outlook search operators must be in uppercase letters for them to work. Here are a few familiar search operators and when to use them.
AND
The AND search operator is best used when combining search terms in the search bar. This ensures that both keywords are present in the search results. For example, sempre AND search displays results with the words sempre and search.

OR
The OR search operator is best used when combining search terms so that either term appears in the results. For example, sempre OR search displays results that have sempre or search.

“ ”
The “ ” search operator is best used when you want exact results for a word or phrase. For example, “prefix matching” displays search results with the exact word prefix matching.

()
The () search operator is best used to combine search operators. For example, if you want to search for an email containing (sempre OR prefix OR Prem) testing.

How the Microsoft Outlook Search Function Works
For most people, searching in Outlook means entering a keyword in the search bar and hitting enter. The expectation after this action is that the results brought up should have the item searched for. However, below we break how the search function works:
Prefix Matching
When searching with a keyword, it is essential to note that Outlook will search within your mailbox for messages that start with that keyword. If a word ends with that keyword, Outlook may not bring it up as a search result. For example, if you use the keyword ‘pre’ in your search, Outlook will generate results such as ‘Prem,’ ‘preach,’ and ‘prehistoric’. However, words that end or do not start with pre, such as ‘sempre’ or ‘spread,’ will not feature in the results.

Search Scope
When using keywords to search your mailbox, the search range and results do not only include messages in the mail. Outlook will also search and return results that feature the words in the email’s subject, attachments, body, and sender name.

Search Limitations
Outlook has limitations when it comes to producing search results. Only the first 250 search results from your mailbox are shown. In addition, if your search includes numbers and the strings of numbers are less than four digits, Outlook will not produce any results. For example, if you search for a number such as ‘123’, Outlook will not produce any results as it is less than the 4-digit requirement.

Was this helpful?
Last updated on 28 August, 2024
Read Next
 4 Fixes for Google Search Bar or Widget Not Working on Android
Basic Fixes: Restart your phone: Temporary glitches in the Google app can cause the search bar or widget not to work properly.
4 Fixes for Google Search Bar or Widget Not Working on Android
Basic Fixes: Restart your phone: Temporary glitches in the Google app can cause the search bar or widget not to work properly.
 5 Best Ways to Fix Google Search Bar Widget Missing in Android
Google is still the king of search engines.
5 Best Ways to Fix Google Search Bar Widget Missing in Android
Google is still the king of search engines.
 8 Ways to Fix Windows Search Bar Is Missing Issue
Windows 10 came with a lot of tweaks under the hood.
8 Ways to Fix Windows Search Bar Is Missing Issue
Windows 10 came with a lot of tweaks under the hood.
 7 Ways to Fix Can’t Type in Windows 11 Search Bar
Fix 1: Restart the Windows Explorer Process Windows Explorer is a system process that handles the graphical user interface (GUI) for several utilities, including the taskbar.
7 Ways to Fix Can’t Type in Windows 11 Search Bar
Fix 1: Restart the Windows Explorer Process Windows Explorer is a system process that handles the graphical user interface (GUI) for several utilities, including the taskbar.
 How to Add Google Search Bar to Home Screen on Android and iPhone
On Android Step 1: Tap and hold a space on your home screen, and tap on Widgets.
How to Add Google Search Bar to Home Screen on Android and iPhone
On Android Step 1: Tap and hold a space on your home screen, and tap on Widgets.
 How to Use Twitter Advanced Search: The Ultimate Guide
How to Use Twitter's Advanced Search Features Effectively Note: You can use multiple filters at once while doing an advanced search on Twitter.
How to Use Twitter Advanced Search: The Ultimate Guide
How to Use Twitter's Advanced Search Features Effectively Note: You can use multiple filters at once while doing an advanced search on Twitter.
 How to Use the Edge Bar in Microsoft Edge on Windows 11
How to Enable Edge Bar in Microsoft Edge Step 1: Launch Microsoft Edge on your PC > click the three-dot menu icon at the top right > select Settings.
How to Use the Edge Bar in Microsoft Edge on Windows 11
How to Enable Edge Bar in Microsoft Edge Step 1: Launch Microsoft Edge on your PC > click the three-dot menu icon at the top right > select Settings.
 How to Fix Outlook Search Not Working on Mac
Basic Fixes Check your internet speed: When you search from your inbox having numerous email conversations, a good internet connection speeds up the mail search.
How to Fix Outlook Search Not Working on Mac
Basic Fixes Check your internet speed: When you search from your inbox having numerous email conversations, a good internet connection speeds up the mail search.
The article above may contain affiliate links which help support Guiding Tech. The content remains unbiased and authentic and will never affect our editorial integrity.

