Did you ever update your system software only to realize you were better off before the move? You’re not alone. It might be a system-breaking bug, or a lost feature you can’t live without. Rolling back an update is never as easy as installing one, but in this article, we’ll be explaining how to do just that, going from Windows 11 24H2 to 23H2.
New Update, New Features
Microsoft released its 24H2 update for Windows 11 on June 18, 2024. Aside from all the regular cumulative updates and security buffs you expect to see with any OS update, there are also a few new features, including:
- Wi-Fi 7 support
- The addition of Sudo (to run elevated commands)
- HDR background support for monitors
- Bluetooth LE Audio support
Equally important (albeit with less fanfare) is the removal of deprecated features, including:
- The longstanding program WordPad
- Windows Mixed Reality (VR)
- The implementation of open-source communication software, AllJoyn
You might be missing some of the old features or find that the new update doesn’t work well with you or your machine’s hardware. If that’s the case, it’s time to roll back to 23H2.
How to Roll Back Windows 11 24H2 Update
You’re not happy with how the latest Windows update turned out and want to return to the previous system. Unfortunately, the process isn’t simple and will require a clean boot of your operating system. As such, it’s vital to create a backup of all important files, accounts, and login details before proceeding.
Rolling back system software requires that you boot and install a previous version from a USB or external drive. To find the ISO for Windows 11 23H2, you can search online at sites like os.click.
Next, you’ll need to create a bootable USB or DVD (if you have the drive). You can do this through the Diskpart program, or the PowerShell Utility, with scripts that can be found on the Microsoft Site.
Finally, restart your machine and press the required button (usually F2, F11, F12, or Del) to enter the BIOS and boot from your USB or DVD. Choose your USB and the BIOS will boot and install 23H2 back onto your machine.
10-Day Roll Back: For Future Reference
Microsoft has tried to make rolling back software easier for Windows users, offering them 10 days to revert to the previous version of Windows 11 or even Windows 10 if you’re freshly switched. It’ll also keep all files and programs, though it never hurts to create a backup.
It may be too late for you to take advantage of this now, but it’s good to keep it in mind for future updates.
Here’s how to revert to the previous operating system:
Step 1. Open Settings (Win + I) and click “System” on the sidebar.
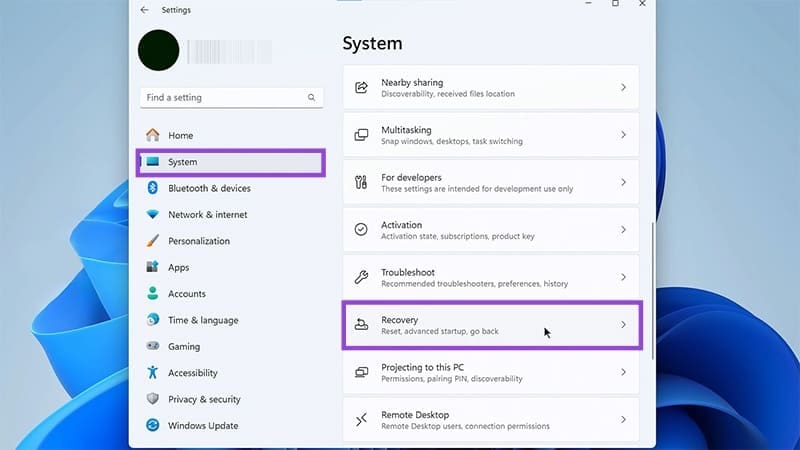
Step 2. On the right panel, select the “Recovery” option.
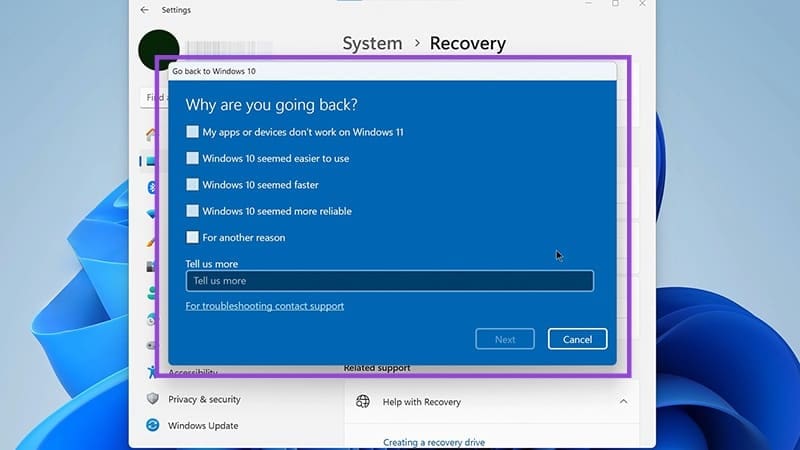
Step 3. Select the “Go Back” option. This will allow you to revert to the last version of the software, be that Windows 10 or 23H2.

Step 4. You’ll be asked to select a reason why you’re reverting for feedback purposes.
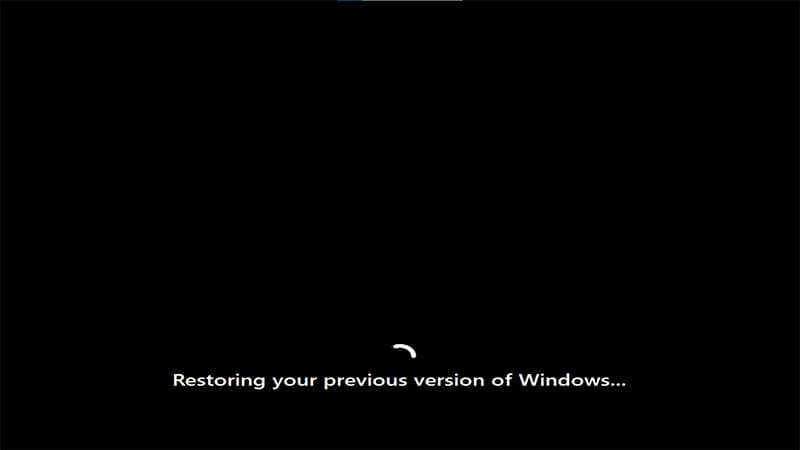
Step 5. Confirm your choice one last time, and the rollback process will then begin. Do not turn off your machine during this time or interrupt the process.
Was this helpful?
Last updated on 14 July, 2025
Read Next
 How to Add Camera Roll Photos (Multiple) to Snapchat Story
How to Add Photos to Your Snapchat Story Before we get started on adding multiple pictures from your camera roll, let us quickly look at how to add a single
How to Add Camera Roll Photos (Multiple) to Snapchat Story
How to Add Photos to Your Snapchat Story Before we get started on adding multiple pictures from your camera roll, let us quickly look at how to add a single
 How to Stop Photos From Messages Saving to iPhone’s Camera Roll
Do your friends spam you with their vacation photos on iMessage?
How to Stop Photos From Messages Saving to iPhone’s Camera Roll
Do your friends spam you with their vacation photos on iMessage?
 4 Best Vacuum Cleaners With Tangle-Free Brush Roll
Vacuum cleaners are one of the best appliances for cleaning floors and upholsteries, especially if you have pets or carpeted floors.
4 Best Vacuum Cleaners With Tangle-Free Brush Roll
Vacuum cleaners are one of the best appliances for cleaning floors and upholsteries, especially if you have pets or carpeted floors.
 3 Ways to Delete Old Windows Update Files From Windows 10 and 11
Method 1: Delete Old Windows Update Files via Settings The Storage section of the Settings app provides a detailed breakdown of all temporary files on your PC, including old Windows
3 Ways to Delete Old Windows Update Files From Windows 10 and 11
Method 1: Delete Old Windows Update Files via Settings The Storage section of the Settings app provides a detailed breakdown of all temporary files on your PC, including old Windows
 5 Best Ways To View Windows Update History In Windows 11
By constantly updating your Windows 11 operating system, you get access to new or improved features to deliver a better user experience.
5 Best Ways To View Windows Update History In Windows 11
By constantly updating your Windows 11 operating system, you get access to new or improved features to deliver a better user experience.
 7 Best Fixes for Windows Update Error 0x800f081f in Windows 11
Microsoft regularly releases Windows updates to introduce new features and fix known issues.
7 Best Fixes for Windows Update Error 0x800f081f in Windows 11
Microsoft regularly releases Windows updates to introduce new features and fix known issues.
 5 Ways to Fix Windows Keeps Installing the Same Update
Fix 1: Run the Windows Update Troubleshooter Whenever you encounter any issues with Windows Updates, you should first run the built-in troubleshooter.
5 Ways to Fix Windows Keeps Installing the Same Update
Fix 1: Run the Windows Update Troubleshooter Whenever you encounter any issues with Windows Updates, you should first run the built-in troubleshooter.
 How to Update Epic Games Launcher and Its Games on Windows
How to Check and Update Epic Games Launcher Epic Games Launcher auto-updates along with its games.
How to Update Epic Games Launcher and Its Games on Windows
How to Check and Update Epic Games Launcher Epic Games Launcher auto-updates along with its games.
The article above may contain affiliate links which help support Guiding Tech. The content remains unbiased and authentic and will never affect our editorial integrity.