Windows Defender is an invaluable tool for keeping your PC safe from harm. Sometimes, though, it might take its job a little too seriously and remove files that you know to be safe. If this has happened to you, the good news is they haven’t been deleted, simply quarantined. In this article, we’ll show you a few ways of how to restore files removed by Windows Defender.
How to Restore Files Removed by Windows Defender
When Windows Defender flags any potentially hazardous files, it automatically quarantines them to prevent any damage to your system and corruption to other data on your machine. If you’re absolutely sure that Defender has flagged a false positive, there are a few ways to recover these files and prevent them from getting quarantined again.
Let’s take a look.
Reclaim Your Files and Folders
The quickest way to retrieve your files is through Windows Defender itself, located in Settings. Before you get started with this method, first ensure you have admin privileges. Here’s what you need to do:
Step 1. Navigate to “Virus & threat protection” in Settings, and then scroll down to “Protection History.”
Step 2. Protection History is where all quarantined files and blocked apps are stored. Click on the one (or more) that you want and confirm the UAC message allowing changes to the computer.
Step 3. Click the “Actions” button and select “Allow” to bring your file, folder, or app back.

Restore a Previous Version in Explorer
A more indirect route to restoring a file is to call back a previous version of it in Windows Explorer, otherwise known as File History. This method also works for files that have been accidentally lost, corrupted, or overwritten. You’ll need to have File History activated for this method to work. If it isn’t, you can easily do so in “Files Backup” in Settings.
Here’s how you can make use of it:
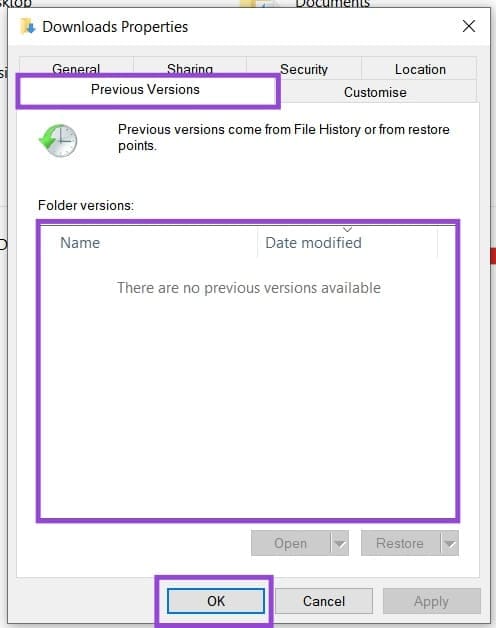
Step 1. In any Windows Explorer window, right-click the folder where your removed file used to be and click “Restore previous versions” in the context menu that pops up.

Step 2. A new window will appear. Choose a previous version of your folder (if there is one) with a date before your file was removed and click “OK.” File History will restore your folder to the way it was.
Preventing Windows Defender From Deleting Files
Prevention beats a cure, and stopping Windows Defender from removing your files (or doing it again) in the first place can be stopped most effectively by adding an Exclusion to your file or folder. Here’s what to do:
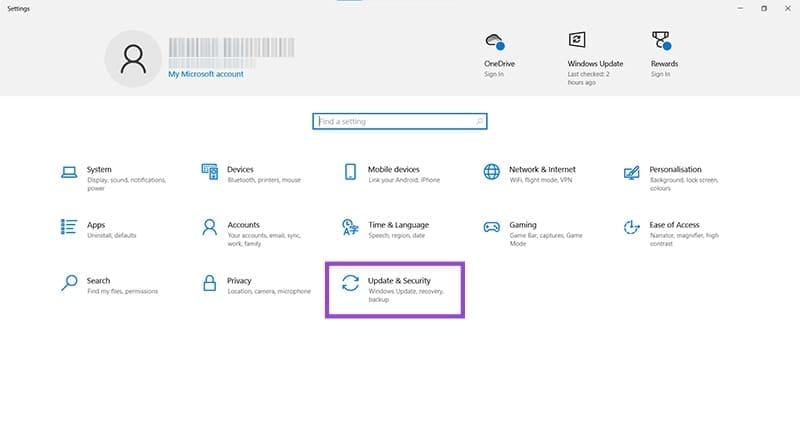
Step 1. Open Settings (Win + I) and click on “Update & Security.”
Step 2. Click on “Windows Security” in the sidebar and then “Virus & threat protection” in the main window.

Step 3. Scroll down to the “Virus & threat protection settings” and click “Manage settings,” highlighted in blue.

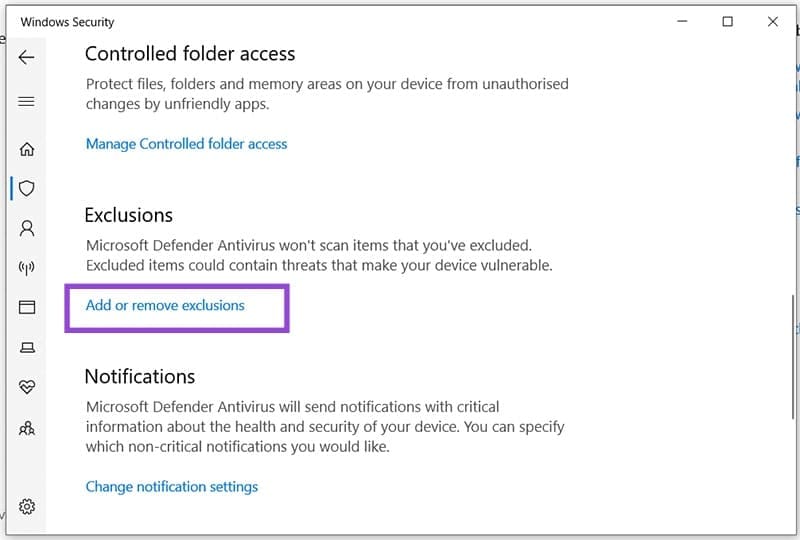
Step 4. Scroll down to the “Exclusions” subsection and click “Add or remove exclusions.”
Step 5. Grant permission to make changes (UAC), and you’ll be taken to the Exclusions window.
Step 6. Click the “Add an exclusion” button and choose the type of exclusion to add from the dropdown list.

Step 7. An Explorer window will open. Choose what you want Windows Defender to ignore and click “Open” (or “Select Folder”) afterwards.
Step 8. Your file or folder should in the exception list should now appear.
Was this helpful?
Last updated on 15 October, 2025
Read Next
 How to Restore Quarantined Items From Windows Defender
Windows Defender (technically named “Windows Security” in Windows 11) remains one of the most reliable built-in antivirus tools and should be sufficient for most users.
How to Restore Quarantined Items From Windows Defender
Windows Defender (technically named “Windows Security” in Windows 11) remains one of the most reliable built-in antivirus tools and should be sufficient for most users.
 How to Prevent Windows Defender From Removing Files
Windows Defender is Microsoft’s built-in way of keeping your computer safe from viruses and malware.
How to Prevent Windows Defender From Removing Files
Windows Defender is Microsoft’s built-in way of keeping your computer safe from viruses and malware.
 How to Know Who Removed You From a Meeting in Microsoft Teams
‘Someone just removed you from the meeting’ — Does that message sound familiar?
How to Know Who Removed You From a Meeting in Microsoft Teams
‘Someone just removed you from the meeting’ — Does that message sound familiar?
 How to See Removed Friends on Snapchat
Whenever we're new to any app, like Snapchat, we end up adding anyone and everyone to our friends list.
How to See Removed Friends on Snapchat
Whenever we're new to any app, like Snapchat, we end up adding anyone and everyone to our friends list.
 How to Use File History to Backup and Restore Files on Windows 11
File History is a useful utility in Windows 11 to back up select files and folders to an external drive automatically.
How to Use File History to Backup and Restore Files on Windows 11
File History is a useful utility in Windows 11 to back up select files and folders to an external drive automatically.
 2 Quick Ways to Schedule Windows Defender Scan
Windows Defender has become integral to the Windows Security suite of tools.
2 Quick Ways to Schedule Windows Defender Scan
Windows Defender has become integral to the Windows Security suite of tools.
 5 Ways to Completely Disable Windows Defender
Method 1: Using Command Prompt Step 1: Press the Windows key on your keyboard, type Command Prompt, and click Run as administrator.
5 Ways to Completely Disable Windows Defender
Method 1: Using Command Prompt Step 1: Press the Windows key on your keyboard, type Command Prompt, and click Run as administrator.
The article above may contain affiliate links which help support Guiding Tech. The content remains unbiased and authentic and will never affect our editorial integrity.