Windows Defender is Microsoft’s built-in way of keeping your computer safe from viruses and malware. But sometimes it automatically removes files that you might know are safe, but have been flagged anyway. This can be extremely frustrating.
Luckily, there are a few ways to curb an overzealous Windows Defender scan, and this article will cover them.
How to Prevent Windows Defender from Removing Files
Whether Windows Defender is deleting files as you download them, or right from under your nose in an Explorer window when you open something up, not being able to prevent the situation can be aggravating. Better safe than sorry isn’t always going to cut it when it comes to deleting problematic files. Try the following solutions to stop this issue:
Add Exclusions in Windows Security
The most straightforward method of preventing file removal is to go straight to the source via Windows Security. If you trust the file or folder that Windows Defender keeps removing, you can add it to an exclusion list. Here’s what to do:
Step 1. Open up Settings (Win + I) and click on “Update & Security.”

Step 2. Click on “Windows Security” in the sidebar and then choose “Virus & threat protection” in the main window.

Step 3. A new window will pop up. Scroll down to the “Virus & threat protection settings” subsection and click on “Manage settings,” highlighted in blue.
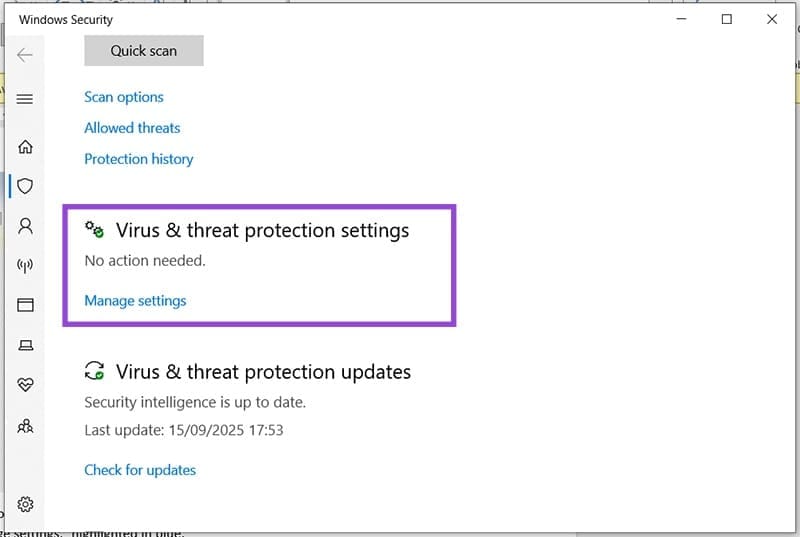
Step 4. In the next screen, navigate down to the “Exclusions” subsection and click “Add or remove exclusions.”

Step 5. Grant permission to make changes if asked, and you’ll be taken to the Exclusions window.
Step 6. Click the “Add an exclusion” button and choose the type of exclusion to add from the dropdown list.

Step 7. An Explorer window will open. Navigate to the file, folder, etc. that you want to exclude from removal and click “Open” (or “Select Folder”) once done.
Step 8. Your file or folder should now show up (along with its network path) in the exception list.
Reclaim Your Files and Folders
Windows Defender doesn’t delete the files it removes, but rather quarantines them to limit their potential impact. You can restore these files and folders at any time. Here’s how:
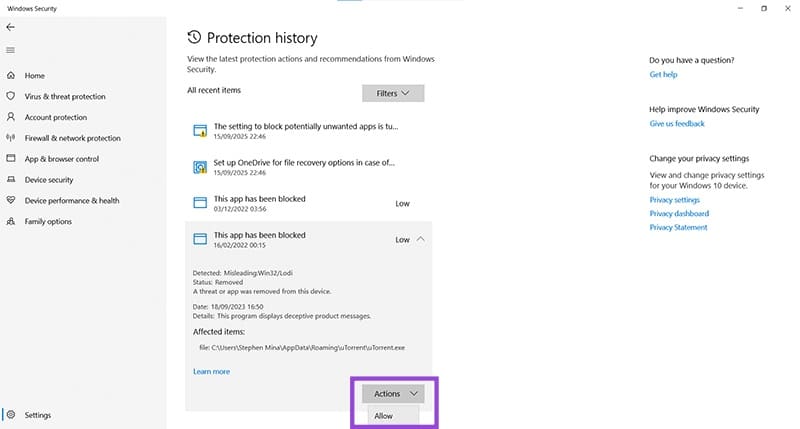
Step 1. Navigate to “Virus & threat protection” in Settings, and then to “Protection History.”
Step 2. You’ll see a list of blocked apps and removed files. Click on the one you want and confirm the UAC message allowing changes to the computer.
Step 3. Click the “Actions” button on your item and select “Allow” to bring your item back.
Disable Storage Sense
While it’s not Windows Defender, Storage Sense is a feature that will remove files and folders to free up storage space. This is limited to the Recycle Bin and deletes things automatically after 30 days. If, however, you are terrified that you might need a file back, you can easily disable this feature. Here’s how to do so:
Step 1. Open Settings (Win + I) and choose “System.”
Step 2. In the sidebar, click the “Storage” option.
Step 3. Your PC will calculate available space for display. Above these stats, you’ll see the “Storage Sense” slider. Ensure that it’s dragged to “Off.”
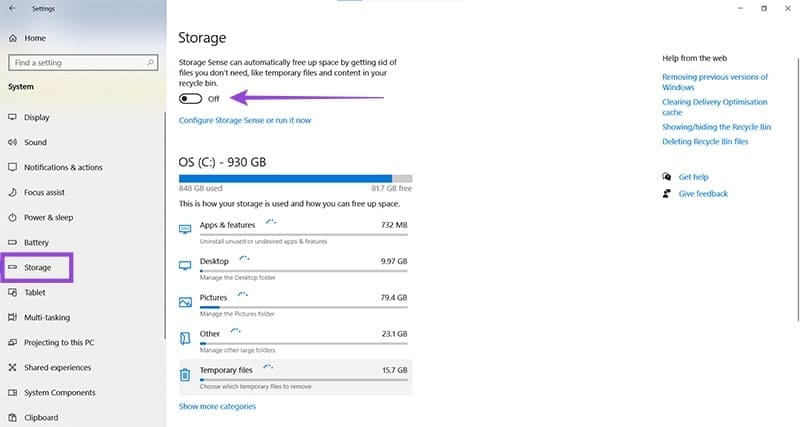
Step 4. All files that make their way into the Recycle Bin should now stay there until you delete them yourself.
Was this helpful?
Last updated on 17 September, 2025
Read Next
 5 Reasons Why Microsoft is Removing ReFS from Windows
Reasons Why Microsoft is Removing ReFS from Windows 1.
5 Reasons Why Microsoft is Removing ReFS from Windows
Reasons Why Microsoft is Removing ReFS from Windows 1.
 How to Prevent Battery Drain When Windows Laptop Lid Is Closed
Common Fixes Unplug external devices: Disconnect all plugged-in devices (e.g., USB devices, external hard drives, etc.) to prevent them from waking up the laptop when the lid is closed.
How to Prevent Battery Drain When Windows Laptop Lid Is Closed
Common Fixes Unplug external devices: Disconnect all plugged-in devices (e.g., USB devices, external hard drives, etc.) to prevent them from waking up the laptop when the lid is closed.
 3 Ways to Prevent Users From Installing New Software on Windows 11
Method 1: Turn Off Windows Installer via Group Policy The Group Policy Editor on Windows lets you make various administrative-level changes.
3 Ways to Prevent Users From Installing New Software on Windows 11
Method 1: Turn Off Windows Installer via Group Policy The Group Policy Editor on Windows lets you make various administrative-level changes.
 How to Prevent Users From Running Certain Programs on Windows 11
Method 1: Prevent Users From Running Certain Programs via the Group Policy Editor The Local Group Policy Editor on Windows makes it easy to apply system-wide changes on a computer.
How to Prevent Users From Running Certain Programs on Windows 11
Method 1: Prevent Users From Running Certain Programs via the Group Policy Editor The Local Group Policy Editor on Windows makes it easy to apply system-wide changes on a computer.
 2 Quick Ways to Schedule Windows Defender Scan
Windows Defender has become integral to the Windows Security suite of tools.
2 Quick Ways to Schedule Windows Defender Scan
Windows Defender has become integral to the Windows Security suite of tools.
 5 Ways to Completely Disable Windows Defender
Method 1: Using Command Prompt Step 1: Press the Windows key on your keyboard, type Command Prompt, and click Run as administrator.
5 Ways to Completely Disable Windows Defender
Method 1: Using Command Prompt Step 1: Press the Windows key on your keyboard, type Command Prompt, and click Run as administrator.
The article above may contain affiliate links which help support Guiding Tech. The content remains unbiased and authentic and will never affect our editorial integrity.