How to Put Apps to Sleep on Samsung Galaxy Phones
One UI lets you put apps in Sleep or Deep Sleep state to limit their background activities. Putting an app to sleep allows it to run occasionally in the background, while the deep sleep state stops the app from running in the background altogether.
Here’s how to put apps to sleep or deep sleep state on your Galaxy phone.
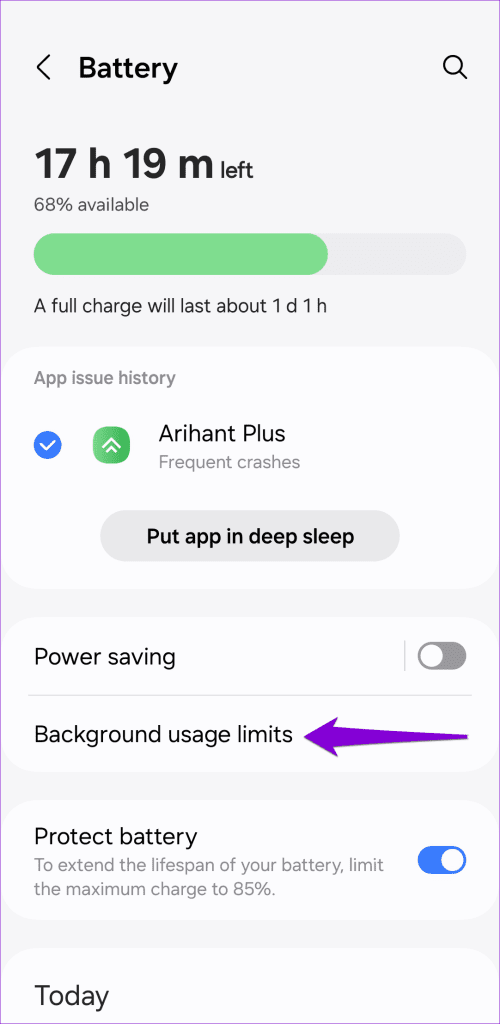
Step 1: Open the Settings app > navigate to Battery > Background usage limits.

Step 2: Select Sleeping apps or Deep sleeping apps.
Step 4: Tap the plus icon at the top right. Check the boxes for the apps you want to put to sleep and tap Add.


What Happens When You Put an App to Sleep?
The outcome of putting an app to sleep varies depending on your chosen sleeping state. For instance, if you add an app to the “Sleeping” list, One UI will optimize its battery usage and only allow it to check for updates occasionally. As a result, notifications from that app may be delayed on your Samsung phone.
On the other hand, when you put an app in a Deep sleeping state, One UI restricts its background battery usage entirely. This prevents the app from syncing data or using any of your phone’s resources when you’re not using it. This can cause the app notifications to stop working on your Galaxy phone.
How to Prevent Apps From Sleeping on Samsung Galaxy Phone
By default, your Samsung phone is configured to add apps to the Sleeping or Deep sleeping states based on your usage. While this helps improve your phone’s battery life, One UI may put your important apps to sleep if you haven’t used them. You can stop apps from sleeping on your Galaxy phone if you don’t want that.
Step 1: Open the Settings app > navigate to Battery > Background usage limits.
Step 2: Disable the toggle for Put unused apps to sleep. This will stop One UI from putting apps to sleep automatically.
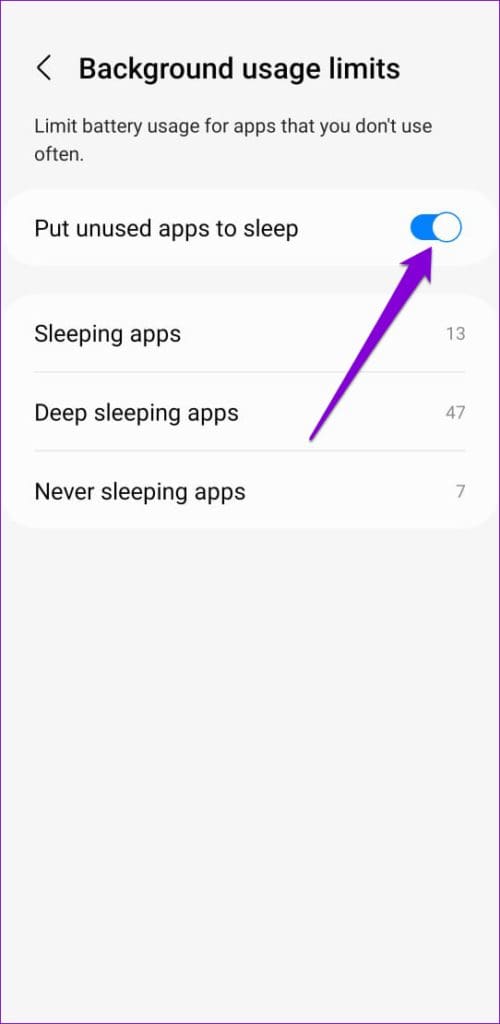


Alternatively, you can add important apps to the Never sleeping apps list. Once you do, One UI won’t put those apps to sleep even if you don’t use them.
Was this helpful?
Last updated on 09 August, 2024
1 Comment
Leave a Reply
Read Next
 How to Stop iPhone From Turning Off, Sleeping, or Locking Automatically
Basic Fixes Restart Device: You can try restarting your device to see if it fixes the problem.
How to Stop iPhone From Turning Off, Sleeping, or Locking Automatically
Basic Fixes Restart Device: You can try restarting your device to see if it fixes the problem.
 How to Enable Sleeping Tabs in Google Chrome
Method 1: Enable Sleeping Tabs Using Memory Saver Step 1: Open Google Chrome and click on three vertical dots.
How to Enable Sleeping Tabs in Google Chrome
Method 1: Enable Sleeping Tabs Using Memory Saver Step 1: Open Google Chrome and click on three vertical dots.
 How to Manage OneDrive on Samsung Galaxy Phones
Setup OneDrive on Your Samsung Phone To start syncing, sign in with your OneDrive account in the Gallery app.
How to Manage OneDrive on Samsung Galaxy Phones
Setup OneDrive on Your Samsung Phone To start syncing, sign in with your OneDrive account in the Gallery app.
 Top 7 Ways to Fix Samsung Galaxy Phone Connected to Wi-Fi But No Internet
Most Samsung Galaxy phone users prefer a robust Wi-Fi connection to download large apps, games, TV shows, movies, and playlists from the likes of Netflix, Disney Plus, and Spotify.
Top 7 Ways to Fix Samsung Galaxy Phone Connected to Wi-Fi But No Internet
Most Samsung Galaxy phone users prefer a robust Wi-Fi connection to download large apps, games, TV shows, movies, and playlists from the likes of Netflix, Disney Plus, and Spotify.
 3 Ways to Fix Samsung Galaxy Phone Not Charging
https://youtu.be/tAdDbG829DU Basic Fixes: Wait for some time: After a heavy gaming session or a big update on your Samsung Galaxy phone, the device can heat up a little.
3 Ways to Fix Samsung Galaxy Phone Not Charging
https://youtu.be/tAdDbG829DU Basic Fixes: Wait for some time: After a heavy gaming session or a big update on your Samsung Galaxy phone, the device can heat up a little.
 4 Ways to Fix Samsung Galaxy Phone Not Charging After 80 or 85 Percent
https://youtu.be/jIQ1_jjmQec Why Samsung Limits the Phone Charge to 80 or 85 Percent?
4 Ways to Fix Samsung Galaxy Phone Not Charging After 80 or 85 Percent
https://youtu.be/jIQ1_jjmQec Why Samsung Limits the Phone Charge to 80 or 85 Percent?
 5 Ways to Fix Samsung Galaxy Phone Not Receiving Calls
https://youtu.be/oL3QSdMsT3o Basic Fixes: Restart your phone: Long-press the power button and select Restart.
5 Ways to Fix Samsung Galaxy Phone Not Receiving Calls
https://youtu.be/oL3QSdMsT3o Basic Fixes: Restart your phone: Long-press the power button and select Restart.
 3 Fixes for Black Screen of Death on Samsung Galaxy Phone
Try Basic Fixes Force restart your phone: Press and hold the power button (or side button) and volume down button simultaneously until the device turns off and the Samsung logo
3 Fixes for Black Screen of Death on Samsung Galaxy Phone
Try Basic Fixes Force restart your phone: Press and hold the power button (or side button) and volume down button simultaneously until the device turns off and the Samsung logo
The article above may contain affiliate links which help support Guiding Tech. The content remains unbiased and authentic and will never affect our editorial integrity.
My Alcatel Joy tab 2 is not working right now and someone has hacked my tablet