If you can’t delay upgrading Windows 10 to Windows 11 any longer, you might be worried about all the extra programs that were added to help you navigate the operating system. Most of these diagnostic options eventually end up tracking your data and sending a part of it to Microsoft. While you can’t remove every single piece of software that monitors your device, here’s how to clean install Windows 11 without bloatware.
Option 1: How to Clean Install Windows 11 Without Bloatware with Open-Source Flyoobe
The Flyoobe open-source repository extends the traditional Windows 11 installer by customizing the settings of the ISO file before it’s installed.
Step 1. Download Flyoobe from the GitHub repository (choose the latest version of Flyoobe).

Step 2. Your browser will download a “FlyoobeApp” zip file. Extract it to whatever folder you want, then open the “Flyo.exe” application.

Step 3. In the app, you can choose the “Upgrade” section if you’re running Windows 10 and need to upgrade. Otherwise, you can go to the “Reinstall” section.
Step 4. If you want to perform a clean reinstall and wipe your data, you can download the Windows 11 ISO file from the official website.
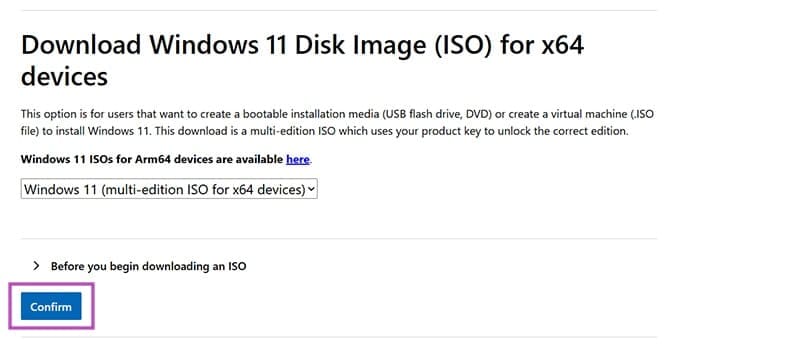
Step 5. Choose the type of installation you want. The “Rufus” or “Media Creation Tool” options will usually net you the best results. Then, click the “Start Setup” button on the top-right.

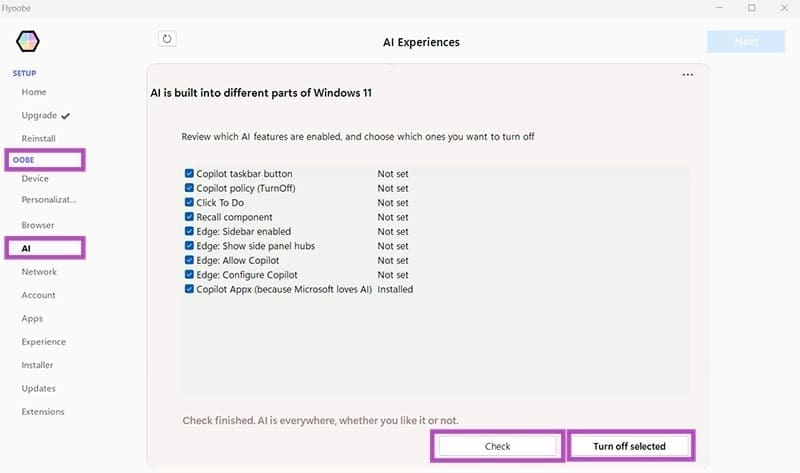
Step 6. In the “OOBE” section, go through every option, then check or uncheck which services you need. In particular, you can go to the “AI” section, click the “Check” button, check every option and select “Turn off Selected.”
Step 7. Once you go through the “Extensions” tab, you should get a “Finish” button on the top-right, which starts the process you need.
From here on out, the process will depend on what exactly you did. If you chose the ISO + Rufus option, the installation media will be created, which you’ll need to mount onto a USB, then use that USB to install Windows like you normally would.
During installation, disable the internet and use a local Microsoft account instead of tying the system to a Microsoft account. You will be able to reconnect it to your existing Windows 10 license later.
Option 2: How to Clean Install Windows 11 Without Bloatware with Tiny11 Open-Source Utility
If you want to go a step further, you can remove pretty much everything that Windows uses to connect to various services. This allows you to start essentially from scratch (you do get Microsoft Store to download a browser).
Step 1. Download the Windows 11 ISO from the website.
Step 2. Right-click on the ISO file and select “Mount.” This will display it as a virtual CD drive in the “This PC” screen. Note the drive letter (C, D, E, F, or so on).
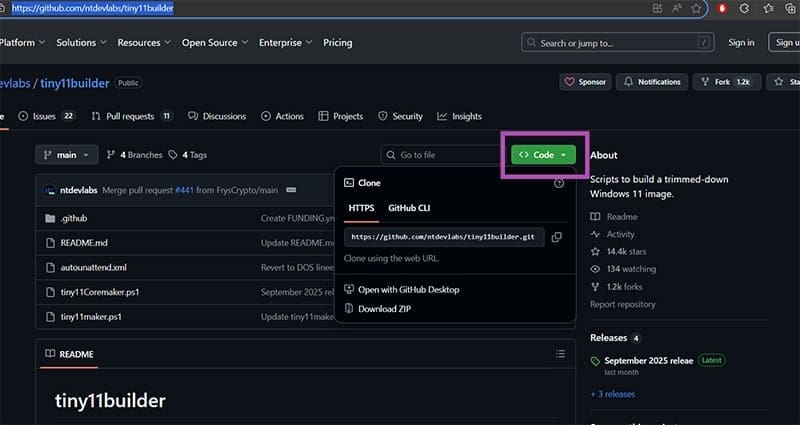
Step 3. Download the Tiny11 utility from the GitHub page. Use the “Code” button and select “Download ZIP.”
Step 4. Extract that folder to anywhere on the PC where you can find the address easily.
Step 5. Search for “PowerShell” in the search bar and click “Run as administrator.”
Step 6. Paste in the following command and hit “Enter:”
Set-ExecutionPolicy unrestricted
Step 7. You’ll be prompted with a set of changes this will do. Type in “A” and hit “Enter.” You can undo this later with: Set-ExecutionPolicy restricted

Step 8. Close the PowerShell screen.
Step 9. Go to the unzipped folder and right-click on the “tiny11maker.ps1” file, then select “Run with PowerShell.”

Step 10. Enter the drive letter for the mounted ISO file.
Step 11. Choose the Windows 11 version that you have a license for (usually the same as the Windows 10 version you had). You’ll need to type in the number for the corresponding version.
Step 12. Tiny11 will finish the script and create a new “Tiny11” ISO file. Mount this using Rufus or other mounting software onto a bootable USB, then install it as usual.
Was this helpful?
Last updated on 03 October, 2025
Read Next
 How to Remove Bloatware in Windows 11
Many devices come with a range of applications installed by default.
How to Remove Bloatware in Windows 11
Many devices come with a range of applications installed by default.
 How to Download and Install NVIDIA Drivers Without GeForce Experience
Prerequisite 1: Check Which NVIDIA GPU You Have First, you need to check which NVIDIA graphics card you have installed on your system.
How to Download and Install NVIDIA Drivers Without GeForce Experience
Prerequisite 1: Check Which NVIDIA GPU You Have First, you need to check which NVIDIA graphics card you have installed on your system.
 How to Install Linux on Windows for Dual Booting or Avoiding Windows 11
If you’re still on the fence about upgrading from Windows 10 to Windows 11 due to the increased number of apps that constantly track and share your information, you might
How to Install Linux on Windows for Dual Booting or Avoiding Windows 11
If you’re still on the fence about upgrading from Windows 10 to Windows 11 due to the increased number of apps that constantly track and share your information, you might
 2 Easy Ways to Install Fonts in Windows 11
While Windows 11 has gotten a major overhaul, that has not impacted the default fonts currently available.
2 Easy Ways to Install Fonts in Windows 11
While Windows 11 has gotten a major overhaul, that has not impacted the default fonts currently available.
 4 Ways to Fix Unable to Install Drivers on Windows 11
Try Basic Fixes Install Windows updates: The driver installation issue may be limited to your Windows build.
4 Ways to Fix Unable to Install Drivers on Windows 11
Try Basic Fixes Install Windows updates: The driver installation issue may be limited to your Windows build.
 Windows 11: How to Fix Install Error 0x80070103
Fix 1: Pause and Resume Windows Updates Windows update install error 0x80070103 arises during the installation of updates when your system detects incompatible drivers or conflicting software.
Windows 11: How to Fix Install Error 0x80070103
Fix 1: Pause and Resume Windows Updates Windows update install error 0x80070103 arises during the installation of updates when your system detects incompatible drivers or conflicting software.
 How to Install the RAM on Your Windows Laptop
How to Upgrade Your Laptop’s RAM If your laptop has an extra RAM slot, you can easily use it to upgrade its current RAM capacity.
How to Install the RAM on Your Windows Laptop
How to Upgrade Your Laptop’s RAM If your laptop has an extra RAM slot, you can easily use it to upgrade its current RAM capacity.
 How to Install the Google Play Store in Windows 11
With the previous Windows versions, the easiest way to use native Android apps on the PC was to download an emulator like BlueStacks.
How to Install the Google Play Store in Windows 11
With the previous Windows versions, the easiest way to use native Android apps on the PC was to download an emulator like BlueStacks.
The article above may contain affiliate links which help support Guiding Tech. The content remains unbiased and authentic and will never affect our editorial integrity.

