VirtualBox is Windows 11’s great way to run numerous operating systems (even at the same time) right from the comfort of your PC. This virtual sandbox has a lot of benefits, but some hiccups too, as described in the headline of this article – VirtualBox: change Windows resolution. If you’re wondering how to do this, we’ll get you sorted out ASAP.
VirtualBox – Change Windows Resolution in These Ways
VirtualBox is a graphics and performance-heavy app. Resolution troubles on operating systems running inside it are usually caused by the lack of advanced graphics drivers that these OSs lack, leaving you with smaller resolutions that harken back to the days of CRT monitors. Thankfully, there are ways to fix this, and we have them below:
Insert Guest Additions
If you can’t change Windows resolution in VirtualBox, even when going full screen, a good first step is to install Guest Additions. Here’s how:
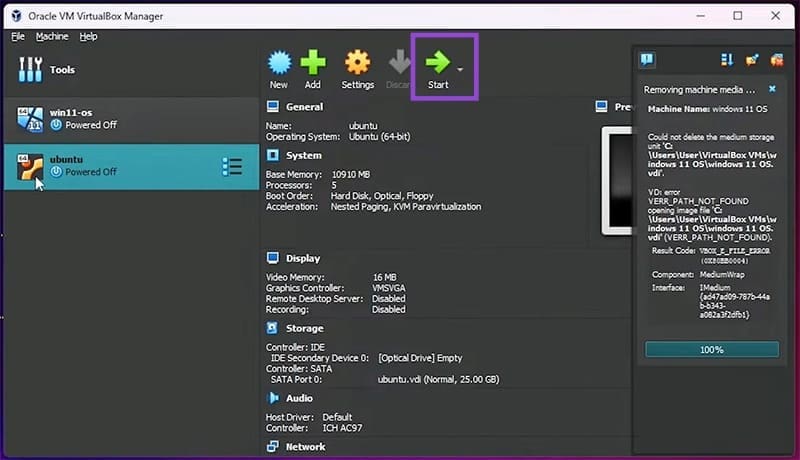
Step 1. Open VirtualBox, select your operating system, and click the “Start” button.
Step 2. Once started up, click “Devices” in the menu bar, then “Insert Guest Additions CD Image.”
Step 3. Then, in the virtual operating system, open an Explorer window and head to “This PC” in the sidebar.
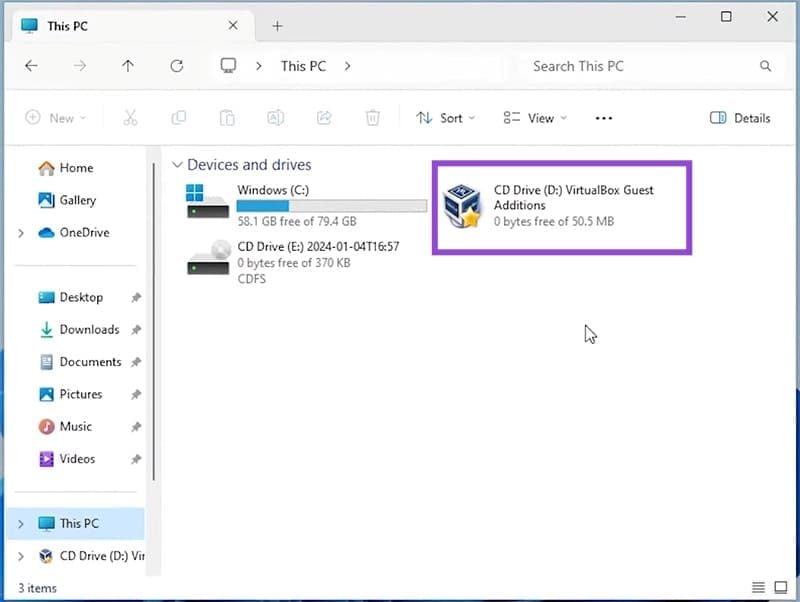
Step 4. Double-click the “VirtualBox Guest Additions” icon.
Step 5. Scroll down to the Application files. Choose the one that matches your virtual operating system and right-click it, selecting “Run as Administrator.”

Step 6. The wizard will take you through the installation steps. Screen flickering is perfectly normal (it is a graphics driver addition after all) and should be resolved when finished installing.
Step 7. Once done, manually reboot your operating system inside VirtualBox.
Step 8. Once rebooted, click on “View” in the menu bar, then click “Full Screen.”
Step 9. Click “Switch” to confirm, and your resolution should be changed.

Force Things With Command Prompt
If VirtualBox isn’t cooperating or you have a custom resolution in mind, you can force things along with Command Prompt. Here’s how:
Step 1. Open the Run Dialog (Win + R) on your host machine and type “cmd” before hitting (Ctrl + Shift + Enter) to run as Administrator.
Step 2. In Command Prompt, type “VBoxManage setextradata “[VM name]” CustomVideoMode1 1920x1080x32” and hit “Enter.”
Step 3. Boot up your VM and head to the Display settings. The resolution you entered should be an option.
Configure the Graphics Controller
Another area that might be hindering you from a VirtualBox change resolution, Windows 11, is the graphics controller. Older controllers like “VBoxVGA” will be at odds with running newer operating systems like Windows 11. To change this:
Step 1. Close your operating system on VirtualBox.
Step 2. Click your VM in the sidebar and select “Settings.”
Step 3. In the window that pops up, navigate to the “Display” section in the side panel.
Step 4. In the main window, ensure your video memory is set to the highest possible.

Step 5. Click the “Graphics Controller” dropdown and select a different one. “VBoxSVGA” is a good controller for operating systems like Windows 11.
Step 6. Click “OK” to finalize and boot up your VM again.
Was this helpful?
Last updated on 23 December, 2025
Read Next
 How to Install Windows 11 on VirtualBox: The Ultimate Guide
How to Enable Virtualization on Windows 11 Enabling virtualization on Windows typically involves going into the BIOS or UEFI settings and enabling support, which may vary depending on your PC's
How to Install Windows 11 on VirtualBox: The Ultimate Guide
How to Enable Virtualization on Windows 11 Enabling virtualization on Windows typically involves going into the BIOS or UEFI settings and enabling support, which may vary depending on your PC's
 How to Install VirtualBox on Windows 11 and 10
Prerequisites for Installing VirtualBox on Windows CPU: x86-compatible hardware (most modern Intel and AMD CPUs are supported) RAM: The minimum requirement of the host operating system (Windows 11: 4GB) plus
How to Install VirtualBox on Windows 11 and 10
Prerequisites for Installing VirtualBox on Windows CPU: x86-compatible hardware (most modern Intel and AMD CPUs are supported) RAM: The minimum requirement of the host operating system (Windows 11: 4GB) plus
 Top 5 Ways to Fix Screen Resolution Setting Grayed Out Problem on Windows 10
Whether you’ve plugged in a new monitor or trying to improve the video performance, tweaking your screen resolution to the right settings is the key to a better viewing experience.
Top 5 Ways to Fix Screen Resolution Setting Grayed Out Problem on Windows 10
Whether you’ve plugged in a new monitor or trying to improve the video performance, tweaking your screen resolution to the right settings is the key to a better viewing experience.
 How to Fix Display Resolution Greyed out on Windows 11
Basic Fixes: Restart the computer: Rebooting is effective because minor bugs may trigger the problem, and a reboot often kills the problematic services or processes.
How to Fix Display Resolution Greyed out on Windows 11
Basic Fixes: Restart the computer: Rebooting is effective because minor bugs may trigger the problem, and a reboot often kills the problematic services or processes.
 How to Check Video Resolution on Windows and Android
In the world of high definition content, quality is the king.
How to Check Video Resolution on Windows and Android
In the world of high definition content, quality is the king.
 How to Change Screen Resolution in Windows 11
Method 1: Using Windows 11 Settings Menu In Windows 11, you can control or change almost every feature and option using the Settings menu.
How to Change Screen Resolution in Windows 11
Method 1: Using Windows 11 Settings Menu In Windows 11, you can control or change almost every feature and option using the Settings menu.
 3 Ways to Adjust Resolution for Second Display on Mac
https://youtu.be/62dyX2dyuUw Method 1: Tweak Display Scaling Level for External Monitor If you don’t want to deal with third-party apps, you can tweak the display with these simple steps.
3 Ways to Adjust Resolution for Second Display on Mac
https://youtu.be/62dyX2dyuUw Method 1: Tweak Display Scaling Level for External Monitor If you don’t want to deal with third-party apps, you can tweak the display with these simple steps.
 3 Best Ways to Fix Keyboard Backlight Not Working on Windows 10 and Windows 11
Try Basic Fixes Toggle the keyboard backlight using the hotkey: You can use a key combination to quickly enable or disable the keyboard backlight on your Windows 11 PC.
3 Best Ways to Fix Keyboard Backlight Not Working on Windows 10 and Windows 11
Try Basic Fixes Toggle the keyboard backlight using the hotkey: You can use a key combination to quickly enable or disable the keyboard backlight on your Windows 11 PC.
The article above may contain affiliate links which help support Guiding Tech. The content remains unbiased and authentic and will never affect our editorial integrity.