The GUID Partition Table (GPT) is a key part of the startup process, storing the partition layout and disk information that UEFI firmware and Windows use during the boot process. If, for whatever reason, it is detected as corrupted, then you’ll get an error message and the boot won’t continue. It might seem alarming, but in this article we’ll provide some troubleshooters to GPT Header Corruption in Windows 11.
What Causes This Error

When starting up your PC, UEFI checks all the system components and hardware for information. GPT provides disk information. If corruption is detected in the GPT header or partition table, Windows or the firmware may be unable to locate the required boot partitions, preventing the system from booting. What causes this error, though? Major culprits are:
- An improper or sudden shutdown
- Corruption of the disk or malware
- A failing hard drive
- Faulty connections or cables
- Improper UEFI settings
The good news is that this message doesn’t always mean the end of the world or major data loss. Let’s take a look at the troubleshooters.
How to Fix GPT Header Corruption in Windows 11
If GPT corruption has been detected, Windows 11 provides a few ways to address the problem:
Change Boot Order
The boot order decides which drive, external or not, your PC uses to start up. An incorrect boot order may result in a GPT header error, meaning you might need to change things. Here’s how:
Step 1. Restart your machine and press the special key that takes you to the BIOS or UEFI. This varies by manufacturer and is usually a Function, Delete, or Escape key.
Step 2. While each BIOS or UEFI menu is different, try to find a “Boot” section, or something similar.
Step 3. Look for the Boot order section. You’ll see a numbered list of devices to boot from. Choose your “Windows Boot Manager” and move it to the top spot.

Step 4. Save your changes and exit. Restart and see if this resolves the problem.
Check Your Hard Drive Connection
It could be that your system hard drive isn’t being detected. Check that all connecting cables and the power supply (especially the SATA cable) are properly connected. In addition, disconnect all other external storage devices to prevent possible conflict.
Fix With Win RE
If you can access the desktop after the error message (it can happen after a restart) then restart your PC into recovery mode (RE) with Shift + Restart. If you can’t, performing a forced shutdown three or four times when starting up Windows should be enough.
You can start by checking the status of your drive with the CHKDSK command:
Step 1. Head to “Advanced options” and choose “Command Prompt.”

Step 2. Type “chkdsk c: /f /r” into the prompt (“c” is your OS drive, “f” is “fix,” and “r” is recover).
Step 3. Click “Enter.” You’ll be told the volume is in use. Type “Y” and hit Enter to begin the scan. Once done, restart your machine and see if the problem resolves.
If the GPT is intact but the boot configuration is damaged, rebuilding the BCD may resolve boot errors. Simply type “bootrec /rebuildbcd” then hit “Enter” and let the process run.
If the partition table is beyond repair and you’ve backed up your data, you can erase the drive and create a new GPT partition table using DiskPart. Keep in mind, this will wipe data, so only use it if files aren’t critical:
Step 1. In Command Prompt, type “diskpart” and hit “Enter “to begin.
Step 2. Type “Listdisk” and hit “Enter,” then select your disk with “Select disk [#]” and hit “Enter.”
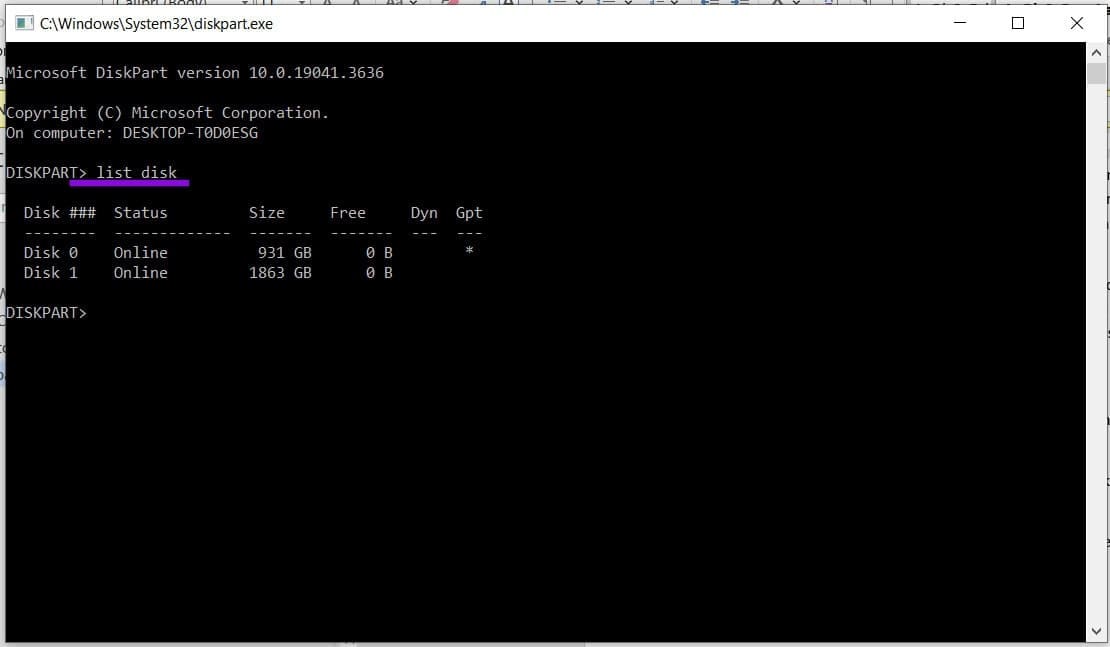
Step 3. Clean all partitions and wipe data by typing “clean” and hitting “Enter.”
Step 4. Then convert to GPT with “convert gpt” and hit “Enter.”
Step 5. From here, you can create new partitions. Type “Exit” to leave DiskPart before restarting.
Was this helpful?
Last updated on 16 July, 2026
Read Next
 6 Best Ways to Fix Store Data Structure Corruption on Windows 10
The BSOD or blue screen of death is one of the most dreaded errors on a Windows PC.
6 Best Ways to Fix Store Data Structure Corruption on Windows 10
The BSOD or blue screen of death is one of the most dreaded errors on a Windows PC.
 How to Make Excel Tables With Multiple Header Rows Easier to Use
Sometimes we complicate our lives, and that includes Excel spreadsheets.
How to Make Excel Tables With Multiple Header Rows Easier to Use
Sometimes we complicate our lives, and that includes Excel spreadsheets.
 How to Create a Different Header and Footer for Each Page in Google Docs
Add Different Headers and Footers for Pages in Google Docs First, you must add a section break and cut the link between successive sections by unchecking the 'Link to previous'
How to Create a Different Header and Footer for Each Page in Google Docs
Add Different Headers and Footers for Pages in Google Docs First, you must add a section break and cut the link between successive sections by unchecking the 'Link to previous'
 2 Ways to Fix Discord Not Opening on Windows 10 and Windows 11
Try Basic Fixes End Discord processes: Press Ctrl + Shift + Esc to launch the Task Manager.
2 Ways to Fix Discord Not Opening on Windows 10 and Windows 11
Try Basic Fixes End Discord processes: Press Ctrl + Shift + Esc to launch the Task Manager.
 7 Ways to Fix Windows Key Not Working in Windows 11
Basic Fixes Check for physical damage: There might be physical damage or dirt buildup on your keyboard.
7 Ways to Fix Windows Key Not Working in Windows 11
Basic Fixes Check for physical damage: There might be physical damage or dirt buildup on your keyboard.
 4 Ways to Fix Firefox Not Opening on Windows 10 and Windows 11
Fix 1: Force Close Firefox Processes Sometimes, Firefox processes may become unresponsive on your PC, resulting in such issues.
4 Ways to Fix Firefox Not Opening on Windows 10 and Windows 11
Fix 1: Force Close Firefox Processes Sometimes, Firefox processes may become unresponsive on your PC, resulting in such issues.
 6 Ways to Fix Print Spooler Keeps Stopping on Windows 10 and Windows 11
Fix 1: Run Printer Troubleshooter Windows comes with a dedicated printer troubleshooter that can automatically diagnose and fix any printing issues on your PC.
6 Ways to Fix Print Spooler Keeps Stopping on Windows 10 and Windows 11
Fix 1: Run Printer Troubleshooter Windows comes with a dedicated printer troubleshooter that can automatically diagnose and fix any printing issues on your PC.
 Windows Focus Assist (Windows 11) Keeps Turning On – How to Fix It
Usually, not getting notifications while you’re hard at work is a good thing.
Windows Focus Assist (Windows 11) Keeps Turning On – How to Fix It
Usually, not getting notifications while you’re hard at work is a good thing.
The article above may contain affiliate links which help support Guiding Tech. The content remains unbiased and authentic and will never affect our editorial integrity.