Caps Lock is one of the most used keys on a keyboard that lets you type in capital letters without holding down the Swift key. However, sometimes this key can be reversed, causing irritation and confusion. This problem usually arises due to outdated keyboard drivers, filter keys, or corrupt system files.

If your keyboard is typing in all caps even when the Caps Lock key is off, then you’ve come to the right place. In this article, we’ll explore ways to fix reversed caps lock in Windows 11. So, let’s begin.
1. Try Basic Repairs
Whether your mouse is not working or you’re facing problems with your keyboard, it’s a good idea to restart your computer. That can often resolve temporary bugs or glitches causing the problem. After restart, check if you’re still facing the issue.
Sometimes, the problem can occur due to faulty connections. To fix this, remove the keyboard’s USB cable from your computer, wait for a few seconds, and plug it back in. If you are using a bluetooth keyboard, disconnect and pair it back again and check if it resolves the problem.
If the Caps Lock key is stuck, it will work in reverse order. To check for this possibility, follow these steps:
Step 1: Press the Windows key to open the Start Menu.
Step 2: Type On-Screen Keyboard in the search bar and press Enter.

Step 3: In the On-Screen Keyboard, check the Caps Lock key. If it’s in blue, it means the key is stuck.
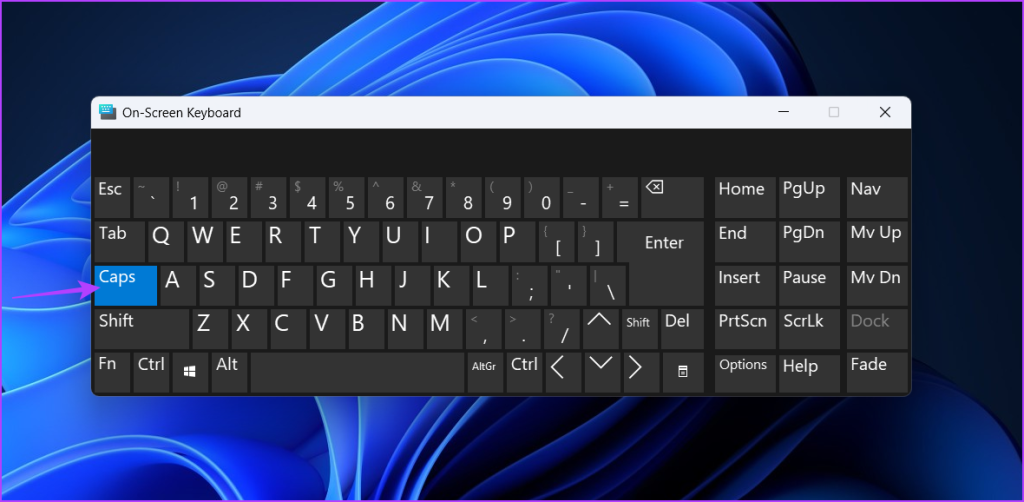
Try clicking multiple times on the On-Screen Keyboard’s Caps Lock key and check if it turns off. If that doesn’t help, take your physical keyboard and try cleaning the area around the Caps Lock key using a a microfiber cloth. However, if you do not feel confident in doing this yourself, it’s best to take the keyboard to a repair shop.
2. Use the Keyboard Troubleshooter
Windows comes with a keyboard troubleshooter that you can use to eliminate any keyboard-related issues, including the one at hand. You can access and use the keyboard troubleshooter by following these steps:
Step 1: Press the Windows + I keyboard shortcut to open the Settings app.
Step 2: Choose System from the left sidebar and Troubleshoot from the right pane.

Step 3: Select Other troubleshooters.

Step 4: Click the Run button next to the Keyboard.
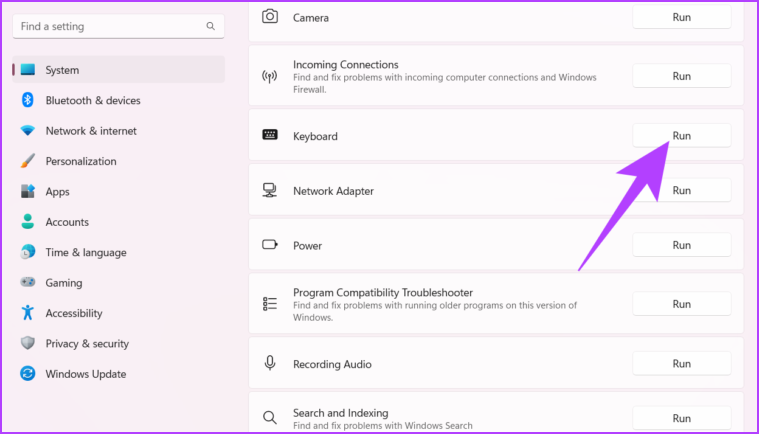
The keyboard troubleshooter window will open and look for any available issues. If it finds any, it will automatically resolve it without much user input. However, if it fails to detect any problem, it’s time to disable filter keys.
3. Turn Off Filter Keys
Filter keys are an incredible Windows feature that prevents the keyboard from responding to brief or repeated keystrokes. This feature is helpful to users who are suffering from motor impairments.
However, it may cause problems with the Caps Lock key. So, disable the filter keys and check for the issue. Here’s how to do that:
Step 1: Press Windows + I keyboard shortcut to open the Settings app, choose Accessibility from the left sidebar and Keyboard from the right pane.
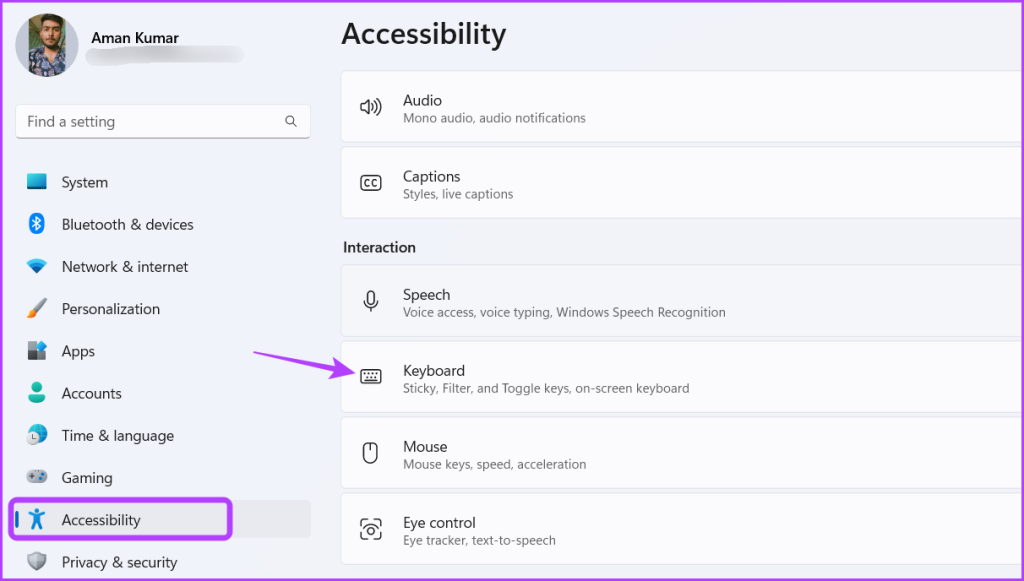
Step 2: Disable the toggle next to the Filter keys.

4. Update the Keyboard Driver
If turning off filter keys wasn’t helpful, there’s a possibility that the keyboard driver is not installed correctly or is outdated. The solution, in this case, is to update the keyboard driver. You can do that by following these steps:
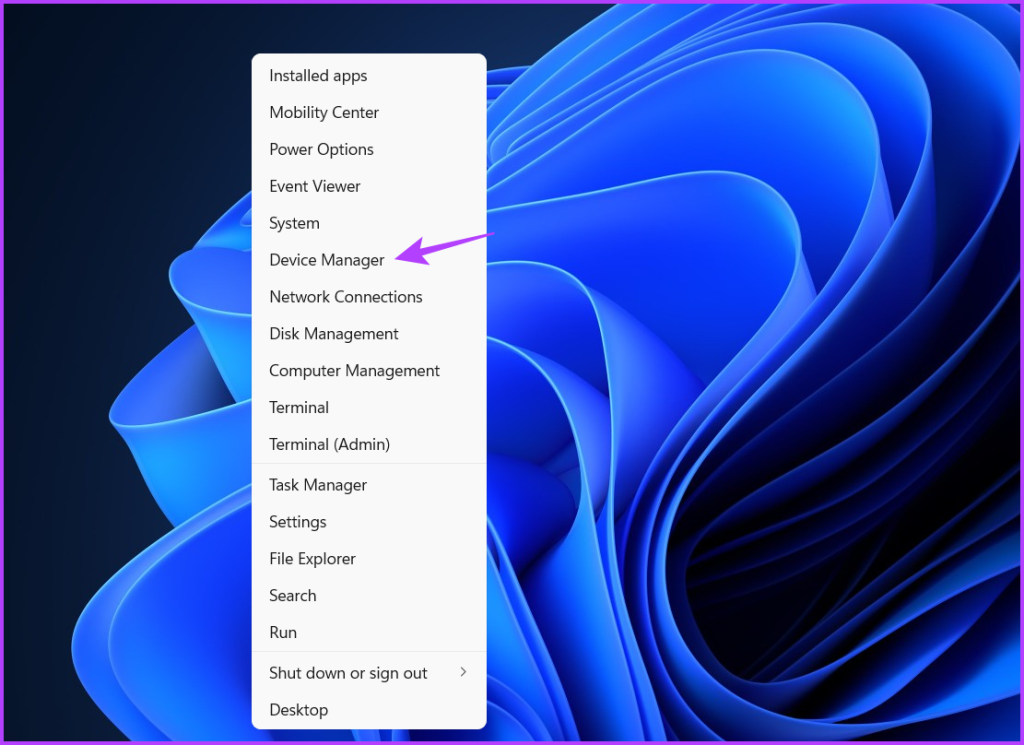
Step 1: Press the Windows + X keyboard shortcut to open the Power User menu and choose Device Manager from the list.
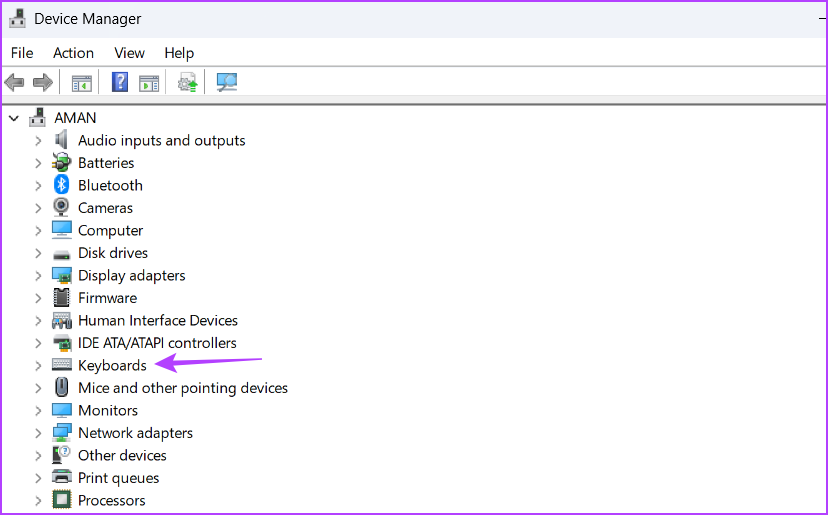
Step 2: Double-click on the Keyboard listing in the Device Manager window.
Step 3: Right-click on your keyboard and choose Update driver.

Step 4: Choose the ‘Search automatically for drivers’ option.
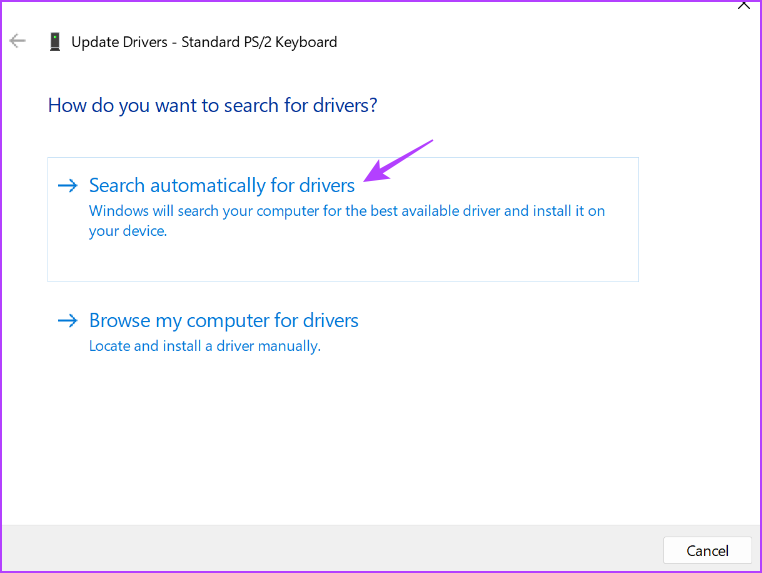
Windows will look for and download any available update for your keyboard driver. After that, restart your computer and check if the Caps Lock key works normally. If not, probably corruption in important system files is causing the issue.
5. Run SFC and DISM
It’s very common for Windows files to get corrupt. When that happens, you become prone to various issues, including the reversed Caps Lock.
Fortunately, you can get rid of these corrupt files by running an System File Checker (SFC) and Deployment Image Servicing and Management (DISM) scan. To run an SFC and DISM scan, follow these instructions:
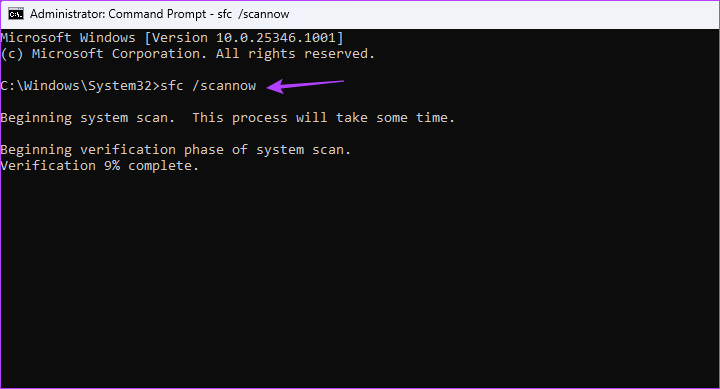
Step 1: Click on the Windows key to open the Start Menu, type Command Prompt, and choose ‘Run as administrator’ from the right pane.

Step 2: Type sfc/ scannow and press Enter.
Step 3: To run the DISM command, type the following commands one by one and press Enter after each command:
DISM /Online /Cleanup-Image /CheckHealth
DISM /Online /Cleanup-Image /ScanHealth
DISM /Online /Cleanup-Image /RestoreHealth

The scanning process might take a few minutes. After the scan completes, reboot your computer and check for the problem.
Repairing the Caps Lock Key
A malfunctioning Caps Lock key can completely ruin typing experience. Worry not if the Caps Lock key is working in reverse order. It’s a very common issue and can easily be resolved. Check out the above solutions to fix reversed caps lock in Windows.
Was this helpful?
Last updated on 01 May, 2023
Read Next
 2 Fixes When the Windows 11 Caps Lock Light Is Not Working
Basic Fixes: Check for keyboard problems: If the Caps Lock light does not work on Windows 11, it may indicate a physical or mechanical issue.
2 Fixes When the Windows 11 Caps Lock Light Is Not Working
Basic Fixes: Check for keyboard problems: If the Caps Lock light does not work on Windows 11, it may indicate a physical or mechanical issue.
 7 Best Ways to Fix Hibernate Goes to Lock Screen Error on Windows 10
The Hibernate mode, not to be confused with the Sleep feature, on Windows OS saves battery, but the best part is, you can close your lid to activate it.
7 Best Ways to Fix Hibernate Goes to Lock Screen Error on Windows 10
The Hibernate mode, not to be confused with the Sleep feature, on Windows OS saves battery, but the best part is, you can close your lid to activate it.
 4 Ways to Fix Dynamic Lock Not Working on Windows 11
Basic Fixes Re-pair your Bluetooth device: Press the Windows + I shortcut to open the Settings app, select Bluetooth & devices from the left sidebar, and click Devices.
4 Ways to Fix Dynamic Lock Not Working on Windows 11
Basic Fixes Re-pair your Bluetooth device: Press the Windows + I shortcut to open the Settings app, select Bluetooth & devices from the left sidebar, and click Devices.
 3 Ways to Turn off Auto-Lock in Windows
Method 1: Turn Off Auto Lock Using Power and Sleep Settings Here's how you can modify your power and sleep settings on your Windows PC, and turn off auto lock.
3 Ways to Turn off Auto-Lock in Windows
Method 1: Turn Off Auto Lock Using Power and Sleep Settings Here's how you can modify your power and sleep settings on your Windows PC, and turn off auto lock.
 4 Ways to Enable or Disable Num Lock at Windows Startup
Method 1: Disable Fast Startup Step 1: Click the search icon on the taskbar, type control panel, and press Enter.
4 Ways to Enable or Disable Num Lock at Windows Startup
Method 1: Disable Fast Startup Step 1: Click the search icon on the taskbar, type control panel, and press Enter.
 How to Personalize the Windows 11 Lock Screen
Update Lock Screen Images While Windows 11 lets you customize the Lock screen, Microsoft has revealed a few things.
How to Personalize the Windows 11 Lock Screen
Update Lock Screen Images While Windows 11 lets you customize the Lock screen, Microsoft has revealed a few things.
 How to Save Windows Spotlight (Lock Screen) Wallpapers
Windows Spotlight's stunning landscapes and vibrant scenes might just be the refresh you need.
How to Save Windows Spotlight (Lock Screen) Wallpapers
Windows Spotlight's stunning landscapes and vibrant scenes might just be the refresh you need.
 3 Ways to Turn Off Scroll Lock In Excel on Windows and Mac
How to Check if Scroll Lock Is Enabled on Excel If you're unsure whether scroll lock is enabled on Excel, glance at the status bar in the bottom corner of
3 Ways to Turn Off Scroll Lock In Excel on Windows and Mac
How to Check if Scroll Lock Is Enabled on Excel If you're unsure whether scroll lock is enabled on Excel, glance at the status bar in the bottom corner of
The article above may contain affiliate links which help support Guiding Tech. The content remains unbiased and authentic and will never affect our editorial integrity.