VirtualBox is a fantastic tool in Windows 11 for running a virtual sandbox for testing and playing around in. Audio is a big part of any virtual machine, and if your sound isn’t working, then half the experience isn’t available to you. In this article, we’ll be looking at a few fixes to help you fix audio problems in VirtualBox.
Fix Audio Problems in VirtualBox with These Troubleshooting Tips
There are a few reasons why your sound might be acting up (or not acting at all) in VirtualBox, so we’ve assembled a few potential VirtualBox audio problems fixes below for you to try:
The Obvious Fixes
Before committing to grander troubleshooters, it’s always a good idea to touch base with the obvious first:
- Ensure that all software (Windows, VirtualBox, etc.) is updated.
- Check that your sound device is plugged in and powered on.
- Ensure your audio drivers are all up to date.
Ensure the Machine’s Audio is Working
The next step is to ensure the audio on your virtual machine is actually enabled. Here’s what to do:
Step 1. In VirtualBox, right-click your guest OS and select “Settings” from the context menu.

Step 2. In the window that pops up, select the “Audio” tab in the sidebar.

Step 3. Ensure that “Enable Audio” is checked, and ensure your audio controller is aligned with your native OS defaults.
Step 4. Click OK once done and test the sound again.
Install Additional Drivers and Software Tools
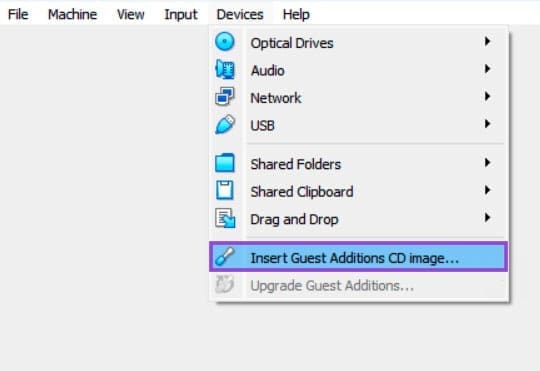
Another reason your virtual machine might be having trouble with your audio devices is that it lacks the proper drivers. In this case, installing additional add-ons through the “Insert Guest Additions CD Image” ISO option might help. Here’s what to do:
Step 1. In your virtual OS, click the “Devices” menu option.
Step 2. Select “Insert Guest Additions CD Image” from the dropdown menu.
Step 3. A pop-up will appear. If not, open “This PC” in Explorer and click the “Guest Additions” icon, which shows as a mounted drive.
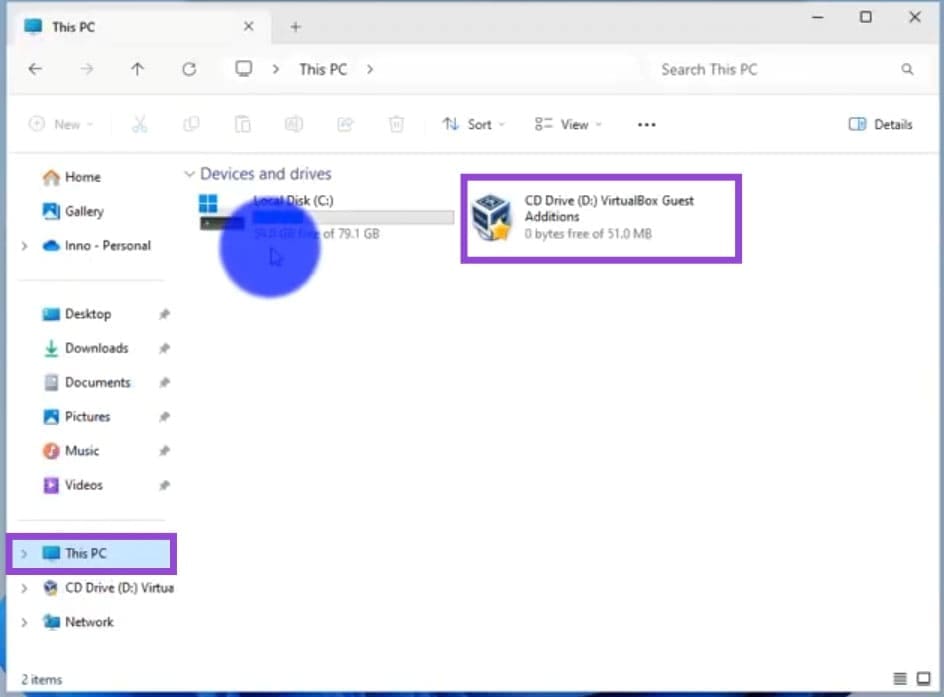
Step 4. Look for the “VBox Windows Additions – x86” (or the bit number of your virtual machine) and double-click it.
Step 5. Follow the steps to install the additional drivers and tools, restart VirtualBox, and test the audio again.
Restart the System Audio
Windows Audio needs to be running properly in order to support both your machine and any virtual machine running on it. Restarting the Windows Audio Service is a good way to ensure everything is running smoothly. Here’s how to do it:
Step 1. Open the Run Dialog (Win + R) and type in “services.msc” before pressing “Enter.”
Step 2. In Services, scroll down to “Windows Audio.”

Step 3. Right-click it and select “Restart” from the dropdown menu.
Step 4. Restart VirtualBox and try the audio again.
Was this helpful?
Last updated on 21 March, 2026
Read Next
 How to Fix Windows Resolution in VirtualBox
VirtualBox is Windows 11’s great way to run numerous operating systems (even at the same time) right from the comfort of your PC.
How to Fix Windows Resolution in VirtualBox
VirtualBox is Windows 11’s great way to run numerous operating systems (even at the same time) right from the comfort of your PC.
 How to Install Windows 11 on VirtualBox: The Ultimate Guide
How to Enable Virtualization on Windows 11 Enabling virtualization on Windows typically involves going into the BIOS or UEFI settings and enabling support, which may vary depending on your PC's
How to Install Windows 11 on VirtualBox: The Ultimate Guide
How to Enable Virtualization on Windows 11 Enabling virtualization on Windows typically involves going into the BIOS or UEFI settings and enabling support, which may vary depending on your PC's
 How to Install VirtualBox on Windows 11 and 10
Prerequisites for Installing VirtualBox on Windows CPU: x86-compatible hardware (most modern Intel and AMD CPUs are supported) RAM: The minimum requirement of the host operating system (Windows 11: 4GB) plus
How to Install VirtualBox on Windows 11 and 10
Prerequisites for Installing VirtualBox on Windows CPU: x86-compatible hardware (most modern Intel and AMD CPUs are supported) RAM: The minimum requirement of the host operating system (Windows 11: 4GB) plus
 How to Fix Audio Sync Problems on the Samsung Galaxy Buds 3
Try Basic Fixes Restart your phone and earbuds: Temporary issues with your Galaxy Buds 3 or phone can cause audio sync problems.
How to Fix Audio Sync Problems on the Samsung Galaxy Buds 3
Try Basic Fixes Restart your phone and earbuds: Temporary issues with your Galaxy Buds 3 or phone can cause audio sync problems.
 5 Ways to Fix Some Update Files are Missing or Have Problems Error on Windows 11
Fix 1: Run the Windows Update Troubleshooter Windows 11 includes a dedicated troubleshooter to automatically identify and resolve any common issues with the Windows Update process.
5 Ways to Fix Some Update Files are Missing or Have Problems Error on Windows 11
Fix 1: Run the Windows Update Troubleshooter Windows 11 includes a dedicated troubleshooter to automatically identify and resolve any common issues with the Windows Update process.
 Top 15 Ways to Fix Amazon Echo and Alexa Setup Problems
If you've landed on this page, it means that the Amazon Echo setup process is giving you a hard time too.
Top 15 Ways to Fix Amazon Echo and Alexa Setup Problems
If you've landed on this page, it means that the Amazon Echo setup process is giving you a hard time too.
 How to Fix “Fire TV Stick Connected With Problems” Error
Basic Fixes: Restart the Fire TV Stick and router: Temporary connection problems can cause internet issues on your Fire TV Stick.
How to Fix “Fire TV Stick Connected With Problems” Error
Basic Fixes: Restart the Fire TV Stick and router: Temporary connection problems can cause internet issues on your Fire TV Stick.
 Top 9 Ways to Fix Telegram Connecting Problems on iOS and Android
Telegram is jumping the popularity charts on both iOS and Android.
Top 9 Ways to Fix Telegram Connecting Problems on iOS and Android
Telegram is jumping the popularity charts on both iOS and Android.
The article above may contain affiliate links which help support Guiding Tech. The content remains unbiased and authentic and will never affect our editorial integrity.