On paper, Credential Guard should increase security on network- or corporation-managed devices. However, if you happen to have Windows 11 Enterprise or Education and are using it for personal use, you might find it limiting virtualization software options. Here’s how to disable Credential Guard (Windows 11 version).
How to Check if Credential Guard Is Active
In most cases, Windows 11 devices running on the Enterprise or Education edition will have the feature running by default. Microsoft has force-enabled it on applicable devices back with version 22H2, and you should’ve been prompted to update past it.
You can check if the feature is active through the System Information utility.
Step 1. In the Run utility, open “msinfo32.”

Step 2. In the System Summary, look for the entries under “Virtualization-based security,” such as “Virtualization-based security Services Configured” and “Virtualization-based security Services Running.”
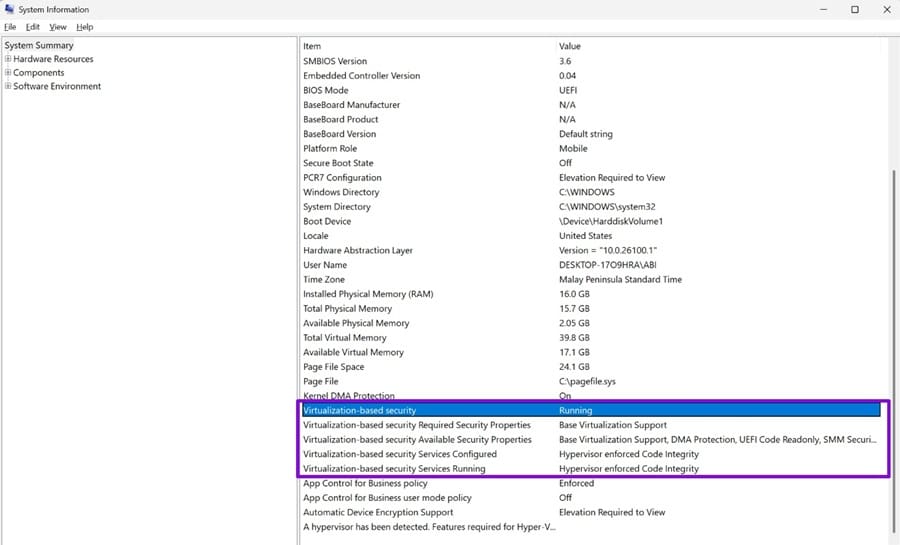
Step 3. If Credential Guard is configured, it should appear under “Virtualization-based security Services Configured.”
If Credential Guard doesn’t appear and you have Windows 11 Enterprise or Education, the feature may not be enabled, or the device may not meet its hardware and software requirements.
Part 1 – Disable Credential Guard (Windows 11) via Group Policy for non-UEFI Lock
The Group Policy option should be the easiest and can even be used to apply the change to multiple managed computers. This only applies if the UEFI lock wasn’t enabled when turning on Credential Guard for the first time (or if the setting was turned on in BIOS before).
Step 1. Open the Run utility and run “gpedit.msc”
Step 2. Go to the following address:
Computer Configuration\Administrative Templates\System\Device Guard
Step 3. Open the “Device Guard” folder and the “Turn on Virtualization-Based Security Policy” setting.
Step 4. Select “Disabled” and click “Apply” and “OK.”
Step 5. Exit the utility and restart the PC.
If Credential Guard was enabled without UEFI lock and isn’t being controlled by Group Policy, you can disable it through the registry.
Step 1. Open the Registry Editor.
Step 2. Go to the following registry key and set the LsaCfgFlags value to 0:
HKEY_LOCAL_MACHINE\SYSTEM\CurrentControlSet\Control\Lsa
Step 3. Set the flag to 0.
Step 4. Go to the following registry key and set the LsaCfgFlags value to 0:
HKEY_LOCAL_MACHINE\SOFTWARE\Policies\Microsoft\Windows\DeviceGuard
Step 5. Set that value to 0 as well.
Step 6. Exit the Registry Editor and restart the PC.
If Group Policy is controlling Credential Guard, registry changes may be overridden by the policy. Microsoft recommends setting these registry values to 0 instead of deleting them.

Part 2 – Disabling Credential Guard With UEFI Lock
If the UEFI lock was enabled, you’ll need to follow the first option, and then remove the lock as well through Command Prompt. This requires physical presence at the PC because you must confirm the change at boot using a function key.
Step 1. Open the Command Prompt with administrator access.
Step 2. Run the following commands one by one:
mountvol X: /s
copy %WINDIR%\System32\SecConfig.efi X:\EFI\Microsoft\Boot\SecConfig.efi /Y
bcdedit /create {0cb3b571-2f2e-4343-a879-d86a476d7215} /d “DebugTool” /application osloader
bcdedit /set {0cb3b571-2f2e-4343-a879-d86a476d7215} path “\EFI\Microsoft\Boot\SecConfig.efi”
bcdedit /set {bootmgr} bootsequence {0cb3b571-2f2e-4343-a879-d86a476d7215}
bcdedit /set {0cb3b571-2f2e-4343-a879-d86a476d7215} loadoptions DISABLE-LSA-ISO
bcdedit /set {0cb3b571-2f2e-4343-a879-d86a476d7215} device partition=X:
mountvol X: /d
Step 3. Restart the PC. Before Windows starts, a prompt will appear to notify you that UEFI was modified and ask you to confirm the change. Follow the on-screen instructions and press the required function key to confirm.
Was this helpful?
Last updated on 28 September, 2026
Read Next
 How to Access and Use Credential Manager on Windows 10 and 11
How to Access Sign-in Details in Credential Manager First, let's see how you can access Credential Manager on Windows to view and update your saved passwords.
How to Access and Use Credential Manager on Windows 10 and 11
How to Access Sign-in Details in Credential Manager First, let's see how you can access Credential Manager on Windows to view and update your saved passwords.
 7 Quick Ways to Open Credential Manager in Windows 11
Are you looking for a password manager to save your login credentials securely?
7 Quick Ways to Open Credential Manager in Windows 11
Are you looking for a password manager to save your login credentials securely?
 3 Ways to Disable or Enable Search Highlights in Windows 10 and Windows 11
Method 1: Disable or Enable Search Highlights From the Settings App The Settings app on Windows allows you to control most things on your PC.
3 Ways to Disable or Enable Search Highlights in Windows 10 and Windows 11
Method 1: Disable or Enable Search Highlights From the Settings App The Settings app on Windows allows you to control most things on your PC.
 How to Enable or Disable Confirm on Delete Files Pop-up in Windows 10
Windows 10 packs multiple safety and security features to help you save your data from deleting due to accidental clicks and presses.
How to Enable or Disable Confirm on Delete Files Pop-up in Windows 10
Windows 10 packs multiple safety and security features to help you save your data from deleting due to accidental clicks and presses.
 4 Ways to Enable or Disable Num Lock at Windows Startup
Method 1: Disable Fast Startup Step 1: Click the search icon on the taskbar, type control panel, and press Enter.
4 Ways to Enable or Disable Num Lock at Windows Startup
Method 1: Disable Fast Startup Step 1: Click the search icon on the taskbar, type control panel, and press Enter.
 4 Ways to Disable Hyper-V in Windows
Method 1: Using Control Panel The simplest method to disable Hyper-V is by using the Control Panel.
4 Ways to Disable Hyper-V in Windows
Method 1: Using Control Panel The simplest method to disable Hyper-V is by using the Control Panel.
 Disable Low Disk Space Warning (Windows 11)
Have you been running out of disk space on one of your drives?
Disable Low Disk Space Warning (Windows 11)
Have you been running out of disk space on one of your drives?
 Which Services Can You Disable in Windows 11 to Boost Performance and Privacy
There’s a lot to love about Windows, and then there are all the extras that run behind the scenes and slow down your machine.
Which Services Can You Disable in Windows 11 to Boost Performance and Privacy
There’s a lot to love about Windows, and then there are all the extras that run behind the scenes and slow down your machine.
The article above may contain affiliate links which help support Guiding Tech. The content remains unbiased and authentic and will never affect our editorial integrity.