Windows 11 has a set of basic touch keyboard themes that change key colors, text colors, transparency, and even a background image. While these should provide a solid range of options that match Windows themes in general (including a general “light” and “dark” theme), you can further customize them if needed. Here’s how.
Part 1 – Use the Settings to Get to Touch Keyboard Themes
Luckily, as soon as you find the right page for changing the keyboard, most options there directly apply and you won’t have to switch tabs. Microsoft occasionally changes where these are stored precisely, but you can usually access it via “Personalize” in the right-click context menu from the Desktop.
Step 1. Go to Settings and choose “Personalization.”
Step 2. Click on “Text input.”
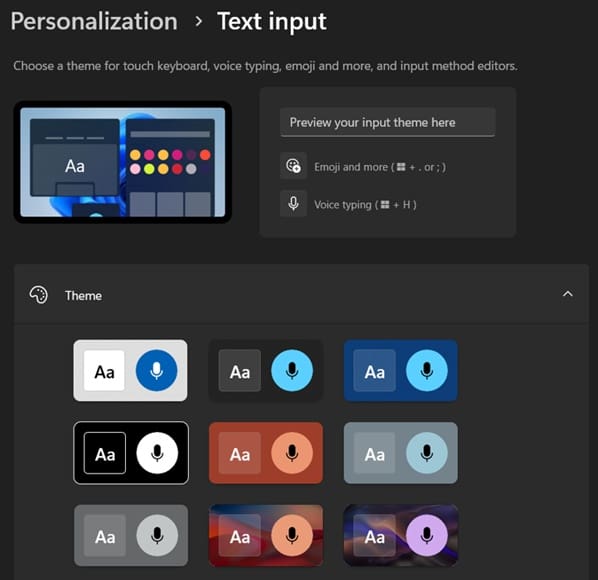
Step 3. If you can’t find the options (perhaps because they were moved by a major update), use the search box at the top and type in “touch keyboard.”
Option 1 – Build a Custom Theme
Once there, you can use the section to make a custom theme.
Step 1. Select “Custom theme” or the plus sign from the theme grid.
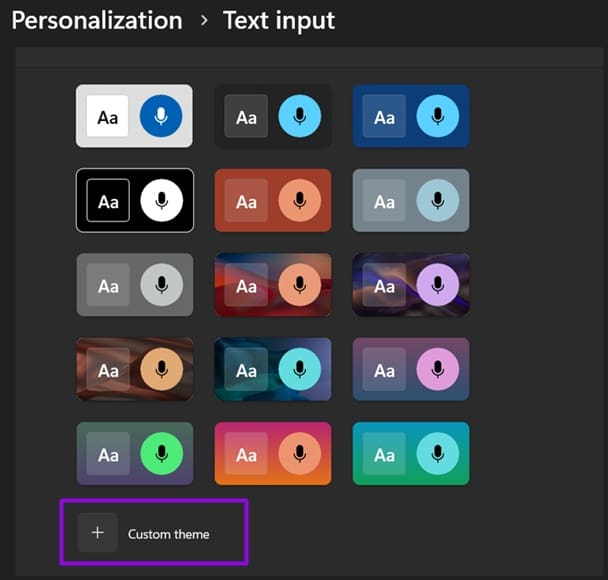
Step 2. For the background color, you can use a preset from solid colors. If you want a custom image, save it to your PC, remember where you saved it, then go to the “Background Picture” section, select “Browse,” and find the image. Use the “Fit” dropdown options as needed.

Step 3. To change the keys, go to the “Touch keyboard” section and adjust the settings inside, from background color to text color. Use the “Open keyboard” button to preview the changes you made.
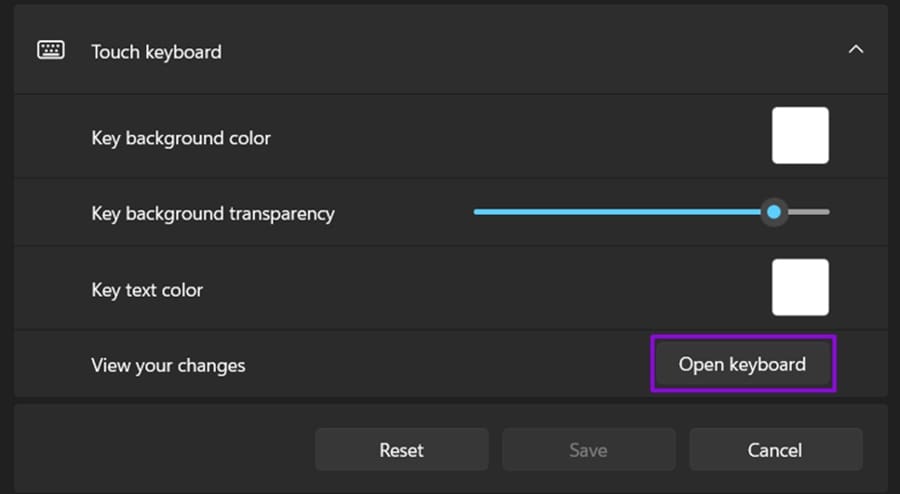
Step 4. Change the text and accent color as needed. Click on “Save” when you’re done.
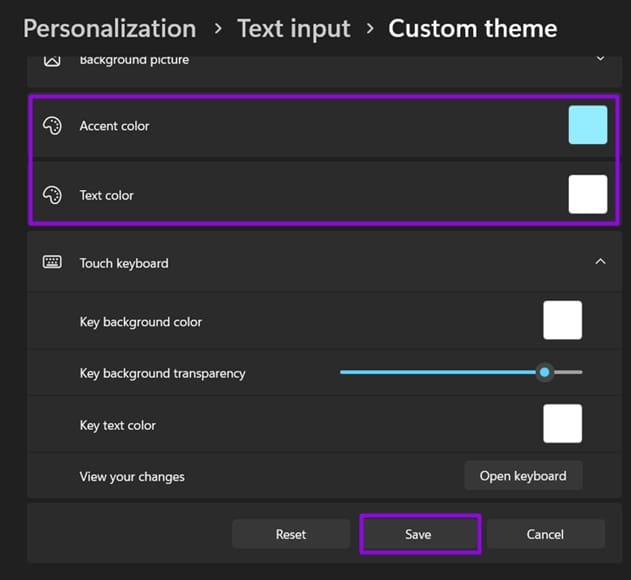
Note that key transparency stacks with whatever is behind the keyboard. At high transparency, the keys can become hard to read.
Option 2 – Use the Theme Everywhere It Applies
Your Touch Keyboard theme doesn’t apply only to the keyboard in most cases (even if you only use it most of the time).
Step 1. Open the Touch Keyboard from the taskbar icon to confirm the theme applied.
Step 2. Hit “Win + .” (period) to open the emoji panel. It should use the same theme.
Step 3. Hit “Win + V” for clipboard history and “Win + H” for voice typing. Both should follow the theme too.
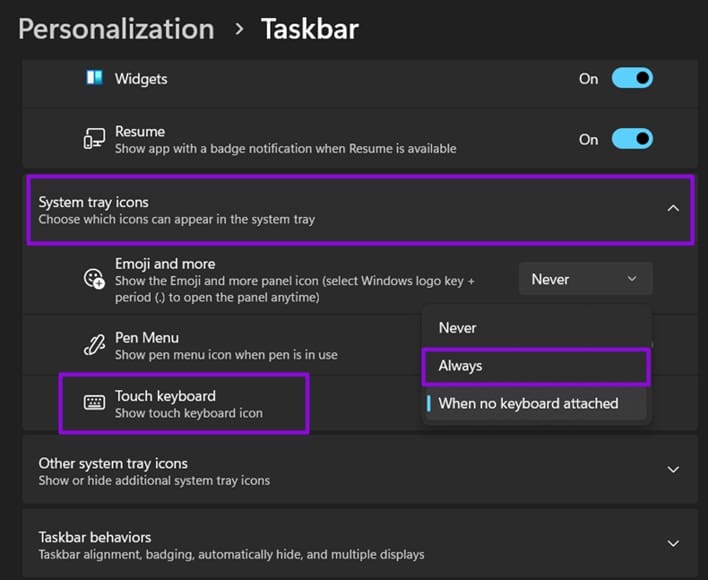
Step 4. If the keyboard icon is missing from the taskbar, right-click the taskbar, open “Taskbar settings,” expand “System tray icons,” and for “Touch Keyboard,” change the option to “Always” if needed.
Option 3 – Change the Size of the Keys
For this, you need to go back to the “Text input” section in Personalization settings. These settings apply to each theme separately, so putting them once will make them stick even if you create a new theme later. Here are the basics:
- Keyboard size affects the on-screen size of the keyboard proportional to your desktop.
- Key text size dictates how much of the key is taken up by the character representing it.
- Show key background puts the traditional keyboard grid over the keyboard.

Was this helpful?
Last updated on 24 August, 2026
Read Next
 How to Enable and Use Touch Keyboard on Windows 11
How to Enable Touch Keyboard on Windows 11 Enabling the Touch Keyboard on Windows 11 is quite straightforward.
How to Enable and Use Touch Keyboard on Windows 11
How to Enable Touch Keyboard on Windows 11 Enabling the Touch Keyboard on Windows 11 is quite straightforward.
 4 Best Ways to Change Themes in Windows 11
Are you tired of seeing the same old theme on your Windows PC?
4 Best Ways to Change Themes in Windows 11
Are you tired of seeing the same old theme on your Windows PC?
 How to Change or Remove Themes in Facebook Messenger
Things to Know About Messenger Chat Themes Any participant in the chat can change the Messenger theme.
How to Change or Remove Themes in Facebook Messenger
Things to Know About Messenger Chat Themes Any participant in the chat can change the Messenger theme.
 How to Change Default Chrome Incognito Color With Themes
Important Update (August 13, 2024) Due to recent security restrictions implemented by Google, it is currently impossible to change the background color of Chrome’s Incognito mode using themes.
How to Change Default Chrome Incognito Color With Themes
Important Update (August 13, 2024) Due to recent security restrictions implemented by Google, it is currently impossible to change the background color of Chrome’s Incognito mode using themes.
 How to Change Instagram Chat Themes When They’re Not Working
How to Change Instagram Chat Theme in the Correct Manner The first thing to do to fix the Instagram chat themes not showing would be to follow the correct steps
How to Change Instagram Chat Themes When They’re Not Working
How to Change Instagram Chat Theme in the Correct Manner The first thing to do to fix the Instagram chat themes not showing would be to follow the correct steps
 5 Ways to Fix Samsung Themes Not Working Issue
Fix 1: Sign Out of Your Samsung Account Once you sign out of your Samsung account, restart your device, and sign in again to check if the problem is solved.
5 Ways to Fix Samsung Themes Not Working Issue
Fix 1: Sign Out of Your Samsung Account Once you sign out of your Samsung account, restart your device, and sign in again to check if the problem is solved.
 6 Ways to Fix if Google Chrome Keeps Changing Themes
Fix 1: Disable the "Customize Chrome Color Extraction" Flag A common reason Google Chrome may keep changing themes automatically is if the "Customize Chrome Color Extraction" flag is active.
6 Ways to Fix if Google Chrome Keeps Changing Themes
Fix 1: Disable the "Customize Chrome Color Extraction" Flag A common reason Google Chrome may keep changing themes automatically is if the "Customize Chrome Color Extraction" flag is active.
 How to Customize Keyboard Shortcuts in Firefox 67
Keyboard shortcuts always come in handy no matter what software you’re using on your system.
How to Customize Keyboard Shortcuts in Firefox 67
Keyboard shortcuts always come in handy no matter what software you’re using on your system.
The article above may contain affiliate links which help support Guiding Tech. The content remains unbiased and authentic and will never affect our editorial integrity.