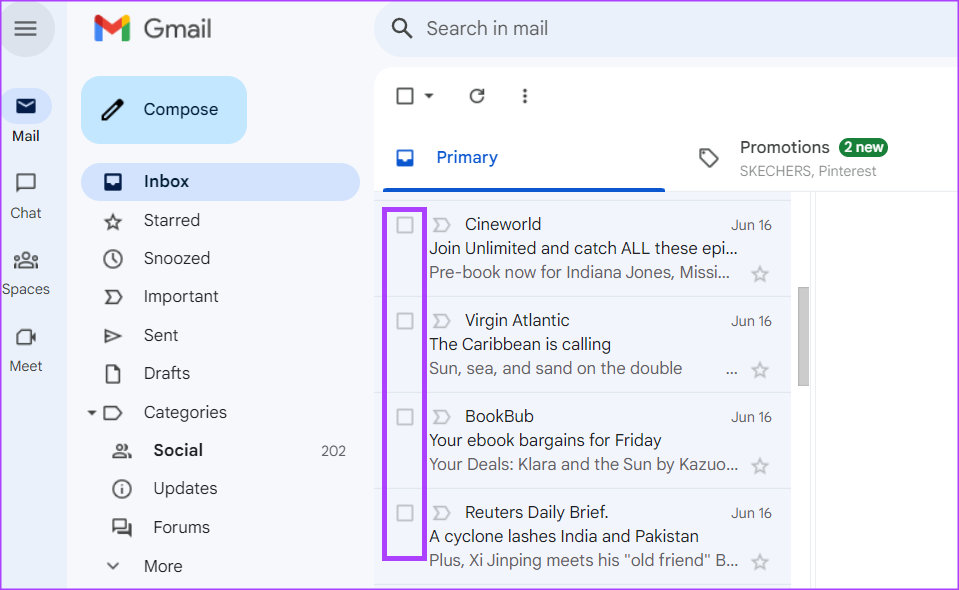
Most Gmail users are familiar with the email service’s interface. By default, emails appear into three main categories named Primary, Promotions, and Social. Gmail uses these categories to separate emails sent by marketing or media-sharing sites. However, if you need to sift through several emails at once, these categories might make your work more tedious.

For better email management, you can create rules to further filter the emails in your inbox. With these rules, you can send emails to labels, trash, star, or forward emails. That way, you can click on those filters or labels to check specific batch of emails. Here’s how to create rules to filter your Gmail:
How to Create a Filter in Gmail
With specific rules, you can forward emails, add them to labels or send them to the trash. For these rules to apply to your email, you need to create a filter. There are three different ways to create a filter in Gmail.
How to Create a Filter Using a Search Criteria
The search bar in Gmail already serves as a filtering tool. When used, it generates targeted results based on search queries. Here’s how you can create a filter using search criteria.
Step 1: Open Gmail in your preferred web browser.
Step 2: Within the Search bar, click the Show search options icon.

Step 3: In any or all of the below fields, enter your search criteria:
- From
- To
- Subject
- Has the words
- Doesn’t have
- Size
- Date within
- Search
- Has attachment
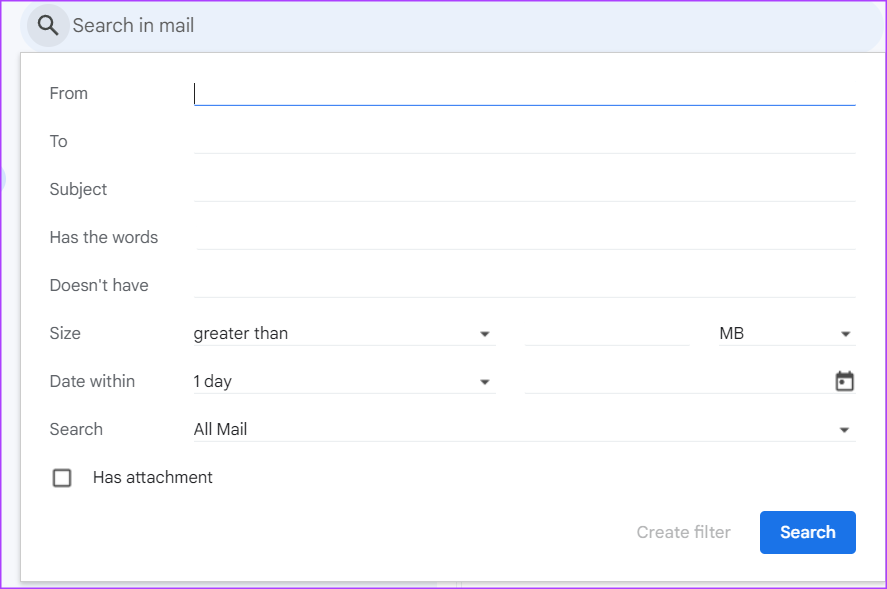
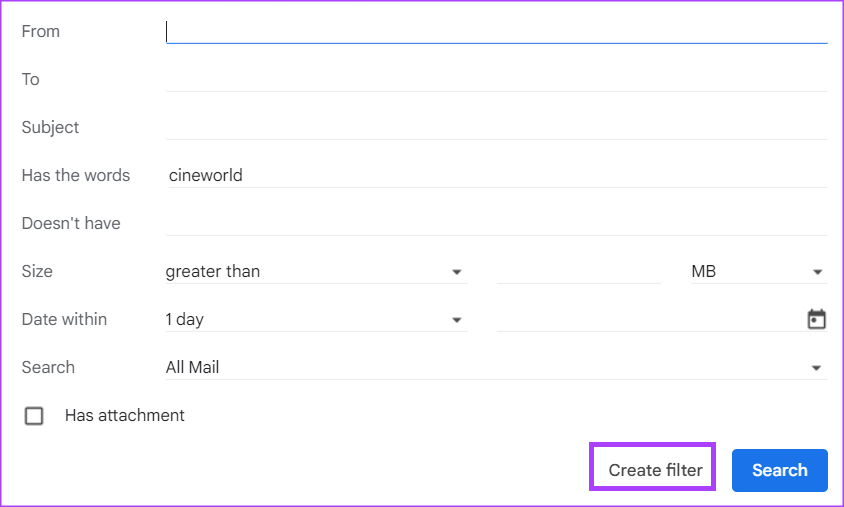
Step 3: Click the Create filter button at the bottom of the search window.
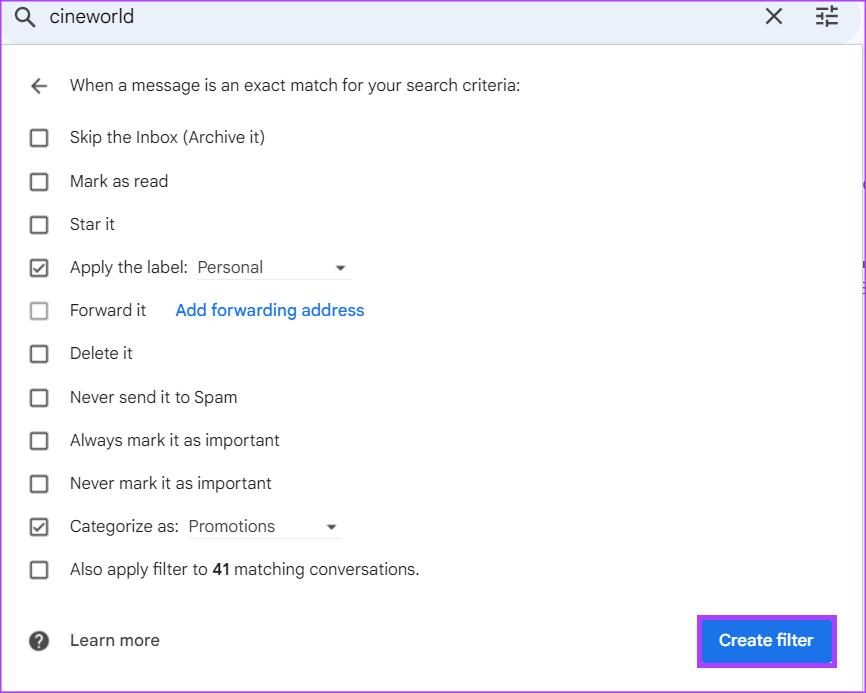
Step 4: In a new window, choose what you would like the filter to do when a message matches your search criteria.

If you choose to forward messages, this action will only apply to future emails.
Step 5: After selecting your preferred action, click Create filter at the bottom of the window.
How to Create a Filter Using a Specific Email
Instead of going through the search bar to set up a filter for your emails, you can bulk-select emails in your inbox and assign a particular action to them. Here’s how to do so:
Step 1: Open Gmail in your preferred web browser.
Step 2: Tick the box beside the email you want to use for the filter.
Step 3: Click the three vertical dots menu in the top-right corner.
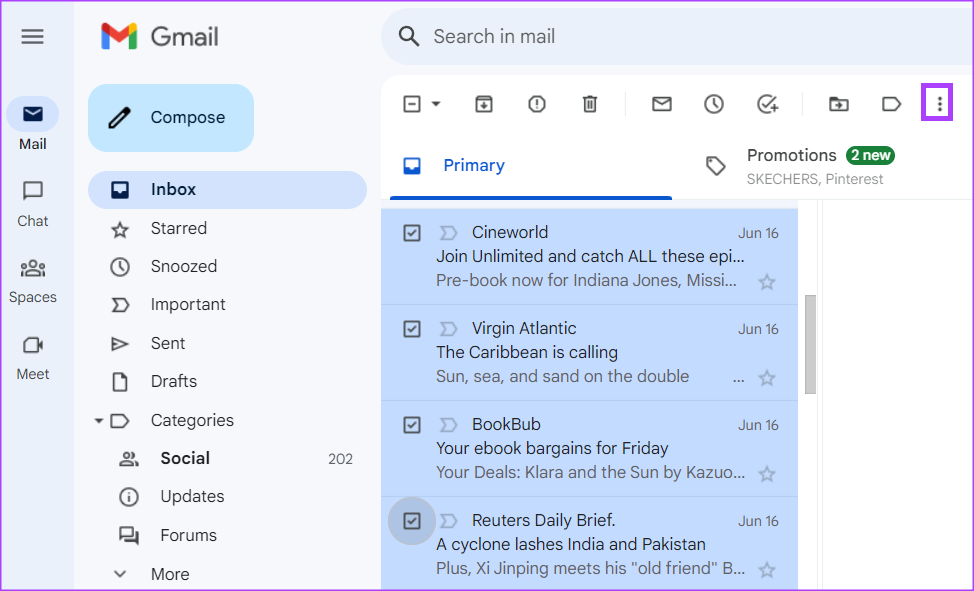
Step 4: Click ‘Filter messages like these’ from the options shown.

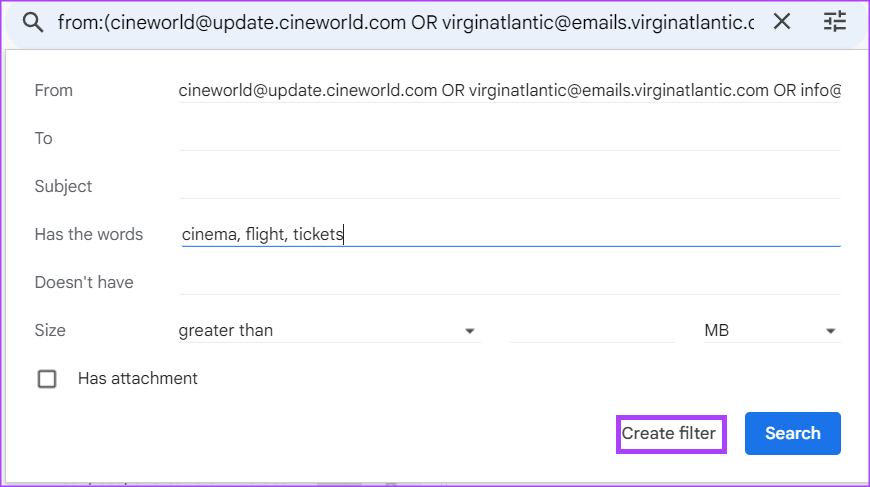
Step 5: Enter your search criteria in the new window that appears.

Step 6: Click the Create filter button at the bottom of the search window.
Step 7: In a new window, choose what you would like the filter to do when a message matches your search criteria.
Step 8: After selecting your preferred action, click Create filter at the bottom of the window.
How to Create a Filter From Gmail Settings
You can also make use of your Gmail settings to create a filter. Here’s how to do so:
Step 1: Open Gmail in your preferred web browser.
Step 2: Click the Settings icon.

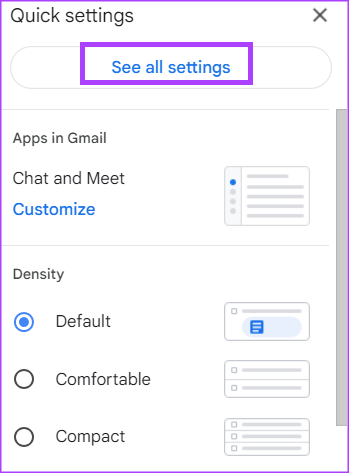
Step 3: Click See all settings.
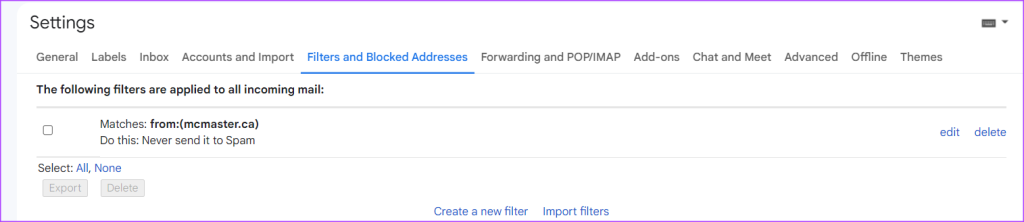
Step 4: Click the Filters and Blocked Addresses tab.

Step 5: Click ‘Create a new filter.’

Step 6: Enter your search criteria in the new window that appears.
Step 7: Click the Create filter button at the bottom of the search window.
Step 8: In a new window, choose what you would like the filter to do when a message matches your search criteria.
Step 9: After selecting your preferred action, click Create filter at the bottom of the window.
How to Edit or Delete a Filter
If you want to make additional changes to a filter after creating it or you would like to delete it, here’s what you should do:
Step 1: Open Gmail in your preferred web browser.
Step 2: Click the Settings icon.
Step 3: Click See all settings.
Step 4: Click the Filters and Blocked Addresses tab.
Step 5: Tick the box beside the filter you want to edit or delete.
Step 6: Click Edit to update the filter or Delete to remove it.
If you select Edit, the search window will pop-up from which you can change the filter.
How to Export a Filter in Gmail
If you would like to set up the same rules across all your Gmail accounts, you can do so by exporting a filter. Here’s how:
Step 1: Open Gmail in your preferred web browser.
Step 2: Click the Settings icon.
Step 3: Click See all settings.
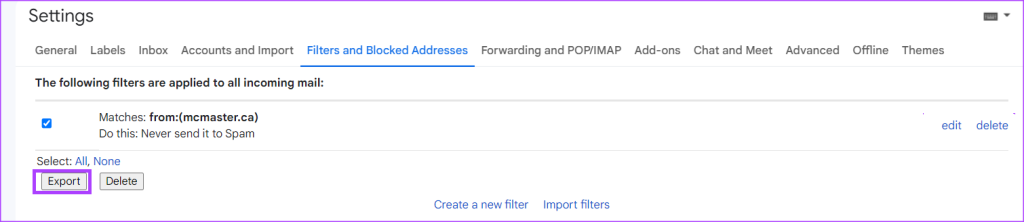
Step 4: Click the Filters and Blocked Addresses tab.
Step 5: Tick the box beside the filter you want to export.
Step 6: At the bottom of the page, click Export, and you will get an .XML file.
How to Import a Filter in Gmail
After exporting the .xml file, here’s how to import it into other Gmail accounts.
Step 1: Open Gmail in your preferred web browser.
Step 2: Click the Settings icon.
Step 3: Click See all settings.
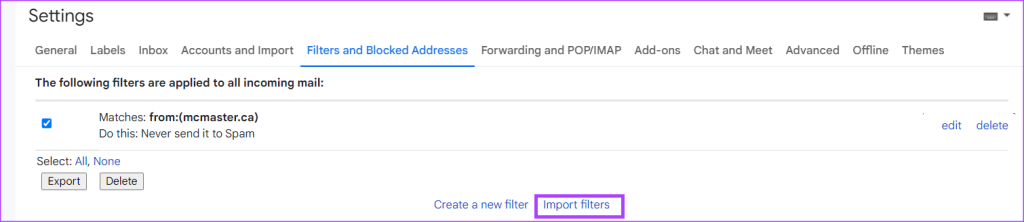
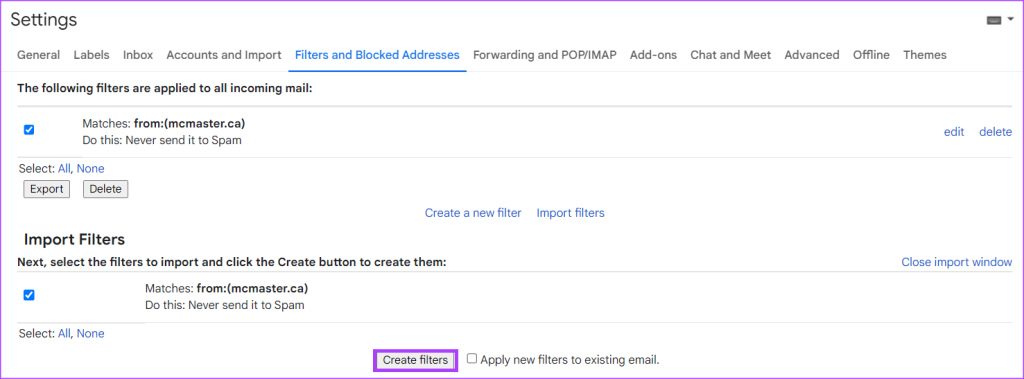
Step 4: Click the Filters and Blocked Addresses tab.
Step 5: At the bottom of the page, click Import filters.
Step 6: Click the Choose file button and select the file with the filter you want to import.
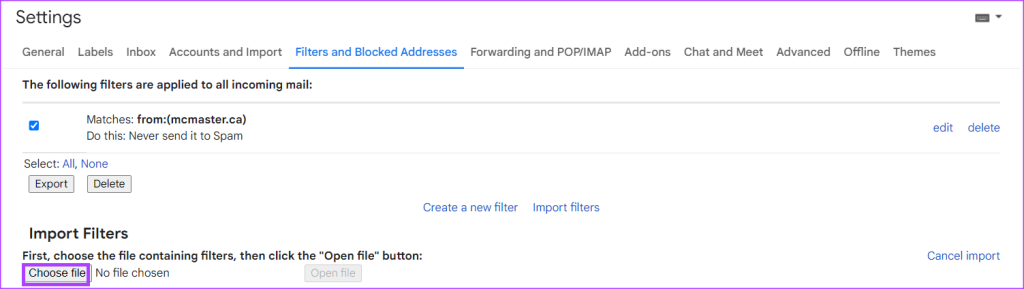
Step 7: Click Open file.
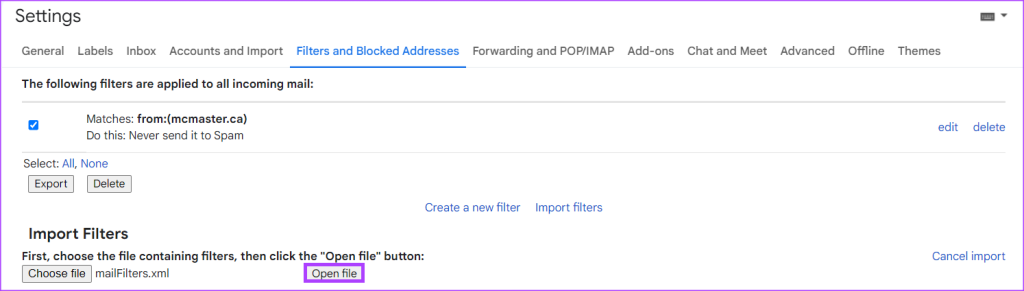
Step 8: Click Create Filters.
Mass Deleting Emails in Gmail
While creating rules helps with better email management, it may not help clearing up your Gmail storage. To ensure irrelevant emails do not take up your storage space, you can consider mass deleting the mails.
Was this helpful?
Last updated on 19 June, 2023
Read Next
 Declutter Your Inbox: How to Filter Unread Emails in Gmail
Method 1: Using a Query in the Search Field Like Google Search, there are various tips and tricks for using Gmail Search to get the desired results.
Declutter Your Inbox: How to Filter Unread Emails in Gmail
Method 1: Using a Query in the Search Field Like Google Search, there are various tips and tricks for using Gmail Search to get the desired results.
 How to Create and Manage Rules in Outlook 365 Webmail
Managing emails is an arduous task.
How to Create and Manage Rules in Outlook 365 Webmail
Managing emails is an arduous task.
 How to Auto-Delete Emails in Gmail
Method 1: Using Filters Gmail offers filters to manage incoming emails automatically.
How to Auto-Delete Emails in Gmail
Method 1: Using Filters Gmail offers filters to manage incoming emails automatically.
 How to Archive or Unarchive Emails in Gmail
What Does Archive in Gmail Mean?
How to Archive or Unarchive Emails in Gmail
What Does Archive in Gmail Mean?
 4 Ways to Fix Emails Stuck in Gmail Outbox
Try Basic Fixes Verify the recipient's email address: This may seem too obvious, but if you have misspelled the email address, Gmail won’t be able to send the message.
4 Ways to Fix Emails Stuck in Gmail Outbox
Try Basic Fixes Verify the recipient's email address: This may seem too obvious, but if you have misspelled the email address, Gmail won’t be able to send the message.
 How to Share Gmail Folder With Another User Along With Emails Automatically
How to Share a Gmail Label With Other Users To share your Gmail labels with another person, you will need a Chrome extension called Label Sharing for Gmail by cloudHQ.
How to Share Gmail Folder With Another User Along With Emails Automatically
How to Share a Gmail Label With Other Users To share your Gmail labels with another person, you will need a Chrome extension called Label Sharing for Gmail by cloudHQ.
 How to Use Stars to Organize Your Emails in Gmail
Add Star to an Email on Web Step 1: Open Gmail and locate the essential email or the one you want to visit again.
How to Use Stars to Organize Your Emails in Gmail
Add Star to an Email on Web Step 1: Open Gmail and locate the essential email or the one you want to visit again.
 How to Set Up Auto Forward in Gmail for All or Specific Emails
Auto forwarding email is quite helpful when you move to a different mailbox but still want to receive all incoming emails sent to the older mail address.
How to Set Up Auto Forward in Gmail for All or Specific Emails
Auto forwarding email is quite helpful when you move to a different mailbox but still want to receive all incoming emails sent to the older mail address.
The article above may contain affiliate links which help support Guiding Tech. The content remains unbiased and authentic and will never affect our editorial integrity.