How to Uninstall GPU Drivers Using DDU
Step 1: Download the DDU installer from the Guru3D dedicated webpage. Then, select one of the Download Locations links.
Step 2: Once you’ve downloaded the installer file, unzip it to the location of your choice. Then, open the extracted folder and double-click on DDU vxyz.ab.c.exe to launch the self-extraction tool.

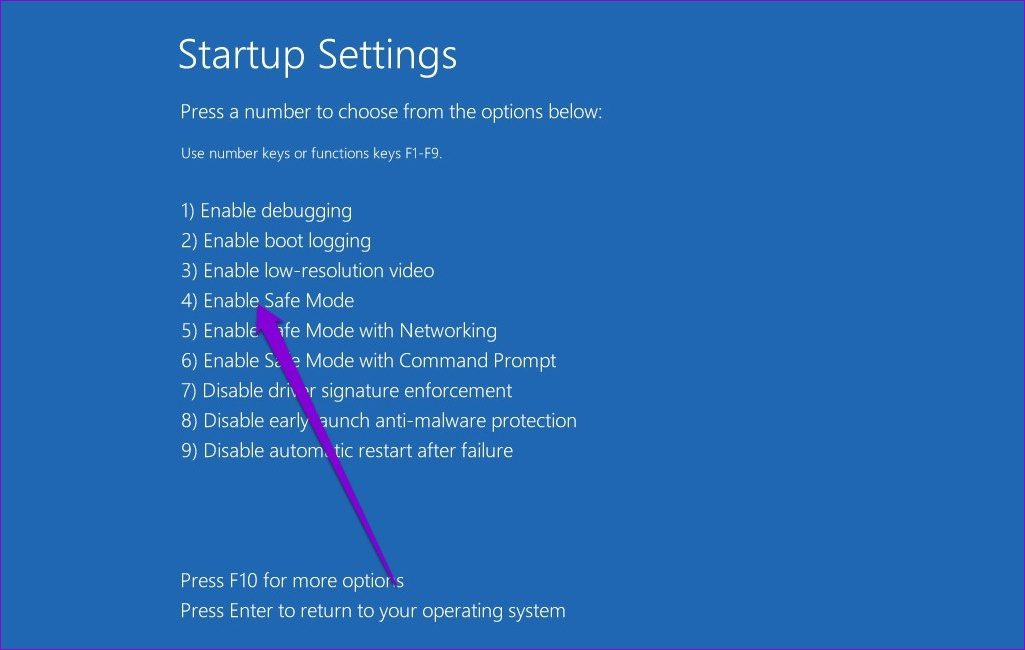
Step 3: Reboot your system to Safe Mode using the Advanced Recovery.
Step 4: In Safe mode, open the DDU folder and double-click on Display Driver Uninstaller.exe to launch it.

Step 5: In the Options window, select your preferences. Uncheck specific files or add-on software from the list if you wish to keep them.

Step 6: Once you’ve made the changes per your preferences, click Close.

Step 7: The DDU window should now open. On the right side, click select device type dropdown > GPU.
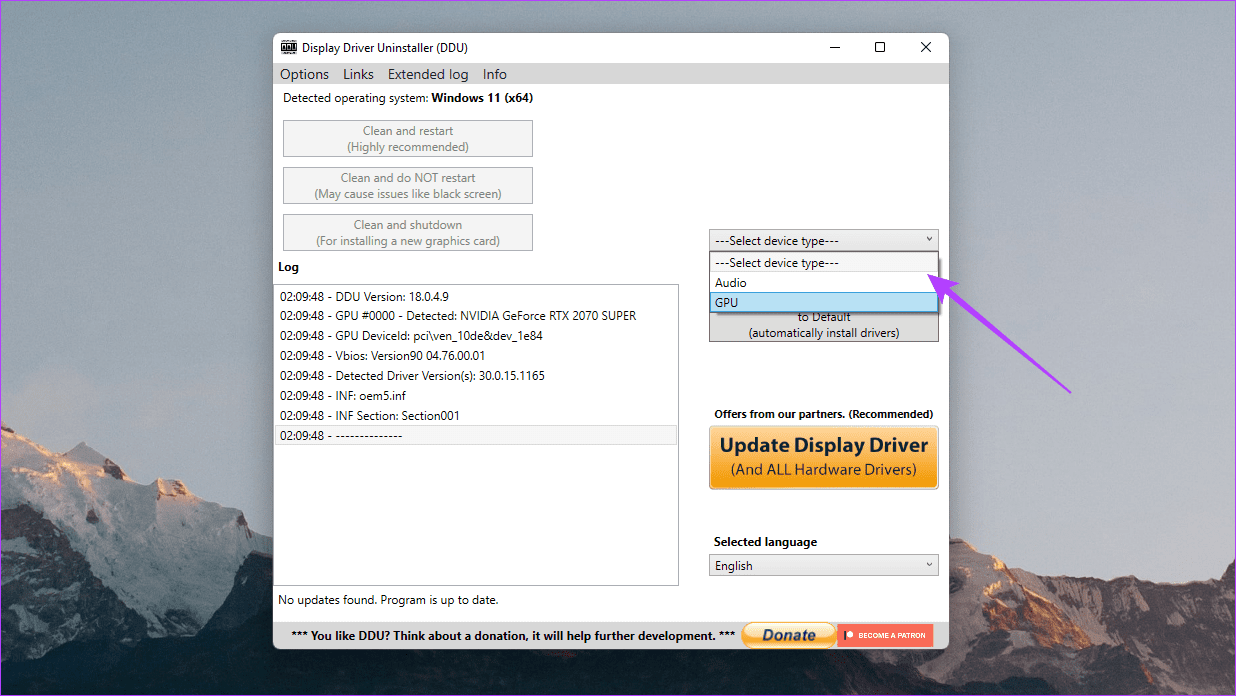
Step 8: Now, select your GPU manufacturer – NVIDIA, AMD, or Intel

Step 9: Finally, click on Clean and restart.

And that’s it. DDU will uninstall your graphics driver, clean up the registry, remove any leftover files, and reboot your system. Once your PC boots up, connect it to the internet, and Windows will automatically fetch the latest stable driver.
If your computer has NVIDIA’s graphics, check our guide on installing and updating NVIDIA’s drivers without GeForce Experience.
Was this helpful?
Last updated on 28 August, 2024
Read Next
 A Guide to Completely Uninstall OneDrive From Windows
Things to Know Before Uninstalling OneDrive OneDrive is often used for file synchronization across devices.
A Guide to Completely Uninstall OneDrive From Windows
Things to Know Before Uninstalling OneDrive OneDrive is often used for file synchronization across devices.
 How to Completely Uninstall McAfee From Windows 11
Prerequisite: Stop All McAfee Services Running in the Background Before you start, stop all McAfee services running in the background.
How to Completely Uninstall McAfee From Windows 11
Prerequisite: Stop All McAfee Services Running in the Background Before you start, stop all McAfee services running in the background.
 How to Completely Uninstall Discord From Windows, Mac, Android, and iOS
https://youtu.be/Zvxq_KArqpY How to Completely Uninstall Discord From Windows Note: We are running on a Windows 11 machine.
How to Completely Uninstall Discord From Windows, Mac, Android, and iOS
https://youtu.be/Zvxq_KArqpY How to Completely Uninstall Discord From Windows Note: We are running on a Windows 11 machine.
 4 Ways to Uninstall Drivers From Windows 11
Method 1: Uninstall Drivers Using Device Manager Device Manager is a handy utility for managing various hardware devices installed on your system.
4 Ways to Uninstall Drivers From Windows 11
Method 1: Uninstall Drivers Using Device Manager Device Manager is a handy utility for managing various hardware devices installed on your system.
 What Happens When You Uninstall Graphics Drivers on Windows
Consequence of Uninstalling Graphics Drivers on Windows Uninstalling graphics drivers can result in washed-out colors and incorrect resolution if the system relies on native graphics drivers.
What Happens When You Uninstall Graphics Drivers on Windows
Consequence of Uninstalling Graphics Drivers on Windows Uninstalling graphics drivers can result in washed-out colors and incorrect resolution if the system relies on native graphics drivers.
 5 Best Smart Relay Switches to Make Your Existing Sockets Smart
Smart relay switches connect to the internet and can control the socket they are attached to -- be it a wall outlet, a light bulb, or your air conditioner.
5 Best Smart Relay Switches to Make Your Existing Sockets Smart
Smart relay switches connect to the internet and can control the socket they are attached to -- be it a wall outlet, a light bulb, or your air conditioner.
 How to Disable Task View in Windows 10 Completely
The Task View feature in Windows 10 is a boon for power users.
How to Disable Task View in Windows 10 Completely
The Task View feature in Windows 10 is a boon for power users.
 5 Ways to Completely Disable Windows Defender
Method 1: Using Command Prompt Step 1: Press the Windows key on your keyboard, type Command Prompt, and click Run as administrator.
5 Ways to Completely Disable Windows Defender
Method 1: Using Command Prompt Step 1: Press the Windows key on your keyboard, type Command Prompt, and click Run as administrator.
The article above may contain affiliate links which help support Guiding Tech. The content remains unbiased and authentic and will never affect our editorial integrity.