How to Change Date and Time in Windows
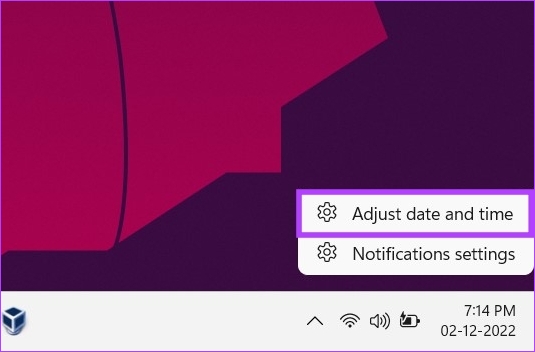
Step 1: On the desktop, right-click on the Date and time widget at the bottom right corner.
Step 2: From the context menu, select Adjust date and time. You will be taken to the Date & time settings window.
Step 3: Toggle off Set time automatically.
Note: If the option is already toggled off, move to the next method.

Step 4: Click the Change button next to Set the date and time manually.
Step 5: Now, change the date and time as per your preference. Finally, press the Change button.

And that’s about it. The date and time change on your PC as needed. Well, if you don’t want to do it through the Settings app, you can do it the traditional way.
How to Change Date and Time on Windows With Old UI
Step 1: Press the Windows key, type Control Panel, and click Open.
Step 2: Go to Clock and Region.

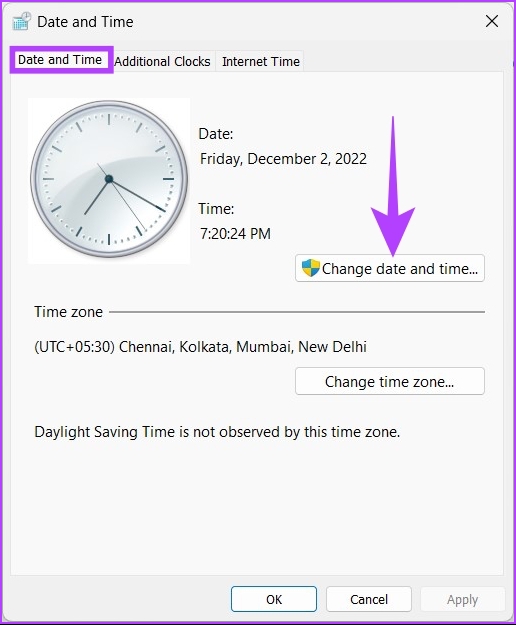
Step 3: Under the Clock and Region window, select Date and time.
Step 4: Click Change date and time.
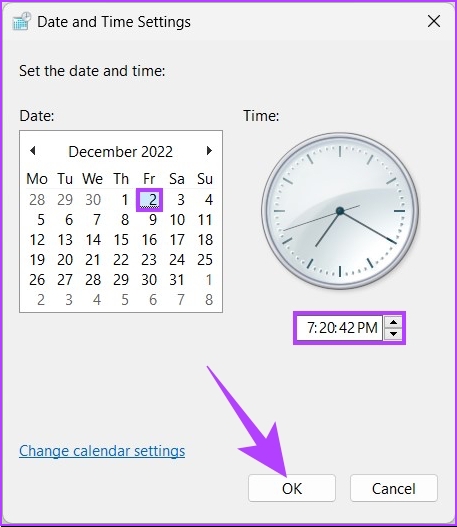
You will be presented with an option to change the date and time in the old-fashioned Windows way.
Step 5: After setting the date and time, click OK to apply the changes.
There you go. You have successfully changed the date and time using the old-fashioned way. This method is still prevalent, even after the release of Windows 11.
How to Set Date and Time Automatically on Windows
If you don’t want to manually change anything and want the operating system to set everything up for you, or if you want to roll back all the manual changes you made and automatically set your date and time, follow the below instructions.
Step 1: Press the Windows key, type Settings, and click Open.
Step 2: Go to Time & language.

Step 3: Now, select Date & time.
Step 4: Under Date & time, click on Time zone.

Step 5: From the drop-down, select your Time zone.

That’s it. Your time zone gets changed, and all the manual settings you made earlier will be replaced and updated with the time zone you select.
How to Synchronize Windows Time and Date to an Internet Time Server
Step 1: Press the Windows key, type Control Panel, and click Open.
Step 2: Go to Clock and Region.
Step 3: Select the Date and time.
Step 4: Go to the Internet Time tab and click Change settings.
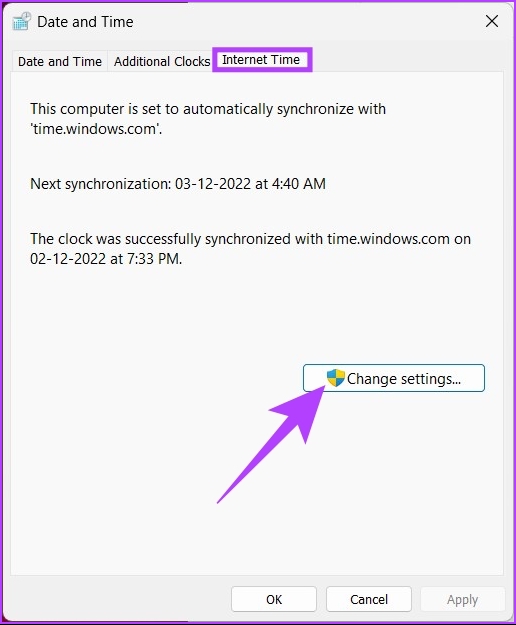
Step 5: In the Internet Time Settings window, check the Synchronize with an Internet time server box. Additionally, click the Update now button.
Note: You can change the server to in.pool.ntp.org if you are in India or time.nist.gov, the time server of the US National Institute of Standards and Technology.
Step 6: Finally, click OK.

FAQs
Several factors can cause your computer to display the wrong date and time. Among them are malware or viruses that change the system time, low CMOS batteries, and disabled Windows Time Service.
If this occurs, it is probably because your motherboard’s CMOS battery is low or dead. Once you change it, you will be good to go.
The ability to maintain accurate time on your system is the most basic requirement for operating a computer network. Other than that, many tasks, such as file transfers, file details, basic recordkeeping, and so on, require accurate time.
Was this helpful?
Last updated on 20 August, 2024
1 Comment
Leave a Reply
Read Next
 3 Ways to Change Date Created, Date Modified, and Other Attributes on Windows
Potential Risks and Considerations of Modifying File Attributes Manually changing the creation and modification date of any file on Windows can be useful for better organizing your files, making them
3 Ways to Change Date Created, Date Modified, and Other Attributes on Windows
Potential Risks and Considerations of Modifying File Attributes Manually changing the creation and modification date of any file on Windows can be useful for better organizing your files, making them
 2 Ways to Change Your Age (and Birth Date) on Discord
Things to Know Before Changing Your Age on Discord 1. Discord's 'Terms of Service' clearly state that users must be at least 13 years old to use the platform.
2 Ways to Change Your Age (and Birth Date) on Discord
Things to Know Before Changing Your Age on Discord 1. Discord's 'Terms of Service' clearly state that users must be at least 13 years old to use the platform.
 How to Show Missing Date and Time in Taskbar on Windows
A few days back, I was playing with the Taskbar settings on my Windows laptop.
How to Show Missing Date and Time in Taskbar on Windows
A few days back, I was playing with the Taskbar settings on my Windows laptop.
 Top 5 Ways to Add Date and Timestamp to Photos on Android
Over the last couple of iterations, the humble phone camera has evolved significantly.
Top 5 Ways to Add Date and Timestamp to Photos on Android
Over the last couple of iterations, the humble phone camera has evolved significantly.
 How To Fix Your Phone Date Is Inaccurate Error In WhatsApp
When WhatsApp is your go-to platform for communicating with friends and family, you'd want it to function properly.
How To Fix Your Phone Date Is Inaccurate Error In WhatsApp
When WhatsApp is your go-to platform for communicating with friends and family, you'd want it to function properly.
 How to Add Date, Time and Weather to Your Phone’s Home Screen
How to Show Date, Time, and Weather on iPhone Home Screen You can do so, in the following two ways.
How to Add Date, Time and Weather to Your Phone’s Home Screen
How to Show Date, Time, and Weather on iPhone Home Screen You can do so, in the following two ways.
 4 Ways to Get Google Search Results by Date
Method 1: Search by Date Using the Google Any Time Tool The Google Any Time tool is handy when researching or looking for information from a specific time.
4 Ways to Get Google Search Results by Date
Method 1: Search by Date Using the Google Any Time Tool The Google Any Time tool is handy when researching or looking for information from a specific time.
 How to Insert a Date Picker in Google Sheets and Google Docs
Google Sheets and Google Docs provide a free, online alternative to Microsoft Office, along with unique features.
How to Insert a Date Picker in Google Sheets and Google Docs
Google Sheets and Google Docs provide a free, online alternative to Microsoft Office, along with unique features.
The article above may contain affiliate links which help support Guiding Tech. The content remains unbiased and authentic and will never affect our editorial integrity.


Correction of Date on PC