With the average office worker receiving over 100 emails per day, managing your inbox can feel overwhelming. A good way to maintain order is to automatically divert incoming messages to different folders in Outlook. You can do this by setting up a rule, either via an existing email or by using the Rules Wizard.
Option 1: Creating a Rule From an Email
This is the quickest and easiest method to divert emails from your inbox to a folder of your choice.
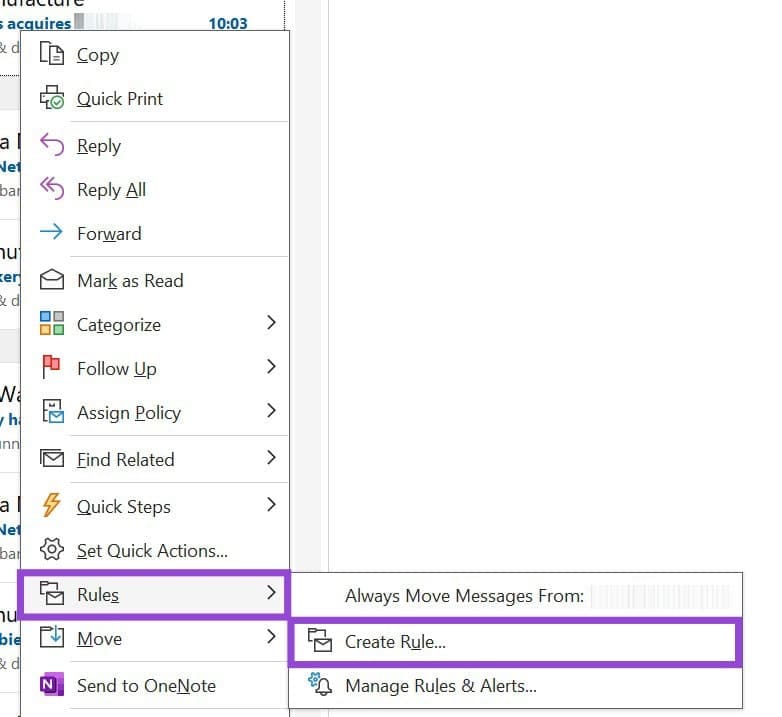
Step 1. Right-click any message from the sender you want to filter.
Step 2. Hover the mouse over “Rules” and select “Create Rule.”
Step 3. Tick the box next to “From [sender’s name].”
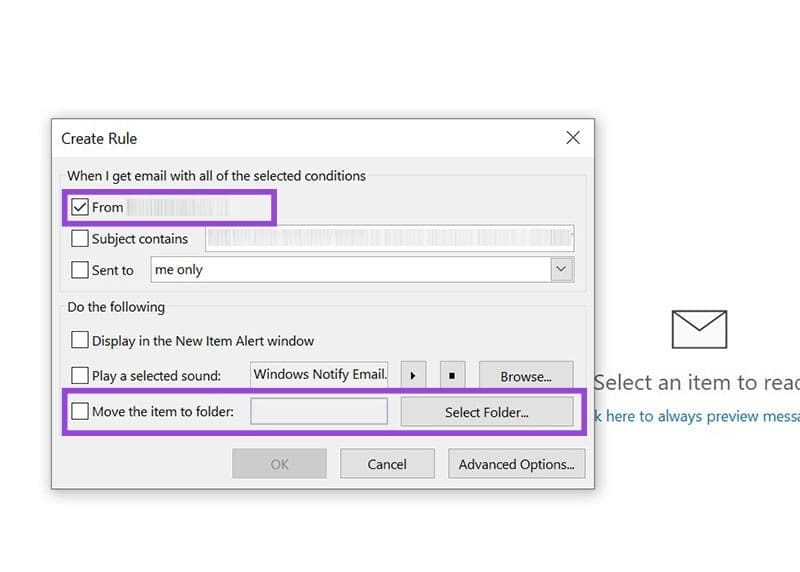
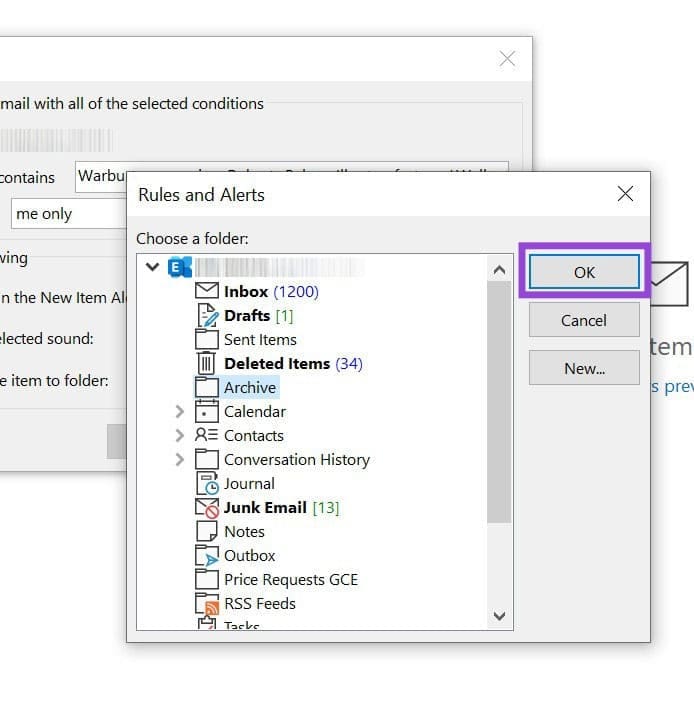
Step 4. Check the box “Move the item to folder:” and select the folder from the next pop-up window.
Step 5. Click on “OK.”
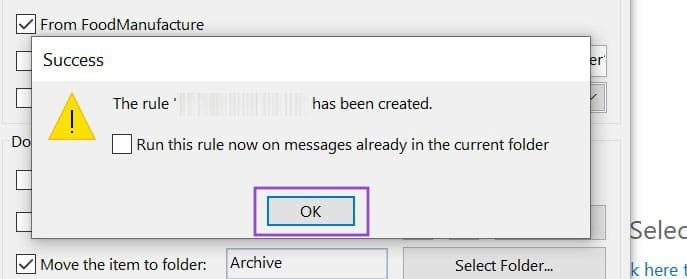
Step 6. Outlook will tell you the rule has been created and ask if you want to “Run this rule now on messages already in the current folder.” Check this box to apply the rule to every matching message in your inbox.
Step 7. Click “OK.”
Option 2: Using the Rules Wizard (Advanced Method)
If you want more control over how messages are filtered, you’ll need to use Outlook’s Rules Wizard. Although this method is more difficult and time-consuming, it does allow you to automate more actions and fine-tune.
Step 1. Navigate to the “Move” group in the Home tab. Click “Rules” and select “Manage Rules & Alerts…”
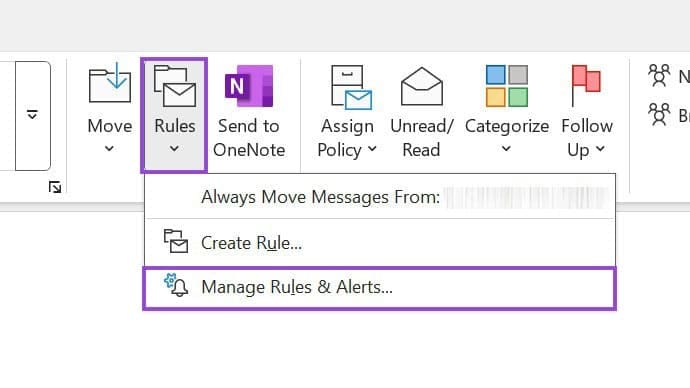
Step 2. In the next window, click “New Rule…”

Step 3. Under the “Start from a blank rule,” choose “Apply rule on messages I receive.”

Step 4. Click “Next.”
Step 5. Select the various conditions you want to apply (e.g., from people or public group).

Step 6. Then, click the blue underlined text for each of your conditions to specify the details, such as the name of the sender or the level of importance. Click “Next.”

Step 7. Double-click the name or public group in the “Rule Address” window, and click “OK.”
Step 8. Click “Next.”
Step 9. Check “move it to the specified folder.”

Step 10. In the lower box, click the blue underlined word “specified” and choose the target folder for your emails. Click “Next.”
Step 11. Give the rule a name (e.g., sent only to me) and tick the box “Turn on this rule.” You can optionally choose to “Run this rule now on messages already in ‘inbox’” by checking that box, too.

Step 12. Finally, click “Finish.”
Was this helpful?
Last updated on 25 October, 2025
Read Next
 How to Share Gmail Folder With Another User Along With Emails Automatically
How to Share a Gmail Label With Other Users To share your Gmail labels with another person, you will need a Chrome extension called Label Sharing for Gmail by cloudHQ.
How to Share Gmail Folder With Another User Along With Emails Automatically
How to Share a Gmail Label With Other Users To share your Gmail labels with another person, you will need a Chrome extension called Label Sharing for Gmail by cloudHQ.
 How to Create Folders and Move Emails in Outlook on Mac and Windows
Microsoft Outlook app for Mac and Windows lets you manage email conversations and calendar events.
How to Create Folders and Move Emails in Outlook on Mac and Windows
Microsoft Outlook app for Mac and Windows lets you manage email conversations and calendar events.
 How to Automatically Forward Emails in Outlook
There are several reasons you may want to automatically forward emails in Outlook.
How to Automatically Forward Emails in Outlook
There are several reasons you may want to automatically forward emails in Outlook.
 How to Fix Outlook for Mac Not Receiving Emails Automatically
Basic Fixes Check email storage: If your email inbox storage is full, you won’t receive new messages in any app or on the web Switch between new and classic Outlook
How to Fix Outlook for Mac Not Receiving Emails Automatically
Basic Fixes Check email storage: If your email inbox storage is full, you won’t receive new messages in any app or on the web Switch between new and classic Outlook
 How to Automatically CC or BCC Yourself in Outlook and Gmail
How to Automatically CC or BCC Yourself in Outlook Step 1: Open Outlook and click on the three-dot menu.
How to Automatically CC or BCC Yourself in Outlook and Gmail
How to Automatically CC or BCC Yourself in Outlook Step 1: Open Outlook and click on the three-dot menu.
 How to Delete Multiple Emails in Outlook on Mobile and Web
How to Delete Multiple Outlook Emails on Mobile Let's first start with how you can mass delete emails from the Microsoft Outlook app on your mobile.
How to Delete Multiple Emails in Outlook on Mobile and Web
How to Delete Multiple Outlook Emails on Mobile Let's first start with how you can mass delete emails from the Microsoft Outlook app on your mobile.
 How to Translate Emails in Microsoft Outlook
How to Translate an Email Message in Outlook for Desktop In order to translate messages manually in Outlook, you first need to set up your preferred translation language in the
How to Translate Emails in Microsoft Outlook
How to Translate an Email Message in Outlook for Desktop In order to translate messages manually in Outlook, you first need to set up your preferred translation language in the
 How to Send Recurring Emails in Microsoft Outlook
Set up Recurring Emails Using Power Automate The purpose of setting up a recurring email is to ensure the email is sent out automatically during the required period.
How to Send Recurring Emails in Microsoft Outlook
Set up Recurring Emails Using Power Automate The purpose of setting up a recurring email is to ensure the email is sent out automatically during the required period.
The article above may contain affiliate links which help support Guiding Tech. The content remains unbiased and authentic and will never affect our editorial integrity.

