How to Automatically CC or BCC Yourself in Outlook
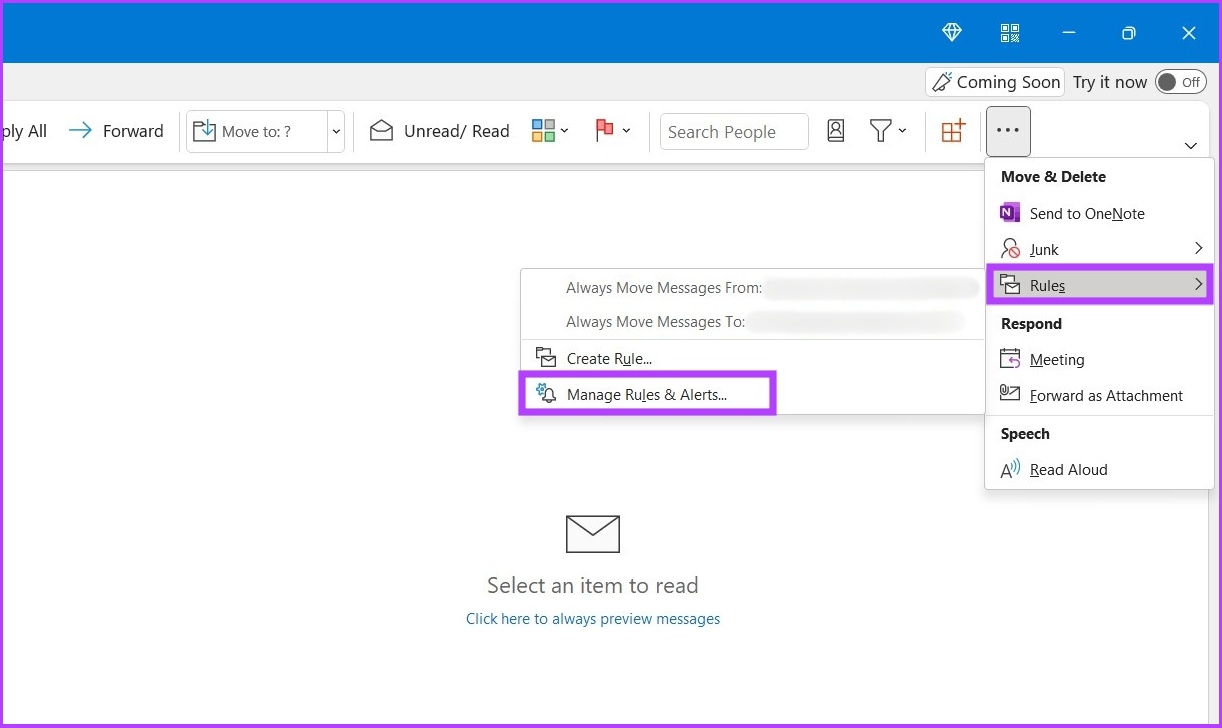
Step 1: Open Outlook and click on the three-dot menu.
Step 2: Now, go to Rules and select Manage Rules and Alerts in the drop-down menu.
Step 3: Click on New Rule.

Step 4: Click the Apply rule on messages I send and click Next.

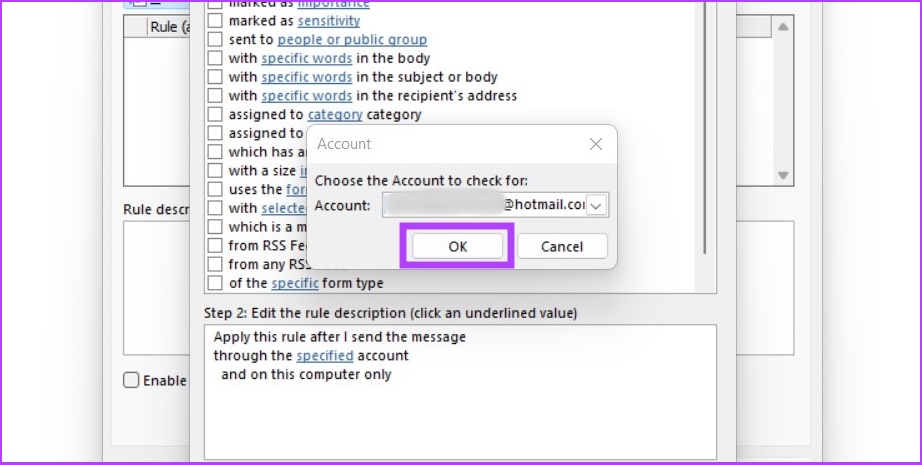
Step 5: Check the box next to through the specified account in Step 1, and click on the specified in Step 2.

Step 6: Choose your email account and select OK.
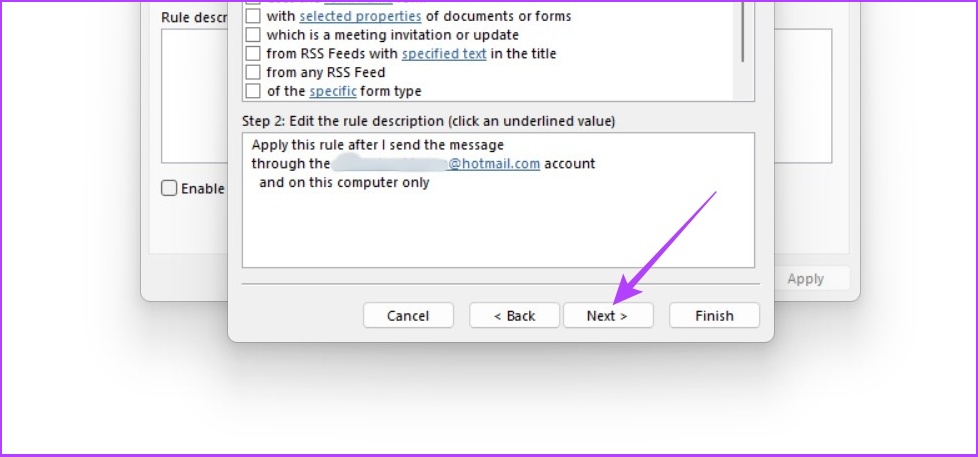
Step 7: Click on Next.
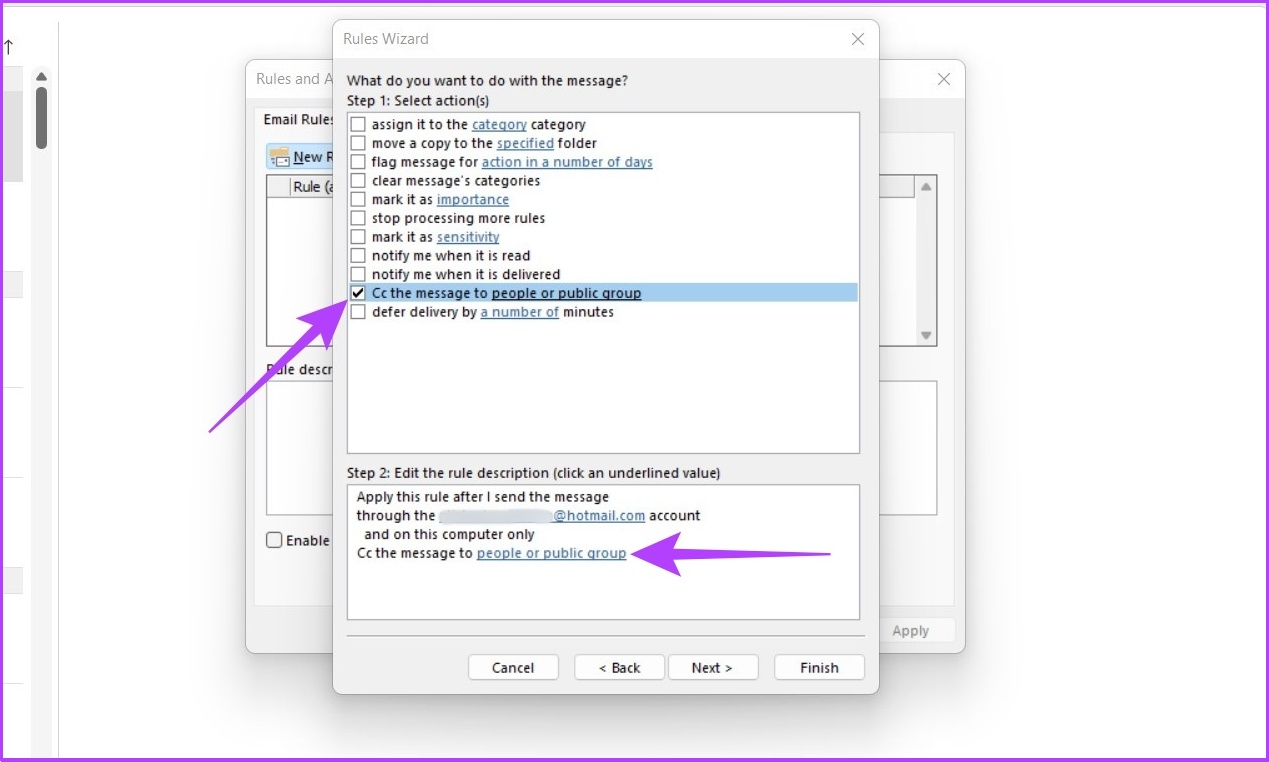
Step 8: In Step 1, check the box next to Cc the message to people or public group and click people or public group in Step 2.
Note: To BCC an email, select ‘Move a copy to the specified folder’ in Step 1.
Step 9: Now, add your Email ID and click OK.
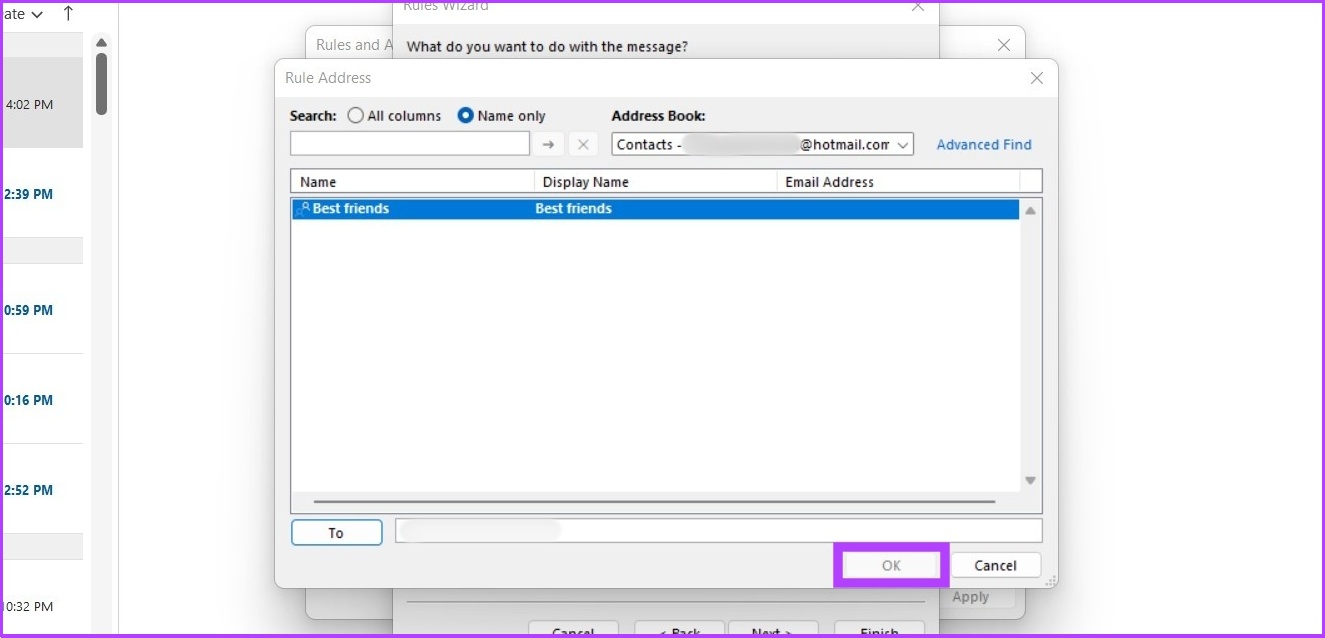
Step 10: Select the exception if you want to exclude this rule for specific emails and click on Next.

Step 11: Enter your Email ID, select Turn on this rule in Step 2, and click Finish.

Note: To undo CC or BCC automation in Outlook, go to Rules > Manage Rules & Alerts > Under Rule, select the rule you created to automate CC and BCC > Click Delete. That’s it. You will be back to normal.
Now, every time you send an email in Outlook, you’ll automatically receive a copy of it. This can be handy if you want to keep track of all the correspondence you send out. However, if you don’t want to CC or BCC yourself in every email, you can simply auto-forward emails in Outlook.
How to Automatically CC or BCC Yourself in Gmail
Gmail doesn’t natively support auto-CC or BCC emails. So, we will use a free browser extension called Auto BCC & Auto CC extension for Chrome.
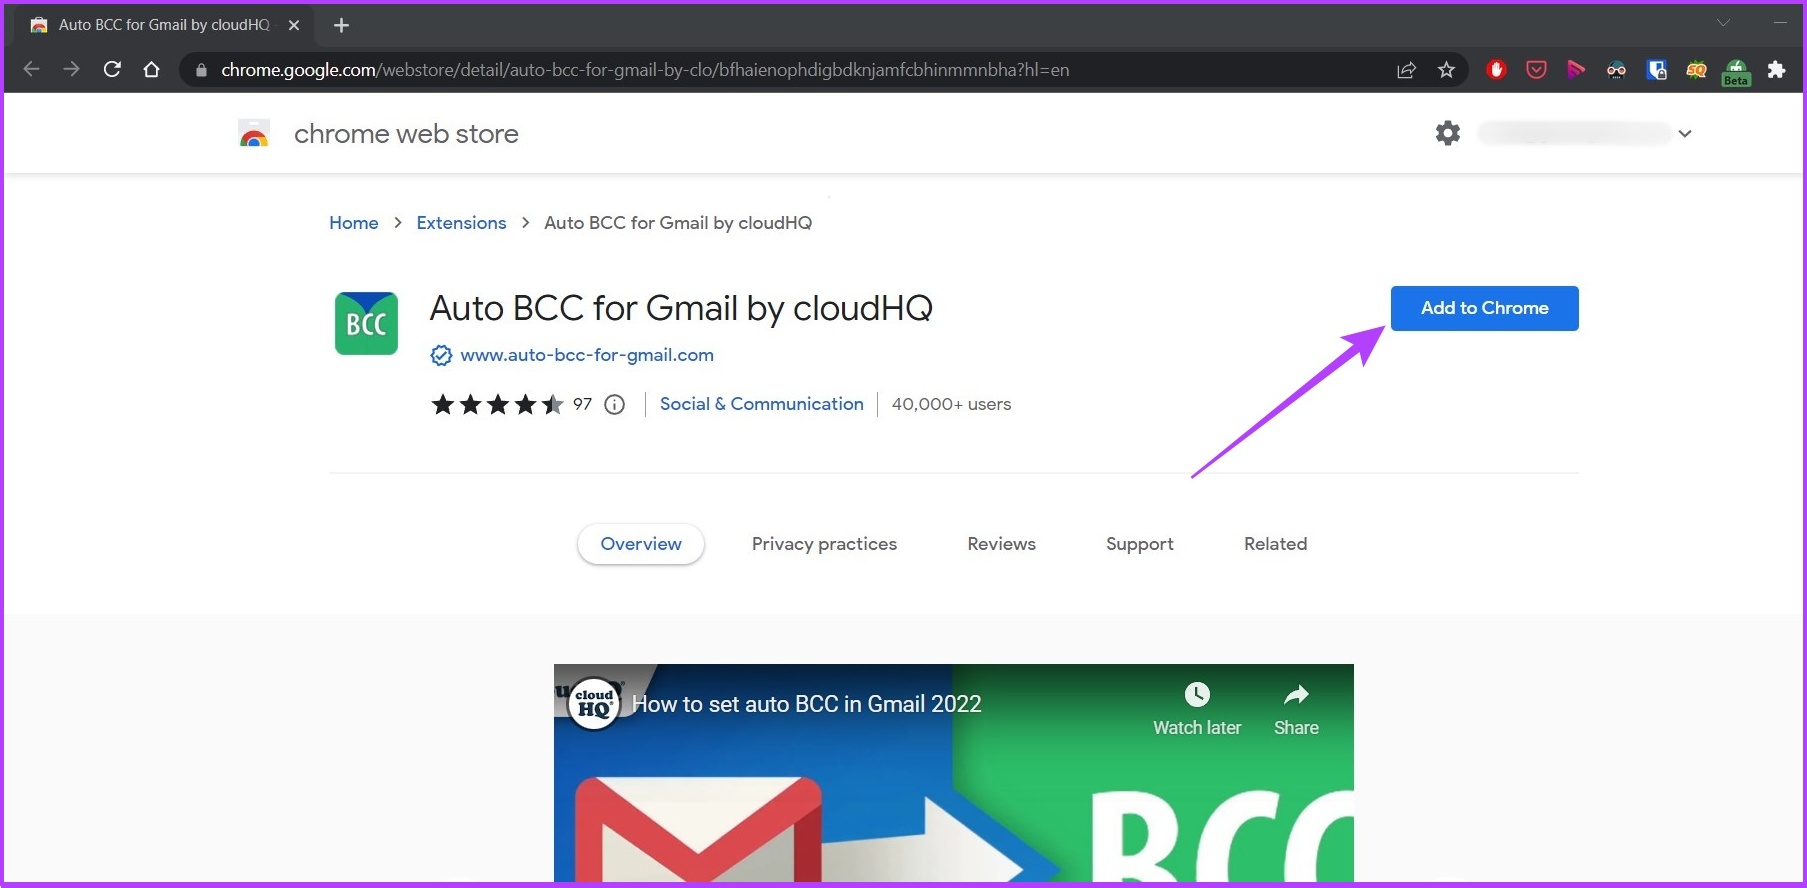
Step 1: Go to Auto BCC for Gmail and click Add to Chrome to download the Chrome extension.
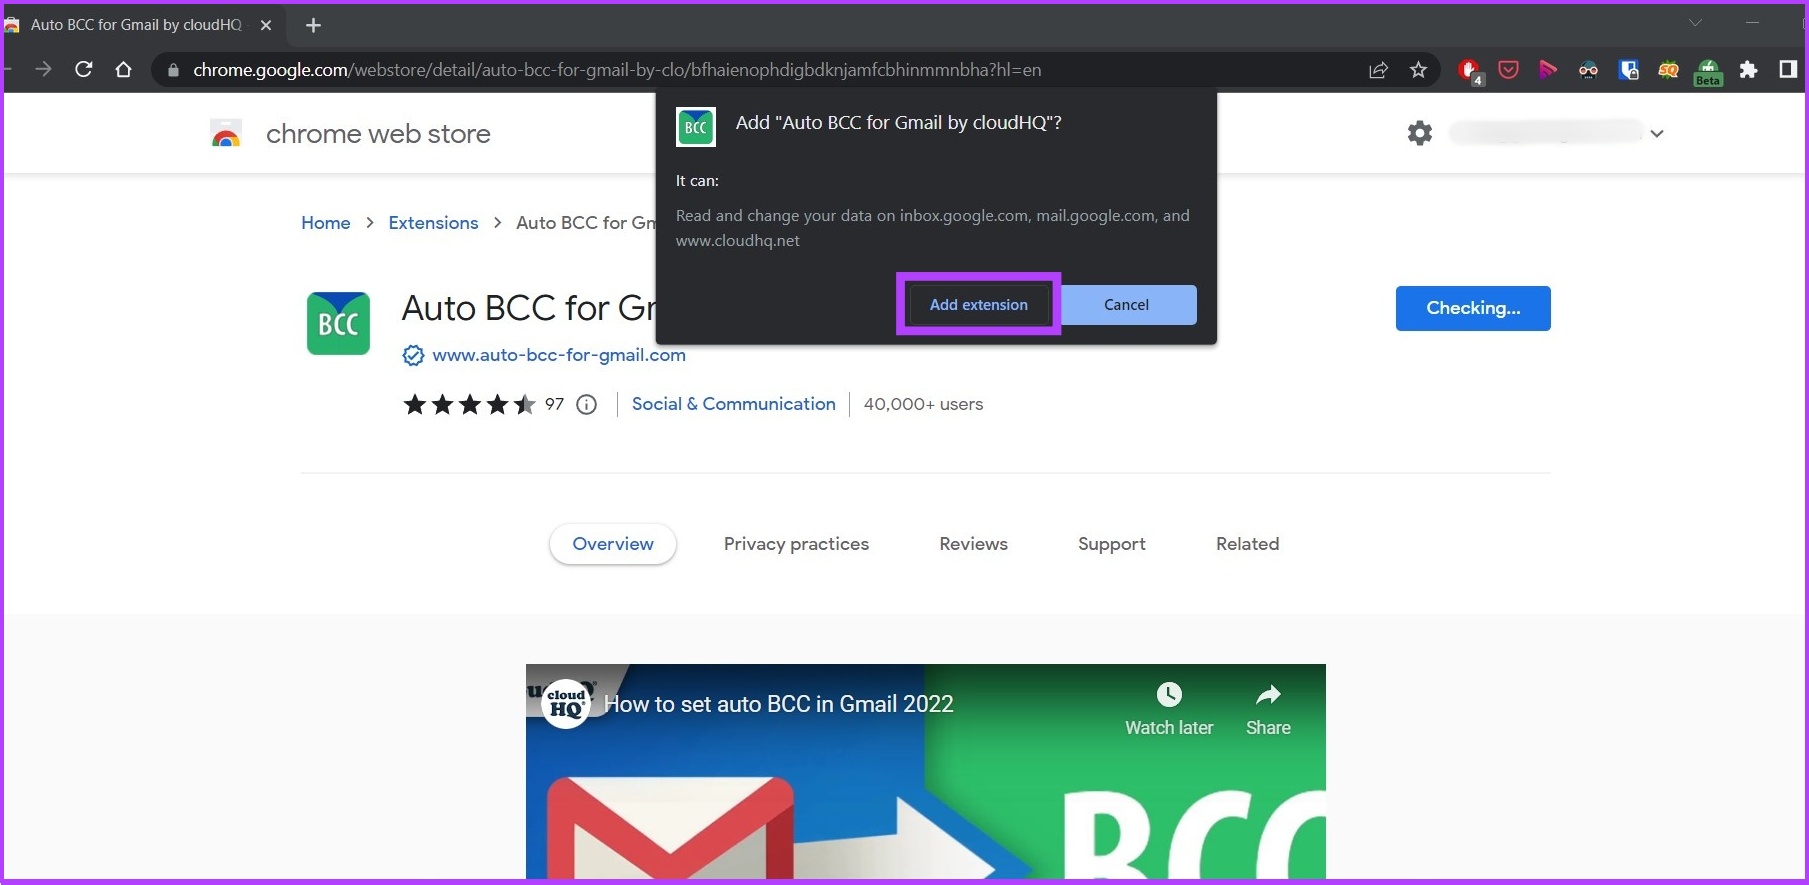
Step 2: Click on Add extension to add this extension on Chrome.
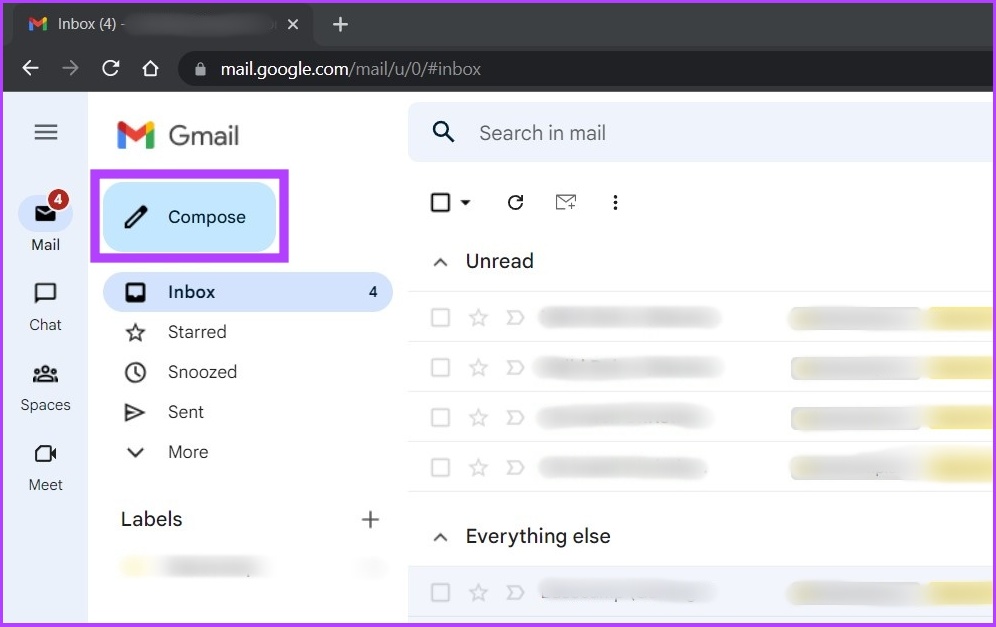
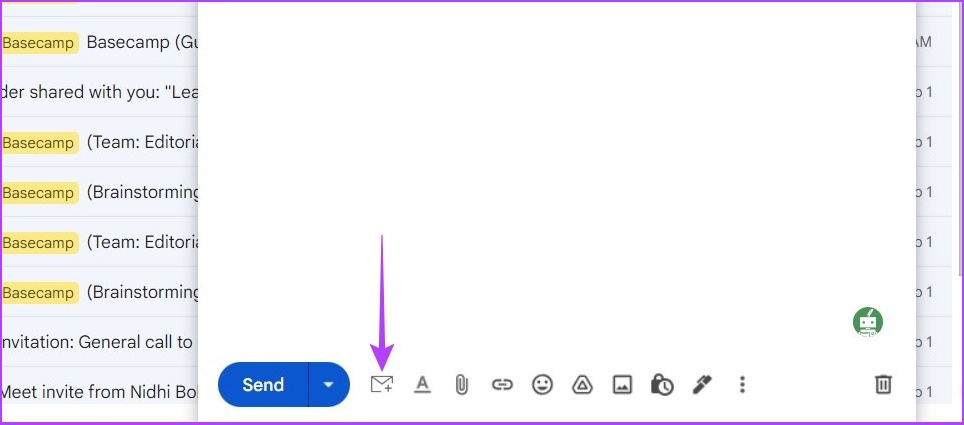
Step 3: Now, open Gmail on Chrome and click the Compose button.
Step 4: Click the envelope icon right next to the send button.
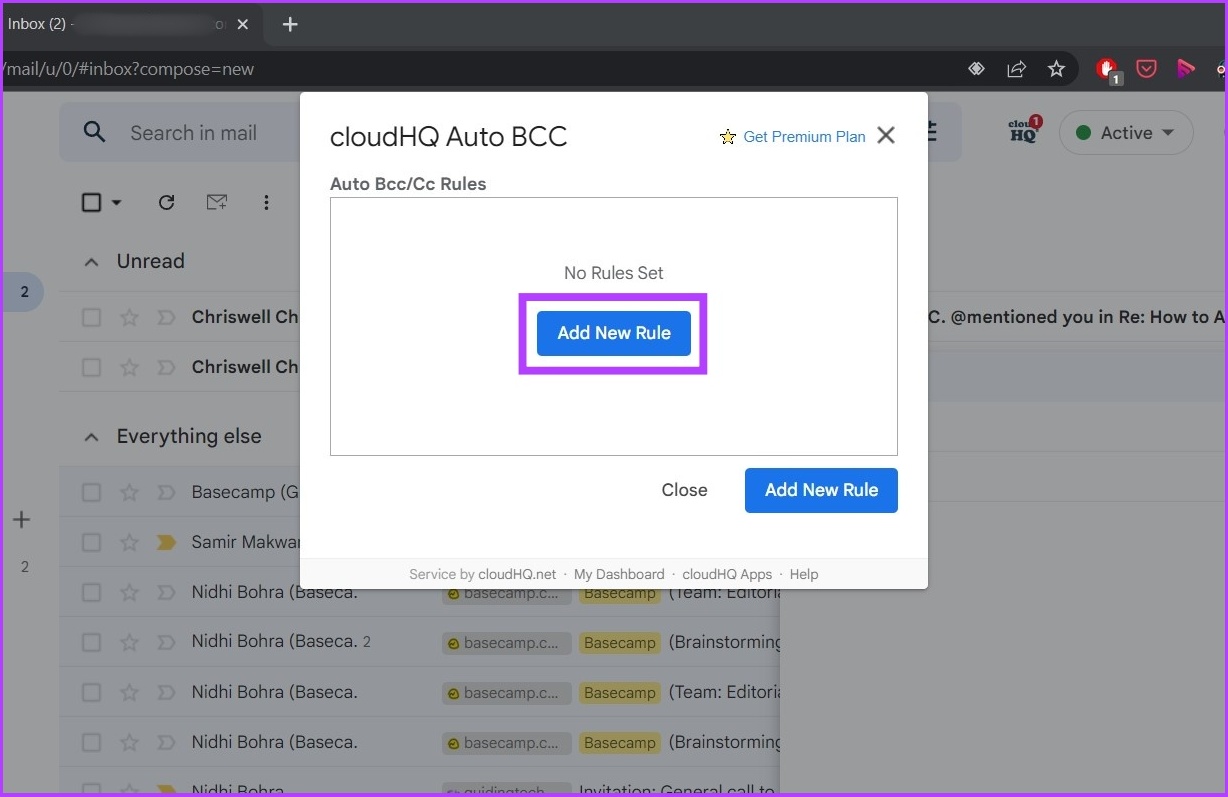
Step 5: Click on Add New Rule.
Step 6: Under When emails are sent from, you should see your email already filled in. In the drop-down menu beneath it, select to anyone.
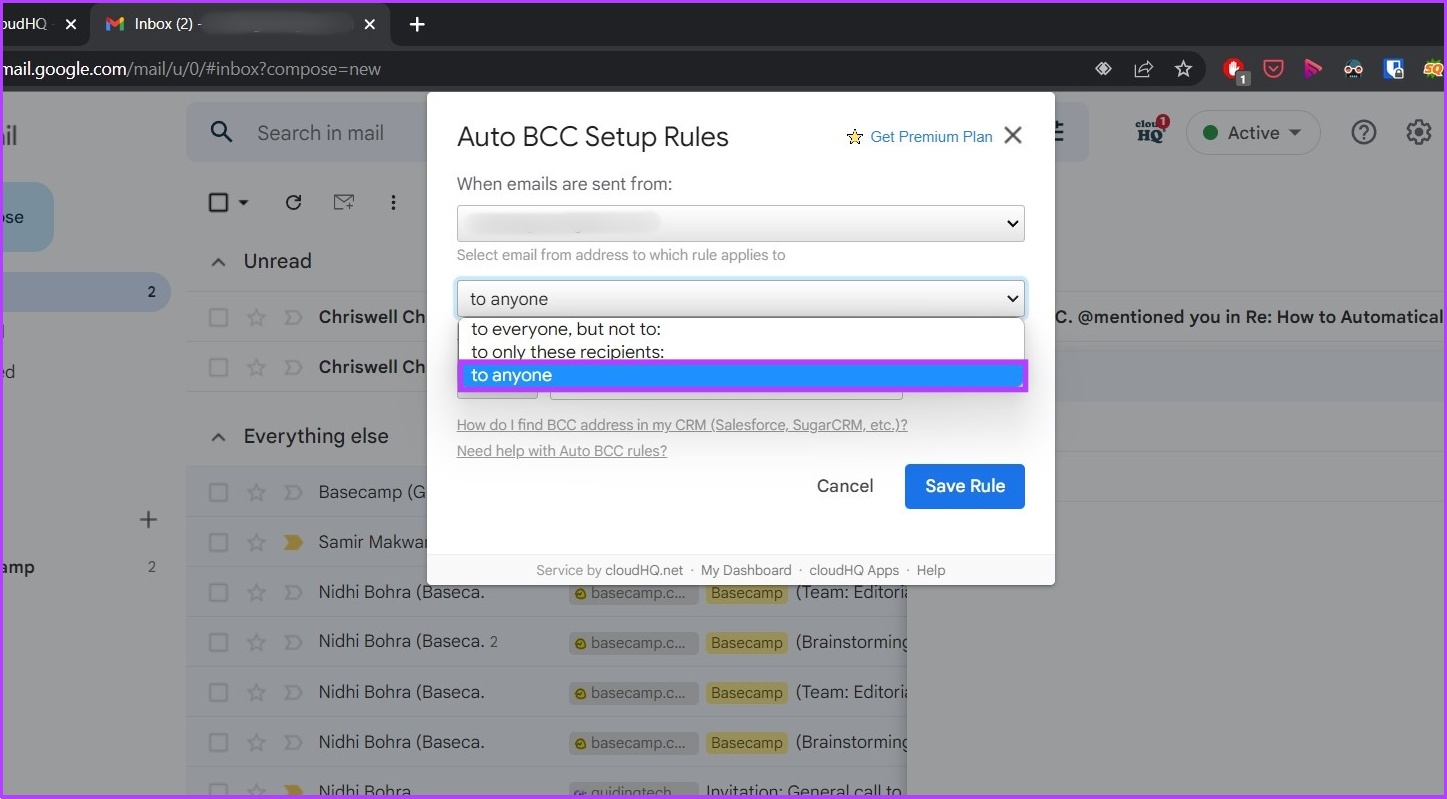
Step 7: Select BCC or CC (whatever you prefer) in the drop-down.

Step 8: Now, enter your email address.
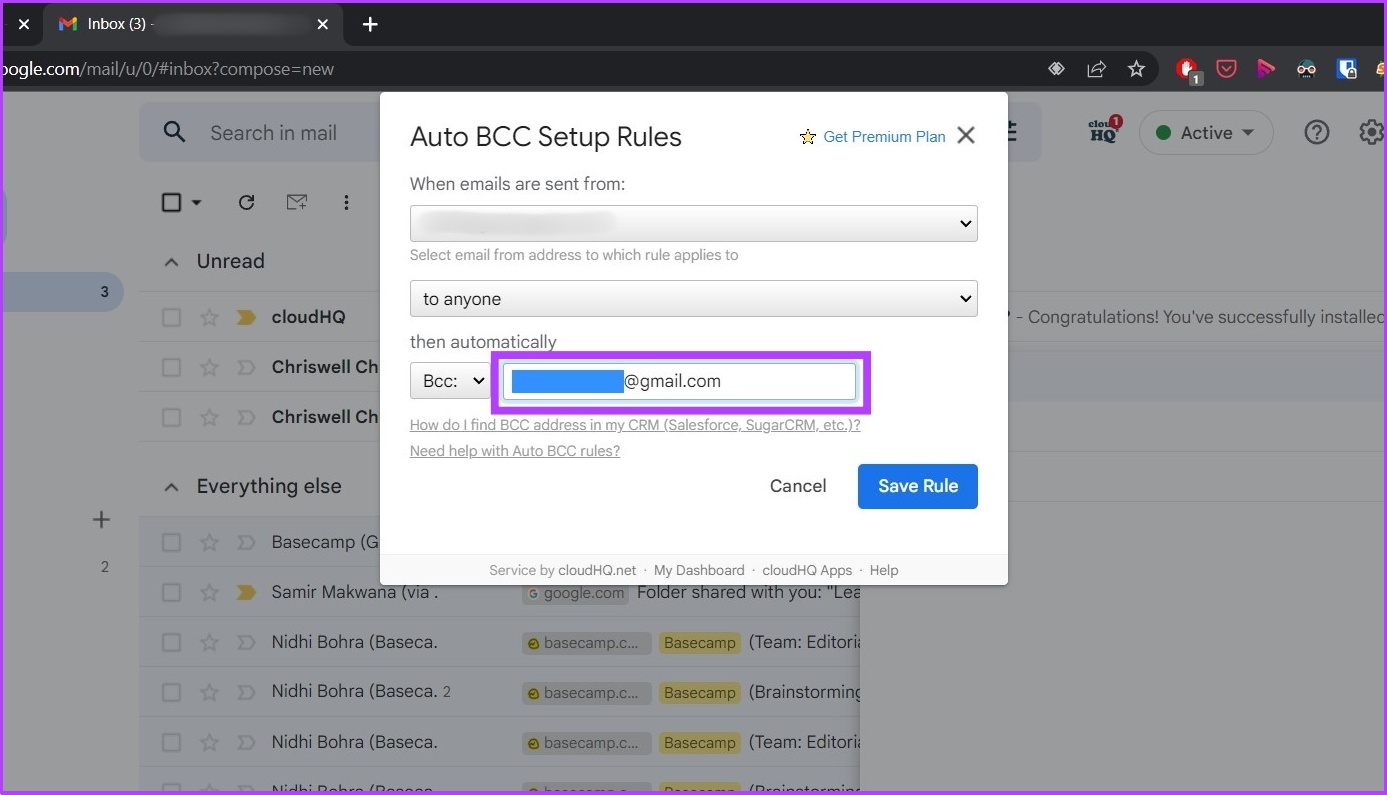
Step 9: Click Save Rule.

That’s it. You have enabled auto CC or BCC yourself in Gmail. Finally, click on Close and compose your email as usual.
To turn off auto CC or BCC, go to the Google Account Permission page > CloudHQ > Remove Access. This will remove account access. Once removed, go to Manage Extension on Chrome and remove the Auto BCC for Gmail extension.
Was this helpful?
Last updated on 29 August, 2024
1 Comment
Leave a Reply
Read Next
 3 Ways to Create a WhatsApp Group or a Chat With Yourself
Method 1: Create a Group By Removing Another Member You can temporarily create a group with just one member, and remove them later.
3 Ways to Create a WhatsApp Group or a Chat With Yourself
Method 1: Create a Group By Removing Another Member You can temporarily create a group with just one member, and remove them later.
 How to Hide and Unhide Yourself on Google Meet (PC and Mobile)
Note: When you hide your camera feed, you can still see others, depending on their camera privacy setting.
How to Hide and Unhide Yourself on Google Meet (PC and Mobile)
Note: When you hide your camera feed, you can still see others, depending on their camera privacy setting.
 Can You Remove Yourself From a Private Story on Snapchat
In order to ensure your snaps remain private, users can create private stories on Snapchat.
Can You Remove Yourself From a Private Story on Snapchat
In order to ensure your snaps remain private, users can create private stories on Snapchat.
 How to Share Gmail Folder With Another User Along With Emails Automatically
How to Share a Gmail Label With Other Users To share your Gmail labels with another person, you will need a Chrome extension called Label Sharing for Gmail by cloudHQ.
How to Share Gmail Folder With Another User Along With Emails Automatically
How to Share a Gmail Label With Other Users To share your Gmail labels with another person, you will need a Chrome extension called Label Sharing for Gmail by cloudHQ.
 How to Mute Yourself or Others on FaceTime
Mute Yourself on FaceTime (iPhone and iPad) You can take FaceTime calls using your iPhone or iPad while you are outside and don't have access to your Mac.
How to Mute Yourself or Others on FaceTime
Mute Yourself on FaceTime (iPhone and iPad) You can take FaceTime calls using your iPhone or iPad while you are outside and don't have access to your Mac.
 3 Ways to Text Yourself on iMessage
Send a Message to Yourself on iMessage If you want to jot down something or remind yourself of something, text yourself on your iPhone or Mac using iMessage.
3 Ways to Text Yourself on iMessage
Send a Message to Yourself on iMessage If you want to jot down something or remind yourself of something, text yourself on your iPhone or Mac using iMessage.
 How to Fix Outlook for Mac Not Receiving Emails Automatically
Basic Fixes Check email storage: If your email inbox storage is full, you won’t receive new messages in any app or on the web Switch between new and classic Outlook
How to Fix Outlook for Mac Not Receiving Emails Automatically
Basic Fixes Check email storage: If your email inbox storage is full, you won’t receive new messages in any app or on the web Switch between new and classic Outlook
 How to Forward Email to Your Phone as a Text
Popular Carriers and SMS Gateways to Convert Email to Text Before we move forward, we need to look at the phone carrier and their email-SMS gateway address.
How to Forward Email to Your Phone as a Text
Popular Carriers and SMS Gateways to Convert Email to Text Before we move forward, we need to look at the phone carrier and their email-SMS gateway address.
The article above may contain affiliate links which help support Guiding Tech. The content remains unbiased and authentic and will never affect our editorial integrity.
The section for Outlook will NOT BCC! It will instead CC. Moving an email from one folder to another does not control how the email is sent, only how the email is stored after it is sent.
So you still expose to the intended recipient that you sent yourself a copy.