Basic Fixes:
- Ensure your devices support Miracast and Wi-Fi Direct protocol: One essential prerequisite for using the wireless display feature on Windows 11 is that all your devices, including your PC and the transmitting device, should support the Miracast and Wi-Fi Direct protocol.
- Ensure both devices are on the same Wi-Fi network: This is because the Wireless Display feature on Windows 11 works via Miracast. This feature depends on the Wi-Fi Direct protocol to share media files and mirror content between devices on the same network.
Fix 1: Reinstall Wireless Display Through Optional Features
If the problem is caused by corrupt files or settings linked to the wireless display functionality, reinstalling through optional features will fix the problem. Follow these steps:
Step 1: Press Windows + I to open the Settings app.
Step 2: Click the System menu on the left, then on the right, click Optional Features.

Step 3: Click View features.

Step 4: Type Wireless display in the search box, click the Wireless Display checkbox, and click the Install button.

Step 5: Finally, restart the computer.
Fix 2: Allow Wireless Display Feature Through The Windows Defender Firewall
The Windows Defender Firewall may often prevent the wireless display feature from connecting to the Internet. Therefore, you must allow it through the Windows Defender Firewall. Follow the steps below.
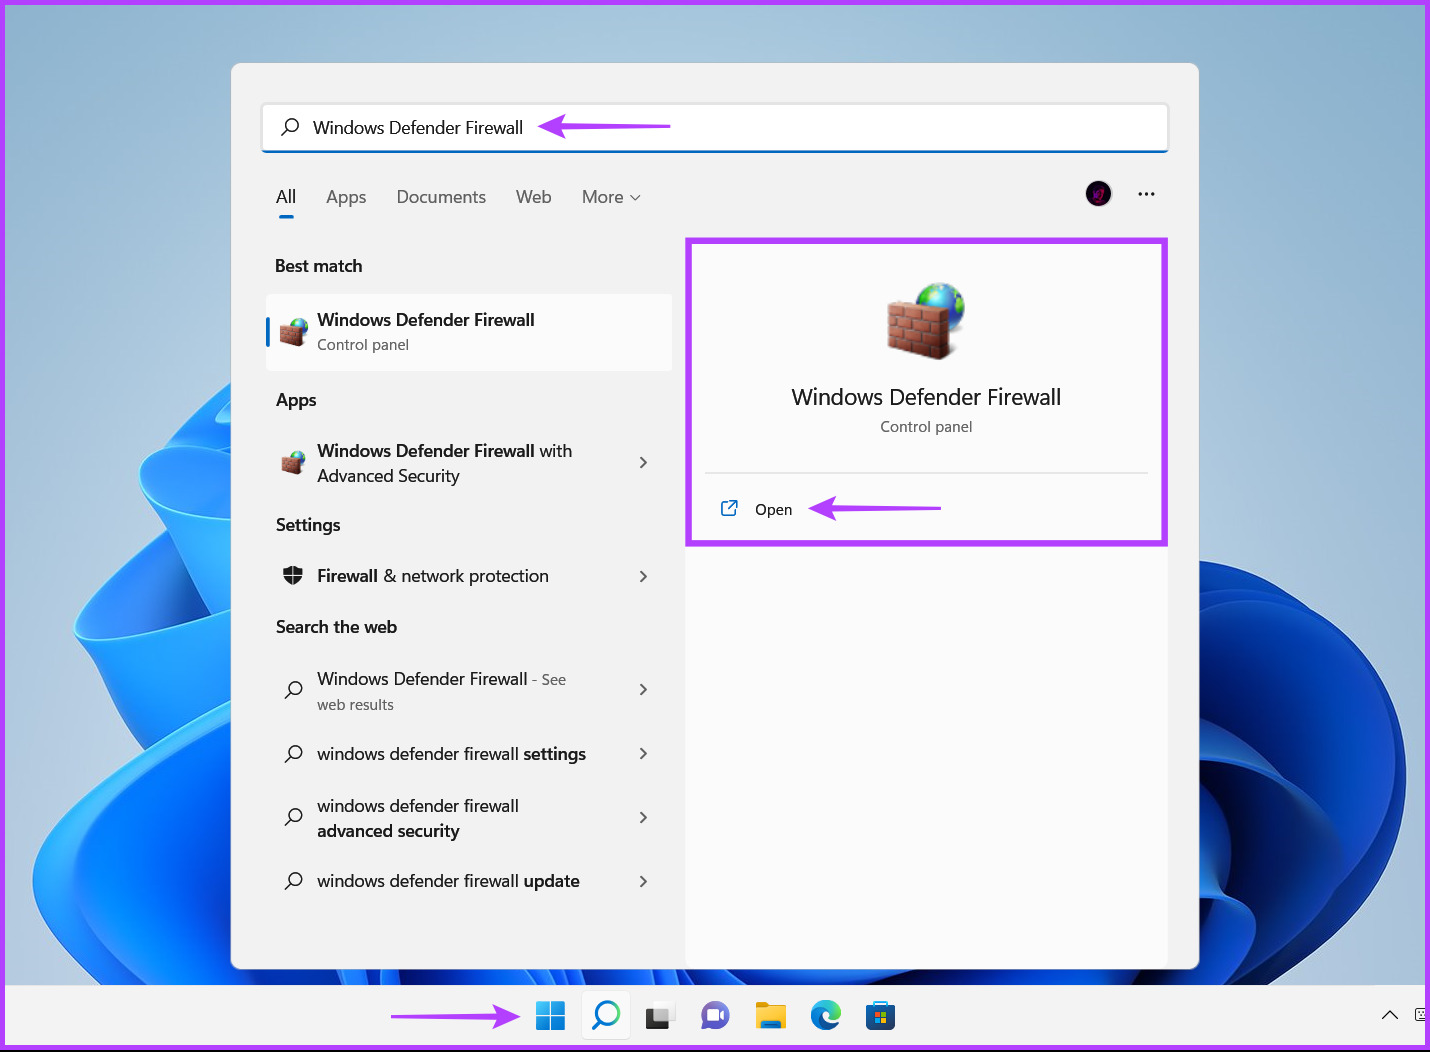
Step 1: Click the Start button on the taskbar, type Windows Defender Firewall, and click Open next to the Windows Defender Firewall search result.
Step 2: From the left column, click on the Allow an app or feature through the Windows Defender Firewall option.

Step 3: Click the Change Settings button at the window’s top-right corner. If a User Account Control prompt appears, select Yes.

Step 4: Lastly, look for an entry called Wireless Display. Once located, check all the checkboxes, including those on the left side of the entry and those under the Private and Public columns.

Fix 3: Temporarily Disable Firewall for Public Networks
This fix will resolve the problem if your firewall blocks some communication channels Wireless Display uses when establishing the connection. Follow the steps below.
Step 1: Press the Windows key, type Security, and click Windows Security.

Step 2: On the right pane, click Firewall & Network Protection.

Step 3: Click Public Network.
Step 4: Finally, toggle off Microsoft Defender Firewall.

Fix 4: Check If the Wi-Fi Direct Driver Is Enabled
The wireless display feature on Windows 11 works using Wi-Fi Direct. However, the Wi-Fi Direct driver responsible for running this feature may be disabled. Here’s how to check if the Wi-Fi Direct driver is disabled on your PC and how to enable it if it’s turned off:
Step 1: Right-click the Start button and select Device Manager from the list.

Step 2: Under Network adapters, right-click Microsoft Wi-Fi Direct Virtual Adapter and select Enable Device.

Try using the Wireless display feature again. If this doesn’t work, move on to the next solution.
Fix 5: Reinstall the Wi-Fi Driver
Your Wi-Fi Direct driver may be corrupt. Reinstalling drivers using the device manager can easily fix driver-related issues.
Step 1: Right-click the Start button and select Device Manager from the list.
Step 2: Look for the Network adapters entry in the Device Manager window and double-click to expand it.

Step 3: Right-click on Microsoft Wi-Fi Direct Virtual Adapter and select Uninstall device.

Step 4: In the confirmation dialog that appears, click on Uninstall.

Step 5: Lastly, restart your PC.
After you restart your PC, Windows 11 will automatically search for and install the relevant Wi-Fi Direct driver. You may also reinstall or update other network drivers on your computer because some Wi-Fi adapters may support the Wi-Fi Direct feature without installing additional drivers.
Was this helpful?
Last updated on 23 July, 2024
Read Next
 6 Best Wireless Earbuds With Ambient Sound Feature
Wireless earphones are small, compact, and don't have the most tangled dread - wires.
6 Best Wireless Earbuds With Ambient Sound Feature
Wireless earphones are small, compact, and don't have the most tangled dread - wires.
 3 Fixes for iPhone Check In Feature Not Working or Unavailable
Basic Fixes: Ensure both devices are running iOS 17: Because the Check In feature is exclusive to iOS 17, to use it, both you and your contact must have iOS
3 Fixes for iPhone Check In Feature Not Working or Unavailable
Basic Fixes: Ensure both devices are running iOS 17: Because the Check In feature is exclusive to iOS 17, to use it, both you and your contact must have iOS
 Top 6 Wireless Earbuds With Wireless Charging
While wireless earbuds support support wired charging, it never hurts to drop them and let them charge overnight or over a long period.
Top 6 Wireless Earbuds With Wireless Charging
While wireless earbuds support support wired charging, it never hurts to drop them and let them charge overnight or over a long period.
 3 Fixes for Display Connection Might Be Limited Error on Windows
Try Basic Fixes Rule out any compatibility issues: Only computers with USB-C ports that support DisplayPort alternate modes can transmit video and audio signals.
3 Fixes for Display Connection Might Be Limited Error on Windows
Try Basic Fixes Rule out any compatibility issues: Only computers with USB-C ports that support DisplayPort alternate modes can transmit video and audio signals.
 How to Create and Use the Storage Spaces Feature on Windows 11
What Are Storage Spaces in Windows 11 and Why Should You Create One Storage Spaces lets you create an array or group of two or more physical hard drives to create
How to Create and Use the Storage Spaces Feature on Windows 11
What Are Storage Spaces in Windows 11 and Why Should You Create One Storage Spaces lets you create an array or group of two or more physical hard drives to create
 How to Display Internet Speed on Taskbar in Windows
https://youtu.be/m62gwMYvYVk Download Internet Speed Meter for Windows for Real-Time Monitoring To show internet speed in the taskbar on Windows, you will have to download a dedicated app known as NetSpeedMonitor.
How to Display Internet Speed on Taskbar in Windows
https://youtu.be/m62gwMYvYVk Download Internet Speed Meter for Windows for Real-Time Monitoring To show internet speed in the taskbar on Windows, you will have to download a dedicated app known as NetSpeedMonitor.
 6 Ways to Fix NVIDIA’s ‘Unable to Change Display Mode’ Error on Windows 11
Method 1: Terminate and Restart the NVIDIA Control Panel It is common for apps and their associated processes to encounter glitches and stop working properly.
6 Ways to Fix NVIDIA’s ‘Unable to Change Display Mode’ Error on Windows 11
Method 1: Terminate and Restart the NVIDIA Control Panel It is common for apps and their associated processes to encounter glitches and stop working properly.
The article above may contain affiliate links which help support Guiding Tech. The content remains unbiased and authentic and will never affect our editorial integrity.