Method 1: Terminate and Restart the NVIDIA Control Panel
It is common for apps and their associated processes to encounter glitches and stop working properly. Completely closing the NVIDIA Control Panel application and restarting it can fix the issue.
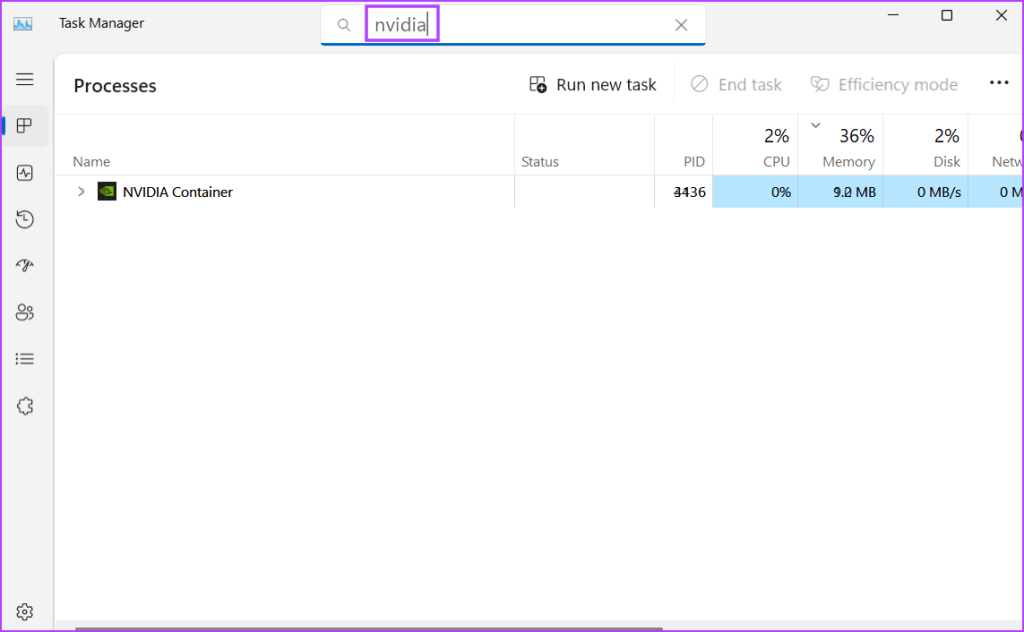
Step 1: Press the Ctrl + Shift + Esc keyboard shortcut to open Task Manager.
Step 2: Click on the search bar, type Nvidia, and press Enter. It will list all the active NVIDIA processes.
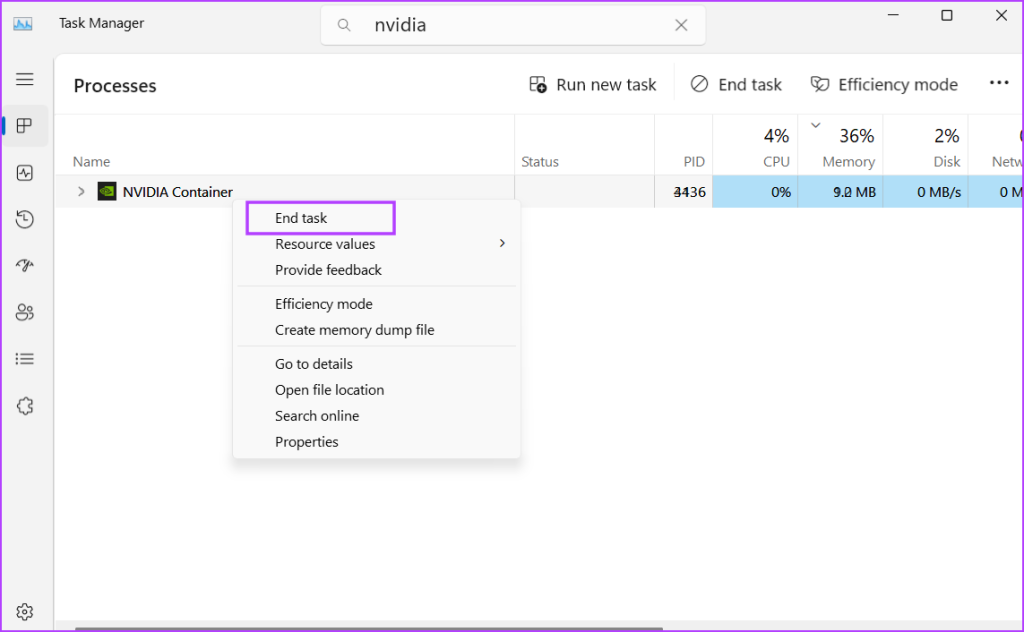
Step 3: Right-click on one such active NVIDIA process and click on End task.
Repeat the above step for all NVIDIA processes and terminate them. Close the Task Manager and re-open the NVIDIA control panel.
Also Read: How to open Task Manager on Windows
Fix 2: Close Problematic Background Apps
Apps that minimize and continue to run in the background, like Discord, PowerToys, and the ones with an overlay option, can cause NVIDIA’s ‘Unable to change display mode’ error while launching a game.
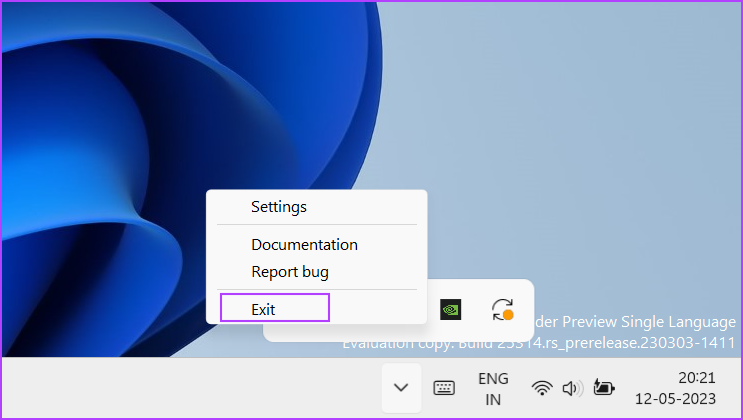
Step 1: Go to the right side of the Taskbar > click on the upward arrow icon.

Step 2: Right-click on an active app icon > click on Exit.
Step 3: Repeat this step for all applications you don’t need while playing the game. Don’t close the NVIDIA Control Panel from the system tray.
Fix 3: Configure NVIDIA Services
NVIDIA Control Panel needs the NVIDIA Display Container LS Service to work properly. If this service encounters a glitch, you will face issues while launching GPU-bound tasks. So, check and restart it using the Services program.
Step 1: Press the Windows key to open the Start menu, type services in the search bar, and press Enter.

Step 2: In the Services window, locate and right-click on NVIDIA Display Container LS > select Restart.
Step 3: Close the Services utility.

Fix 4: Manually Switch to the NVIDIA GPU
The processor offers an inbuilt GPU to handle basic GPU-bound tasks. Modern laptops automatically switch to the discrete NVIDIA or AMD GPU for heavy tasks like games. But if it fails to do so, you will have to manually switch to the GPU.
Step 1: Go to the system tray icons area on the Taskbar > right-click on the NVIDIA icon > select NVIDIA Control Panel.

Step 2: NVIDIA Control Panel will launch. Go to the left-hand side menu and click on Manage 3D Settings.
Step 3: Go to Preferred Graphics Processor and click on the arrow button to expand the drop-down list. Select High-performance NVIDIA processor.

Step 4: Click on Apply. Close the NVIDIA Control Panel app.

Fix 5: Perform a Clean Boot
Often, another third-party app can conflict with the NVIDIA Control Panel app and produce the error. To fix the “Unable to change display mode” error notification, narrow down the troublesome application using a clean boot. Here’s how to do it:
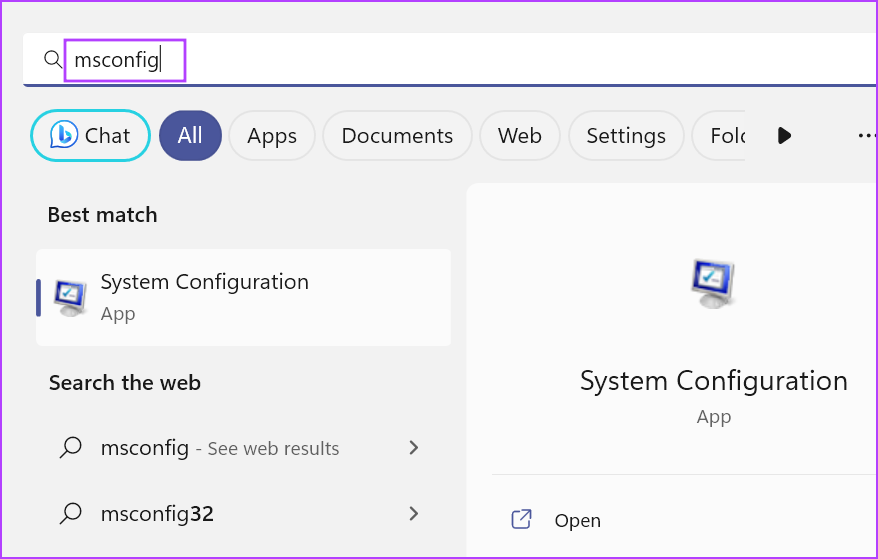
Step 1: Press the Windows key to open the Start menu > type msconfig in the search bar > press Enter to launch the System Configuration utility.
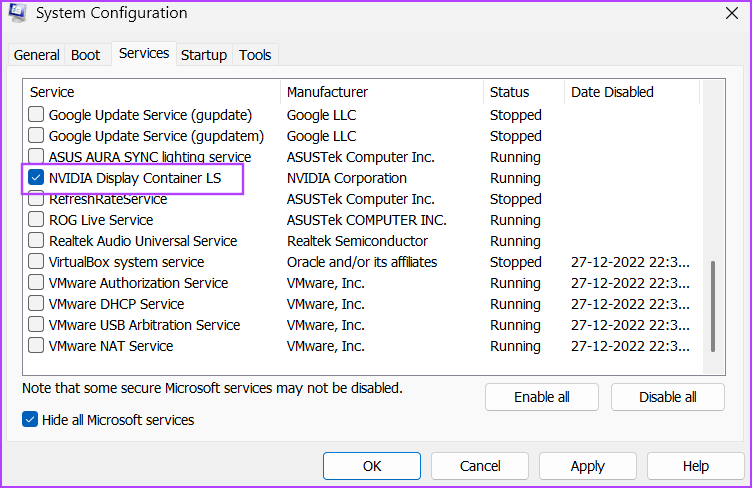
Step 2: Switch to the Services tab.

Step 3: Check the Hide all Microsoft services box > click on Disable all.
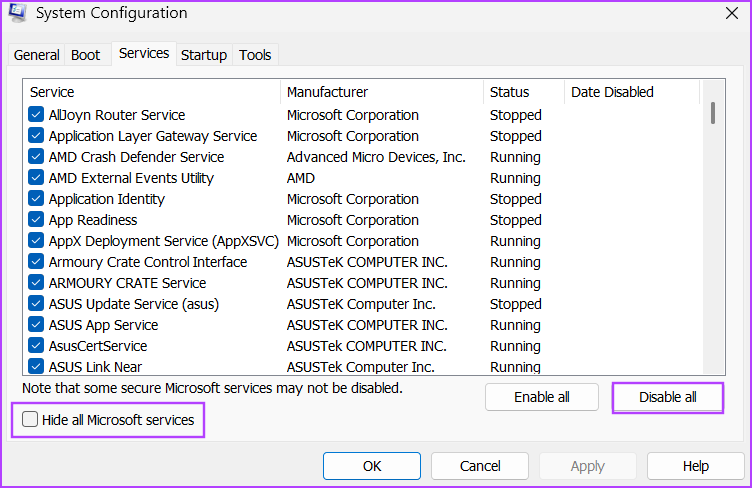
Step 4: Locate the NVIDIA Display Container LS service and click on the checkbox to enable it.
Step 5: Click on the Startup tab > Open Task Manager.

Step 6: Right-click on a program from the list and select Disable. This program will not run when you boot Windows the next time.

Step 7: Repeat the same process for all third-party apps and disable them. Close Task Manager.
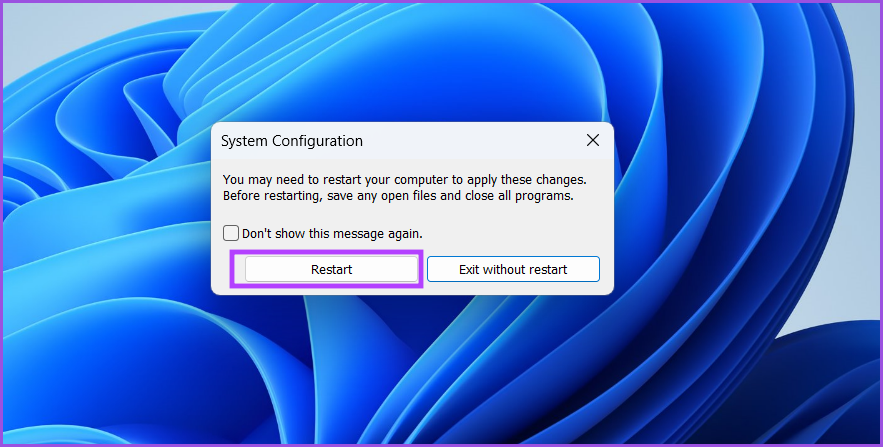
Step 8: Return to the System Configuration tool window. Click on Apply > OK.

Step 9: A pop-up window will open. Click on Restart. Windows will boot with essential Microsoft drivers and NVIDIA Display Container LS service only.
If you don’t see any error while launching a game, an existing application conflicts with the service. Enable services related to one application and perform a clean boot again. Repeat this process until you identify the culprit program and disable or remove it from your computer.
Fix 6: Rollback NVIDIA Drivers
NVIDIA releases new drivers regularly to extend compatibility with new games and applications. However, the new drivers often cause errors and game launch issues. If you notice an error after recently updating the NVIDIA driver, roll back to the previous version.
Step 1: Right-click on the Start button to open the Power User menu. Click on Device Manager.
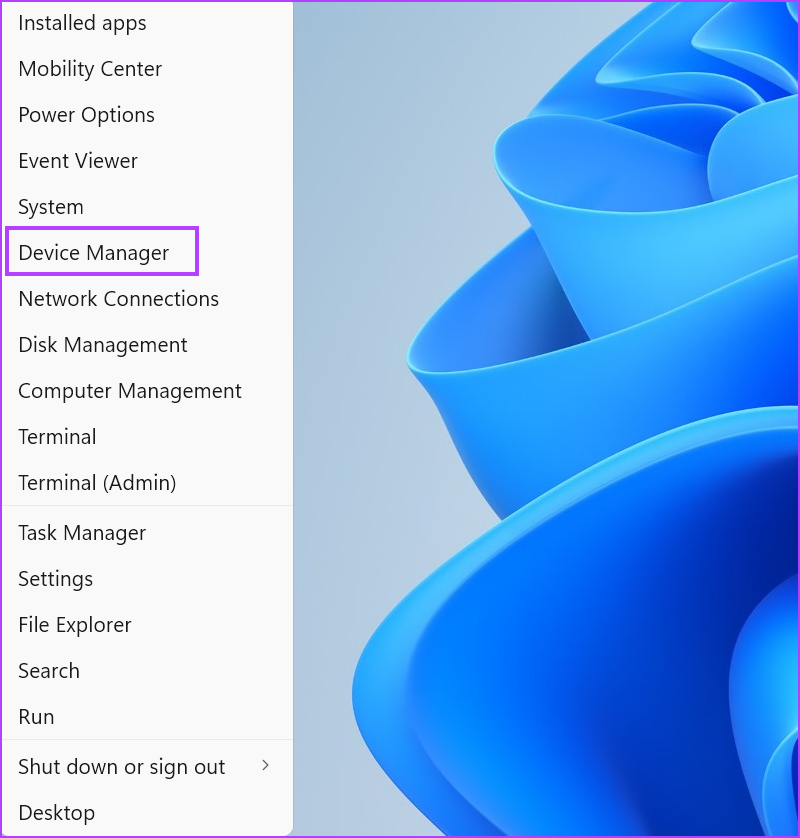
Step 2: Expand the Display adapters section > double-click on NVIDIA GPU to open its Properties.

Step 3: Switch to the Driver tab > click on Roll Back Driver.
Step 4: Wait for the utility to roll back the GPU drivers. Close Device Manager and restart your system.

Additionally, ensure you update your Windows PC to the latest OS version for a bug-free experience.
Was this helpful?
Last updated on 27 August, 2024
Read Next
 4 Ways to Fix Unable to Switch Out of S Mode on Windows 11
Try Basic Fixes Switch out of S mode using the Microsoft Store page link: If you don't see an option to exit S mode in the Settings app, visit the
4 Ways to Fix Unable to Switch Out of S Mode on Windows 11
Try Basic Fixes Switch out of S mode using the Microsoft Store page link: If you don't see an option to exit S mode in the Settings app, visit the
 Top 9 Ways to Fix Unable to Change Default Programs in Windows 10
The apps offered by Microsoft are great.
Top 9 Ways to Fix Unable to Change Default Programs in Windows 10
The apps offered by Microsoft are great.
 6 Ways to Fix Unable to Change Sign-in PIN on Windows
Fix 1: Disconnect Work or School Account One of the most common reasons Windows may prevent you from changing your sign-in PIN is if you've linked your work or school
6 Ways to Fix Unable to Change Sign-in PIN on Windows
Fix 1: Disconnect Work or School Account One of the most common reasons Windows may prevent you from changing your sign-in PIN is if you've linked your work or school
 4 Ways to Fix Unable to Contact Your DHCP Server Error on Windows 11
Fix 1: Restart Your DHCP Client service The DHCP Client service registers and updates the PC's IP address and DNS record.
4 Ways to Fix Unable to Contact Your DHCP Server Error on Windows 11
Fix 1: Restart Your DHCP Client service The DHCP Client service registers and updates the PC's IP address and DNS record.
 Top 10 Ways to Fix ‘Display Driver Failed to Start’ Error in Windows 10 and 11
Display drivers facilitate communication between the Windows operating system (or any OS) with your GPU.
Top 10 Ways to Fix ‘Display Driver Failed to Start’ Error in Windows 10 and 11
Display drivers facilitate communication between the Windows operating system (or any OS) with your GPU.
 5 Fixes for Unable to Change Desktop Background on Windows
Fix 1: Ensure Windows Is Activated Although you can use an unactivated version of Windows 10 or 11, there are a few limitations.
5 Fixes for Unable to Change Desktop Background on Windows
Fix 1: Ensure Windows Is Activated Although you can use an unactivated version of Windows 10 or 11, there are a few limitations.
 How to Fix “Unable to Locate Java Runtime” Error
Basic Fixes: Uninstall conflicting Java versions: If conflicts are causing the problem, you can resolve them by completely removing older Java versions and leaving only the most recent one.
How to Fix “Unable to Locate Java Runtime” Error
Basic Fixes: Uninstall conflicting Java versions: If conflicts are causing the problem, you can resolve them by completely removing older Java versions and leaving only the most recent one.
 5 Ways to Fix “Unable to Load Photo” Error on iPhone
Try Basic Fixes Free up storage space: A lack of storage space could prevent your iPhone from loading photos from the cloud.
5 Ways to Fix “Unable to Load Photo” Error on iPhone
Try Basic Fixes Free up storage space: A lack of storage space could prevent your iPhone from loading photos from the cloud.
The article above may contain affiliate links which help support Guiding Tech. The content remains unbiased and authentic and will never affect our editorial integrity.